Draw QR Code Overlays using SVG with JavaScript
Scalable Vector Graphics, SVG, is a W3C XML dialect to mark up graphics1. SVG can be created dynamically with JavaScript and injected into the HTML DOM2.
Using SVG, it is very easy to draw a graphics in a web page. Below is a polygon example:
<svg width="100" height="100" version="1.1" xmlns="http://www.w3.org/2000/svg">
  <polygon points="10 10 45 10 50 80 5 90" stroke="green" fill="transparent" stroke-width="1"/>
</svg>
Rendered SVG:
Since SVG has DOM interfaces, it is also possible to dynamically add an SVG element with JavaScript:
var svg = document.createElementNS("http://www.w3.org/2000/svg","svg");
svg.style.width = 100;
svg.style.height = 100;
var polygon = document.createElementNS("http://www.w3.org/2000/svg","polygon");
polygon.setAttribute("points","10 10 45 10 50 80 5 90");
polygon.setAttribute("stroke","green");
polygon.setAttribute("stroke-width","1");
polygon.setAttribute("fill","transparent");
svg.appendChild(polygon);
document.body.appendChild(svg);
Here, we use createElementNS to create SVG elements so that the namespace of SVG is specified.
SVG is suitable for drawing the overlays of QR codes/barcodes (An overlay displays recognized QR codes on top of the original image). The localization results of a QR code can be defined by four points. We can use the polygon shape to highlight detected ones.
In this article, we are going to demonstrate how to show the QR code overlays using SVG by creating a reader which reads QR codes from static images and a scanner which reads QR codes from the video stream. The JavaScript version of Dynamsoft Barcode Reader (DBR) is used.
Here is a demo video of the scanner scanning an EAN13 barcode. An extra container is used to show the barcode text:
Draw QR Code Overlays with SVG in a Static Image Reader
The static image reader allows the user to pick up a local image to decode. The overlays will be added upon the image.
Read a Local Image and Display it on the Page
We use FileReader to read the image file as a data URL. An img element is created to display the image on the page.
<!DOCTYPE html>
<html>
<body>
    <input type="file" id="barcode-file" onchange="loadfile()" accept=".jpg,.jpeg,.png,.bmp" />
    <div id="imgContainer" style="width:100%;position:relative;">
    </div>
<script>
    function loadfile() {
        let name = document.getElementById('barcode-file');
        if (name.files.length == 0) {
            return;
        }
        showLocalImage(name.files)
    }

    function showLocalImage(files){
        var imgContainer =document.getElementById("imgContainer");
        imgContainer.innerHTML="";
        for(let i = 0; i < files.length; ++i){
            var file = files[i];
            thisType = file.type,
            thisSize = file.size,
            fileReader = new FileReader();
            fileReader.onload = function(e){
                appendImg(e.target.result);
            };
            fileReader.onerror = function () {
                console.warn('oops, something went wrong.');
            };
            fileReader.readAsDataURL(file);
        }
    }

    function appendImg(data){
        var imgContainer =document.getElementById("imgContainer");
        img = document.createElement("img");
        img.src = data;
        img.style="width:100%;max-width:500px;"
        imgContainer.append(img);
    }
</script>
</body>
</html>
Use Dynamsoft Barcode Reader to Decode an Image
After the image is loaded, we use DBR to decode it.
-
Include the library of DBR JS:
<head> <script src="https://cdn.jsdelivr.net/npm/dynamsoft-javascript-barcode@9.0.0/dist/dbr.js"></script> </head> <script> Dynamsoft.DBR.BarcodeReader.license = "DLS2eyJoYW5kc2hha2VDb2RlIjoiMjAwMDAxLTE2NDk4Mjk3OTI2MzUiLCJvcmdhbml6YXRpb25JRCI6IjIwMDAwMSIsInNlc3Npb25QYXNzd29yZCI6IndTcGR6Vm05WDJrcEQ5YUoifQ=="; </script> -
Initialize the reader:
let reader = null; reader = reader || await Dynamsoft.DBR.BarcodeReader.createInstance(); -
Decode the image file by passing the img element to it:
 var imgContainer =document.getElementById("imgContainer");
 var image = imgContainer.getElementsByTagName("img")[0];
 var results = await reader.decode(image);
Draw Overlays with SVG
After getting the decoding results, we can draw the overlays.
-
Create an SVG element which has the same position and shape with the image:
 var imgContainer =document.getElementById("imgContainer");
 var image = imgContainer.getElementsByTagName("img")[0];
 var svg = document.createElementNS("http://www.w3.org/2000/svg","svg");
 svg.style.width = image.width;
 svg.style.top = 0;
 svg.style.left = 0;
 svg.style.position = "absolute";
 svg.setAttribute("viewBox","0 0 "+image.naturalWidth+" "+image.naturalHeight);
 imgContainer.append(svg);
The
viewBoxattribute is defined so that no matter how the client width and height of the SVG element change, the elements inside it will have the correct position and size. -
Append detected polygons:
 function showResult(result, svg){
     var points = getPointsData(result.localizationResult);
     var polygon = document.createElementNS("http://www.w3.org/2000/svg","polygon");
     polygon.setAttribute("points",points);
     polygon.setAttribute("class","barcode-polygon");
     var title = document.createElementNS("http://www.w3.org/2000/svg","title");
     title.textContent = result.barcodeText;
     polygon.append(title);
     svg.append(polygon);
 }

 function getPointsData(lr){
     var pointsData = lr.x1+","+lr.y1 + " ";
     pointsData = pointsData+ lr.x2+","+lr.y2 + " ";
     pointsData = pointsData+ lr.x3+","+lr.y3 + " ";
     pointsData = pointsData+ lr.x4+","+lr.y4;
     return pointsData;
 }
The style of polygons is defined in CSS:
 <style>
     .barcode-polygon {
       fill:rgba(85,240,40,0);
       stroke:green;
       stroke-width:5;
     }

     .barcode-polygon:hover {
       fill:rgba(85,240,40,0.5);
       stroke:green;
       stroke-width:5;
     }
 </style>
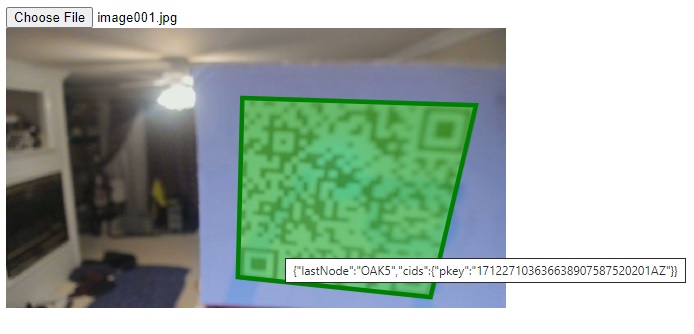
Okay, the static image reader is completed. In the following screenshot, a QR code is detected and the SVG element precisely draws the overlay.
Draw QR Code Overlays with SVG in a Camera Barcode Scanner
We can also use SVG to draw overlays in a live stream barcode reading scenario.
Create a Barcode Scanner.
Use the following code to create a web barcode scanner.
<!DOCTYPE html>
<html>
<head>
    <script src="https://cdn.jsdelivr.net/npm/dynamsoft-javascript-barcode@9.0.0/dist/dbr.js"></script>
</head>
<body>
<input type="button" value="Start Scanning" onclick="startScanning();" />
<script>
let scanner = null;
init();
async function init(){
    scanner = await Dynamsoft.DBR.BarcodeScanner.createInstance();
    scanner.onFrameRead = results => {
        //handle barcode results
    };
    scanner.onUniqueRead = (txt, result) => {
    };
}

async function startScanning(){
    if (scanner==null){
        alert("Please wait for the initialization of the scanner.")
        return;
    }
    await scanner.show();
}
</script>
</body>
</html>
Disable the Default Canvas which also Draws the QR Code Overlays.
Add a scanner element without the canvas which has the class name dbrScanner-cvs-drawarea:
<div id="scanner" style="display:none;">
    <video class="dbrScanner-video" playsinline="true" style="width:100%;height:100%;position:absolute;left:0;top:0;"></video>
    <!--<canvas class="dbrScanner-cvs-drawarea" style="width:100%;height:100%;position:absolute;left:0;top:0;"></canvas>-->
    <select class="dbrScanner-sel-camera" style="z-index:999;margin:0 auto;position:absolute;left:0;top:0;height:30px;"></select>
    <select class="dbrScanner-sel-resolution" style="z-index:999;position:absolute;left:0;top:30px;"></select>
</div>
Use this as the scanner’s UI:
await scanner.setUIElement(document.getElementById('scanner'));
You can learn about the comparison between Canvas and SVG here: When to Use SVG vs. When to Use Canvas.
Draw Overlays with SVG
-
Create an SVG element with the same position and size as the video element. We can get the width and height of the video in the
onPlayed3 event and update the SVG’sviewBoxattribute. TheonPlayedevent is called after callingshow(),open(),play()orsetCurrentCamera(), so if the resolution or camera is changed, theviewBoxattribute will be updated as well.async function init(){ scanner = await Dynamsoft.DBR.BarcodeScanner.createInstance(); await scanner.setUIElement(document.getElementById('scanner')); scanner.onPlayed = rsl=>{ updateSVGViewBox(rsl.width,rsl.height) }; //newly added scanner.onFrameRead = results => { //handle barcode results showOverlayOnSVG(results); //newly added }; scanner.onUnduplicatedRead = (txt, result) => {}; } async function startScanning(){ if (scanner==null){ alert("Please wait for the initialization of the scanner.") return; } addSVGOverlay(); //newly added await scanner.show(); } function addSVGOverlay(){ var svg = document.createElementNS("http://www.w3.org/2000/svg","svg"); svg.style.top = 0; svg.style.left = 0; svg.style.position = "absolute"; svg.style.width = "100%"; svg.style.height = "100%"; document.getElementById("scanner").appendChild(svg); } function updateSVGViewBox(width,height){ var scannerUI = document.getElementById("scanner"); if (scannerUI.getElementsByTagName("svg").length>0) { var svg = scannerUI.getElementsByTagName("svg")[0]; svg.setAttribute("viewBox","0 0 "+width+" "+height) } } -
If barcodes are detected, draw the overlays.
 function showOverlayOnSVG(results){
     var scannerUI =  document.getElementById("scanner");
     if (scannerUI.getElementsByTagName("svg").length>0) {
         var svg = scannerUI.getElementsByTagName("svg")[0];
         svg.innerHTML=""
         for(let i = 0; i < results.length; i++){
             var result = results[i];
             var points = getPointsData(result.localizationResult);
             var a = document.createElementNS("http://www.w3.org/2000/svg","a");
             var polygon = document.createElementNS("http://www.w3.org/2000/svg","polygon");
             polygon.setAttribute("points",points);
             polygon.setAttribute("class","barcode-polygon");
             var title = document.createElementNS("http://www.w3.org/2000/svg","title");
             title.textContent = result.barcodeText;
             polygon.append(title);
             a.append(polygon)
             svg.append(a);
         }
     }
 }
Object-fit
If we set the object-fit property of the video element, the SVG element may not match the video content. We have to update the SVG element’s attributes.
For example, if the object-fit property is set to cover, we need to update the SVG element’s preserveAspectRatio to xMidYMid slice.
Source Code
https://github.com/xulihang/Barcode-Results-Viewer