How to Build Angular Barcode and QR Code Scanner Apps from Scratch
Dynamsoft JavaScript barcode SDK is compatible with all mainstream web frameworks and web browsers. This article goes through the steps to build Angular barcode and QR code scanner apps with Dynamsoft JavaScript barcode SDK.
This article is Part 1 in a 2-Part Series.
Development Environment
- Node.js
-
Angular CLI v13.3.7
npm install -g @angular/cli ng --version Angular CLI: 13.3.7 Node: 16.13.1 Package Manager: npm 8.1.2 OS: win32 x64 Angular: 13.3.10 ... animations, common, compiler, compiler-cli, core, forms ... platform-browser, platform-browser-dynamic, router Package Version --------------------------------------------------------- @angular-devkit/architect 0.1303.7 @angular-devkit/build-angular 13.3.7 @angular-devkit/core 13.3.7 @angular-devkit/schematics 13.3.7 @angular/cli 13.3.7 @schematics/angular 13.3.7 ng-packagr 13.3.1 rxjs 7.5.5 typescript 4.6.4 - Dynamsoft JavaScript Barcode SDK v9.0.2
To get started right away, you can visit the online project built on StackBlitz, which is a good place for editing and testing Angular code in the browser.
Steps to Create Angular App for Scanning Barcode and QR Code
Dynamsoft JavaScript barcode SDK provides two primary classes: BarcodeReader and BarcodeScanner. The BarcodeReader class supports reading barcode and QR code from static images, and the BarcodeScanner class supports scanning barcode and QR code from live video feeds. So in our Angular app, we will create two pages to demonstrate their functionalities respectively.
Scaffold and configure Angular project
We create a new Angular project named angular-barcode-qr-code-scanner in terminal:
ng new angular-barcode-qr-code-scanner
Then install Dynamsoft JavaScript barcode SDK via npm command:
npm i dynamsoft-javascript-barcode
Some resource (*.js, *.wasm) files must be copied to the assets folder in order to make the JS barcode SDK work. Let’s open the angular.json file to add the configuration.
"build":
{
  "builder": "@angular-devkit/build-angular:browser",
  "options": {
    ...
    "assets": [
      "src/favicon.ico",
      "src/assets",
      {
        "glob": "**/*",
        "input": "./node_modules/dynamsoft-javascript-barcode/dist",
        "output": "assets/dynamsoft-javascript-barcode"
      }
    ...
    ],
  },
  ...
},

"test":
{
  "builder": "@angular-devkit/build-angular:karma",
  "options": {
    ...
    "assets": [
      "src/favicon.ico",
      "src/assets",
      {
        "glob": "**/*",
        "input": "./node_modules/dynamsoft-javascript-barcode/dist",
        "output": "assets/dynamsoft-javascript-barcode"
      }
    ],
    ...
  }
}
In addition, the resource path has to be specified in TypeScript code. We create a products.ts file to set the license key and the resource path globally.
import { BarcodeReader } from 'dynamsoft-javascript-barcode';

BarcodeReader.license =
  'DLS2eyJoYW5kc2hha2VDb2RlIjoiMjAwMDAxLTE2NDk4Mjk3OTI2MzUiLCJvcmdhbml6YXRpb25JRCI6IjIwMDAwMSIsInNlc3Npb25QYXNzd29yZCI6IndTcGR6Vm05WDJrcEQ5YUoifQ==';

BarcodeReader.engineResourcePath = 'assets/dynamsoft-javascript-barcode/';

export interface Product {
  id: string;
  name: string;
  description: string;
}

export const products = [
  {
    id: 'reader',
    name: 'Barcode and QR Code Reader',
    description: 'Scan barcode and QR code from image files',
  },
  {
    id: 'scanner',
    name: 'Barcode and QR Code Scanner',
    description: 'Scan barcode and QR code from camera stream',
  },
];
The products array will be used to create Angular components later.
List components and add navigation
In this section, we will create the homepage that contains a top bar and a component list.
Top bar
-
Create a top-bar component:
ng generate component top-bar -
Add the top-bar component to the
app.component.htmlfile.<app-top-bar></app-top-bar> <div class="container"> <router-outlet></router-outlet> </div> -
Add the router link to the
<H1>title in thetop-bar.component.html.<a [routerLink]="['/']"> <h1>Dynamsoft Barcode Reader and Scanner</h1> </a>
Product list
-
Create a product-list component:
ng generate component product-list -
Import pre-defined products to the
product-list.components.tsfile.import { Component } from '@angular/core'; import { products } from '../products'; @Component({ selector: 'app-product-list', templateUrl: './product-list.component.html', styleUrls: ['./product-list.component.css'], }) export class ProductListComponent { products = products; } -
Dynamically create the product list with
*ngForand*ngIfin theproduct-list.component.html.<h2>Examples</h2> <div *ngFor="let product of products"> <h3> <div *ngIf="product.id === 'reader'; else elseBlock"> <a [title]="product.name + ' details'" [routerLink]="['/barcode-reader']" >> </a> </div> <ng-template #elseBlock ><a [title]="product.name + ' details'" [routerLink]="['/barcode-scanner']" >> </a></ng-template > </h3> <p *ngIf="product.description">Description: </p> </div> -
Open the
app-routing.module.tsfile to configure the routes.import { ProductListComponent } from './product-list/product-list.component'; import { BarcodeReaderComponent } from './barcode-reader/barcode-reader.component'; import { BarcodeScannerComponent } from './barcode-scanner/barcode-scanner.component'; const routes: Routes = [ { path: '', component: ProductListComponent }, { path: 'barcode-reader', component: BarcodeReaderComponent }, { path: 'barcode-scanner', component: BarcodeScannerComponent }, ];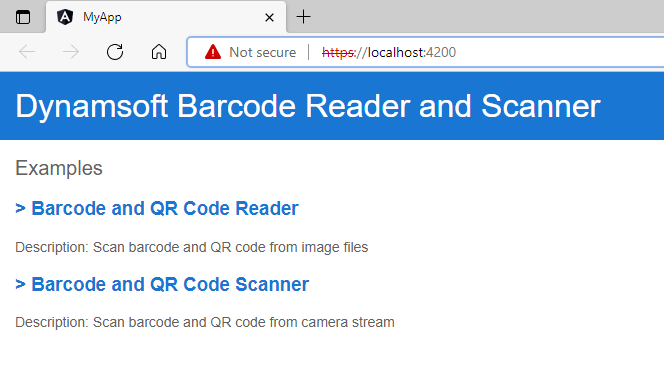
The
ProductListComponentis configured as the homepage. We will create theBarcodeReaderComponentandBarcodeScannerComponentin the following paragraphs.
Create the Barcode Reader component
-
Create the
barcode-readercomponent.ng generate component barcode-reader -
Add
HTMLInputElement,HTMLCanvasElement, andHTMLImageElementto thebarcode-reader.component.htmlfile.<span id="loading-status" style="font-size:x-large" [hidden]="isLoaded" >Loading Library...</span > <br /> <input type="file" id="file" accept="image/*" (change)="onChange($event)" /> <div> <a id="result"></a> </div> <div id="imageview"> <img id="image" /> <canvas id="overlay"></canvas> </div>The
changeevent is bound to theonChangemethod, which is defined in thebarcode-reader.component.tsfile. -
Initialize the
BarcodeReaderobject in thebarcode-reader.component.tsfile.import { Component, OnInit } from '@angular/core'; import { BarcodeReader } from 'dynamsoft-javascript-barcode'; @Component({ selector: 'app-barcode-reader', templateUrl: './barcode-reader.component.html', styleUrls: ['./barcode-reader.component.css'], }) export class BarcodeReaderComponent implements OnInit { isLoaded = false; overlay: HTMLCanvasElement | undefined; context: CanvasRenderingContext2D | undefined; reader: BarcodeReader | undefined; constructor() {} ngOnInit(): void { this.initOverlay(); (async () => { this.reader = await BarcodeReader.createInstance(); this.isLoaded = true; })(); } } -
In the
onChangemethod, we firstly load an image file withFileReaderand then draw barcode and QR code results on the canvas which is above the image. The size of the canvas is determined by the image size.onChange(event: Event) { const element = event.currentTarget as HTMLInputElement; let fileList: FileList | null = element.files; if (fileList) { let file = fileList.item(0) as any; if (file) { let fr = new FileReader(); fr.onload = (event: any) => { let image = document.getElementById('image') as HTMLImageElement; if (image) { image.src = event.target.result; const img = new Image(); img.onload = (event: any) => { this.updateOverlay(img.width, img.height); if (this.reader) { this.reader.decode(file).then((results: any) => { console.log(results); let txts: any = []; let elem = document.getElementById('result'); try { let localization; if (results.length > 0) { for (var i = 0; i < results.length; ++i) { txts.push(results[i].barcodeText); localization = results[i].localizationResult; this.drawOverlay( localization, results[i].barcodeText ); } if (elem) { elem.innerHTML = txts.join(', '); } } else { if (elem) { elem.innerHTML = txts.join(', '); } } } catch (e) { alert(e); } }); } }; img.src = event.target.result; } }; fr.readAsDataURL(file); } } }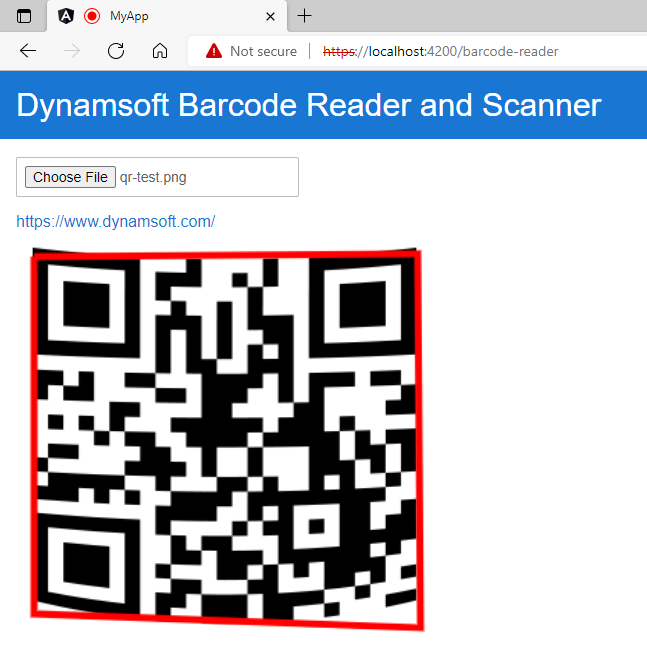
Create the Barcode Scanner component
-
Create the
barcode-scannercomponent:ng generate component barcode-scanner -
Add
HTMLSelectElementandHTMLCanvasElementto thebarcode-scanner.component.htmlfile. Dynamsoft barcode scanner has encapsulated the video element. It simplifies the process of writing JavaScript code for camera control.<span id="loading-status" style="font-size:x-large" [hidden]="isLoaded" >Loading Library...</span > <br /> <div class="select"> <label for="videoSource">Video source: </label> <select id="videoSource" (change)="openCamera()"></select> </div> <div id="videoview"> <div class="dce-video-container" id="videoContainer"></div> <canvas id="overlay"></canvas> </div> -
Initialize the
BarcodeScannerobject in thebarcode-scanner.component.tsfile.import { Component, OnInit } from '@angular/core'; import { BarcodeScanner } from 'dynamsoft-javascript-barcode'; @Component({ selector: 'app-barcode-scanner', templateUrl: './barcode-scanner.component.html', styleUrls: ['./barcode-scanner.component.css'], }) export class BarcodeScannerComponent implements OnInit { isLoaded = false; overlay: HTMLCanvasElement | undefined; context: CanvasRenderingContext2D | undefined; scanner: BarcodeScanner | undefined; cameraInfo: any = {}; videoSelect: HTMLSelectElement | undefined; constructor() { } ngOnInit(): void { this.videoSelect = document.querySelector('select#videoSource') as HTMLSelectElement; this.initOverlay(); (async () => { await this.initBarcodeScanner(); })(); } async initBarcodeScanner(): Promise<void> { this.scanner = await BarcodeScanner.createInstance(); this.isLoaded = true; await this.scanner.updateRuntimeSettings("speed"); let uiElement = document.getElementById('videoContainer'); if (uiElement) { await this.scanner.setUIElement(uiElement); let cameras = await this.scanner.getAllCameras(); this.listCameras(cameras); await this.openCamera(); this.scanner.onFrameRead = results => { this.clearOverlay(); let txts = []; let resultElement = document.getElementById('result'); try { let localization; if (results.length > 0) { for (var i = 0; i < results.length; ++i) { txts.push(results[i].barcodeText); localization = results[i].localizationResult; this.drawOverlay(localization, results[i].barcodeText); } if (resultElement) { resultElement.innerHTML = txts.join(', '); } } else { if (resultElement) { resultElement.innerHTML = "No barcode found"; } } } catch (e) { alert(e); } }; this.scanner.onPlayed = () => { this.updateResolution(); } await this.scanner.show(); } }We can get the barcode and QR code results by registering the
onFrameReadevent. TheonFrameReadevent is triggered when the barcode and QR code results are ready.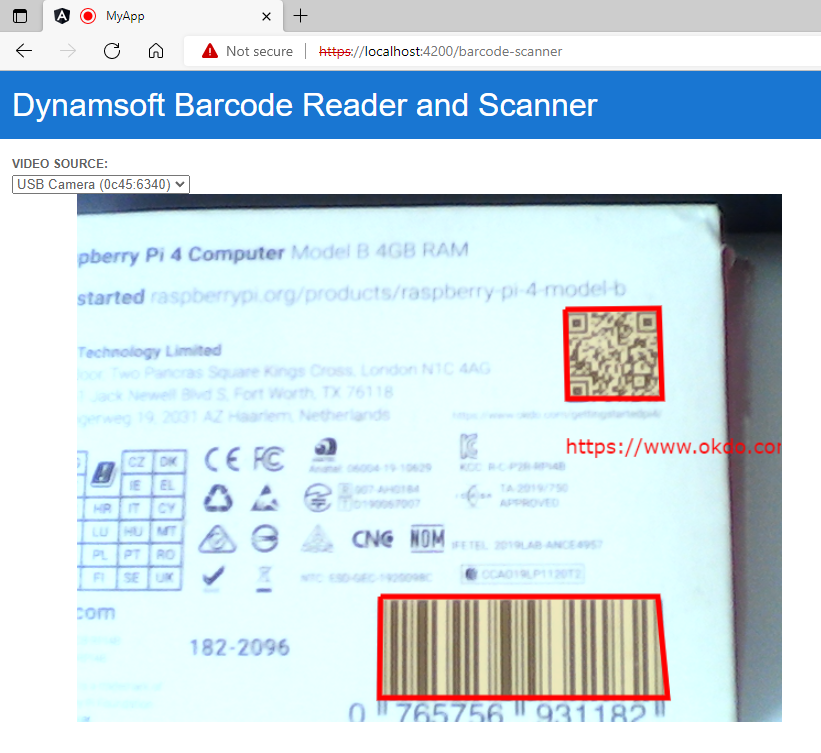
Run the Angular project with SSL
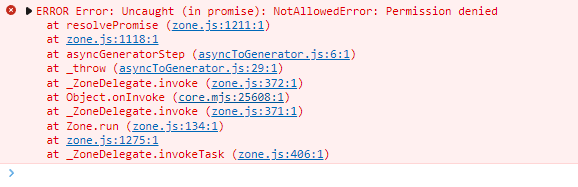
Web camera access requires HTTPS protocol. Therefore, we use the ng serve --ssl command to run the Angular project. Without ssl, the NotAllowedError: Permission denied error is thrown:
GitHub Page Deployment
After pushing the source code to GitHub, we can deploy the Angular project to GitHub pages with GitHub actions.
Here are the steps:
-
Create a custom workflow file including Angular Deploy gh-pages Actions:
 name: Build and Deploy
 on:
   push:
     branches:
       - main
 jobs:
   build:

     runs-on: ubuntu-latest

     steps:
     - uses: actions/checkout@v2
     - name: All things angular
       uses: AhsanAyaz/angular-deploy-gh-pages-actions@v1.3.2
       with:
         github_access_token: $
         build_configuration: production
         base_href: /angular-barcode-qr-code-scanner/
         deploy_branch: gh-pages
         angular_dist_build_folder: dist/angular-barcode-qr-code-scanner
You need to replace
angular-barcode-qr-code-scannerwith your project name. -
Go to
Your GitHub repository > Settings > Pagesto launch the GtiHub page with thegh-pagesbranch. The sample project page is available at https://yushulx.me/angular-barcode-qr-code-scanner/.