Writing a Wrapper to use Cordova Plugins in an Ionic App
The Ionic framework has shifted its native runtime from Cordova to Capacitor. But for compatibility concerns and the fact that there are many good Cordova plugins, we can still use Cordova plugins in an Ionic project.
We can directly use Cordova plugins with the cordova object, but there is a better way. The Awesome Cordova Plugins is a curated set of wrappers for Cordova plugins that make adding any native functionality you need to your Ionic mobile app easy. It wraps plugin callbacks in a Promise or Observable and provides a common interface.
In this article, we are going to write a wrapper for the cordova-plugin-dynamsoft-barcode-reader and use it in an Ionic React QR code scanning app.
Writing a Wrapper for the Cordova Plugin
Let’s follow this guide to create a wrapper.
Create a New Plugin Wrapper from Template
-
clone the project and change the root to the project’s directory:
git clone https://github.com/danielsogl/awesome-cordova-plugins/ cd awesome-cordova-plugins - install npm packages:
npm install -
create a new plugin wrapper named DynamsoftBarcodeScanner:
gulp plugin:create -n DynamsoftBarcodeScannerWe can find the wrapper in
src\@awesome-cordova-plugins\plugins\dynamsoft-barcode-scanner.
Implement the Plugin Wrapper
Next, we are going to implement the plugin wrapper.
First, let’s fill in the meta data of the plugin according to the guide of the comments:
@Plugin({
  pluginName: 'DynamsoftBarcodeScanner',
  plugin: 'cordova-plugin-dynamsoft-barcode-reader', // npm package name, example: cordova-plugin-camera
  pluginRef: 'cordova.plugins.DBR', // the variable reference to call the plugin, example: navigator.geolocation
  repo: 'https://github.com/xulihang/cordova-plugin-dynamsoft-barcode-reader', // the github repository URL for the plugin
  install: '', // OPTIONAL install command, in case the plugin requires variables
  installVariables: [], // OPTIONAL the plugin requires variables
  platforms: ['Android', 'iOS'] // Array of platforms supported, example: ['Android', 'iOS']
})
Then, add the plugin methods.
@Injectable()
export class BarcodeScanner extends AwesomeCordovaNativePlugin {
  /**
   * Initialize Dynamsoft Barcode Reader
   * @param license {string}
   * @return {Promise<any>} Returns a promise that resolves when the initialization is done
   */
  @Cordova({
    successIndex: 1,
    errorIndex: 2,
  })
  init(license: string): Promise<any> {
    return;
  }

  /**
   * start the camera to scan barcodes
   * @param dceLicense {string} License of Dynamsoft Camera Enhancer
   * @return {Observable<FrameResult>}
   */
  @Cordova({
    successIndex: 1,
    errorIndex: 2,
    observable: true,
  })
  startScanning(dceLicense?: string): Observable<FrameResult> {
    return;
  }

  /**
   * stop scanning
   * @return {Promise<any>} Returns a promise
   */
  @Cordova({ successIndex: 1, errorIndex: 2 })
  stopScanning(): Promise<any> {
    return;
  }

  /**
   * switch torch
   * @param desiredStatus {string} on or off
   * @return {Promise<any>} Returns a promise
   */
  @Cordova({ successIndex: 1, errorIndex: 2 })
  switchTorch(desiredStatus: string): Promise<any> {
    return;
  }

  /**
   * Set up runtime settings
   * @param settings {string} runtime settings template in JSON
   * @return {Promise<any>} Returns a promise
   */
  @Cordova({
    successIndex: 1,
    errorIndex: 2,
  })
  initRuntimeSettingsWithString(settings?: string): Promise<any> {
    return;
  }
}
Normally, the methods return a promise. The startScanning method will call its callbacks multiple times to pass barcode scanning results, so it returns an observable. Its usage is like this:
await BarcodeScanner.init("barcode reader license");
BarcodeScanner.startScanning("camera enhancer license").subscribe(result => {
  console.log(result);
});
The licenses of Dynamsoft Barcode Reader and Dynamsoft Camera Enhancer are required to use the plugin. You can apply for a trial license here.
We also need to define the returned frame reading results. The plugin returns a frame result with the frame width, frame height and the barcode results.
export interface FrameResult {
  frameWidth: number;
  frameHeight: number;
  results: BarcodeResult[];
}

export interface BarcodeResult {
  barcodeText: string;
  barcodeFormat: string;
  barcodeBytesBase64?: string;
  x1: number;
  x2: number;
  x3: number;
  x4: number;
  y1: number;
  y2: number;
  y3: number;
  y4: number;
}
Using the Wrapper to Create a QR Code Scanning App
Let’s create a QR code scanning app using Ionic React and the wrapper. The app will have two pages: a home page and a scanner page.
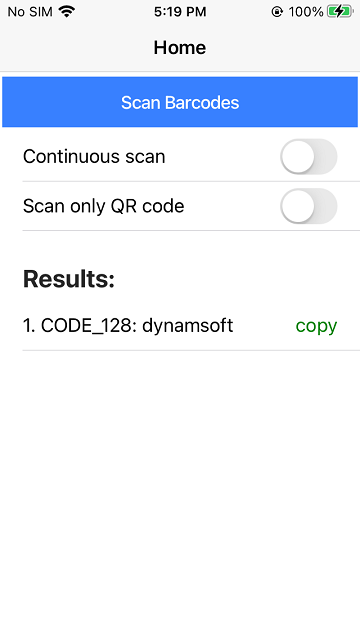
On the home page, users can select whether to scan continuously and whether to scan QR codes only and then start the scanner page to scan QR codes. Scanned results will be displayed and users can copy the text result.
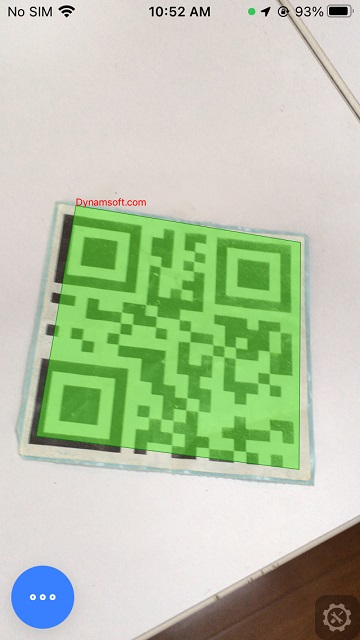
On the scanner page, there is a floating action button. Users can use it to turn on the flashlight or stop scanning. Scanned QR codes will be highlighted.

Read the following for more details.
New Project
Use the Ionic cli tool to create a new project.
ionic start qr-code-scanner tabs --type=react
Add iOS and Android platforms:
ionic capacitor add ios
ionic capacitor add android
Run the app:
ionic capacitor run android
ionic capacitor run ios
Add Camera Permission
For iOS, add the following to ios\App\App\Info.plist:
<key>NSCameraUsageDescription</key>
<string>For barcode scanning</string>
Install Dependencies
npm install cordova-plugin-dynamsoft-barcode-reader @awesome-cordova-plugins/core
We also need to install the wrapper. We can install the already published package:
npm install @awesome-cordova-plugins/dynamsoft-barcode-scanner
Or build it and install it this way:
- Under the directory of awesome-cordova-plugins, run
npm run build. - Copy the
dist\@awesome-cordova-plugins\plugins\dynamsoft-barcode-scannerto the app’snode_modules\@awesome-cordova-plugins.
Create a QR Code Scanner Component
Create a new QR code scanner component named QRCodeScanner.tsx under src\components.
import { BarcodeScanner as DBR, FrameResult } from '@awesome-cordova-plugins/dynamsoft-barcode-scanner';
import { useEffect } from 'react';

const QRCodeScanner = (props: { isActive: boolean;
  torchOn?:boolean;
  runtimeSettings?:string;
  onFrameRead?: (frameResult:FrameResult) => void;
  license?:string}) => {
  useEffect(() => {
    const init = async () => {
      let license = "LICENSE-KEY";
      if (props.license) {
        license = props.license;
      }
      let result = await DBR.init(license);
    }

    init();

    return () => {
      console.log("unmount");
      DBR.stopScanning();
    }
  }, []);

  useEffect(() => {
    if (props.isActive == true) {
      let license = "LICENSE-KEY";
      if (props.license) {
        license = props.license;
      }
      DBR.startScanning(license).subscribe((result:FrameResult) => {
        console.log(result);
        if (props.onFrameRead) {
          props.onFrameRead(result);
        }
      });
    }else if (props.isActive == false){
      DBR.stopScanning();
    }

  }, [props.isActive]);

  useEffect(() => {
    if (props.torchOn == true) {
      DBR.switchTorch("on");
    }else if (props.torchOn == false){
      DBR.switchTorch("off");
    }
  }, [props.torchOn]);

  useEffect(() => {
    if (props.runtimeSettings) {
      DBR.initRuntimeSettingsWithString(props.runtimeSettings);
    }
  }, [props.runtimeSettings]);

  return (
    <div></div>
  );
};

export default QRCodeScanner;
Create a Home Page
Create Home.tsx under src\pages with the following code:
import { IonButton, IonContent, IonHeader, IonItem, IonLabel, IonList, IonListHeader, IonPage, IonTitle, IonToggle, IonToolbar, useIonToast } from '@ionic/react';
import { useEffect, useState } from 'react';
import { RouteComponentProps } from 'react-router';
import './Home.css';
import { BarcodeResult } from '@awesome-cordova-plugins/dynamsoft-barcode-scanner';
import copy from 'copy-to-clipboard';

const Home = (props:RouteComponentProps) => {
  const [present, dismiss] = useIonToast();
  const [continuous, setContinuous] = useState(false);
  const [QRCodeOnly, setQRCodeOnly] = useState(false);
  const [barcodeResults, setBarcodeResults] = useState([] as BarcodeResult[]);

  useEffect(() => {
    const state = props.location.state as { results?: BarcodeResult[] };
    console.log(state);
    if (state) {
      if (state.results) {
        setBarcodeResults(state.results);
        props.history.replace({ state: {} });
      }
    }
  }, [props.location.state]);

  const startScan = () => {
    props.history.push("scanner",{continuous:continuous,QRCodeOnly:QRCodeOnly})
  }

  const copyBarcode = (text:string) => {
    if (copy(text)){
      present("copied",500);
    }
  }

  return (
    <IonPage>
      <IonHeader>
        <IonToolbar>
          <IonTitle>Home</IonTitle>
        </IonToolbar>
      </IonHeader>
      <IonContent>
        <IonButton expand='full' onClick={startScan} >Scan Barcodes</IonButton>
        <IonList>
          <IonItem>
            <IonLabel>Continuous scan</IonLabel>
            <IonToggle slot="end" checked={continuous} onIonChange={e => setContinuous(e.detail.checked)} />
          </IonItem>
          <IonItem>
            <IonLabel>Scan only QR code</IonLabel>
            <IonToggle slot="end" checked={QRCodeOnly} onIonChange={e => setQRCodeOnly(e.detail.checked)} />
          </IonItem>
          {(barcodeResults.length>0) &&
            <IonListHeader>
              <IonLabel>Results:</IonLabel>
            </IonListHeader>
          }
          {barcodeResults.map((tr,idx) => (
            <IonItem key={idx}>
              <IonLabel>{(idx+1) + ". " + tr.barcodeFormat + ": " + tr.barcodeText}</IonLabel>
               <IonLabel style={{color:"green"}} slot="end" onClick={() =>{copyBarcode(tr.barcodeText)}}>copy</IonLabel>
            </IonItem>
          ))}
        </IonList>
      </IonContent>
    </IonPage>
  );
};

export default Home;
In App.tsx, add the router for the home page.
const App: React.FC = () => (
  <IonApp>
    <IonReactRouter>
      <IonRouterOutlet>
      <Route path="/home" component={Home} exact={true} />
      <Route exact path="/">
        <Redirect to="/home" />
      </Route>
      </IonRouterOutlet>
    </IonReactRouter>
  </IonApp>
);

export default App;
Create a Scanner Page
Create Scanner.tsx under src\pages with the following template:
const Scanner = (props:RouteComponentProps) => {
  return (
    <IonPage>
      <IonContent>
      </IonContent>
    </IonPage>
  );
};

export default Scanner;
In App.tsx, add the router for the scanner page.
const App: React.FC = () => (
  <IonApp>
    <IonReactRouter>
      <IonRouterOutlet>
      <Route path="/home" component={Home} exact={true} />
+     <Route path="/scanner" component={Scanner} exact={true} />
      <Route exact path="/">
        <Redirect to="/home" />
      </Route>
      </IonRouterOutlet>
    </IonReactRouter>
  </IonApp>
);

export default App;
Next, let’s add functions to the scanner page.
Add the QR Code Scanner Component
The Cordova plugin puts the native camera preview view under the WebView so that we can overlay web controls above the camera preview. We need to set the background to transparent so that the web content will not block the camera preview.
Here are the steps to display the QR code scanner while keeping desired web controls above the camera preview.
-
Create a function to render the desired web controls to
document.bodyusing createPortal.const renderToBody = () => { return createPortal( <div> <QRCodeScanner isActive={isActive} torchOn={torchOn} runtimeSettings={runtimeSettings} onFrameRead={(frameResult) => {onFrameRead(frameResult)}} ></QRCodeScanner> {renderResults()} <IonFab vertical="bottom" horizontal="start" slot="fixed"> <IonFabButton> <IonIcon icon={ellipsisHorizontalOutline} /> </IonFabButton> <IonFabList side="top"> <IonFabButton onClick={toggleTorch}> <IonIcon icon={flashlightOutline} /> </IonFabButton> <IonFabButton onClick={close}> <IonIcon icon={closeOutline} /> </IonFabButton> </IonFabList> </IonFab> </div>,document.body ); } -
Set the display attribute of the
IonContenttonone.return ( <IonPage> <IonContent style={{display:"none"}}> {renderToBody()} </IonContent> </IonPage> );
Here are the functions controlling the behavior of the QR code scanner, like whether to start scanning, whether to turn on the torch and whether to scan QR codes only.
const [isActive, setIsActive] = useState(false);
const [torchOn, setTorchOn] = useState(false);
const [runtimeSettings,setRuntimeSettings] = useState("{\"ImageParameter\":{\"BarcodeFormatIds\":[\"BF_ALL\"],\"Description\":\"\",\"Name\":\"Settings\"},\"Version\":\"3.0\"}") // default runtime settings which read all barcode formats

const startScan = () => {
  setIsActive(true);
}

const toggleTorch = () => {
  setTorchOn(!torchOn);
}

const close = () => {
  setIsActive(false);
  props.history.goBack();
}

useEffect(() => {
  const state = props.location.state as { continuous:boolean,QRCodeOnly:boolean };
  if (state.QRCodeOnly == true) {
    setRuntimeSettings("{\"ImageParameter\":{\"BarcodeFormatIds\":[\"BF_QR_CODE\"],\"Description\":\"\",\"Name\":\"Settings\"},\"Version\":\"3.0\"}"); //modify the runtime settings to scan QR codes only
  }
  startScan(); //start scanning when the page is mounted
}, []);
Handle Frame Reading Results
We can get the frame reading results in the onFrameRead event.
If it is in continuous scanning mode, draw barcode overlays. Otherwise, close the scanner and return to the home page with the barcode results.
const onFrameRead = (frameResult:FrameResult) => {
  const state = props.location.state as { continuous:boolean,QRCodeOnly:boolean };
  if (state.continuous == false) {
    if (frameResult.results.length>0) {
      props.history.replace({ state: {results:frameResult.results} });
      close();
    }
  }else{
    setViewBox("0 0 "+frameResult.frameWidth+" "+frameResult.frameHeight);
    setBarcodeResults(frameResult.results);
  }
}
We use SVG to draw barcode and QR code overlays (check out this article to learn more):
const [viewBox, setViewBox] = useState("0 0 720 1280");

const getPointsData = (lr:BarcodeResult) => {
  let pointsData = lr.x1 + "," + lr.y1 + " ";
  pointsData = pointsData + lr.x2+ "," + lr.y2 + " ";
  pointsData = pointsData + lr.x3+ "," + lr.y3 + " ";
  pointsData = pointsData + lr.x4+ "," + lr.y4;
  return pointsData;
}

const renderResults = () => {
  return (
    <div className="overlay">
      <svg
        viewBox={viewBox}
        className="overlay"
        xmlns="<http://www.w3.org/2000/svg>"
      >
        {barcodeResults.map((tr,idx) => (
          <polygon key={"poly-"+idx} xmlns="<http://www.w3.org/2000/svg>"
          points={getPointsData(tr)}
          className="barcode-polygon"
          />
        ))}
        {barcodeResults.map((tr,idx) => (
          <text key={"text-"+idx} xmlns="<http://www.w3.org/2000/svg>"
          x={tr.x1}
          y={tr.y1}
          fill="red"
          fontSize="20"
          >{tr.barcodeText}</text>
        ))}
      </svg>
    </div>
  );
}
All right, we’ve finished writing the Ionic QR code scanner using the Cordova plugin wrapper. You can check out the source code to have a try.
Source Code
- Wrapper: https://github.com/xulihang/awesome-cordova-plugins/tree/master/src/%40awesome-cordova-plugins/plugins/dynamsoft-barcode-scanner
- Demo app: https://github.com/xulihang/Ionic-React-Cordova-Barcode-Scanner
Disclaimer:
The wrappers and sample code on Dynamsoft Codepool are community editions, shared as-is and not fully tested. Dynamsoft is happy to provide technical support for users exploring these solutions but makes no guarantees.


