How to Improve Python Barcode QR Code Scanning Performance on Raspberry Pi
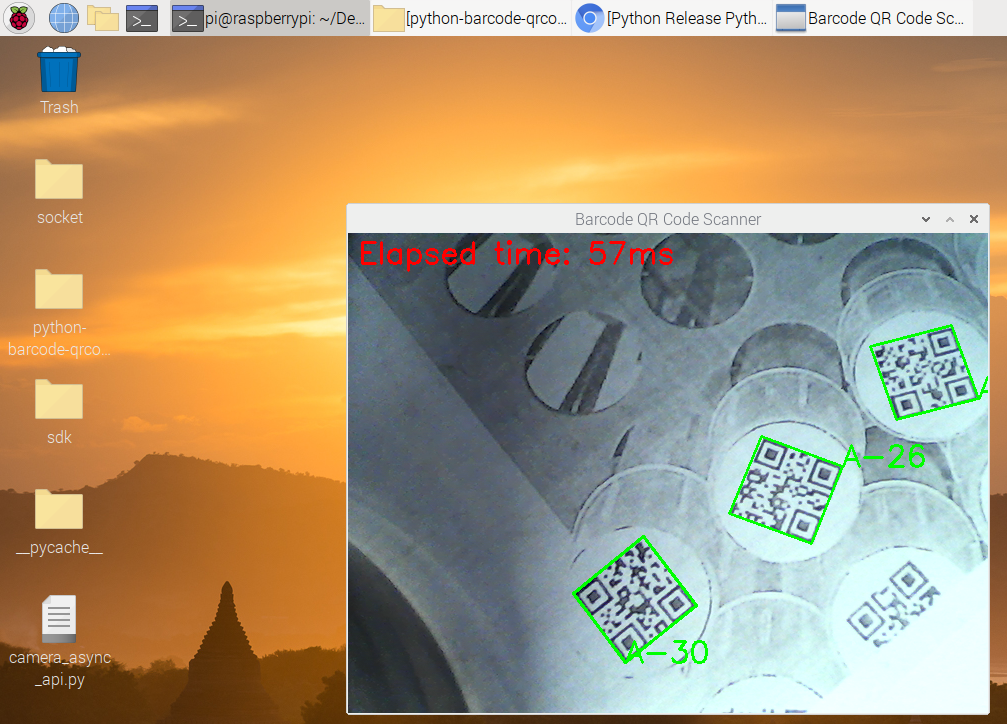
Raspberry Pi is an affordable single-board computer often chosen by developers for cost-effective IoT solutions, such as barcode and QR code scanning. It’s important to note that the CPU clock speed influences the decoding speed and accuracy. Dynamsoft Barcode Reader SDK, compatible with Raspberry Pi, excels in decoding multiple and low-quality barcodes, a capability that’s heavily dependent on the CPU clock rate. Even though the latest Raspberry Pi model boasts a 1.5GHz quad-core CPU, striking a balance between speed and accuracy by adjusting algorithm parameters remains challenging. In this article, I’ll guide you through scanning barcodes and QR codes asynchronously in Python on Raspberry Pi and offer insights into overcoming the CPU limitations using server-side decoding via socket.
Prerequisites
- Python 3.6 or above
- Dynamsoft Barcode Reader
- License Key
- Python Package
pip install dbr: the official Python package of Dynamsoft Barcode Reader, which provides full API and relevant documentation.pip install barcode-qr-code-sdk: a community version based on Dynamsoft C/C++ Barcode SDK, providing async decoding API for easy usage.
Building Python Barcode Scanner on Raspberry Pi
Implementing a barcode scanner in Python involves the following steps:
- Use OpenCV to capture the video stream from the camera.
- Use Dynamsoft Barcode Reader to decode the barcode from the image.
Barcode reading is a CPU-intensive task. When running synchronous API on a high clock rate CPU, we may not be aware of the latency on desktop computers. However, the CPU clock rate of Raspberry Pi is much lower. To avoid FPS (frames per second) dropping, it is necessary to carry out barcode detection algorithm in a separate thread.
Python’s GIL (Global Interpreter Lock) limits the thread concurrency performance, especially for CPU-intensive tasks. The multiprocessing module is a better choice for the barcode scanning scenario. However, it is not easy to share the memory between processes. The Python package released by Dynamsoft Barcode Reader SDK provides three asynchronous decoding methods start_video_mode(), append_video_frame and stop_video_mode to overcome the GIL limitation. They maintains a C/C++ thread pool and a buffer queue.
To simplify the native-threaded API, the community version adds an alternative method called decodeMatAsync(), which decodes the latest image buffer and send decoding results via a registered callback function.
import barcodeQrSDK
import numpy as np
import cv2
import json

g_results = None

def callback(results, elapsed_time):
    global g_results
    g_results = (results, elapsed_time)

def run():
    # set license
    barcodeQrSDK.initLicense("LICENSE-KEY")

    # initialize barcode scanner
    scanner = barcodeQrSDK.createInstance()
    params = scanner.getParameters()

    # register callback function to native thread
    scanner.addAsyncListener(callback)

    cap = cv2.VideoCapture(0)
    while True:
        ret, image = cap.read()
        if image is not None:
            scanner.decodeMatAsync(image)

        if g_results != None:
            print('Elapsed time: ' + str(g_results[1]) + 'ms')
            cv2.putText(image, 'Elapsed time: ' + str(g_results[1]) + 'ms', (10, 30), cv2.FONT_HERSHEY_SIMPLEX, 1, (0, 0, 255), 2)
            for result in g_results[0]:
                x1 = result.x1
                y1 = result.y1
                x2 = result.x2
                y2 = result.y2
                x3 = result.x3
                y3 = result.y3
                x4 = result.x4
                y4 = result.y4

                cv2.drawContours(image, [np.int0([(x1, y1), (x2, y2), (x3, y3), (x4, y4)])], 0, (0, 255, 0), 2)
                cv2.putText(image, result.text, (x1, y1), cv2.FONT_HERSHEY_SIMPLEX, 1, (0, 255, 0), 2)

        cv2.imshow('Barcode QR Code Scanner', image)
        ch = cv2.waitKey(1)
        if ch == 27:
            break

    scanner.clearAsyncListener()

if __name__ == '__main__':
    run()

Moving Barcode Detection Work to Server Side
The performance of running above Python barcode scanner on Raspberry Pi 4 looks not bad. However, if you want to run the program on some older Raspberry Pi models or other cheaper single-board computers with lower CPU clock rate, the performance will be much worse. To relieve the CPU burden, we can move the heavy computation to a powerful server. Here we use Python socket programming. You can get started with the article - Socket Programming in Python.
How to Compress Camera Frames for Socket Transmission
WebP is a modern image format that provides superior lossless and lossy compression for images. It is supported by OpenCV. The following code shows how to encode and decode an image with WebP using OpenCV API:
import cv2 as cv
import numpy as np

cap = cv.VideoCapture(0)
rval, frame = cap.read()
# Send
webp = cv.imencode('.webp', frame, [cv.IMWRITE_WEBP_QUALITY, 90])[1]
bytes_sent = webp.tobytes()

# Receive
frame = cv.imdecode(np.frombuffer(bytes_sent, np.uint8), cv.IMREAD_COLOR)
A Simple Socket Class for Sending and Receiving Data
We create a SimpleSocket class with socket and selector modules. The selector is used to implement non-blocking I/O.
import socket
import selectors

class SimpleSocket():
    def __init__(self) -> None:
        self.sel = selectors.DefaultSelector()
        self.sock = socket.socket(socket.AF_INET, socket.SOCK_STREAM)
        self.callback = None

    def registerEventCb(self, callback):
        self.callback = callback

    def startClient(self, address, port):
        self.sock.setblocking(False)
        self.sock.connect_ex((address, port))
        events = selectors.EVENT_READ | selectors.EVENT_WRITE
        self.sel.register(self.sock, events, data=self.callback)

    def startServer(self, port, number_of_clients=1):
        self.sock.bind(('', port))
        self.sock.listen(number_of_clients)
        print('waiting for a connection at port %s' % port)
        self.sock.setblocking(False)
        self.sel.register(self.sock, selectors.EVENT_READ, data=None)
The callback parameter is a tuple of read and write callback functions.
In an infinite loop, we call select() to wait for I/O events. It monitors connection, read, and write events.
def monitorEvents(self):
    events = self.sel.select(timeout=None)
    for key, mask in events:
        if key.data is None:
            self.acceptConn(key.fileobj, self.callback)
        else:
            self.serveConn(key, mask)

def acceptConn(self, sock, callback):
    connection, addr = sock.accept()
    print('Connected to %s' % addr[0])
    connection.setblocking(False)
    events = selectors.EVENT_READ | selectors.EVENT_WRITE
    self.sel.register(connection, events, data=callback)

def serveConn(self, key, mask):
    sock = key.fileobj
    callback = key.data
    if callback != None and len(callback) == 2:
        if mask & selectors.EVENT_READ:
            data_type, data = self.receiveData(sock)
            callback[0](data_type, data)
        if mask & selectors.EVENT_WRITE:
            data_type, data = callback[1]()
            if data_type != None and data != None:
                self.sendData(sock, data_type, data)
For C/S communication, we need to define a simple protocol.
'''
+-+-+-+-+-------+-+-------------+-------------------------------+
|Type (1 byte)                  |   Payload length (4 bytes)    |
|0: text, 1: json 2: webp       |                               |
+-------------------------------+-------------------------------+
|                           Payload Data                        |
+-------------------------------- - - - - - - - - - - - - - - - +
:                     Payload Data continued ...                :
+ - - - - - - - - - - - - - - - - - - - - - - - - - - - - - - - +
|                     Payload Data continued ...                |
+---------------------------------------------------------------+
'''
The first byte is the data type that represents text, json, or webp. The next 4 bytes are the payload length. The rest of the data is the payload data.
According to the protocol, we can implement the receiveData() and sendData() functions.
def sendData(self, sock, data_type, data):
    msg = data_type + len(data).to_bytes(4, 'big') + data
    return self.send(sock, msg)

def receiveData(self, sock):
    data_type = self.receive(sock, 1)
    if data_type == b'':
        return b'', b''
    data_length = self.receive(sock, 4)
    if data_length == b'':
        return b'', b''
    data = self.receive(sock, int.from_bytes(data_length, 'big'))
    return data_type, data

def send(self, sock, msg):
    try:
        totalsent = 0
        while totalsent < len(msg):
            sent = sock.send(msg[totalsent:])
            if sent == 0:
                # connection closed
                return False

            totalsent = totalsent + sent
    except Exception as e:
        print(e)
        return False

    return True

def receive(self, sock, size):
    try:
        chunks = []
        bytes_recd = 0
        while bytes_recd < size:
            chunk = sock.recv(min(size, 1024))
            if chunk == b'':
                # connection closed
                return b''

            chunks.append(chunk)
            bytes_recd = bytes_recd + len(chunk)

    except Exception as e:
        print(e)
        return b''

    return b''.join(chunks)
Implementing Server-side Barcode Scanning Solution
The steps to implement the client.
- Create a
client.pyfile. - Set camera resolution to 640x480 and create a loop to capture frames.
import cv2 as cv from simplesocket import SimpleSocket, DataType import json import numpy as np g_local_results = None g_remote_results = None isDisconnected = False msgQueue = [] isReady = True cap = cv.VideoCapture(0) if cap.isOpened() == False: print("Unable to read camera feed") exit() cap.set(cv.CAP_PROP_FRAME_WIDTH, 640) cap.set(cv.CAP_PROP_FRAME_HEIGHT, 480) def run(): while True: rval, frame = cap.read() cv.imshow('client', frame) if cv.waitKey(10) == 27: break if __name__ == '__main__': run() - Initialize the socket client and register the callback functions.
def callback(results, elapsed_time): global g_local_results print("Local decoding time: " + str(elapsed_time) + " ms") g_local_results = (results, elapsed_time) def readCb(data_type, data): global isDisconnected, g_remote_results, isReady if data == b'': isDisconnected = True if data_type == DataType.TEXT: text = data.decode('utf-8') print(text) if data_type == DataType.JSON: obj = json.loads(data) g_remote_results = (obj['results'], obj['time']) isReady = True # Data for sending def writeCb(): if len(msgQueue) > 0: data_type, data = msgQueue.pop(0) return data_type, data return None, None def run(): global isDisconnected, g_local_results, g_remote_results, isReady client = SimpleSocket() client.registerEventCb((readCb, writeCb)) client.startClient('192.168.8.72', 8080) - Keep reading frames from the camera and send them to the server.
while True: client.monitorEvents() if (isDisconnected): break rval, frame = cap.read() # Send data to server if isReady: isReady = False webp = cv.imencode('.webp', frame, [cv.IMWRITE_WEBP_QUALITY, 90])[1] msgQueue.append((DataType.WEBP, webp.tobytes())) cv.imshow('client', frame) if cv.waitKey(10) == 27: break - Display the results when the results are returned from the server.
 if g_remote_results != None:
     print("Remote decoding time: " + str(int(g_remote_results[1])) + " ms")
     for result in g_remote_results[0]:
         text = result['text']
         x1 = result['x1']
         y1 = result['y1']
         x2 = result['x2']
         y2 = result['y2']
         x3 = result['x3']
         y3 = result['y3']
         x4 = result['x4']
         y4 = result['y4']
         cv.putText(frame, text, (x1, y1), cv.FONT_HERSHEY_SIMPLEX, 0.5, (0, 0, 255), 2)
         cv.drawContours(frame, [np.int0([(x1, y1), (x2, y2), (x3, y3), (x4, y4)])], 0, (0, 255, 0), 2)

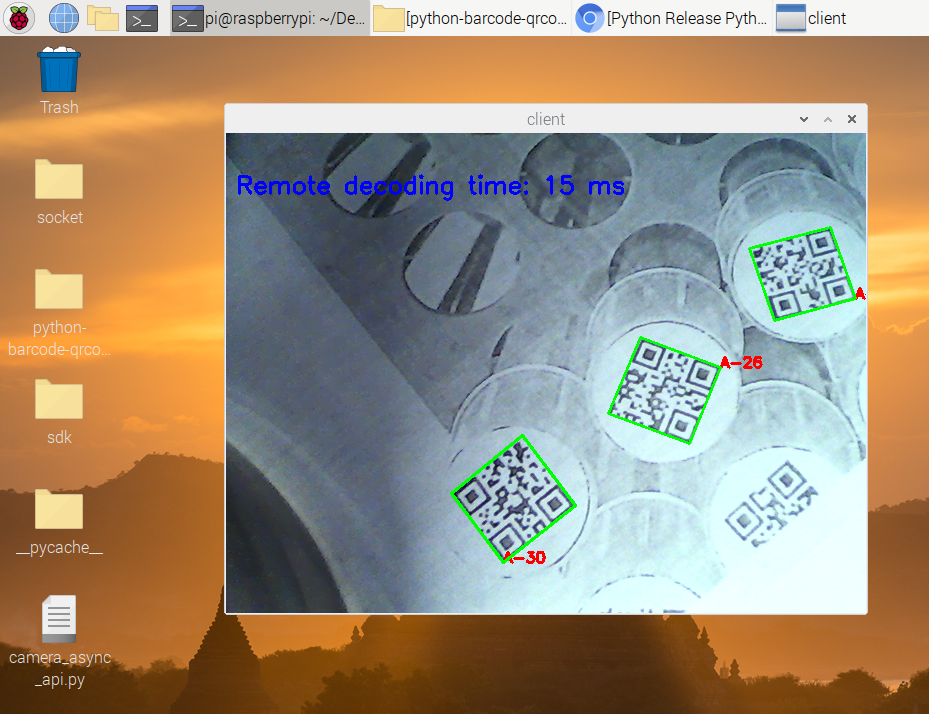
     cv.putText(frame, "Remote decoding time: " + str(int(g_remote_results[1])) + " ms", (10, 60), cv.FONT_HERSHEY_SIMPLEX, 0.8, (255, 0, 0), 2)
Considering the CPU performance is good and there is no UI required on the server side, we can use synchronous API to recognize barcode and Qr code after receiving the frame from the client. The returned results are encoded as JSON string.
import cv2 as cv
import numpy as np
from simplesocket import SimpleSocket, DataType
import json
import barcodeQrSDK

g_results = None
isDisconnected = False
msgQueue = []

# Initialize Dynamsoft Barcode Reader
barcodeQrSDK.initLicense("LICENSE-KEY")
reader = barcodeQrSDK.createInstance()

# Process received data
def readCb(data_type, data):
    global isDisconnected, g_results, msgQueue

    if data == b'':
        isDisconnected = True

    if data_type == DataType.TEXT:
        text = data.decode('utf-8')
        print(text)

    if data_type == DataType.JSON:
        obj = json.loads(data)
        print(obj)


    if data_type == DataType.WEBP:
        try:
            frame = cv.imdecode(np.frombuffer(data, np.uint8), cv.IMREAD_COLOR)

            if frame is not None:
                results, elpased_time = reader.decodeMat(frame)
                g_results = (results, elpased_time)

            if g_results != None:
                jsonData = {'results': [], 'time': g_results[1]}
                for result in g_results[0]:
                    format = result.format
                    text = result.text
                    x1 = result.x1
                    y1 = result.y1
                    x2 = result.x2
                    y2 = result.y2
                    x3 = result.x3
                    y3 = result.y3
                    x4 = result.x4
                    y4 = result.y4
                    data = {'format': format, 'text': text, 'x1': x1, 'y1': y1, 'x2': x2, 'y2': y2, 'x3': x3, 'y3': y3, 'x4': x4, 'y4': y4}
                    jsonData['results'].append(data)

                msgQueue.append((DataType.JSON, json.dumps(jsonData).encode('utf-8')))

        except Exception as e:
            isDisconnected = True

def writeCb():
    if len(msgQueue) > 0:
        data_type, data =  msgQueue.pop(0)
        return data_type, data

    return None, None

def run():
    global isDisconnected

    server = SimpleSocket()
    server.registerEventCb((readCb, writeCb))
    server.startServer(8080, 1)

    try:
        while True:
            server.monitorEvents()
            if (isDisconnected):
                break

    except KeyboardInterrupt:
            print("Caught keyboard interrupt, exiting")
    finally:
        server.shutdown()

if __name__ == '__main__':
    run()
Testing the Server-side Barcode Scanning Solution
When running the client.py and server.py, you need to change the IP address and port. If the network transmission is stable, the server-side barcode scanning solution can achieve good performance.

Source Code
https://github.com/yushulx/python-barcode-qrcode-sdk/tree/main/examples/socket


