How to Create VSCode Extension for Dynamsoft Barcode Reader Development
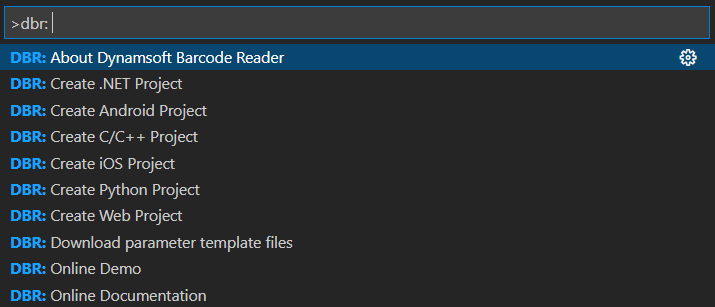
Dynamsoft Barcode Reader, as an enterprise-class barcode and QR code SDK, supports many platforms (Windows, Linux, macOS, Android, iOS, Raspberry Pi OS, and Web) and programming languages (Python, Java, Swift, C#, Cpp, and JavaScript). There are many sample projects distributed in Dynamsoft GitHub repositories and official website. To help developers get started with Dynamsoft Barcode Reader quickly, we created a VSCode extension that features project generation for different programming languages and frameworks, code snippet insertion, and template download.
This article is Part 1 in a 2-Part Series.
Install the VSCode Extension
https://marketplace.visualstudio.com/items?itemName=Dynamsoft.dynamsoft-barcode-reader
Creating Our First VSCode Extension
Let’s follow the official tutorial to create a basic VSCode extension project:
-
Install Yeoman and VS Code Extension Generator:
npm install -g yo generator-code -
Run the following command to scaffold a TypeScript or JavaScript project:
yo code -
Press
F5to debug the project and then pressF1to show theCommand Palette. We can enterHello Worldcommand to see the result.
Making VSCode Extension for Dynamsoft Barcode Reader
The extension will support:
-
Project generation
Create console, desktop GUI, web and mobile apps.
-
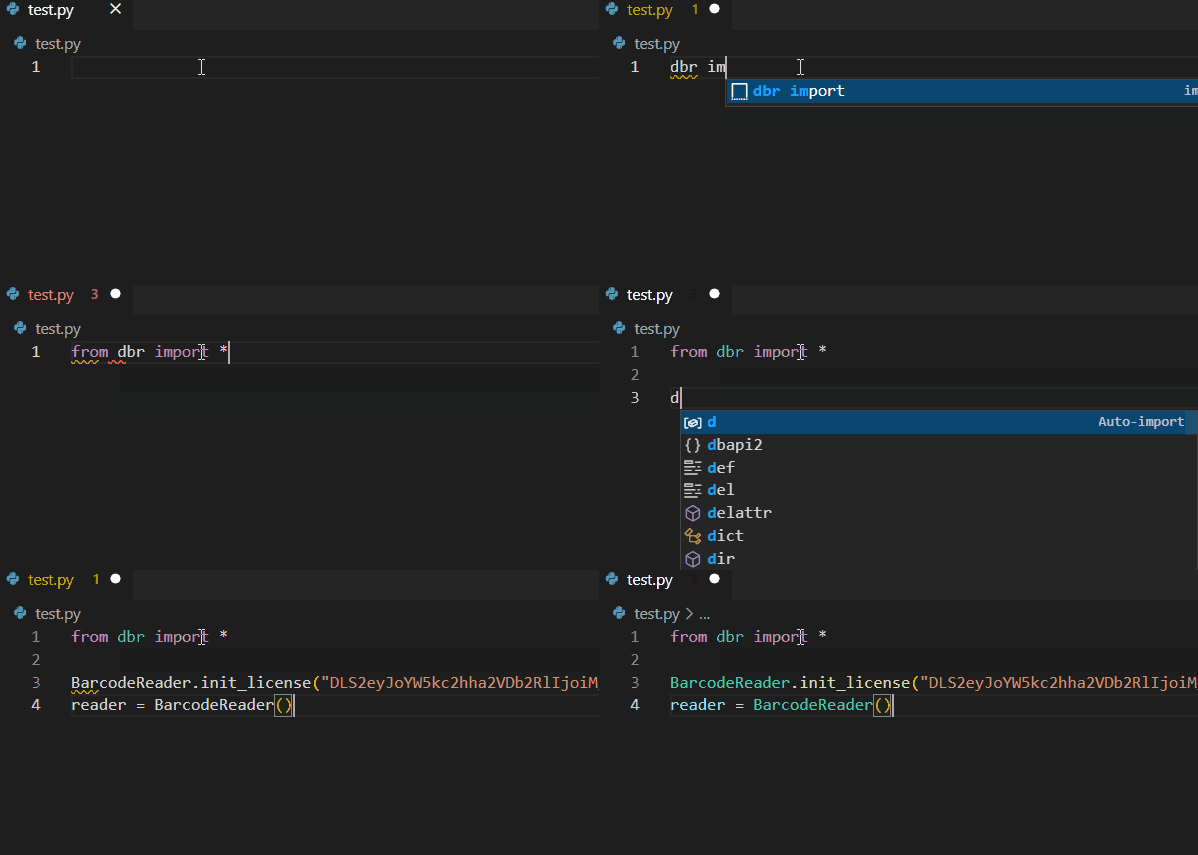
Code snippet insertion
Add code snippets into corresponding programing language files.
-
File download
Download pre-set parameter template files for barcode and QR code recognition.
Steps to Generate a DBR Project
Step1: List the commands for Command Palette
In package.json file, the commands for project generation are defined as follows:
"activationEvents": [
    "onCommand:dbr.dotnet",
    "onCommand:dbr.cpp",
    "onCommand:dbr.web",
    "onCommand:dbr.python",
    "onCommand:dbr.android",
    "onCommand:dbr.ios"
  ],
"contributes": {
    "commands": [
      {
        "command": "dbr.dotnet",
        "title": "DBR: Create .NET Project"
      },
      {
        "command": "dbr.cpp",
        "title": "DBR: Create C/C++ Project"
      },
      {
        "command": "dbr.web",
        "title": "DBR: Create Web Project"
      },
      {
        "command": "dbr.python",
        "title": "DBR: Create Python Project"
      },
      {
        "command": "dbr.android",
        "title": "DBR: Create Android Project"
      },
      {
        "command": "dbr.ios",
        "title": "DBR: Create iOS Project"
      }
    ],
  },
To make the commands work, we need to add the following TypeScript code to extension.ts file:
export function activate(context: vscode.ExtensionContext) {

	context.subscriptions.push(...[
		vscode.commands.registerCommand('dbr.dotnet', async () => {
		}),
		vscode.commands.registerCommand('dbr.cpp', async () => {
		}),
		vscode.commands.registerCommand('dbr.web', async () => {
		}),
		vscode.commands.registerCommand('dbr.python', async () => {
		}),
		vscode.commands.registerCommand('dbr.android', async () => {
		}),
		vscode.commands.registerCommand('dbr.ios', async () => {
		})
	]);
}

Step2: Prepare the project template
We put some project templates under the res folder and store their physical paths in TypeScript:
private samples = {
        "python": path.join(__dirname, '../res/python/'),
        "dotnet": path.join(__dirname, '../res/dotnet/'),
        "cpp": path.join(__dirname, '../res/cpp/'),
        "web": path.join(__dirname, '../res/web/'),
        "android": path.join(__dirname, '../res/android/'),
        "ios": path.join(__dirname, '../res/ios/')
    };
According to the input command, we can return the corresponding project path:
enum Type {
    CONSOLE = 'Console App',
    WINFORMS = 'Windows Forms App',
    FILE = 'File Reader',
    CAMERA = 'Camera Scanner',
    GUI = 'GUI App',
}

enum FolderName {
    FOLDER_NAME_CONSOLE = 'console',
    FOLDER_NAME_WINFORMS = 'winforms',
    FOLDER_NAME_FILE = 'file',
    FOLDER_NAME_CAMERA = 'camera',
    FOLDER_NAME_GUI = 'gui',
}

switch (option) {
    case "dotnet":
        root = this.samples.dotnet;
        projectType = await this.getProjectType([Type.CONSOLE, Type.WINFORMS]);
        break;
    case "cpp":
        root = this.samples.cpp;
        projectType = await this.getProjectType([Type.CONSOLE]);
        break;
    case "web":
        root = this.samples.web;
        projectType = await this.getProjectType([Type.FILE, Type.CAMERA]);
        break;
    case "python":
        root = this.samples.python;
        projectType = await this.getProjectType([Type.CONSOLE, Type.GUI]);
        break;
    case "android":
        root = this.samples.android;
        projectType = await this.getProjectType([Type.CAMERA]);
        break;
    case "ios":
        root = this.samples.ios;
        projectType = await this.getProjectType([Type.CAMERA]);
        break;
}
if (projectType === '') { return; }

switch (projectType) {
    case Type.CONSOLE:
        src = path.join(root, FolderName.FOLDER_NAME_CONSOLE);
        break;
    case Type.WINFORMS:
        src = path.join(root, FolderName.FOLDER_NAME_WINFORMS);
        break;
    case Type.FILE:
        src = path.join(root, FolderName.FOLDER_NAME_FILE);
        break;
    case Type.CAMERA:
        src = path.join(root, FolderName.FOLDER_NAME_CAMERA);
        break;
    case Type.GUI:
        src = path.join(root, FolderName.FOLDER_NAME_GUI);
        break;
}
Step3: Select and open the target project folder
When creating a new project, we call vscode.window.showQuickPick to list two options: using current workspace folder or opening a new folder.
const answer = await vscode.window.showQuickPick(['Yes', 'No'], { placeHolder: 'Do you want to create a new folder?' });
        if (!answer) { return; }
If the answer is Yes, we call vscode.window.showOpenDialog to pop up a window for opening a folder:
const projectName = await vscode.window.showInputBox({
            prompt: 'Enter a name for the new project',
            validateInput: (value: string): string => {
                if (!value.length) {
                    return 'A project name is required';
                }
                return '';
            }
        });

let workspace = '';
const folderUris = await vscode.window.showOpenDialog({ canSelectFolders: true, canSelectFiles: false, canSelectMany: false, openLabel: 'Select folder' });
if (!folderUris) {
    return '';
}

let workspaceFolderUri = folderUris[0];
workspace = workspaceFolderUri.fsPath;
let des = path.join(workspace, projectName);
If the answer is No, we use the current workspace folder:
let folders = vscode.workspace.workspaceFolders;
let des = folders[0].uri.fsPath;
Step4: Copy project files to the target folder
Once the target folder is determined, we can copy the project template files to the target folder:
export function copyFolder(src: string, des: string) {
	fs.readdir(src, (err, files) => {
		if (err) {
			return;
		}

		files.forEach(file => {
			let srcFile = path.join(src, file);
			let desFile = path.join(des, file);
			if (fs.statSync(srcFile).isDirectory()) {
				fs.mkdirSync(desFile);
				copyFolder(srcFile, desFile);
			} else {
				fs.copyFileSync(srcFile, desFile);
			}
		});
	});
}

copyFolder(src, des);
Code Snippet Insertion
The structure of the snippet files are as follows:
{
    "prefix": "",
    "body": "",
    "description": ""
}
Create a folder named snippets and add some snippet files:
snippets
 - android.json
 - cpp.json
 - csharp.json
 - python.json
 - swift.jon
 - web.json
After that, open package.json to add the snippet file paths:
"contributes": {
    "snippets": [
			{
				"language": "python",
				"path": "./snippets/python.json"
			},
      {
				"language": "csharp",
				"path": "./snippets/csharp.json"
			},
      {
				"language": "html",
				"path": "./snippets/web.json"
			},
      {
				"language": "cpp",
				"path": "./snippets/cpp.json"
			},
      {
				"language": "java",
				"path": "./snippets/android.json"
			},
      {
				"language": "swift",
				"path": "./snippets/swift.json"
			}
		]
}
As long as the extension is installed in Visual Studio Code, we can quickly add code snippet in corresponding language files to expedite the development process.

File Download
To download files from specified URLs in VSCode extension, we invoke http or https module. The vscode.window.withProgress is used to visually show the progress status.
import * as https from 'https';

export async function httpsDownload(url: string, filename: string) {
	await vscode.window.withProgress({
		location: vscode.ProgressLocation.Notification,
		cancellable: true
	}, (progress, token) => {
		token.onCancellationRequested(() => {
			console.log("User canceled the long running operation");
		});

		progress.report({ message: "Downloading " + filename });

		return new Promise((resolve, reject) => {
			const file = fs.createWriteStream(filename);
			https.get(url, function (response: any) {
				response.pipe(file);
				file.on("finish", () => {
					file.close();
					console.log("Download Completed");
					resolve("Download Completed");
				});
			});

		});
	});
}
We call the function defined above to download parameter template files of Dynamsoft Barcode Reader:
import * as vscode from 'vscode';
import { httpsDownload } from './utils';
import * as path from 'path';

enum Template {
    URL = "https://raw.githubusercontent.com/yushulx/cmake-cpp-barcode-qrcode/main/templates/",
    SPEED = 'Speed',
    SPEED_FILE = 'speed.json',
    BALANCED = 'Balanced',
    BALANCED_FILE = 'balanced.json',
    COVERAGE = 'Coverage',
    COVERAGE_FILE = 'coverage.json',
    MORECOVERAGE = 'More Coverage',
    MORECOVERAGE_FILE = 'morecoverage.json',
    MOSTCOVERAGE = 'Most Coverage',
    MOSTCOVERAGE_FILE = 'mostcoverage.json',
}

export class ParameterManager {
    private templates: any = {};

    constructor() {
        this.templates[Template.SPEED] = Template.URL + Template.SPEED_FILE;
        this.templates[Template.BALANCED] = Template.URL + Template.BALANCED_FILE;
        this.templates[Template.COVERAGE] = Template.URL + Template.COVERAGE_FILE;
        this.templates[Template.MORECOVERAGE] = Template.URL + Template.MORECOVERAGE_FILE;
        this.templates[Template.MOSTCOVERAGE] = Template.URL + Template.MOSTCOVERAGE_FILE;
    }

    public async downloadParameterFile() {
        // Select a template file
        const answer = await vscode.window.showQuickPick([Template.SPEED, Template.BALANCED, Template.COVERAGE, Template.MORECOVERAGE, Template.MOSTCOVERAGE], { placeHolder: 'Select a template' });
        if (!answer) { return; }

        let folders = vscode.workspace.workspaceFolders;
        if (!folders) {
            vscode.window.showWarningMessage('No folder is opened.');
        }
        else {
            let des = folders[0].uri.fsPath;
            switch (answer) {
                case Template.SPEED:
                    httpsDownload(this.templates[Template.SPEED], path.join(des, Template.SPEED_FILE));
                    break;
                case Template.BALANCED:
                    httpsDownload(this.templates[Template.BALANCED], path.join(des, Template.BALANCED_FILE));
                    break;
                case Template.COVERAGE:
                    httpsDownload(this.templates[Template.COVERAGE], path.join(des, Template.COVERAGE_FILE));
                    break;
                case Template.MORECOVERAGE:
                    httpsDownload(this.templates[Template.MORECOVERAGE], path.join(des, Template.MORECOVERAGE_FILE));
                    break;
                case Template.MOSTCOVERAGE:
                    httpsDownload(this.templates[Template.MOSTCOVERAGE], path.join(des, Template.MOSTCOVERAGE_FILE));
                    break;
            }
        }
    }
}
Source Code
https://github.com/yushulx/vscode-extension-dev/tree/main/dbr


