


How to Scan Barcodes in a C++ Win32 Application with Dynamsoft Barcode SDK
Dynamsoft’s official C++ Barcode SDK provides only command line samples in C++, which are not user-friendly for selecting image files and displaying results. The Win32 API (Windows API) is a core set of application programming interfaces primarily used for developing Windows GUI applications in C and C++. This article will guide you through building a Windows desktop barcode reader application with the Win32 API and Dynamsoft C++ Barcode SDK.
What you’ll build: A native Windows desktop application that loads image files, decodes barcodes using the Dynamsoft C++ Barcode SDK, and draws location overlays on detected barcodes — all with the Win32 API and GDI+.
Key Takeaways
- The Win32 API combined with GDI+ provides a lightweight, dependency-free approach to building native barcode reader GUIs on Windows without MFC or .NET.
- Dynamsoft Capture Vision SDK’s
CCaptureVisionRouter::Capturemethod decodes 1D/2D barcodes from image files in a single call, returning format, text, and quadrilateral coordinates. - Barcode location overlays are drawn by mapping
CQuadrilateralcoordinates onto the scaled image surface inside theWM_PAINThandler. - This approach works for batch document scanning workflows, warehouse inventory apps, and any Windows-native barcode processing pipeline.
Common Developer Questions
How do I scan barcodes in a C++ Win32 desktop application?
Load an image through a native Win32 file workflow, send it to the Dynamsoft Capture Vision SDK for decoding, and display the returned text and format data in your own window controls. A classic Win32 layout with separate image and result panels gives users a GUI instead of a console-only sample.
How do I draw barcode location overlays on an image using GDI+ in C++?
Read the quadrilateral coordinates returned by the SDK and map them onto the scaled image inside the WM_PAINT path. GDI+ then draws the overlay lines directly on top of the displayed bitmap so users can see exactly where each barcode was detected.
How do I integrate the Dynamsoft Barcode Reader SDK into a Visual Studio Win32 project?
Add the SDK headers, import libraries, and DLLs to a standard Visual Studio Win32 project, then initialize the capture router in your application code. The article combines that setup with GDI+ image loading so the GUI and barcode engine stay in the same native C++ application.
This article is Part 2 in a 5-Part Series.
- Part 1 - How to Link MSVC-Compiled DLLs with MinGW GCC Using a C Shim DLL
- Part 2 - How to Scan Barcodes in a C++ Win32 Application with Dynamsoft Barcode SDK
- Part 3 - Build a Rust CLI Barcode Scanner with Dynamsoft Capture Vision SDK
- Part 4 - Read Barcodes from a Desktop Webcam in C++ with OpenCV and CMake
- Part 5 - How to Build a Cross-Platform C++ Barcode and QR Code Reader with Dynamsoft Capture Vision v11
Prerequisites
- Download dynamsoft-barcode-reader-cpp-10.0.20.zip. The SDK includes header files, lib files, and DLL files.
- Get a 30-day free trial license for Dynamsoft Capture Vision.
Build a Win32 Barcode Reader Step by Step
Let’s get started with the Win32 project skeleton in Visual Studio 2022.
Step 1: Create Image and Result Panels
The window can be split into two panels: one for displaying an image and the other for displaying barcode results.
-
Declare two global variables for the two panels.
HWND hwndImagePanel = nullptr, hwndResultPanel = nullptr; -
Create the two panels in the window procedure’s
WM_CREATEcase and assign identifiers to them (e.g.,IDC_IMAGE_PANELandIDC_RESULT_PANEL).case WM_CREATE: { hwndImagePanel = CreateWindowEx( 0, L"STATIC", nullptr, WS_CHILD | WS_VISIBLE | SS_ETCHEDFRAME, 10, 10, 100, 100, hWnd, (HMENU)IDC_IMAGE_PANEL, (HINSTANCE)GetWindowLongPtr(hWnd, GWLP_HINSTANCE), nullptr); hwndResultPanel = CreateWindowEx( 0, L"STATIC", nullptr, WS_CHILD | WS_VISIBLE | SS_ETCHEDFRAME, 10, 10, 100, 100, hWnd, (HMENU)IDC_IMAGE_PANEL, (HINSTANCE)GetWindowLongPtr(hWnd, GWLP_HINSTANCE), nullptr); } break;
Step 2: Add a Button to Load and Display an Image
Implementing a button in a Windows C++ GUI application to load and display an image involves several steps.
- Include the necessary headers at the top of your source file.
#include <windows.h> #include <commdlg.h> #include <gdiplus.h> using namespace Gdiplus; -
Declare a global
Gdiplus::Imagepointer, initialized tonullptr, to load an image file.Gdiplus::Image* g_pImage = nullptr; -
Link the
Gdiplus.liblibrary and initialize GDI+ in theWinMainfunction.#pragma comment (lib, "Gdiplus.lib") int APIENTRY wWinMain(_In_ HINSTANCE hInstance, _In_opt_ HINSTANCE hPrevInstance, _In_ LPWSTR lpCmdLine, _In_ int nCmdShow) { GdiplusStartupInput gdiplusStartupInput; ULONG_PTR gdiplusToken; GdiplusStartup(&gdiplusToken, &gdiplusStartupInput, nullptr); } -
Use the
CreateWindowfunction to create a button in the window procedure’sWM_CREATEcase and assign an identifier to the button (e.g.,IDC_LOADIMAGE_BUTTON).HWND hwndButton = CreateWindow( L"BUTTON", L"Load Image", WS_TABSTOP | WS_VISIBLE | WS_CHILD | BS_DEFPUSHBUTTON, 10, 10, 100, 30, hWnd, (HMENU)IDC_LOADIMAGE_BUTTON, (HINSTANCE)GetWindowLongPtr(hWnd, GWLP_HINSTANCE), nullptr); -
Handle the button click in the window procedure by adding a
WM_COMMANDcase. Check if the button with the identifier (e.g.,IDC_LOADIMAGE_BUTTON) was clicked. On a button click, open anOpen Filedialog for image file selection.case WM_COMMAND: { int wmId = LOWORD(wParam); // Parse the menu selections: switch (wmId) { case IDC_LOADIMAGE_BUTTON: { OPENFILENAME ofn; TCHAR szFile[260] = { 0 }; // Initialize OPENFILENAME structure ZeroMemory(&ofn, sizeof(ofn)); ofn.lStructSize = sizeof(ofn); ofn.hwndOwner = hWnd; ofn.lpstrFile = szFile; ofn.nMaxFile = sizeof(szFile); ofn.lpstrFilter = L"All\0*.*\0JPEG\0*.jpg\0PNG\0*.png\0"; ofn.nFilterIndex = 1; ofn.lpstrFileTitle = nullptr; ofn.nMaxFileTitle = 0; ofn.lpstrInitialDir = nullptr; ofn.Flags = OFN_PATHMUSTEXIST | OFN_FILEMUSTEXIST; // Open the file dialog if (GetOpenFileName(&ofn) == TRUE) { } } break; default: return DefWindowProc(hWnd, message, wParam, lParam); } } break; -
Once an image file is selected, invalidate the window to trigger a redraw in the
WM_PAINTevent, where the image will be displayed.if (GetOpenFileName(&ofn) == TRUE) { delete g_pImage; g_pImage = new Gdiplus::Image(ofn.lpstrFile); InvalidateRect(hWnd, nullptr, TRUE); } ... case WM_PAINT: { PAINTSTRUCT ps; HDC hdc = BeginPaint(hWnd, &ps); if (g_pImage && !g_pImage->GetLastStatus()) { // Set your desired width and height const int desiredWidth = 800; const int desiredHeight = 600; // Calculate aspect ratio and scaling factor float scaleX = static_cast<float>(desiredWidth) / g_pImage->GetWidth(); float scaleY = static_cast<float>(desiredHeight) / g_pImage->GetHeight(); float scale = min(scaleX, scaleY); // Calculate new dimensions int imageWidth = static_cast<int>(scale * g_pImage->GetWidth()); int imageHeight = static_cast<int>(scale * g_pImage->GetHeight()); Gdiplus::Graphics graphics(hdc); graphics.DrawImage(g_pImage, 10, 50, imageWidth, imageHeight); } EndPaint(hWnd, &ps); } break;
Step 3: Integrate the Dynamsoft C++ Barcode SDK
To use the Dynamsoft C++ Barcode SDK, you need to include the header files and link the lib files.
- Create a
dbrfolder in your project directory and copy the SDK’s header (.h) and library (.liband.dll) files into it.dbr ├── include ├── lib - Include the header file
dbr/DynamsoftBarcodeReader.hin your source file.#include "dbr/include/DynamsoftCaptureVisionRouter.h" using namespace Gdiplus; using namespace dynamsoft::license; using namespace dynamsoft::cvr; using namespace dynamsoft::dbr; -
Link the lib files by adding them to your project’s linker input settings.
#pragma comment (lib, "dbr/lib/DynamsoftCorex64.lib") #pragma comment (lib, "dbr/lib/DynamsoftLicensex64.lib") #pragma comment (lib, "dbr/lib/DynamsoftCaptureVisionRouterx64.lib") #pragma comment (lib, "dbr/lib/DynamsoftUtilityx64.lib") -
Right-click the project and navigate to
Properties > Build Events > Post-Build Event > Command Line. Here, add a command to copy the SDK’s DLL files to your output directory after each build.xcopy /Y "$(ProjectDir)\dbr\lib\*.dll" "$(OutDir)"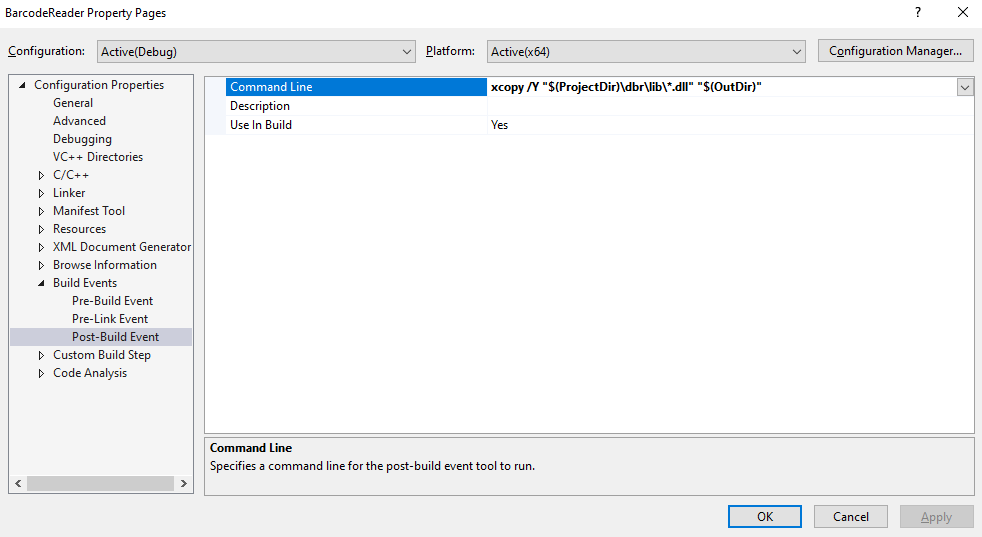
Step 4: Read Barcodes from the Image File
In our sample, we will read barcodes from an image file and display the results in a scrollable text box. The steps are as follows:
-
Initialize the Dynamsoft Barcode Reader in your application’s startup routine using a valid license key.
CCaptureVisionRouter* cvr = nullptr; int APIENTRY wWinMain(_In_ HINSTANCE hInstance, _In_opt_ HINSTANCE hPrevInstance, _In_ LPWSTR lpCmdLine, _In_ int nCmdShow) { ... char errorMsgBuffer[512]; const char* pLicense = "LICENSE-KEY"; CLicenseManager::InitLicense(pLicense, errorMsgBuffer, 512); cvr = new CCaptureVisionRouter; ... } -
Create a scrollable text box in the
WM_CREATEcase of the window procedure and assign it an identifier (e.g.,IDC_TEXTBOX).HWND hwndEdit = nullptr; ... case WM_CREATE: { ... hwndEdit = CreateWindowEx( WS_EX_CLIENTEDGE, L"EDIT", L"", WS_CHILD | WS_VISIBLE | WS_VSCROLL | ES_LEFT | ES_MULTILINE | ES_AUTOVSCROLL, 10, 40, 400, 200, hwndResultPanel, (HMENU)IDC_TEXTBOX, (HINSTANCE)GetWindowLongPtr(hWnd, GWLP_HINSTANCE), nullptr); if (!hwndEdit) { MessageBox(hWnd, L"Could not create edit box.", L"Error", MB_OK | MB_ICONERROR); } } break; -
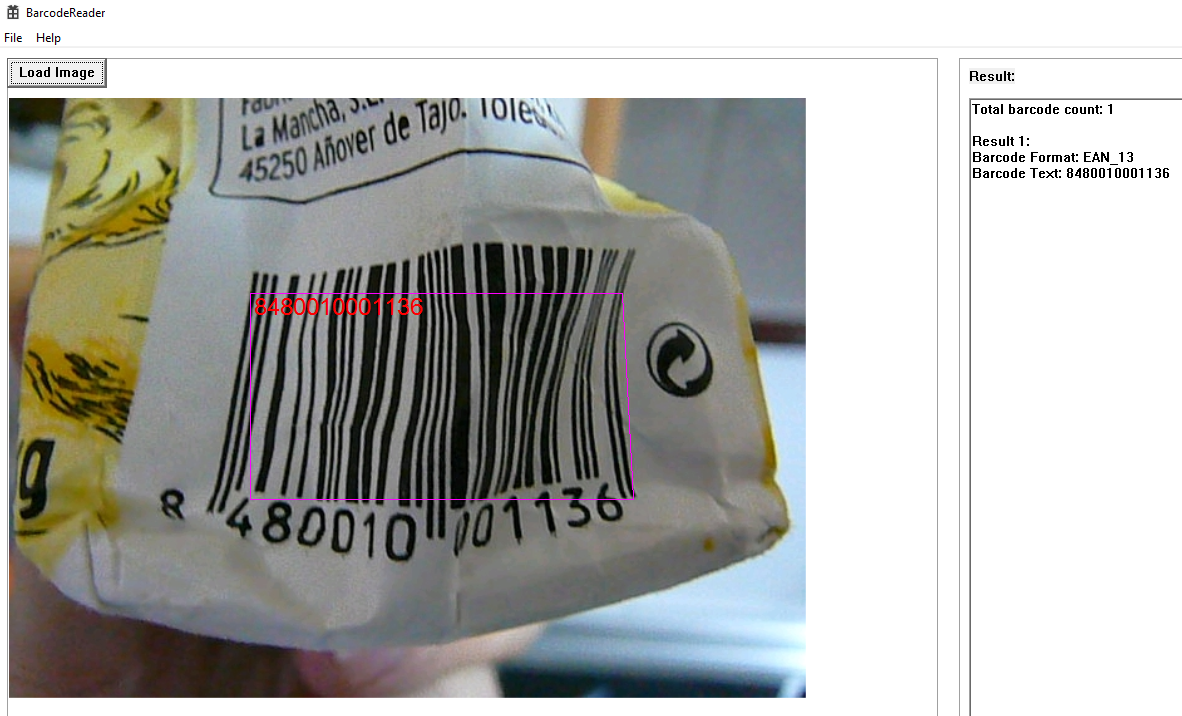
Use the barcode reader to decode barcodes from the selected image file. Then, display the decoding results in the text box using the
SetDlgItemTextfunction.if (GetOpenFileName(&ofn) == TRUE) { delete g_pImage; g_pImage = new Gdiplus::Image(ofn.lpstrFile); // Decode barcodes from the image const char* filename = ConvertWCharToChar(ofn.lpstrFile); CCapturedResult* result = cvr->Capture(filename); delete filename; if (result->GetErrorCode() != 0) { printf("%d, %s\n", result->GetErrorCode() , result->GetErrorString() ); } int capturedResultItemCount = result->GetItemsCount(); string content = "No barcode found"; if (capturedResultItemCount > 0) { content = "Total barcode count: " + std::to_string(capturedResultItemCount) + "\r\n\r\n"; for (int j = 0; j < capturedResultItemCount; j++) { const CCapturedResultItem* capturedResultItem = result->GetItem(j); CapturedResultItemType type = capturedResultItem->GetType(); if (type & CapturedResultItemType::CRIT_BARCODE) { const CBarcodeResultItem* barcodeResultItem = dynamic_cast<const CBarcodeResultItem*> (capturedResultItem); content += "Result " + std::to_string(j + 1) + ": \r\n"; content += "Barcode Format: " + string(barcodeResultItem->GetFormatString()) + "\r\n"; content += "Barcode Text: " + string(barcodeResultItem->GetText()) + "\r\n\r\n"; } } } wchar_t* newText = ConvertCharToWChar(content.c_str()); SetDlgItemText(hwndResultPanel, IDC_TEXTBOX, newText); delete newText; InvalidateRect(hWnd, nullptr, TRUE); }
Step 5: Draw Barcode Location Overlays
Besides the text content, we can also draw overlays on the image to highlight the barcode locations, which dramatically improves the user experience.
-
Save the barcode results, including the barcode type and coordinates, in a vector for later use.
vector<CCapturedResult*> results; ... if (GetOpenFileName(&ofn) == TRUE) { ... results.push_back(result); ... } -
In the
WM_PAINTcase of your window procedure, use the graphics drawing functions to overlay graphics on the image. Utilize the barcode results stored in the vector to accurately position these overlays over the detected barcode locations.case WM_PAINT: { PAINTSTRUCT ps; HDC hdc = BeginPaint(hWnd, &ps); if (g_pImage && !g_pImage->GetLastStatus()) { ... // Draw overlay if (!results.empty()) { CCapturedResult* result = results[0]; Gdiplus::Pen pen(Gdiplus::Color(255, 255, 0, 255)); Gdiplus::FontFamily fontFamily(L"Arial"); Gdiplus::Font font(&fontFamily, 24, Gdiplus::FontStyleRegular, Gdiplus::UnitPixel); Gdiplus::SolidBrush solidBrush(Gdiplus::Color(255, 255, 0, 0)); int capturedResultItemCount = result->GetItemsCount(); if (capturedResultItemCount > 0) { for (int j = 0; j < capturedResultItemCount; j++) { const CCapturedResultItem* capturedResultItem = result->GetItem(j); CapturedResultItemType type = capturedResultItem->GetType(); if (type & CapturedResultItemType::CRIT_BARCODE) { const CBarcodeResultItem* barcodeResultItem = dynamic_cast<const CBarcodeResultItem*> (capturedResultItem); CQuadrilateral location = barcodeResultItem->GetLocation(); Gdiplus::Point points[4]; points[0].X = location.points[0][0] * scale + 10; points[0].Y = location.points[0][1] * scale + 50; points[1].X = location.points[1][0] * scale + 10; points[1].Y = location.points[1][1] * scale + 50; points[2].X = location.points[2][0] * scale + 10; points[2].Y = location.points[2][1] * scale + 50; points[3].X = location.points[3][0] * scale + 10; points[3].Y = location.points[3][1] * scale + 50; graphics.DrawPolygon(&pen, points, 4); wchar_t* newText = ConvertCharToWChar(barcodeResultItem->GetText()); graphics.DrawString( newText, -1, &font, Gdiplus::PointF(points[0].X, points[0].Y), &solidBrush); delete newText; } } } results.pop_back(); delete result; } } EndPaint(hWnd, &ps); } break;
Build and Run the Barcode Reader
Common Issues and Edge Cases
- DLL not found at runtime: If the application crashes on startup with a missing DLL error, verify that the post-build event (
xcopy) is copying all SDK DLLs to the output directory. Confirm the paths in your#pragma comment(lib, ...)directives match the actual folder structure. - Image fails to load or displays blank: GDI+ silently returns a bad status for unsupported formats or corrupt files. Always check
g_pImage->GetLastStatus()after constructing theGdiplus::Imageobject and show a user-friendly error if it fails. - Barcode overlay coordinates are offset: The overlay drawing code scales coordinates by the same factor used to fit the image into the panel. If you change the panel size or add padding, update the offset constants (
+10,+50) in theWM_PAINThandler to match.