


Build a Custom Web Document Scanner in JavaScript Without the Default UI
Dynamic Web TWAIN is well-known for document scanner programming. It provides a set of JavaScript API to simplify the way of integrating document scan functions into web applications. Most of the time, we use Dynamic Web TWAIN with its built-in UI. However, the default UI may not be suitable for all scenarios. To meet the different requirements, Dynamic Web TWAIN also provides UI-less JavaScript APIs that only operates document data without coupling HTML elements. This tutorial shows how to build a custom-UI document scanning web app using the UI-less API, including acquiring images, previewing thumbnails, and managing the buffer without the default viewer.
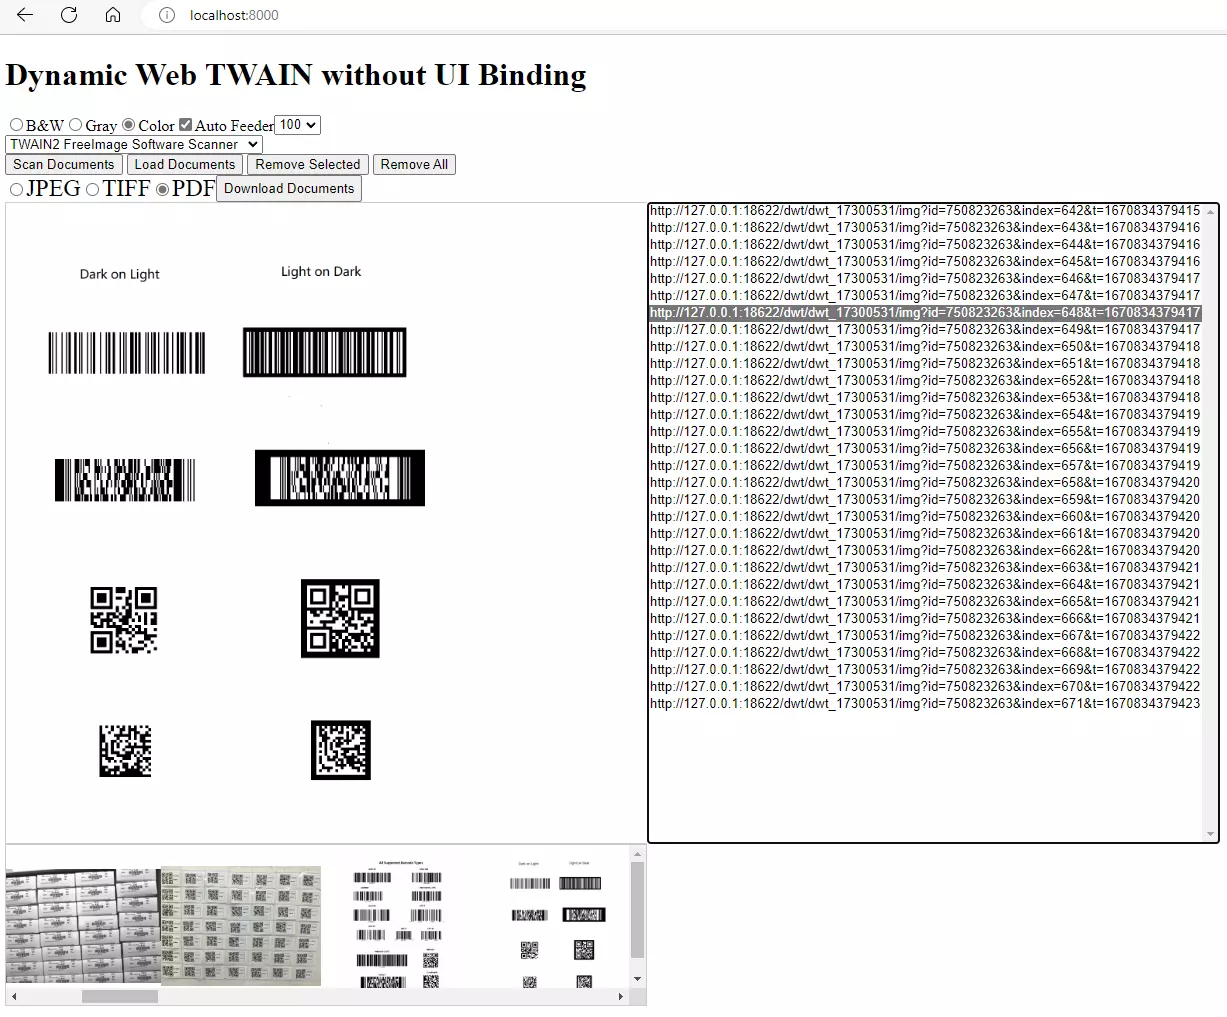
What you’ll build: A custom-UI web document scanning application using the Dynamic Web TWAIN UI-less JavaScript API — with document acquisition, image preview, thumbnail navigation, and buffer management, all without the default built-in viewer.
Key Takeaways
- Dynamic Web TWAIN’s
CreateDWTObjectEx()method creates a scanner object decoupled from any HTML container, giving you full control over the UI. - Scanned document images are accessible via
GetImageURL(), which returns a local URL you can load into any<img>element or custom viewer. - The UI-less API supports the same acquisition, removal, and buffer management operations as the standard API — only the rendering layer is different.
- This approach is ideal when you need to embed document scanning into an existing single-page application or custom dashboard layout.
Common Developer Questions
How do I use Dynamic Web TWAIN without the default UI viewer in JavaScript?
Create the scanner object with CreateDWTObjectEx() and keep the returned reference instead of binding to the built-in viewer container. That gives you the same acquisition and buffer APIs while leaving rendering completely under your own HTML and JavaScript.
How can I build a custom thumbnail view for scanned documents in a web app?
After acquisition, call GetImageURL() for new buffer items and bind those URLs to your own thumbnail list and main preview image. When pages are deleted, update both the SDK buffer and your local thumbnail state so selection and preview stay aligned.
What is CreateDWTObjectEx and how does it differ from the standard Load() initialization?
Load() creates a viewer-bound object from Dynamsoft.DWT.Containers, while CreateDWTObjectEx() creates an object with no default HTML binding. With the UI-less flow, you are responsible for fetching image URLs and rendering the preview yourself.
Understand Where Dynamic Web TWAIN Stores Document Data
Dynamic Web TWAIN allows you to acquire documents from scanners and cameras.
- For scanner access, you need to install a platform-specific Dynamic Web TWAIN Service that communicates with the JavaScript API. All captured document images are stored on the local disk.
- For camera access, no installation is required. The JavaScript API interchanges data with wasm modules. All captured document images are stored in the browser memory.
Create a UI-Less Dynamic Web TWAIN Object Without HTML Binding
The classic code snippet for initializing Dynamic Web TWAIN is as follows:
<div id="dwtcontrolContainer"></div>

<script type="text/javascript">
    Dynamsoft.DWT.RegisterEvent('OnWebTwainReady', Dynamsoft_OnReady);
    window.onload = function () {
      Dynamsoft.DWT.Containers = [{ContainerId:'dwtcontrolContainer', Width:600, Height:800}];
      Dynamsoft.DWT.Load();
    };
    var DWObject;

    function Dynamsoft_OnReady() {
      DWObject = Dynamsoft.DWT.GetWebTwain('dwtcontrolContainer');
    }
</script>
After passing the ContainerId to the Dynamsoft.DWT.Containers property, the Dynamsoft.DWT.Load() method will create a Dynamic Web TWAIN object and bind it to the HTML element with the specified ContainerId. The Dynamsoft.DWT.GetWebTwain() method then returns the Dynamic Web TWAIN object.
To create a web TWAIN object without UI binding, we can call the CreateDWTObjectEx() function:
var dwtObject = null;
Dynamsoft.DWT.CreateDWTObjectEx({ "WebTwainId": "container" }, (obj) => {
        dwtObject = obj;
}, (errorString) => { });
With the UI-less web TWAIN object, we can manage the captured documents and customize the UI elements more flexibly.
Acquire Scanned Documents and Display Them in the Browser
The document acquisition code is the same as the classic code snippet. The only difference is after triggering the success callback function, we need to manually get the document data by calling GetImageURL() method.
var data = [];
var currentURL;

function acquireImage() {
  if (!dwtObject)
    return;
  const onAcquireImageSuccess = () => {
    if (dwtObject) {
      updateImage();
      dwtObject.CloseSource();
    }
  };
  const onAcquireImageFailure = onAcquireImageSuccess;
  dwtObject.OpenSource();
  dwtObject.AcquireImage({}, onAcquireImageSuccess, onAcquireImageFailure);
}

function updateImage() {
  if (dwtObject) {
    let currentLen = data.length;
    let added = dwtObject.HowManyImagesInBuffer - currentLen;
    if (added > 0) {
      for (let i = 0; i < added; i++) {
        let url = dwtObject.GetImageURL(currentLen);
        currentURL = url;
        data.push(url);
        currentLen += 1;
      }
    }
  }
}
The format of the return value is like this:
http://127.0.0.1:18622/dwt/dwt_17300531/img?id=297342469&index=490&t=1670830035678
idis the session ID of the current web page.indexis the ID of the document image in the buffer.tis the timestamp.
We use an array to store image URLs sequentially for further operations. The reason we use a loop to get the image URL is that it may acquire multiple documents at once. The HowManyImagesInBuffer property indicates the number of documents in the buffer. The GetImageURL() method returns the URL of the document image with the specified index.
The image to be displayed is the last one or selected one in the array. The currentURL variable is used to store the URL of the current image. We can dynamically load it into an image element for display.
<img id="document-image">

<script>
  let image = document.getElementById("document-image");
  image.src = url;
</script>
Build a Document File List for Navigation
The image element can only display one document at a time. In order to switch between documents conveniently, an easy workaround is to create a document list. In HTML, we can use the select element to create a list.
<select id="image-list" size="2" onchange="onSelectChange(value)">
</select>
Note: The size attribute is used to set the number of visible options. If the number of options is 1, the select element will be displayed as a drop-down list. Back to the document acquisition code, add the following code to create a new option when a new document is acquired.
var imageList = document.getElementById("image-list");
for (let i = 0; i < added; i++) {
    let url = dwtObject.GetImageURL(currentLen);
    let image = document.getElementById("document-image");
    image.src = url;
    currentURL = url;
    data.push(url);

    let option = document.createElement("option");
    option.selected = true;
    option.text = url;
    option.value = url;
    imageList.add(option);
}
Add a Thumbnail View for Document Preview
Thumbnail view is a better way to preview and select a document. We can create image elements dynamically and add them to a container element.
<style>
  .thumb-bar {
    display: block;
    width: 640px;
    height: 160px;
    overflow-x: auto;
    border: 1px solid #ccc;
  }

  .thumb-box {
    width: 160px;
    height: 160px;
    cursor: pointer;
    display: flex;
    border: 1px solid #ccc;
  }

  .thumb-box img {
    max-width: 100%;
    max-height: 100%;
    min-width: 100%;
    object-fit: contain;
  }
</style>

<div class="thumb-bar" id="thumb-bar">
    <div class="thumb-box" id="thumb-box">
</div>

<script>
...

for (let i = 0; i < added; i++) {
  let url = dwtObject.GetImageURL(currentLen);
  let image = document.getElementById("document-image");
  image.src = url;
  currentURL = url;
  data.push(url);

  ...

  let thumbnails = document.getElementById("thumb-box");
  let newImage = document.createElement('img');
  newImage.setAttribute('src', url);

  if (thumbnails != null) {
    thumbnails.appendChild(newImage);
    newImage.addEventListener('click', e => {
      if (e != null && e.target != null) {
        let target = e.target;
        image.src = target.src;
        currentURL = target.src;
        imageList[data.indexOf(target.src)].selected = true;
      }
    });
  }

  currentLen += 1;
}
...
</script>
Every image element contains a click event listener for switching the document images.
Remove Scanned Documents from the Buffer
When removing a selected document or all documents, we need to update the database maintained by Dynamic Web TWAIN Service, the data list maintained by ourselves, the large image view, the document list, and the thumbnail view.
Let’s deal with them one by one.
Remove a Selected Document
-
Dynamic Web TWAIN Service: call the RemoveImage() method to remove the selected document image from the buffer.
dwtObject.RemoveImage(index); -
Data list: call
splice()to remove an element from a JavaScript array.data.splice(index, 1); -
Large image view: update the image element. If the removed document is the first one, display the next one. Otherwise, display the previous one.
if (dwtObject.HowManyImagesInBuffer > 0) { if (index == 0) { image.src = data[index]; } else { image.src = data[index - 1]; } currentURL = image.src; imageList[data.indexOf(currentURL)].selected = true; } -
Document list: remove the selected option from the select element.
imageList.remove(index); -
Thumbnail view: remove the selected image element from the div element.
let thumbnails = document.getElementById("thumb-box");
thumbnails.removeChild(thumbnails.childNodes[index + 1]);
Remove All Documents at Once
- Dynamic Web TWAIN Service: call the RemoveAllImages() method to remove all document images from the buffer.
dwtObject.RemoveAllImages(); - Data list: create a new array.
data = []; - Large image view: clear the image element.
image.src = ""; currentURL = ""; - Document list: remove all options from the select element.
let imageList = document.getElementById("image-list"); while (imageList.firstChild) { imageList.removeChild(imageList.firstChild); } - Thumbnail view: remove all image elements from the div element.
  let thumbnails = document.getElementById("thumb-box");
  while (thumbnails.firstChild) {
    thumbnails.removeChild(thumbnails.firstChild);
  }
Set Up and Run the Document Scanning Demo
-
Get a trial license and then update the code:
Dynamsoft.DWT.ProductKey = "LICENSE-KEY"; -
Use Python to quickly start a local server:
python -m http.server -
Visit
http://localhost:8000/.
Common Issues and Edge Cases
CreateDWTObjectExcallback never fires: Ensure the Dynamic Web TWAIN Service is running on the client machine. The UI-less API still requires the local service for scanner communication. Checkhttp://127.0.0.1:18622/in the browser to verify service availability.GetImageURL()returns a broken URL: The URL is only valid while the page session is active. If you store URLs across page reloads, the session ID changes and previously retrieved URLs return 404. Always re-acquire URLs after a page refresh.- Thumbnail images don’t update after
RemoveImage(): When a document is removed from the buffer, the remaining image indexes shift. Re-index your data array and regenerate thumbnail elements to keep the UI in sync with the buffer state.