


How to Build a Java Barcode Scanner with LiteCam JNI, ZXing, and Dynamsoft Barcode Reader
Java does not provide a built-in cross-platform camera API. This tutorial uses a JNI wrapper around the lightweight LiteCam C++ SDK to capture camera frames, then decodes them with either ZXing or Dynamsoft Barcode Reader.
You will build a complete barcode scanning solution — from CMake build and JNI binding to Maven packaging — that runs on Windows, Linux, and macOS without dragging in a full OpenCV dependency.
What you’ll build: A cross-platform Java barcode scanner application that captures live camera frames via a JNI-wrapped LiteCam SDK and decodes barcodes using either ZXing or Dynamsoft Barcode Reader.
Key Takeaways
- You can give Java applications native camera access without OpenCV by wrapping a lightweight C++ SDK (LiteCam) through JNI and packaging the native library inside a JAR.
- Dynamsoft Barcode Reader’s
CaptureVisionRouterAPI decodes multiple barcode formats from rawImageDatain a single call, making it straightforward to drop into any Java frame-capture loop. - ZXing provides a zero-cost baseline; Dynamsoft Barcode Reader is engineered for more demanding commercial scenarios such as damaged, low-contrast, and multi-barcode images.
- The Maven build packages the native
.dll/.so/.dylibalongside Java classes, so end users need no manual library setup.
Common Developer Questions
How do I access a webcam from Java without OpenCV?
Use a JNI bridge around the LiteCam C++ SDK instead of relying on OpenCV. That approach gives Java direct access to native camera frames while keeping the camera layer lighter than a full OpenCV dependency.
What is the difference between ZXing and Dynamsoft Barcode Reader for real-time scanning accuracy?
ZXing provides a free open-source baseline, while Dynamsoft Barcode Reader is designed for more demanding commercial scenarios such as damaged, low-contrast, and multi-barcode images. For measured accuracy differences, refer to the barcode scanning accuracy benchmark and comparison.
How do I bundle a native JNI library inside a Maven JAR so it loads automatically?
The Maven build packages the native LiteCam library together with the Java classes so end users do not need to install DLL, SO, or DYLIB files manually. The repository layout and build steps in the article show how the JNI layer, native binaries, and Java scanner app are bundled into one runnable deliverable.
Demo: Java Barcode Scanner in Action
Prerequisites
System Requirements
- Java JDK 8+ and Maven 3.6+
- A camera device (for scanning)
- Platform dependencies: Windows (Visual Studio), Linux (
libx11-dev libv4l-dev), macOS (Xcode) - A 30-day free trial license for Dynamsoft Barcode Reader
Platform-Specific Requirements
Windows
- Visual Studio 2019 or later (for building from source)
- Media Foundation (included with Windows)
- Windows 10/11 recommended
Linux
sudo apt update
sudo apt install libx11-dev libv4l-dev
macOS
- Xcode development tools (for building from source)
- AVFoundation framework (included with macOS)
Understand the Project Structure
This project consists of two main components:
- LiteCam SDK: A lightweight, cross-platform Java camera capture library
-
Maven Barcode Scanner: A full-featured barcode scanning application with dual detection engines
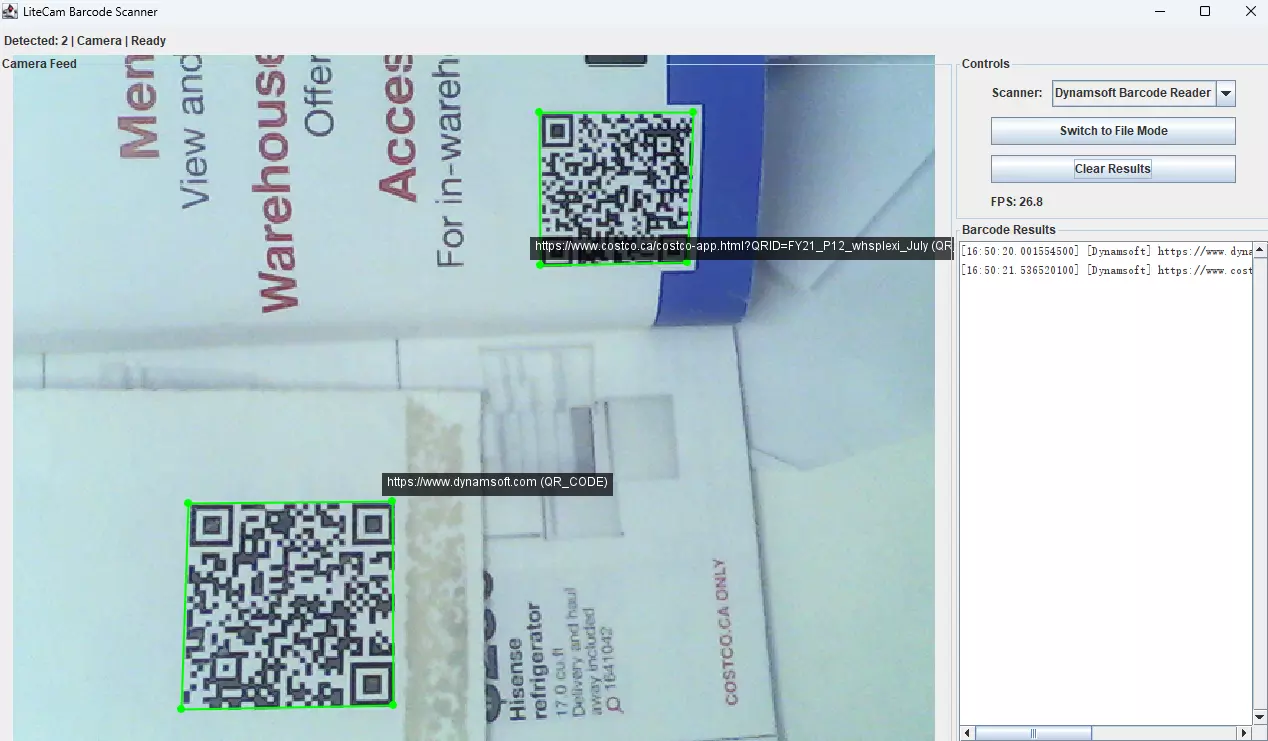
Key Features
- Real-time Camera Feed: High-performance camera capture using native JNI
- Dual Barcode Engines: Switch between ZXing (open-source) and Dynamsoft (enterprise)
- Visual Overlays: Real-time barcode highlighting with coordinates
- File Mode Support: Drag-and-drop image processing
- Cross-Platform: Windows, macOS, and Linux support
- Convenience Scripts: Cross-platform build and run scripts for easy development
What LiteCam SDK Provides
LiteCam is a lightweight C++ camera SDK. A JNI bridge turns it into a Java-compatible library.
Core Features
- Cross-Platform Video Capture: Uses platform-native APIs (Media Foundation, V4L2, AVFoundation)
- RGB Frame Access: Direct access to uncompressed RGB data
- JNI Integration: Optimized native bridge for Java applications
- Resolution Control: Support for multiple resolutions and frame rates
Architecture
┌─────────────────┐    ┌──────────────┐    ┌─────────────────┐
│   Java App      │────│  LiteCam     │────│  Native Camera  │
│                 │    │  JNI Bridge  │    │  APIs           │
└─────────────────┘    └──────────────┘    └─────────────────┘
Supported Platforms
| Platform | Camera API | Display |
|---|---|---|
| Windows | Media Foundation | GDI/DirectX |
| Linux | Video4Linux (V4L2) | X11 |
| macOS | AVFoundation | Cocoa |
Choose a Barcode Detection Engine
The Maven Barcode Scanner application demonstrates advanced integration of camera capture with multiple barcode detection engines.
Application Architecture
┌──────────────────┐
│   Swing GUI      │
├──────────────────┤
│  Camera Panel    │  ← Live preview with overlays
│  Controls Panel  │  ← Engine selection, modes
│  Results Panel   │  ← Detection history
└──────────────────┘
         │
├────────────────────┤
│    Core Engine     │
├────────────────────┤
│ ┌────────────────┐ │
│ │ LiteCam SDK    │ │  ← Camera capture
│ └────────────────┘ │
│ ┌────────────────┐ │
│ │ ZXing Engine   │ │  ← Open-source detection
│ └────────────────┘ │
│ ┌────────────────┐ │
│ │ Dynamsoft DBR  │ │  ← Enterprise detection
│ └────────────────┘ │
└────────────────────┘
Detection Engines Comparison
| Feature | ZXing | Dynamsoft DBR |
|---|---|---|
| Cost | Free (Apache 2.0) | Commercial license |
| Accuracy | Good | Excellent |
| Speed | Fast | Very Fast |
| Damaged Codes | Limited | Advanced |
| Multi-detection | Basic | Advanced |
Explore the Repository Layout
The project is organized into two main components:
├── README.md                    # Project overview and quick start
├── build-jar.ps1/.sh            # Scripts to build LiteCam SDK
├── run-litecam.ps1/.sh          # Scripts to test LiteCam SDK
├── litecam.jar                  # Pre-built Camera SDK with natives
├── include/                     # C++ headers for camera implementation
├── src/                         # C++ camera implementation (cross-platform)
├── java-src/                    # Basic LiteCam Java SDK source
│   └── com/example/litecam/
│       ├── LiteCam.java         # Main camera API
│       └── LiteCamViewer.java   # Simple camera viewer test
└── maven-example/               # Complete Barcode Scanner Application
    ├── pom.xml                  # Maven dependencies and build config
    ├── build.ps1/.sh            # Build scripts for barcode scanner
    ├── run.ps1/.sh              # Run scripts for barcode scanner
    ├── src/main/java/com/example/litecam/
    │   └── BarcodeScanner.java  # Main barcode scanning application
    └── target/                  # Maven build output
        └── litecam-barcode-scanner-1.0.0.jar
Build the Java Camera SDK with JNI
Step 1: Write the JNI Bridge for LiteCam
Create a LiteCamJNI.cpp file to wrap the LiteCam C++ SDK, enabling access from Java:
#include "Camera.h"
#include <jni.h>
#include <vector>
#include <mutex>
#include <string>

struct CameraEntry
{
    int id;
    Camera *cam;
};
static std::mutex g_mutex;
static std::vector<CameraEntry> g_cameras;
static int g_nextId = 1;

static Camera *getCamera(int handle)
{
    std::lock_guard<std::mutex> lock(g_mutex);
    for (auto &e : g_cameras)
        if (e.id == handle)
            return e.cam;
    return nullptr;
}

static int registerCamera(Camera *c)
{
    std::lock_guard<std::mutex> lock(g_mutex);
    int id = g_nextId++;
    g_cameras.push_back({id, c});
    return id;
}

static void unregisterCamera(int handle)
{
    std::lock_guard<std::mutex> lock(g_mutex);
    for (auto it = g_cameras.begin(); it != g_cameras.end(); ++it)
    {
        if (it->id == handle)
        {
            delete it->cam;
            g_cameras.erase(it);
            return;
        }
    }
}

static jclass findAndGlobalRef(JNIEnv *env, const char *name)
{
    jclass local = env->FindClass(name);
    return (jclass)env->NewGlobalRef(local);
}

extern "C"
{

    JNIEXPORT jobjectArray JNICALL Java_com_example_litecam_LiteCam_listDevices(JNIEnv *env, jclass)
    {
        auto devices = ListCaptureDevices();
        jclass stringClass = env->FindClass("java/lang/String");
        jobjectArray arr = env->NewObjectArray((jsize)devices.size(), stringClass, nullptr);
        for (jsize i = 0; i < (jsize)devices.size(); ++i)
        {
#ifdef _WIN32
            char buffer[512];
            wcstombs_s(nullptr, buffer, devices[i].friendlyName, sizeof(buffer));
            env->SetObjectArrayElement(arr, i, env->NewStringUTF(buffer));
#else
            env->SetObjectArrayElement(arr, i, env->NewStringUTF(devices[i].friendlyName));
#endif
        }
        return arr;
    }

    JNIEXPORT jint JNICALL Java_com_example_litecam_LiteCam_open(JNIEnv *env, jobject self, jint deviceIndex)
    {
        auto cam = new Camera();
        if (!cam->Open(deviceIndex))
        {
            delete cam;
            return 0;
        }
        return registerCamera(cam);
    }

    JNIEXPORT void JNICALL Java_com_example_litecam_LiteCam_nativeClose(JNIEnv *, jobject, jint handle)
    {
        unregisterCamera(handle);
    }

    JNIEXPORT jintArray JNICALL Java_com_example_litecam_LiteCam_listSupportedResolutions(JNIEnv *env, jobject, jint handle)
    {
        Camera *cam = getCamera(handle);
        if (!cam)
            return nullptr;
        auto mts = cam->ListSupportedMediaTypes();
        // Flatten as width,height pairs sequentially.
        jintArray arr = env->NewIntArray((jsize)(mts.size() * 2));
        std::vector<jint> tmp;
        tmp.reserve(mts.size() * 2);
        for (auto &m : mts)
        {
            tmp.push_back((jint)m.width);
            tmp.push_back((jint)m.height);
        }
        env->SetIntArrayRegion(arr, 0, (jsize)tmp.size(), tmp.data());
        return arr;
    }

    JNIEXPORT jboolean JNICALL Java_com_example_litecam_LiteCam_setResolution(JNIEnv *, jobject, jint handle, jint w, jint h)
    {
        Camera *cam = getCamera(handle);
        if (!cam)
            return JNI_FALSE;
        return cam->SetResolution(w, h) ? JNI_TRUE : JNI_FALSE;
    }

    JNIEXPORT jboolean JNICALL Java_com_example_litecam_LiteCam_captureFrame(JNIEnv *env, jobject, jint handle, jobject byteBuffer)
    {
        Camera *cam = getCamera(handle);
        if (!cam)
            return JNI_FALSE;
        FrameData frame = cam->CaptureFrame();
        if (!frame.rgbData)
            return JNI_FALSE;
        unsigned char *dst = (unsigned char *)env->GetDirectBufferAddress(byteBuffer);
        if (!dst)
        {
            ReleaseFrame(frame);
            return JNI_FALSE;
        }
        size_t expected = (size_t)(frame.width * frame.height * 3);
        memcpy(dst, frame.rgbData, expected < frame.size ? expected : frame.size);
        ReleaseFrame(frame);
        return JNI_TRUE;
    }

    JNIEXPORT jint JNICALL Java_com_example_litecam_LiteCam_getFrameWidth(JNIEnv *, jobject, jint handle)
    {
        Camera *cam = getCamera(handle);
        if (!cam)
            return 0;
        return (jint)cam->frameWidth;
    }
    JNIEXPORT jint JNICALL Java_com_example_litecam_LiteCam_getFrameHeight(JNIEnv *, jobject, jint handle)
    {
        Camera *cam = getCamera(handle);
        if (!cam)
            return 0;
        return (jint)cam->frameHeight;
    }

} // extern C
Step 2: Configure CMake to Build the JNI Shared Library
The following CMakeLists.txt file is used to build the JNI shared library:
cmake_minimum_required(VERSION 3.15)

# Project name and version
project(CameraProject VERSION 1.0 LANGUAGES CXX)

# Set C++ standard
set(CMAKE_CXX_STANDARD 17)
set(CMAKE_CXX_STANDARD_REQUIRED True)

# Build type
if(NOT CMAKE_BUILD_TYPE)
    set(CMAKE_BUILD_TYPE Release)
endif()


# Define include directories
set(INCLUDE_DIR ${CMAKE_SOURCE_DIR}/include)

# Platform detection
if(WIN32)
    set(PLATFORM_NAME "windows")
elseif(APPLE)
    set(PLATFORM_NAME "macos")
elseif(UNIX)
    set(PLATFORM_NAME "linux")
else()
    set(PLATFORM_NAME "unknown")
endif()

# Architecture detection
if(CMAKE_SIZEOF_VOID_P EQUAL 8)
    set(ARCH_NAME "x86_64")
else()
    set(ARCH_NAME "x86")
endif()

# Compiler-specific settings
if(MSVC)
    # Set runtime library for Windows
    if(CMAKE_BUILD_TYPE STREQUAL "Debug")
        set(CMAKE_MSVC_RUNTIME_LIBRARY "MultiThreadedDebug")
    else()
        set(CMAKE_MSVC_RUNTIME_LIBRARY "MultiThreaded")
    endif()

    # Enable parallel compilation
    add_compile_options(/MP)

    # Disable specific warnings
    add_compile_options(/wd4251 /wd4275)

    # Enable UTF-8 encoding
    add_compile_options(/utf-8)
endif()

# Define source files for the Camera library based on platform
if (WIN32)
    set(LIBRARY_SOURCES
        src/CameraWindows.cpp
        src/CameraPreviewWindows.cpp
    )
elseif (UNIX AND NOT APPLE)
    set(LIBRARY_SOURCES
        src/CameraLinux.cpp
        src/CameraPreviewLinux.cpp
    )
elseif (APPLE)
    # Support universal binaries on macOS
    set(CMAKE_OSX_ARCHITECTURES "x86_64;arm64")

    # Ensure that Objective-C++ source files are compiled as Objective-C++
    set(LIBRARY_SOURCES
        src/CameraMacOS.mm
        src/CameraPreviewMacOS.mm
    )
    set_source_files_properties(src/CameraMacOS.mm src/CameraPreviewMacOS.mm PROPERTIES COMPILE_FLAGS "-x objective-c++")

    # Set main.cpp to be treated as Objective-C++ for macOS
    set_source_files_properties(src/main.cpp PROPERTIES COMPILE_FLAGS "-x objective-c++")

endif()

# Add JNI wrapper source (common for all platforms)
list(APPEND LIBRARY_SOURCES
    src/LiteCamJNI.cpp
)

# Define source files for the executable
set(EXECUTABLE_SOURCES
    src/main.cpp
)

# Add the Camera shared library
add_library(litecam SHARED ${LIBRARY_SOURCES})

# Set library properties
set_target_properties(litecam PROPERTIES
    VERSION ${PROJECT_VERSION}
    SOVERSION ${PROJECT_VERSION_MAJOR}
    OUTPUT_NAME "litecam"
)

# Platform-specific library naming
if(WIN32)
    set_target_properties(litecam PROPERTIES
        PREFIX ""
        SUFFIX ".dll"
    )
elseif(APPLE)
    set_target_properties(litecam PROPERTIES
        PREFIX "lib"
        SUFFIX ".dylib"
    )
else()
    set_target_properties(litecam PROPERTIES
        PREFIX "lib"
        SUFFIX ".so"
    )
endif()

# Set include directories for the Camera library
target_include_directories(litecam PUBLIC
    $<BUILD_INTERFACE:${INCLUDE_DIR}>
    $<INSTALL_INTERFACE:include>
)

# Define the CAMERA_EXPORTS macro for the shared library
target_compile_definitions(litecam PRIVATE
    CAMERA_EXPORTS
    LITECAM_VERSION_MAJOR=${PROJECT_VERSION_MAJOR}
    LITECAM_VERSION_MINOR=${PROJECT_VERSION_MINOR}
    LITECAM_VERSION_PATCH=${PROJECT_VERSION_PATCH}
)

# Platform-specific dependencies for the Camera library
if (UNIX AND NOT APPLE)
    # Linux dependencies
    find_package(X11 REQUIRED)
    find_package(PkgConfig REQUIRED)

    # Check for Video4Linux2
    pkg_check_modules(V4L2 libv4l2)

    if (X11_FOUND)
        target_include_directories(litecam PUBLIC ${X11_INCLUDE_DIR})
        target_link_libraries(litecam PRIVATE ${X11_LIBRARIES} pthread)
    endif()

    if (V4L2_FOUND)
        target_include_directories(litecam PRIVATE ${V4L2_INCLUDE_DIRS})
        target_link_libraries(litecam PRIVATE ${V4L2_LIBRARIES})
    else()
        message(WARNING "Video4Linux2 not found - camera functionality may be limited")
    endif()

elseif (APPLE)
    # macOS dependencies
    find_library(COCOA_LIBRARY Cocoa REQUIRED)
    find_library(AVFOUNDATION_LIBRARY AVFoundation REQUIRED)
    find_library(COREMEDIA_LIBRARY CoreMedia REQUIRED)
    find_library(COREVIDEO_LIBRARY CoreVideo REQUIRED)
    find_library(OBJC_LIBRARY objc REQUIRED)

    target_link_libraries(litecam PRIVATE
        ${COCOA_LIBRARY}
        ${AVFOUNDATION_LIBRARY}
        ${COREMEDIA_LIBRARY}
        ${COREVIDEO_LIBRARY}
        ${OBJC_LIBRARY}
    )

elseif (WIN32)
    # Windows dependencies
    target_link_libraries(litecam PRIVATE
        ole32
        uuid
        mfplat
        mf
        mfreadwrite
        mfuuid
    )

endif()

# JNI support - enhanced detection
find_package(JNI)
if (JNI_FOUND)
    target_include_directories(litecam PRIVATE ${JNI_INCLUDE_DIRS})
    target_compile_definitions(litecam PRIVATE LITECAM_JNI_ENABLED)

    # Add JNI libraries on some platforms
    if(WIN32)
        # Windows doesn't typically need to link JNI libraries
    elseif(APPLE)
        # macOS typically has JNI in the framework
    else()
        # Linux might need explicit JNI library linking
        if(JNI_LIBRARIES)
            target_link_libraries(litecam PRIVATE ${JNI_LIBRARIES})
        endif()
    endif()
endif()

# Optional: Add position independent code for shared library
set_property(TARGET litecam PROPERTY POSITION_INDEPENDENT_CODE ON)

# Add the camera_capture executable
add_executable(camera_capture ${EXECUTABLE_SOURCES})

# Set executable properties
set_target_properties(camera_capture PROPERTIES
    OUTPUT_NAME "camera_capture"
)

# Link the Camera library to the executable
target_link_libraries(camera_capture PRIVATE litecam)

# Include the shared library's headers in the executable
target_include_directories(camera_capture PRIVATE ${INCLUDE_DIR})

# For macOS, link against the frameworks for the executable too
if (APPLE)
    target_link_libraries(camera_capture PRIVATE
        ${COCOA_LIBRARY}
        ${AVFOUNDATION_LIBRARY}
        ${COREMEDIA_LIBRARY}
        ${COREVIDEO_LIBRARY}
        ${OBJC_LIBRARY}
    )
endif()

# Installation rules (optional)
install(TARGETS litecam camera_capture
    EXPORT CameraProjectTargets
    LIBRARY DESTINATION lib
    ARCHIVE DESTINATION lib
    RUNTIME DESTINATION bin
    INCLUDES DESTINATION include
)

install(DIRECTORY ${INCLUDE_DIR}/
    DESTINATION include
    FILES_MATCHING PATTERN "*.h"
)

# Export targets for find_package support
install(EXPORT CameraProjectTargets
    FILE CameraProjectTargets.cmake
    NAMESPACE CameraProject::
    DESTINATION lib/cmake/CameraProject
)

# Generate and install package config files
include(CMakePackageConfigHelpers)

configure_package_config_file(
    "${CMAKE_CURRENT_SOURCE_DIR}/cmake/CameraProjectConfig.cmake.in"
    "${CMAKE_CURRENT_BINARY_DIR}/CameraProjectConfig.cmake"
    INSTALL_DESTINATION lib/cmake/CameraProject
)

write_basic_package_version_file(
    "${CMAKE_CURRENT_BINARY_DIR}/CameraProjectConfigVersion.cmake"
    VERSION ${PROJECT_VERSION}
    COMPATIBILITY SameMajorVersion
)
Step 3: Expose the Camera API to Java via JNI
package com.example.litecam;

import java.nio.ByteBuffer;
import java.util.ArrayList;
import java.util.List;

public class LiteCam implements AutoCloseable {
    static {
        boolean loaded = false;
        try {
            loaded = loadBundled();
        } catch (Throwable t) {
        }
        if (!loaded) {
            System.loadLibrary("litecam");
        }
    }

    private static boolean loadBundled() throws Exception {
        String os = System.getProperty("os.name").toLowerCase();
        String arch = System.getProperty("os.arch").toLowerCase();
        String osToken;
        if (os.contains("win")) osToken = "windows"; else if (os.contains("mac") || os.contains("darwin")) osToken = "macos"; else if (os.contains("nux") || os.contains("linux")) osToken = "linux"; else return false;
        String archToken;
        if (arch.contains("aarch64") || arch.contains("arm64")) archToken = "arm64"; else if (arch.contains("64")) archToken = "x86_64"; else archToken = arch; // fallback

        String libBase = "litecam";
        String ext = osToken.equals("windows") ? ".dll" : (osToken.equals("macos") ? ".dylib" : ".so");
        String resourcePath = "/natives/" + osToken + "-" + archToken + "/" + (osToken.equals("windows") ? libBase + ext : "lib" + libBase + ext);
        try (java.io.InputStream in = LiteCam.class.getResourceAsStream(resourcePath)) {
            if (in == null) return false;
            java.nio.file.Path tempFile = java.nio.file.Files.createTempFile(libBase + "-", ext);
            try (java.io.OutputStream out = java.nio.file.Files.newOutputStream(tempFile)) {
                byte[] buf = new byte[8192]; int r; while ((r = in.read(buf)) != -1) out.write(buf, 0, r);
            }
            tempFile.toFile().deleteOnExit();
            System.load(tempFile.toAbsolutePath().toString());
            return true;
        }
    }

    private int handle = 0;

    // Native methods
    public static native String[] listDevices();
    private native int open(int deviceIndex);
    private native void nativeClose(int handle);
    public native int[] listSupportedResolutions(int handle);
    public native boolean setResolution(int handle, int width, int height);
    public native boolean captureFrame(int handle, ByteBuffer rgbOut);
    public native int getFrameWidth(int handle);
    public native int getFrameHeight(int handle);

    public void openDevice(int index) {
        if (handle != 0) throw new IllegalStateException("Already opened");
        handle = open(index);
        if (handle == 0) throw new RuntimeException("Failed to open camera index " + index);
    }

    public void closeDevice() {
        if (handle != 0) {
        nativeClose(handle);
            handle = 0;
        }
    }

    @Override
    public void close() { closeDevice(); }

    public List<int[]> getSupportedResolutions() {
        int[] flat = listSupportedResolutions(handle);
        List<int[]> list = new ArrayList<>();
        if (flat != null) {
            for (int i=0;i+1<flat.length;i+=2) {
                list.add(new int[]{flat[i], flat[i+1]});
            }
        }
        return list;
    }

    public boolean setResolution(int w, int h) { return setResolution(handle, w, h); }

    public int getWidth() { return getFrameWidth(handle); }
    public int getHeight() { return getFrameHeight(handle); }

    public boolean grabFrame(ByteBuffer dst) { return captureFrame(handle, dst); }

    public boolean isOpen() { return handle != 0; }
}
Step 4: Package the Native Library and Java Classes into a JAR
- Build native library with CMake:
mkdir build cd build cmake .. -DCMAKE_BUILD_TYPE=Release cmake --build . --config Release -
Compile Java sources:
cd .. javac -d build -h include java-src/com/example/litecam/*.java -
Create JAR with native library:
 jar cf litecam.jar -C build com
 jar uf litecam.jar build/litecam.dll # or .dylib on macOS, .so on Linux
Integrate Barcode Scanning into the Java Application
The following code snippet demonstrates the basic usage of LiteCam, ZXing, and Dynamsoft Barcode Reader APIs.
Capture Frames with LiteCam
LiteCam cam = new LiteCam();

String[] devices = LiteCam.listDevices();
for (int i = 0; i < devices.length; i++) {
    System.out.println(i + ": " + devices[i]);
}

cam.openDevice(0);

cam.setResolution(640, 480);

ByteBuffer buffer = ByteBuffer.allocateDirect(640 * 480 * 3);
if (cam.grabFrame(buffer)) {
    byte[] frameData = new byte[buffer.remaining()];
    buffer.get(frameData);
}

cam.close();
Decode Barcodes with ZXing
import com.google.zxing.*;
import com.google.zxing.client.j2se.BufferedImageLuminanceSource;
import com.google.zxing.common.HybridBinarizer;
import com.google.zxing.multi.GenericMultipleBarcodeReader;

public class ZXingDetector {
    private MultiFormatReader reader;
    private GenericMultipleBarcodeReader multiReader;

    public void initialize() {
        reader = new MultiFormatReader();
        multiReader = new GenericMultipleBarcodeReader(reader);
    }

    public List<Result> detectBarcodes(BufferedImage image) {
        List<Result> results = new ArrayList<>();

        try {
            LuminanceSource source = new BufferedImageLuminanceSource(image);
            BinaryBitmap bitmap = new BinaryBitmap(new HybridBinarizer(source));

            try {
                Result[] multiResults = multiReader.decodeMultiple(bitmap);
                results.addAll(Arrays.asList(multiResults));
            } catch (NotFoundException e) {
                try {
                    Result singleResult = reader.decode(bitmap);
                    results.add(singleResult);
                } catch (NotFoundException ignored) {
                }
            }
        } catch (Exception e) {
            logger.debug("ZXing detection failed: {}", e.getMessage());
        }

        return results;
    }
}
Decode Barcodes with Dynamsoft Barcode Reader
Start your 30-day free trial to get a license key before running this code.
import com.dynamsoft.dbr.*;
import com.dynamsoft.core.basic_structures.ImageData;

public class DynamsoftDetector {
    private CaptureVisionRouter cvRouter;

    public void initialize() throws Exception {
        LicenseManager.initLicense("LICENSE-KEY");

        cvRouter = new CaptureVisionRouter();
    }

    public List<BarcodeResultItem> detectBarcodes(BufferedImage image) {
        List<BarcodeResultItem> results = new ArrayList<>();

        try {
            ImageData imageData = createImageData(image);

            CapturedResult result = cvRouter.capture(imageData,
                EnumPresetTemplate.PT_READ_BARCODES);

            DecodedBarcodesResult barcodeResult = result.getDecodedBarcodesResult();
            if (barcodeResult != null) {
                BarcodeResultItem[] items = barcodeResult.getItems();
                if (items != null) {
                    results.addAll(Arrays.asList(items));
                }
            }
        } catch (Exception e) {
            logger.error("Dynamsoft detection failed: {}", e.getMessage());
        }

        return results;
    }

    private ImageData createImageData(BufferedImage image) {
    }
}
Common Issues & Edge Cases
- Native library not found at runtime: If
System.loadLibrary("litecam")fails, confirm the.dll/.so/.dylibis either onjava.library.pathor bundled undernatives/<os>-<arch>/inside the JAR. On Linux, also verifylibv4l-devandlibx11-devare installed before building. - Camera opens but
grabFramealways returns false: This typically means the frame buffer size passed toByteBuffer.allocateDirectdoes not match the actual resolution reported bygetWidth()/getHeight()aftersetResolution(). Always query width and height after setting resolution before allocating the buffer. - ZXing misses barcodes that Dynamsoft decodes: ZXing uses a single-pass binarization strategy (
HybridBinarizer) and struggles with low-contrast, tilted, or partially obscured codes. Switching to Dynamsoft Barcode Reader’sPT_READ_BARCODESpreset resolves most of these cases without additional configuration. initLicenseblocks or times out: Dynamsoft license validation requires an outbound HTTPS connection on first use. In air-gapped environments, request an offline license from Dynamsoft support.