How to Build an Expo Barcode Scanner
In the previous article, we demonstrated how to build a React Native QR code scanner using Vision Camera and the Dynamsoft Barcode Reader frame processor plugin. In this article, we are going to talk about how to build a barcode scanner using Expo.
Expo is an open-source platform for making universal native apps for Android, iOS, and the web with JavaScript and React. It is basically a set of tools built on top of React Native, which makes it easy to develop and distribute apps.
PS: The article uses bare React Native projects. If you need to use Expo in managed workflow, check out this article: How to Start a QR Code Scanner in React Native WebView
Build an Expo Barcode Scanner
Let’s do this in steps.
New Project
Install the Expo cli tool:
npm i -g expo-cli
Create a new project:
npx create-expo-app expo-barcode-scanner
Add Dependencies
-
Install React Native Vision Camera
expo install react-native-vision-camera -
Install React Native Reanimated to enable Frame Processor
expo install react-native-reanimated -
Install the Dynamsoft Barcode Reader Frame Processor plugin
expo install vision-camera-dynamsoft-barcode-readerWe also have to update the
babel.config.jsto register the plugin.module.exports = function(api) { api.cache(true); return { presets: ['babel-preset-expo'], + plugins: [ + [ + 'react-native-reanimated/plugin', + { + globals: ['__decode'], + }, + ], + ], }; }; -
Install react-native-svg to draw barcode overlays
expo install react-native-svg -
Install react-native-safe-area-context to provide the
SafeAreaViewcomponentexpo install react-native-safe-area-context
Add Camera Permission
Add the following to app.json to add camera permission.
"plugins": [
  [
    "react-native-vision-camera",
    {
      "cameraPermissionText": "$(PRODUCT_NAME) needs access to your Camera."
    }
  ]
]
Build the Project
We can then run expo prebuild to generate the native projects for Android and iOS.
Then we can open Android Studio or Xcode to build and run the project.
We can run the following to open the metro bundler in an Expo project as well.
npx react-native start
Expo also provides a service called EAS, which is a hosted service for building app binaries for your Expo and React Native projects. Using EAS, we can build and publish the app without having an Android or iOS development environment on our own devices.
We can run the following command to use the EAS service:
eas build
Make the App Work as a Barcode Scanner
Next, let’s modify the app to make it work as a barcode scanner.
Add the Camera Component
Replace App.js with the following content. After we start the app, we can see the camera preview taking up the whole screen.
export default function App() {
  const [hasPermission, setHasPermission] = React.useState(false);
  const devices = useCameraDevices();
  const device = devices.back;

  React.useEffect(() => {
    (async () => {
      const status = await Camera.requestCameraPermission();
      setHasPermission(status === 'authorized');
    })();
  }, []);

  return (
    <SafeAreaView style={styles.container}>
      {device != null &&
      hasPermission && (
      <>
          <Camera
          style={StyleSheet.absoluteFill}
          device={device}
          isActive={true}
          />
          ))}
      </>)}
    </SafeAreaView>
  );
}

const styles = StyleSheet.create({
  container: {
    flex:1,
  },
});
Enable Barcode Reading
We can use the frame processor feature of Vision Camera to enable barcode reading.
-
Define the frame processor function:
import * as REA from 'react-native-reanimated';

const [barcodeResults, setBarcodeResults] = React.useState([]);
const frameProcessor = useFrameProcessor((frame) => {
    'worklet'
    const config = {};
    config.rotateImage = true;
    const results = decode(frame,config)
    REA.runOnJS(setBarcodeResults)(results);
  }, [])
The function will try to read barcodes from the camera frame and then update the
barcodeResultsstate. -
Set the frame processor for the camera component.
<Camera style={StyleSheet.absoluteFill} device={device} isActive={true} + frameProcessor={frameProcessor} + frameProcessorFps={5} /> -
Display the barcode results using
Textcomponent.{barcodeResults.map((barcode, idx) => ( <Text key={idx} style={styles.barcodeText}> {barcode.barcodeFormat +": "+ barcode.barcodeText} </Text> ))}
Draw Barcode Overlays using SVG
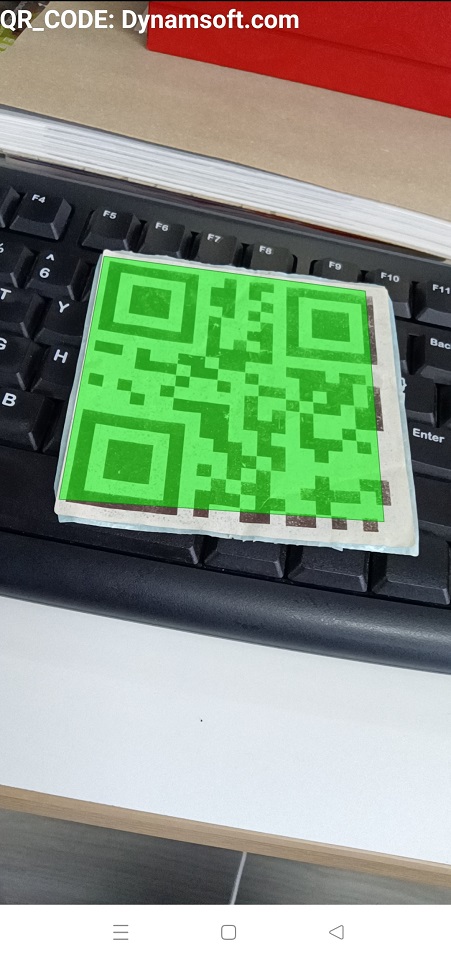
We can highlight the detected barcodes using SVG.
-
Add the SVG component with Polygon elements.
<Svg style={[StyleSheet.absoluteFill]} viewBox={getViewBox()} preserveAspectRatio="xMidYMid slice"> {barcodeResults.map((barcode, idx) => ( <Polygon key={idx} points={getPointsData(barcode)} fill="lime" stroke="green" opacity="0.5" strokeWidth="1" /> ))} </Svg> -
Add two states
frameWidthandframeHeight. We can get the values from the frame processor.const [frameWidth, setFrameWidth] = React.useState(720); const [frameHeight, setFrameHeight] = React.useState(1280); const frameProcessor = useFrameProcessor((frame) => { 'worklet' //... REA.runOnJS(setFrameWidth)(frame.width); REA.runOnJS(setFrameHeight)(frame.height); }, []) -
We can get the
viewBoxattribute based onframeWidthandframeHeight. For Android, because the image sensor’s direction is landscape, we need to switch the width and height if the device is portrait.const getViewBox = () => { const frameSize = getFrameSize(); const viewBox = "0 0 "+frameSize[0]+" "+frameSize[1]; return viewBox; } const getFrameSize = () => { let width, height; if (Platform.OS === 'android') { if (frameWidth>frameHeight && Dimensions.get('window').width>Dimensions.get('window').height){ width = frameWidth; height = frameHeight; }else { console.log("Has rotation"); width = frameHeight; height = frameWidth; } } else { width = frameWidth; height = frameHeight; } return [width, height]; } -
Get the point attribute for the polygons based on the barcode location info.
const getPointsData = (lr) => {
  let pointsData = lr.x1 + "," + lr.y1 + " ";
  pointsData = pointsData+lr.x2 + "," + lr.y2 +" ";
  pointsData = pointsData+lr.x3 + "," + lr.y3 +" ";
  pointsData = pointsData+lr.x4 + "," + lr.y4;
  return pointsData;
}
All right, we’ve now finished the barcode scanner. Here is a screenshot of the result.

Source Code
Here is the link to the Expo barcode scanner demo:
https://github.com/tony-xlh/expo-barcode-scanner
Disclaimer:
The wrappers and sample code on Dynamsoft Codepool are community editions, shared as-is and not fully tested. Dynamsoft is happy to provide technical support for users exploring these solutions but makes no guarantees.


