


Build a Python Desktop App for Barcode, MRZ, and Document Scanning with AI-Assisted Development
AI agents are transforming software development by empowering developers to build complex applications through iterative development, debugging, and optimization. These agents can analyze requirements, propose architectures, generate code, and even troubleshoot issues—dramatically accelerating the development lifecycle.
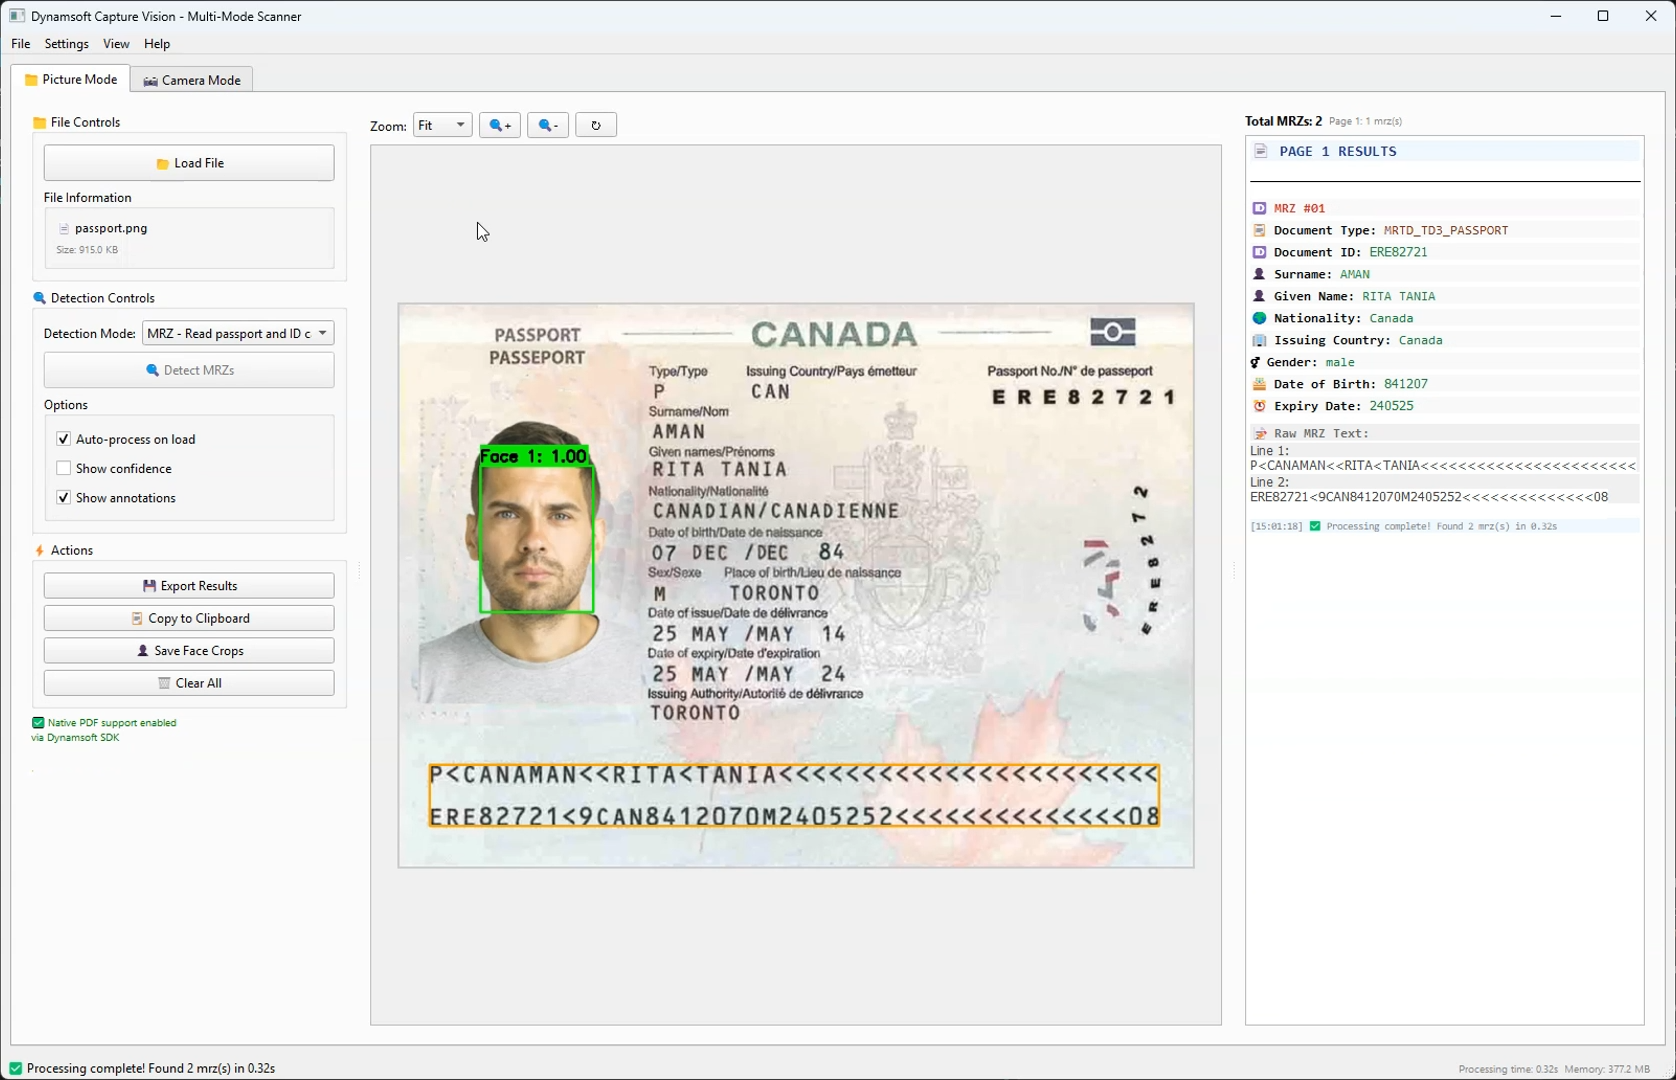
In this tutorial, we’ll explore how to leverage Claude Sonnet 4 to build a sophisticated desktop GUI application from scratch using the Dynamsoft Capture Vision SDK. The result will be a multi-modal computer vision application capable of detecting barcodes/QR codes, normalizing documents, and extracting Machine Readable Zones (MRZ) from passports and ID cards.
What you’ll build: A Python PySide6 desktop application that uses the Dynamsoft Capture Vision SDK to scan barcodes, normalize documents, and extract MRZ data from passports and ID cards — built iteratively with an AI coding agent.
Key Takeaways
- AI-assisted development with Claude Sonnet 4 can generate, debug, and optimize a production-ready Python desktop app end-to-end in iterative cycles.
- The Dynamsoft Capture Vision SDK provides a unified API for barcode/QR code reading, document normalization, and MRZ extraction — eliminating the need to integrate multiple separate libraries.
- Multi-threading via
QThreadis essential when integrating heavy vision processing into a Qt GUI to prevent UI blocking. - This pattern applies to any enterprise use case requiring real-time document capture, identity verification, or barcode inventory scanning on the desktop.
Common Developer Questions
- How do I build a Python desktop app that scans barcodes and reads passport MRZ data?
- How do I integrate the Dynamsoft Capture Vision SDK with PySide6 for real-time camera processing?
- How do I prevent the UI from freezing when running barcode or MRZ detection in Python Qt?
Watch the App in Action
Prerequisites
- 30-day trial license for Dynamsoft Capture Vision
-
Python dependencies:
  dynamsoft-capture-vision-bundle>=2.0.20
  PySide6>=6.5.0
  opencv-python>=4.8.0
  Pillow>=10.0.0
  numpy>=1.24.0
  facenet-pytorch>=2.5.0
  torch>=1.11.0
  torchvision>=0.12.0
  psutil>=5.9.0
What This App Includes
What We Built
A comprehensive desktop application featuring:
- Dual-mode interface: Picture processing and real-time camera capture
- Multi-detection capabilities: Barcodes/QR codes, document normalization, and MRZ reading
- Advanced UI: Tabbed interface with zoom controls, annotation overlays, and export functionality
- Face detection: Integrated MTCNN for passport/ID processing
Technology Stack
- Python 3.11+
- PySide6 (Qt6) for modern GUI
- Dynamsoft Capture Vision SDK (The powerhouse behind all detection)
- facenet-pytorch for face detection
Why Dynamsoft Capture Vision SDK Powers Every Detection Mode
The Dynamsoft Capture Vision SDK is the cornerstone of our application, providing enterprise-grade computer vision capabilities that would be extremely difficult to implement from scratch. Here’s why it was the perfect choice:
- Barcode/QR Code Reading: Supports 1D, 2D, and postal codes
- Document Detection: Advanced edge detection and perspective correction
- MRZ Processing: Specialized OCR for Machine Readable Zones with field validation
- Unified API: Single SDK handles multiple detection types seamlessly
- Cross-platform: Consistent performance across Windows, Linux, and macOS
- Flexible Templates: Pre-configured detection templates for common scenarios
- Intermediate Results: Access to detection pipeline stages for custom processing
- Extensive Customization: Fine-tune detection parameters for specific use cases
How AI-Assisted Development Works
The Iterative Approach
Our development process followed a systematic AI-assisted methodology:
graph TD
    A[Initial Requirements] --> B[AI Analysis & Planning]
    B --> C[Code Generation]
    C --> D[Testing & Validation]
    D --> E[Issue Identification]
    E --> F[AI Debugging & Fix]
    F --> G[Verification]
    G --> H{More Issues?}
    H -->|Yes| E
    H -->|No| I[Feature Enhancement]
    I --> J[Optimization]
    J --> K[Final Validation]
AI Agent Collaboration Pattern
- Requirement Analysis: AI breaks down complex requirements into manageable components
- Architecture Design: AI suggests optimal design patterns and project structure
- Code Generation: AI writes initial implementations with proper error handling
- Debugging Partnership: Human identifies issues, AI diagnoses and provides solutions
- Optimization Cycles: AI suggests performance improvements and best practices
Define Requirements and Design the Architecture
User Requirements
"I want a desktop application that can:
- Detect barcodes and QR codes from images and camera
- Process documents (scan and normalize)
- Read passport/ID card information (MRZ)
- Have a modern, user-friendly interface
- Support both file upload and real-time camera processing"
AI’s Initial Architecture Analysis
The AI agent analyzed these requirements and proposed:
# Core Architecture Components
class BarcodeReaderMainWindow(QMainWindow):
    """Main application window with tabbed interface"""

class CameraWidget(QWidget):
    """Real-time camera capture and processing"""

class ImageDisplayWidget(QLabel):
    """Image display with zoom and annotation capabilities"""

class ProcessingWorker(QThread):
    """Background processing to keep UI responsive"""

class MyIntermediateResultReceiver(IntermediateResultReceiver):
    """SDK integration for advanced processing"""
Build the Application Iteratively
Phase 1: Set Up the Basic GUI Structure
AI’s First Implementation:
def setup_ui(self):
    """Setup the main user interface with tabbed layout."""
    central_widget = QWidget()
    self.setCentralWidget(central_widget)

    # Main layout
    main_layout = QVBoxLayout(central_widget)

    # Create tab widget
    self.tab_widget = QTabWidget()
    main_layout.addWidget(self.tab_widget)

    # Create tabs
    self.picture_tab = self.create_picture_mode_tab()
    self.camera_tab = self.create_camera_mode_tab()

    self.tab_widget.addTab(self.picture_tab, "📁 Picture Mode")
    self.tab_widget.addTab(self.camera_tab, "📷 Camera Mode")
Key AI Decisions:
- Tabbed interface for clear mode separation
- Responsive layout with proper widget sizing
- Consistent styling and iconography
Phase 2: Integrate the Dynamsoft Capture Vision SDK
Challenge: Complex Dynamsoft SDK integration
AI Solution: Proper license management and error handling
def initialize_license_once():
    """Initialize Dynamsoft license globally, only once."""
    global _LICENSE_INITIALIZED
    if not _LICENSE_INITIALIZED:
        try:
            error_code, error_message = LicenseManager.init_license(LICENSE_KEY)
            if error_code == EnumErrorCode.EC_OK or error_code == EnumErrorCode.EC_LICENSE_CACHE_USED:
                _LICENSE_INITIALIZED = True
                print("✅ Dynamsoft license initialized successfully!")
                return True
            else:
                print(f"❌ License initialization failed: {error_code}, {error_message}")
                return False
        except Exception as e:
            print(f"❌ Error initializing license: {e}")
            return False
    return True
Phase 3: Add Real-Time Camera Processing
Challenge: Real-time camera processing with Qt integration
AI Approach: Hybrid OpenCV/Qt solution
def update_frame(self):
    """Update camera frame display with real-time results fetching."""
    if not self.camera_running or not self.opencv_capture:
        return

    try:
        ret, frame = self.opencv_capture.read()
        if not ret:
            return

        # Store the raw frame for detection processing
        with QMutexLocker(self.frame_mutex):
            self.current_frame = frame.copy()

        # Send frame for detection if enabled
        if self.detection_enabled and self.frame_fetcher:
            try:
                image_data = convertMat2ImageData(frame)
                self.frame_fetcher.add_frame(image_data)
            except Exception as e:
                pass  # Silently ignore frame processing errors

        # Process and display results
        self.display_annotated_frame(frame)

    except Exception as e:
        pass  # Silently ignore frame update errors
Solve Key Technical Challenges
Challenge 1: Directory Tracking for User Experience
Problem: File dialogs always opening in current directory
AI Enhancement: Persistent directory tracking
def update_last_used_directory(self, file_path):
    """Update the last used directory from a file path."""
    if file_path:
        directory = os.path.dirname(os.path.abspath(file_path))
        self.last_used_directory = directory
        print(f"📁 Updated last used directory to: {directory}")

def get_last_used_directory(self):
    """Get the last used directory, or current directory if none."""
    return self.last_used_directory if self.last_used_directory else os.getcwd()
Challenge 2: Use Multi-Threading to Keep the UI Responsive
Problem: Heavy processing blocking the UI
AI Solution: QThread-based background processing
class ProcessingWorker(QThread):
    """Worker thread for detection processing to keep UI responsive."""

    # Define signals
    finished = Signal(object)  # Processing results
    error = Signal(str)        # Error message
    progress = Signal(str)     # Progress message

    def run(self):
        """Run detection in background thread."""
        try:
            mode_name = self.detection_mode.split(" - ")[0] if " - " in self.detection_mode else self.detection_mode
            self.progress.emit(f"🔍 Starting {mode_name} detection...")

            # Get the appropriate template for the detection mode
            template = DETECTION_MODES[mode_name]["template"]
            results = self.cvr_instance.capture_multi_pages(self.file_path, template)

            self.finished.emit(results)

        except Exception as e:
            self.error.emit(str(e))
Challenge 3: Handle Multiple Detection Result Types Uniformly
Problem: Different result types for different detection modes
AI Approach: Unified result processing pipeline
def on_processing_finished(self, results):
    """Handle completion of detection processing."""
    try:
        # Get current detection mode
        current_mode_text = self.picture_detection_mode_combo.currentText()
        mode_name = current_mode_text.split(" - ")[0]

        result_list = results.get_results()

        # Build the page mapping from results to maintain correct order
        for i, result in enumerate(result_list):
            if result.get_error_code() == EnumErrorCode.EC_OK:
                # Extract items based on detection mode
                items = []
                if mode_name == "Barcode":
                    items = result.get_items()
                elif mode_name == "Document":
                    processed_doc_result = result.get_processed_document_result()
                    if processed_doc_result:
                        items = processed_doc_result.get_deskewed_image_result_items()
                elif mode_name == "MRZ":
                    # Handle both text lines and parsed results
                    line_result = result.get_recognized_text_lines_result()
                    if line_result:
                        items.extend(line_result.get_items())

                    parsed_result = result.get_parsed_result()
                    if parsed_result:
                        items.extend(parsed_result.get_items())

                # Store results for display
                self.page_results[i] = items
Apply Design Patterns for Maintainable Code
1. Model-View-Controller (MVC) Pattern
# Model: Data handling and SDK integration
class DataManager:
    def __init__(self):
        self.cvr_instance = CaptureVisionRouter()
        self.current_pages = {}
        self.detection_results = {}

# View: UI components
class BarcodeReaderMainWindow(QMainWindow):  # Main view
class CameraWidget(QWidget):                 # Camera view
class ImageDisplayWidget(QLabel):           # Image display view

# Controller: Business logic and event handling
def process_current_file(self):             # File processing controller
def on_detection_mode_changed(self):       # Mode switching controller
2. Observer Pattern for Real-time Updates
class CameraWidget(QWidget):
    # Signals for loose coupling
    barcodes_detected = Signal(list)
    frame_processed = Signal(object)
    error_occurred = Signal(str)

    def update_frame(self):
        # Emit signals for observers
        if latest_items:
            self.barcodes_detected.emit(latest_items)

        self.frame_processed.emit(display_frame)
3. Factory Pattern for Detection Modes
DETECTION_MODES = {
    "Barcode": {
        "template": EnumPresetTemplate.PT_READ_BARCODES.value,
        "description": "Detect barcodes and QR codes"
    },
    "Document": {
        "template": EnumPresetTemplate.PT_DETECT_AND_NORMALIZE_DOCUMENT.value,
        "description": "Detect and normalize documents"
    },
    "MRZ": {
        "template": "ReadPassportAndId",
        "description": "Read passport and ID cards (MRZ)"
    }
}
4. Strategy Pattern for Export Formats
class ExportStrategy:
    def export(self, data, file_path):
        raise NotImplementedError

class TextExporter(ExportStrategy):
    def export(self, data, file_path):
        # Text export implementation
        pass

class CSVExporter(ExportStrategy):
    def export(self, data, file_path):
        # CSV export implementation
        pass

class JSONExporter(ExportStrategy):
    def export(self, data, file_path):
        # JSON export implementation
        pass
Optimize Performance
Memory Management
def cleanup_old_barcode_colors():
    """Remove barcode colors for barcodes not seen recently."""
    current_time = time.time()
    expired_barcodes = []

    for barcode_text, last_seen in BARCODE_LAST_SEEN.items():
        if current_time - last_seen > 10:  # Remove after 10 seconds
            expired_barcodes.append(barcode_text)

    for barcode_text in expired_barcodes:
        BARCODE_COLORS.pop(barcode_text, None)
        BARCODE_LAST_SEEN.pop(barcode_text, None)
Efficient Frame Processing
def update_frame(self):
    """Optimized frame processing with minimal allocations."""
    if not self.camera_running or not self.opencv_capture:
        return

    try:
        ret, frame = self.opencv_capture.read()
        if not ret:
            return

        # Efficient frame copying with mutex protection
        with QMutexLocker(self.frame_mutex):
            self.current_frame = frame.copy()

        # Non-blocking detection processing
        if self.detection_enabled and self.frame_fetcher:
            try:
                image_data = convertMat2ImageData(frame)
                self.frame_fetcher.add_frame(image_data)
            except Exception:
                pass  # Continue processing even if detection fails
Common Issues & Edge Cases
- License initialization fails silently: If
LicenseManager.init_license()returns a non-OK error code but the app continues, detection will fail with cryptic errors. Always checkEC_OKorEC_LICENSE_CACHE_USEDand surface a user-visible warning before proceeding. - Camera frame rate drops under load: Running MRZ or document normalization on every frame can saturate the CPU. Implement a frame-skip strategy (e.g., process every 3rd frame) or gate detection behind a confidence threshold to maintain smooth video display.
- MRZ parsing returns partial fields: Poorly lit or skewed ID cards may yield incomplete OCR results. Use the SDK’s intermediate result callbacks to inspect raw text lines and apply a retry with adjusted exposure or a manual region-of-interest crop before reporting failure to the user.
Run the Application
# Install dependencies
pip install -r requirements.txt

# Run the application
python main.py
Source Code
https://github.com/yushulx/python-barcode-qrcode-sdk/tree/main/examples/official/dcv