


Build a React Native Custom Barcode Scanner Overlay UI with Real-Time Contours — Dynamsoft SDK (2026)
Building a barcode scanner app is one thing, but creating an intuitive user experience with real-time visual feedback is what sets great apps apart from the rest. In this comprehensive tutorial, you’ll learn how to enhance the basic Dynamsoft React Native barcode scanner sample by adding dynamic visual overlays that highlight detected barcodes with detailed information and precise contours.
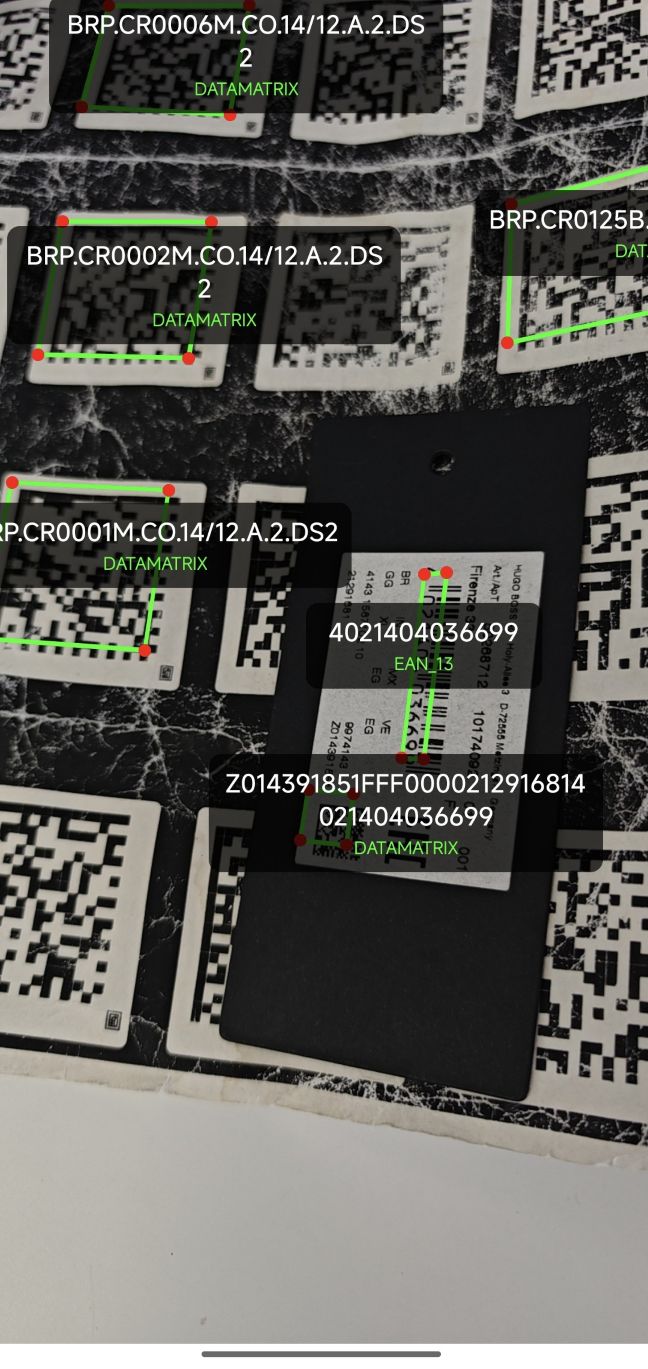
What you’ll build: A React Native barcode scanner app with real-time green contour overlays, red corner markers, and text callouts for every detected barcode — powered by the Dynamsoft Barcode Reader SDK on both Android and iOS.
Key Takeaways
- Dynamsoft Barcode Reader for React Native provides barcode corner coordinates that can be scaled directly to screen space without additional rotation in portrait mode.
- The
onDecodedBarcodesReceivedcallback deliverslocation.pointsfor each barcode, enabling precise contour rendering via React Native’s absolute-positionedViewcomponents. - Camera feed scaling uses
Math.max(scaleX, scaleY)with crop-offset compensation to ensure overlays align correctly regardless of device aspect ratio. - This pattern applies to any mobile scanning workflow where visual confirmation of barcode detection improves UX — retail, logistics, ticketing, and more.
Common Developer Questions
- How do I draw a box or contour around a detected barcode in React Native?
- How do I convert Dynamsoft barcode corner coordinates to screen pixel positions in React Native?
- Why are my barcode overlays misaligned with the camera preview on some devices?
Watch the Final Result: Real-Time Barcode Scanner Overlay in Action
Prerequisites
Before starting this tutorial, ensure you have:
- React Native development environment set up (React Native CLI setup guide)
- Dynamsoft Barcode Reader license - Get your 30-day free trial license
What You’ll See in the Final App
By the end of this tutorial, your barcode scanner will feature:
- Real-time text overlays showing barcode content and format
- Precise green contour lines outlining detected barcodes
- Red corner dots marking the four corners of each barcode
- Multi-barcode support with simultaneous detection and display
Step 1: Clone and Run the Base Dynamsoft Sample
First, clone the official Dynamsoft React Native samples repository:
git clone https://github.com/Dynamsoft/barcode-reader-react-native-samples.git
cd barcode-reader-react-native-samples/ScanBarcodes_FoundationalAPI
npm install
The base sample provides basic barcode detection with alert dialogs. We’ll transform it into a real-time overlay system.
Step 2: Understand How Camera Coordinates Map to Screen Space
Before implementing overlays, it’s important to understand how Dynamsoft handles camera coordinates.
Key Technical Points
- Fixed Camera Resolution: The
dynamsoft-barcode-reader-bundle-react-nativepackage uses a preset camera resolution - 1920x1080 by default. If your device doesn’t support this resolution, the SDK will automatically select the closest available one. - Portrait Mode Rotation: In portrait mode, barcode corner coordinates are already rotated 90 degrees. This results in:
- Portrait mode: Width = 1080px, Height = 1920px
- Landscape mode: Width = 1920px, Height = 1080px
- Coordinate Scaling: You only need to scale the coordinates to fit your screen dimensions. No additional rotation is required.
Step 3: Define the Overlay Data Structure
Define a TypeScript interface for the barcode overlay:
interface BarcodeOverlay {
  id: string;
  text: string;
  formatString: string;
  x: number;
  y: number;
  corners: Array<{ x: number, y: number }>;
}
This structure holds:
id: A unique identifier for each barcode overlaytext: The decoded barcode textformatString: The barcode format (e.g., QR Code, Code 128)xandy: The center point of the barcode for text placementcorners: The four corner points of the barcode for contour drawing
Step 4: Build the Barcode Contour Component
Create a reusable component to draw contours using the corner points:
const BarcodeContour: React.FC<{ corners: Array<{ x: number, y: number }> }> = ({ corners }) => {
  if (corners.length !== 4) return null;

  return (
    <>
      {corners.map((corner, index) => {
        const nextCorner = corners[(index + 1) % 4];
        const lineWidth = 3;

        const deltaX = nextCorner.x - corner.x;
        const deltaY = nextCorner.y - corner.y;
        const length = Math.sqrt(deltaX * deltaX + deltaY * deltaY);
        const angle = Math.atan2(deltaY, deltaX) * (180 / Math.PI);

        return (
          <View
            key={index}
            style={[
              styles.contourLine,
              {
                left: corner.x,
                top: corner.y - lineWidth / 2,
                width: length,
                height: lineWidth,
                transform: [{ rotate: `${angle}deg` }],
              },
            ]}
          />
        );
      })}

      {corners.map((corner, index) => (
        <View
          key={`dot-${index}`}
          style={[
            styles.cornerDot,
            {
              left: corner.x - 4,
              top: corner.y - 4,
            },
          ]}
        />
      ))}
    </>
  );
};
Step 5: Add State Management for Overlays
Update your main App component with state management:
function App(): React.JSX.Element {
  const cameraView = useRef<CameraView>(null!);
  const cvr = CaptureVisionRouter.getInstance();
  const camera = CameraEnhancer.getInstance();

  const [barcodeOverlays, setBarcodeOverlays] = useState<BarcodeOverlay[]>([]);
  const [cameraViewDimensions, setCameraViewDimensions] = useState<{ width: number, height: number } | null>(null);

  const clearTimeoutRef = useRef<NodeJS.Timeout | null>(null);

  const screenWidth = Dimensions.get('window').width;
  const screenHeight = Dimensions.get('window').height;

  // ... rest of component
}
Step 6: Transform Camera Coordinates to Screen Coordinates
This is the most critical part - accurately mapping camera coordinates to screen coordinates:
const receiver = cvr.addResultReceiver({
  onDecodedBarcodesReceived: ({ items }) => {
    if (items?.length) {
      const overlays: BarcodeOverlay[] = items.map((item, index) => {
        let cameraResolutionWidth = 1080;
        let cameraResolutionHeight = 1920;

        if (screenWidth > screenHeight) {
          cameraResolutionWidth = 1920;
          cameraResolutionHeight = 1080;
        }

        const scaleFactorX = (cameraViewDimensions?.width || screenWidth) / cameraResolutionWidth;
        const scaleFactorY = (cameraViewDimensions?.height || screenHeight) / cameraResolutionHeight;

        const scaleFactor = Math.max(scaleFactorX, scaleFactorY);

        const scaledCameraWidth = cameraResolutionWidth * scaleFactor;
        const scaledCameraHeight = cameraResolutionHeight * scaleFactor;

        const viewWidth = cameraViewDimensions?.width || screenWidth;
        const viewHeight = cameraViewDimensions?.height || screenHeight;
        const cropOffsetX = (scaledCameraWidth - viewWidth) / 2;
        const cropOffsetY = (scaledCameraHeight - viewHeight) / 2;

        const scaledCorners = item.location.points.map(point => ({
          x: (point.x * scaleFactor) - cropOffsetX,
          y: (point.y * scaleFactor) - cropOffsetY
        }));

        const centerX = scaledCorners.reduce((sum, point) => sum + point.x, 0) / 4;
        const centerY = scaledCorners.reduce((sum, point) => sum + point.y, 0) / 4;

        const stableId = `${item.text}-${item.formatString}-${Math.round(centerX / 10) * 10}-${Math.round(centerY / 10) * 10}`;

        return {
          id: stableId,
          text: item.text,
          formatString: item.formatString,
          x: centerX,
          y: centerY,
          corners: scaledCorners,
        };
      });

      setBarcodeOverlays(overlays);

      if (clearTimeoutRef.current) {
        clearTimeout(clearTimeoutRef.current);
      }

      clearTimeoutRef.current = setTimeout(() => {
        setBarcodeOverlays([]);
      }, 2000);
    }
  },
});
What This Logic Does
- Orientation Detection: Adjusts resolution based on portrait/landscape mode.
- Scale Factor Calculation: Maintains aspect ratio with
Math.max()to avoid distortion. - Crop Offset Compensation: Adjusts for the portion of camera feed that’s cropped due to aspect ratio differences
- Point Transformation: Scales and offsets each barcode corner for accurate overlay.
Step 7: Render the Overlays on the Camera Preview
Add the overlays to the render output:
return (
  <SafeAreaView style={StyleSheet.absoluteFill}>
    <CameraView
      style={StyleSheet.absoluteFill}
      ref={cameraView}
      onLayout={(event) => {
        const { width, height } = event.nativeEvent.layout;
        setCameraViewDimensions({ width, height });
      }}
    />

    {barcodeOverlays.map((overlay) => (
      <BarcodeContour key={`contour-${overlay.id}`} corners={overlay.corners} />
    ))}

    {barcodeOverlays.map((overlay) => (
      <View
        key={overlay.id}
        style={[
          styles.barcodeOverlay,
          {
            left: overlay.x - 75,
            top: overlay.y - 40,
          },
        ]}
      >
        <Text style={styles.barcodeText}>{overlay.text}</Text>
        <Text style={styles.formatText}>{overlay.formatString}</Text>
      </View>
    ))}
  </SafeAreaView>
);
Step 8: Style Your Overlays
Add the necessary styles for your overlays:
const styles = StyleSheet.create({
  barcodeOverlay: {
    position: 'absolute',
    backgroundColor: 'rgba(0, 0, 0, 0.7)',
    borderRadius: 8,
    padding: 8,
    alignItems: 'center',
    minWidth: 150,
    maxWidth: 250,
  },
  barcodeText: {
    color: 'white',
    fontSize: 14,
    fontWeight: 'bold',
    textAlign: 'center',
    marginBottom: 2,
  },
  formatText: {
    color: '#00FF00',
    fontSize: 10,
    textAlign: 'center',
  },
  contourLine: {
    position: 'absolute',
    backgroundColor: '#00FF00',
    transformOrigin: 'left center',
  },
  cornerDot: {
    position: 'absolute',
    width: 8,
    height: 8,
    borderRadius: 4,
    backgroundColor: '#FF0000',
  },
});
Step 9: Clean Up Resources on Unmount
Don’t forget to clean up resources in your useEffect cleanup:
return () => {
  sub.remove();
  stopScanning();
  cvr.removeResultReceiver(receiver);
  if (clearTimeoutRef.current) {
    clearTimeout(clearTimeoutRef.current);
  }
};
Common Issues & Edge Cases
- Overlays misaligned on tablets or wide-aspect devices: The crop-offset calculation assumes the camera preview fills the full view using
Math.maxscaling. If you constrain theCameraViewto a smaller region, pass its exactonLayoutdimensions rather than falling back toscreenWidth/screenHeight. - No overlays appear on iOS: Ensure camera permissions are granted in
Info.plist(NSCameraUsageDescription) and that the license is initialized beforestartScanning()is called. A missing or expired license silently prevents result callbacks. - Overlays flicker or lag on low-end Android devices: The 2-second
clearTimeoutapproach works well at 30 fps, but on slower devices consider debouncingsetBarcodeOverlaysupdates or reducing the number of simultaneously tracked barcodes by setting a max-results limit in theSimplifiedBarcodeReaderSettings.
Step 10: Run Your App on a Physical Device
Finally, run your app on a physical device:
npx react-native run-android
# or
npx react-native run-ios
