Ionic Document Scanner in React
In this article, we are going to create a mobile document scanning app using Ionic React. Ionic is a cross-platform framework for developing mobile apps with web technologies. An Ionic app can not only run as a web app in browsers but also run as a native app on Android and iOS.
The Dynamsoft Document Viewer SDK is used to provide a set of viewers for document scanning and the Dynamsoft Document Normalizer Capacitor plugin is used to detect the document boundaries.
Demo video:
An online demo running on netlify: link.
Build an Ionic Document Scanner
Let’s build the app in steps.
Overview of the App
It has several major interfaces:
-
The home page which lists the scanned images.


-
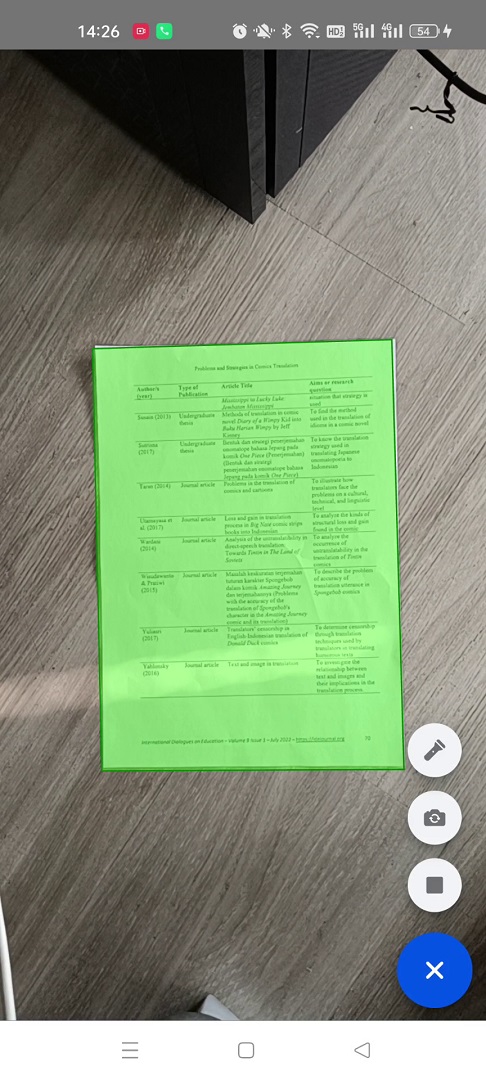
The scanner where the document is detected and automatically captured.

-
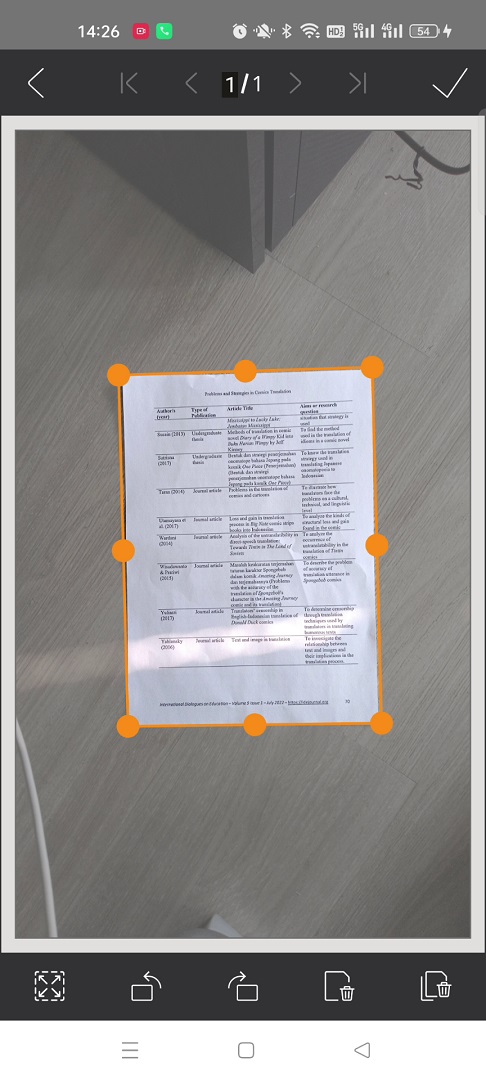
The cropper where we can adjust the detected polygon of the document.

-
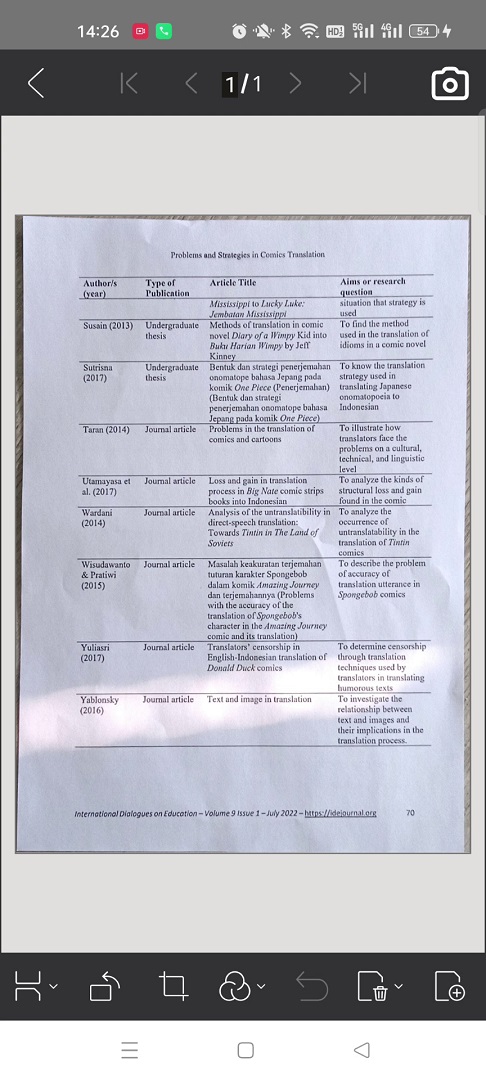
The editor where we can view and edit the scanned images.

New project
First, install Ionic according to its guide.
After installation, create a new project:
ionic start documentScanner blank --type react
We can run ionic serve to start a test server.
Install Dependencies
-
Install Dynamsoft Document Viewer
npm install dynamsoft-document-viewerUpdate the scripts in
package.jsonto copy the resources of Dynamsoft Document Viewer to the public folder. Remember to create the folder beforehand.-
Install ncp as a devDependency.
npm install ncp --save-dev -
Update
package.jsonto use ncp to copy the resources."scripts": { - "dev": "vite", - "build": "tsc && vite build", + "dev": "ncp node_modules/dynamsoft-document-viewer/dist public/assets/ddv-resources && vite", + "build": "ncp node_modules/dynamsoft-document-viewer/dist public/assets/ddv-resources && tsc && vite build", }
-
-
Install
capacitor-plugin-camerato open the camera.npm install capacitor-plugin-camera -
Install
capacitor-plugin-dynamsoft-document-normalizerto detect the documents.npm install capacitor-plugin-dynamsoft-document-normalizer -
Install
@capacitor/filesystemand@capacitor/shareto save the scanned document.npm install @capacitor/filesystem @capacitor/share
Create Components using Dynamsoft Document Viewer
Create DocumentBrowser.tsx, DocumentCropper.tsx and DocumentEditor.tsx respectively. They have a similar initialization login: create an instace of the viewer, bind it to a container, update its UI configuration and register related events.
They all have the docUid and groupUid props. We can specify them to open the document and sync changes across the viewers.
-
DocumentBrowser.tsx:import { useEffect, useRef } from 'react' import { DDV, BrowseViewer, UiConfig } from 'dynamsoft-document-viewer'; import "dynamsoft-document-viewer/dist/ddv.css"; import "./DocumentBrowser.css"; export interface DocumentBrowserProps { docUid:string; groupUid:string; show:boolean; } const DocumentBrowser: React.FC<DocumentBrowserProps> = (props:DocumentBrowserProps) => { const initializing = useRef(false); const browseViewer = useRef<BrowseViewer|undefined>(); useEffect(()=>{ if (initializing.current == false) { initializing.current = true; initBrowseViewer(); } browseViewer.current?.show(); return ()=>{ if (browseViewer.current) { browseViewer.current.hide(); } } },[]) useEffect(() => { if (browseViewer.current) { if (props.show) { browseViewer.current.show(); }else{ browseViewer.current.hide(); } window.dispatchEvent(new Event('resize')); } }, [props.show]); const initBrowseViewer = async () => { browseViewer.current = new DDV.BrowseViewer({ groupUid: props.groupUid, container: "browseViewer" }); browseViewer.current.openDocument(props.docUid); } return ( <div id="browseViewer"></div> ) }; export default DocumentBrowser; -
DocumentCropper.tsx:import { useEffect, useRef } from 'react' import { DDV, PerspectiveViewer, UiConfig } from 'dynamsoft-document-viewer'; import "dynamsoft-document-viewer/dist/ddv.css"; import "./DocumentCropper.css"; export interface DocumentCropperProps { docUid:string; groupUid:string; show:boolean; onInitialized?: (perspectiveViewer:PerspectiveViewer) => void; onBack?: () => void; } const DocumentCropper: React.FC<DocumentCropperProps> = (props:DocumentCropperProps) => { const initializing = useRef(false); const perspectiveViewer = useRef<PerspectiveViewer|undefined>(); useEffect(()=>{ if (initializing.current == false) { initializing.current = true; initPerspectiveViewer(); } perspectiveViewer.current?.show(); return ()=>{ if (perspectiveViewer.current) { perspectiveViewer.current.hide(); } } },[]) useEffect(() => { if (perspectiveViewer.current) { if (props.show) { perspectiveViewer.current.show(); }else{ perspectiveViewer.current.hide(); } window.dispatchEvent(new Event('resize')); } }, [props.show]); const initPerspectiveViewer = async () => { const uiConfig:UiConfig = { type: DDV.Elements.Layout, flexDirection: "column", children: [ { type: DDV.Elements.Layout, className: "ddv-perspective-viewer-header-mobile", children: [ { type: DDV.Elements.Button, className: "ddv-button-back", events:{ click: "back" } }, DDV.Elements.Pagination, { type: DDV.Elements.Button, className: "ddv-button-done", events:{ click: "apply" } }, ], }, DDV.Elements.MainView, { type: DDV.Elements.Layout, className: "ddv-perspective-viewer-footer-mobile", children: [ DDV.Elements.FullQuad, DDV.Elements.RotateLeft, DDV.Elements.RotateRight, DDV.Elements.DeleteCurrent, DDV.Elements.DeleteAll, ], }, ], }; perspectiveViewer.current = new DDV.PerspectiveViewer({ uiConfig: uiConfig, groupUid: props.groupUid, container: "perspectiveViewer" }); perspectiveViewer.current.on("back" as any,() => { if (props.onBack) { props.onBack(); } }); perspectiveViewer.current.on("apply" as any,() => { let quad = perspectiveViewer.current?.getQuadSelection(); if (quad) { perspectiveViewer.current?.applyPerspective(quad); } if (props.onBack) { props.onBack(); } }); perspectiveViewer.current.openDocument(props.docUid); perspectiveViewer.current.show(); if (props.onInitialized) { props.onInitialized(perspectiveViewer.current); } } return ( <div id="perspectiveViewer"></div> ) }; export default DocumentCropper; -
DocumentEditor.tsx:import { useEffect, useRef, useState } from 'react' import { DDV, EditViewer, UiConfig } from 'dynamsoft-document-viewer'; import "dynamsoft-document-viewer/dist/ddv.css"; import "./DocumentEditor.css"; export interface DocumentEditorProps { docUid:string; groupUid:string; show:boolean; onBack?: () => void; onScanRequired?: () => void; onInitialized?: (editViewer:EditViewer) => void; } const DocumentEditor: React.FC<DocumentEditorProps> = (props:DocumentEditorProps) => { const initializing = useRef(false); const editViewer = useRef<EditViewer|undefined>(); useEffect(()=>{ if (initializing.current == false) { initializing.current = true; initEditViewer(); } editViewer.current?.show(); return ()=>{ if (editViewer.current) { editViewer.current.hide(); } } },[]) useEffect(() => { if (editViewer.current) { if (props.show) { editViewer.current.show(); }else{ editViewer.current.hide(); } window.dispatchEvent(new Event('resize')); } }, [props.show]); const initEditViewer = async () => { const config:UiConfig = { type: DDV.Elements.Layout, flexDirection: "column", className: "ddv-edit-viewer-mobile", children: [ { type: DDV.Elements.Layout, className: "ddv-edit-viewer-header-mobile", children: [ { // Add a "Back" buttom to header and bind click event to go back to the perspective viewer // The event will be registered later. type: DDV.Elements.Button, className: "ddv-button-back", events:{ click: "back" } }, DDV.Elements.Pagination, { // Add a "Back" buttom to header and bind click event to go back to the perspective viewer // The event will be registered later. type: DDV.Elements.Button, className: "camera-icon", events:{ click: "scan" } }, ], }, DDV.Elements.MainView, { type: DDV.Elements.Layout, className: "ddv-edit-viewer-footer-mobile", children: [ DDV.Elements.DisplayMode, DDV.Elements.RotateLeft, DDV.Elements.Crop, DDV.Elements.Filter, DDV.Elements.Undo, DDV.Elements.Delete, DDV.Elements.Load, ], }, ], }; // Create an edit viewer editViewer.current = new DDV.EditViewer({ container: "editViewer", groupUid: props.groupUid, uiConfig: config, }); editViewer.current.on("back" as any,() => { if (props.onBack) { props.onBack(); } }); editViewer.current.on("scan" as any,() => { if (props.onScanRequired) { props.onScanRequired(); } }); editViewer.current.openDocument(props.docUid); } return ( <div id="editViewer"></div> ) }; export default DocumentEditor;
Use the Viewers in the Home Page
-
Initialize Dynamsoft Document Viewer with a license when it is mounted. You can apply for a license here.
const [initialized,setInitialized] = useState(false); const initializing = useRef(false); useEffect(()=>{ const init = async () => { try { DDV.Core.license = "LICENSE-KEY"; // Public trial license which is valid for 24 hours DDV.Core.engineResourcePath = "assets/ddv-resources/engine";// Lead to a folder containing the distributed WASM files await DDV.Core.loadWasm(); await DDV.Core.init(); // Configure image filter feature which is in edit viewer DDV.setProcessingHandler("imageFilter", new DDV.ImageFilter()); doc.current = DDV.documentManager.createDocument(); // Create a document instance setInitialized(true); } catch (error) { alert(error); } } if (initializing.current === false) { initializing.current = true; init(); } },[]) -
Display the viewers based on the choice.
const [mode,setMode] = useState<"browse"|"edit"|"crop">("browse"); const renderViewers = () => { if (initialized && doc.current) { let uid = doc.current.uid; let displayEditor = false; let displayCropper = false; let displayBrowser = false; if (mode === "browse") { displayBrowser = true; }else if (mode === "crop") { displayCropper = true; }else if (mode === "edit") { displayEditor = true; } return ( <> <div className={"editor fullscreen" + ((displayEditor && !scanning)?"":" hidden")}> <DocumentEditor docUid={uid} show={displayEditor} groupUid={groupUid.current} onScanRequired={()=>{ stayInEditViewer.current = true; startScanning(); }} onBack={()=>{returnToPrevious(true)}}> </DocumentEditor> </div> <div className={"cropper fullscreen" + (displayCropper?"":" hidden")}> <DocumentCropper docUid={uid} groupUid={groupUid.current} show={displayCropper} onBack={returnToPrevious} onInitialized={(viewer:PerspectiveViewer)=>{perspectiveViewer.current = viewer;}}> </DocumentCropper> </div> <div className={"browser" + ((displayBrowser && !scanning)?"":" hidden")}> <DocumentBrowser docUid={uid} groupUid={groupUid.current} show={displayBrowser}> </DocumentBrowser> </div> </> ) } } return ( <IonPage> {displayHeader && <> <IonHeader> <IonToolbar> <IonTitle>Document Scanner</IonTitle> <IonButtons slot="primary"> <IonButton onClick={()=>{setIsOpen(true)}}> <IonIcon slot="icon-only" ios={ellipsisHorizontal} md={ellipsisVertical}></IonIcon> </IonButton> </IonButtons> </IonToolbar> </IonHeader> </> } <IonContent fullscreen> <IonLoading isOpen={!initialized} message="Loading..." /> {renderViewers()} <IonActionSheet isOpen={isOpen} header="Actions" buttons={[ { text: 'Edit', data: { action: 'edit', }, }, { text: 'Crop', data: { action: 'crop', }, }, { text: 'Download as PDF', data: { action: 'download', }, }, { text: 'Cancel', role: 'cancel', data: { action: 'cancel', }, }, ]} onDidDismiss={({ detail }) => handleAction(detail)} ></IonActionSheet> </IonContent> </IonPage> ); }; -
An action sheet is used to perform actions. Related code:
const handleAction = (detail:OverlayEventDetail) => {
  if (detail.data && detail.data.action != "cancel") {
    if (detail.data.action === "download") {
      downloadAsPDF();
    }else{
      stayInEditViewer.current = false;
      setDisplayHeader(false);
      setMode(detail.data.action);
    }
  }
  setIsOpen(false);
}

const downloadAsPDF = async () => {
  if (doc.current) {
    let blob = await doc.current.saveToPdf();
    if (Capacitor.isNativePlatform()) {
      let fileName = "scanned.pdf";
      let dataURL = await blobToDataURL(blob);
      let writingResult = await Filesystem.writeFile({
        path: fileName,
        data: dataURL,
        directory: Directory.Cache
      });
      Share.share({
        title: fileName,
        text: fileName,
        url: writingResult.uri,
      });
    }else{
      const imageURL = URL.createObjectURL(blob)
      const link = document.createElement('a')
      link.href = imageURL;
      link.download = 'scanned.pdf';
      document.body.appendChild(link);
      link.click();
      document.body.removeChild(link);
    }
  }
}

const blobToDataURL = (blob:Blob):Promise<string> => {
  return new Promise<string>((resolve) => {
    var reader = new FileReader();
    reader.onload = function(e) {
      resolve(e.target!.result as string);
    };
    reader.readAsDataURL(blob);
  })
}
Create a Document Scanner Component
Next, let’s create a document scanner component (DocumentScanner.tsx) to open the camera, detect the document and take a photo.
import { MutableRefObject, useEffect, useRef, useState } from 'react';
import './DocumentScanner.css';
import { DocumentNormalizer, intersectionOverUnion } from 'capacitor-plugin-dynamsoft-document-normalizer';
import { CameraPreview } from 'capacitor-plugin-camera';
import { Capacitor, PluginListenerHandle } from '@capacitor/core';
import { DetectedQuadResultItem } from 'dynamsoft-document-normalizer'
import { IonFab, IonFabButton, IonIcon, IonFabList, IonLoading } from '@ionic/react';
import {
  chevronUpCircle,
  flashlight,
  stop,
  cameraReverse,
} from 'ionicons/icons';
import SVGOverlay from './SVGOverlay';

export interface DocumentScannerProps {
  onScanned?: (blob:Blob,detectionResults:DetectedQuadResultItem[]) => void;
  onStopped?: () => void;
}

const DocumentScanner: React.FC<DocumentScannerProps> = (props:DocumentScannerProps) => {
  const container:MutableRefObject<HTMLDivElement|null> = useRef(null);
  const torchOn = useRef(false);
  const detecting = useRef(false);
  const previousResults = useRef<DetectedQuadResultItem[]>([])
  const interval = useRef<any>();
  const onPlayedListener = useRef<PluginListenerHandle|undefined>();
  const [initialized,setInitialized] = useState(false);
  const initializedRef = useRef(false);
  const initializing = useRef(false);
  const [quadResultItem,setQuadResultItem] = useState<DetectedQuadResultItem|undefined>()
  const [viewBox,setViewBox] = useState("0 0 720 1280");
  useEffect(() => {
    const init = async () => {
      try {
        if (container.current && Capacitor.isNativePlatform() === false) {
          await CameraPreview.setElement(container.current);
        }
        await CameraPreview.initialize();
        await CameraPreview.requestCameraPermission();
        await DocumentNormalizer.initialize();
        if (onPlayedListener.current) {
          onPlayedListener.current.remove();
        }
        onPlayedListener.current = await CameraPreview.addListener("onPlayed", async () => {
          console.log("played");
          await updateViewBox();
          startScanning();
        });
        await CameraPreview.startCamera();
      } catch (error) {
        alert(error);
      }
      initializedRef.current = true;
      setInitialized(true);
    }

    if (initializing.current === false) {
      initializing.current = true;
      init();
    }

    return ()=> {
      console.log("unmount and stop scan");
      stopCamera(false);
    }
  }, []);

  const stopCamera = async (manual:boolean) => {
    if (onPlayedListener.current) {
      onPlayedListener.current.remove();
    }
    stopScanning();
    if (initializedRef.current || Capacitor.isNativePlatform()) {
      console.log("stop camera");
      await CameraPreview.stopCamera();
    }
    if (props.onStopped && manual) {
      props.onStopped();
    }
  }

  const startScanning = () => {
    stopScanning();
    if (!interval.current) {
      interval.current = setInterval(captureAndDetect,100);
    }
  }

  const stopScanning = () => {
    clearInterval(interval.current);
    interval.current = null;
  }

  const captureAndDetect = async () => {
    if (detecting.current === true) {
      return;
    }
    let results:DetectedQuadResultItem[] = [];
    detecting.current = true;
    try {
      if (Capacitor.isNativePlatform()) {
        await CameraPreview.saveFrame();
        results = (await DocumentNormalizer.detectBitmap({})).results;
      }else{
        if (container.current) {
          let video = container.current.getElementsByTagName("video")[0] as any;
          let response = await DocumentNormalizer.detect({source:video});
          results = response.results;
        }
      }
      if (results.length>0) {
        setQuadResultItem(results[0]);
        checkIfSteady(results);
      }else{
        setQuadResultItem(undefined);
      }
    } catch (error) {
      console.log(error);
    }
    detecting.current = false;
  }

  const takePhotoAndStop = async () => {
    stopScanning();
    let blob:Blob|undefined;
    let detectionResults:DetectedQuadResultItem[] = [];
    if (Capacitor.isNativePlatform()) {
      let photo = await CameraPreview.takePhoto({includeBase64:true});
      blob = await getBlobFromBase64(photo.base64!);
      detectionResults = (await DocumentNormalizer.detect({path:photo.path})).results;
      console.log(detectionResults);
    }else{
      let photo = await CameraPreview.takePhoto({});
      console.log(photo);
      if (photo.blob) {
        blob = photo.blob;
      }else if (photo.base64) {
        blob = await getBlobFromBase64(photo.base64);
      }
      let img = await loadBlobAsImage(blob!);
      console.log(img);
      detectionResults = (await DocumentNormalizer.detect({source:img})).results;
    }
    //await stopCamera(false);
    if (props.onScanned && blob && detectionResults) {
      props.onScanned(blob,detectionResults);
    }
  }

  const getBlobFromBase64 = async (base64:string):Promise<Blob> => {
    if (!base64.startsWith("data")) {
      base64 = "data:image/jpeg;base64," + base64;
    }
    const response = await fetch(base64);
    const blob = await response.blob();
    return blob;
  }

  const loadBlobAsImage = (blob:Blob):Promise<HTMLImageElement> => {
    return new Promise((resolve) => {
      let img = document.createElement("img");
      img.onload = function(){
        resolve(img);
      };
      img.src = URL.createObjectURL(blob);
    });
  }

  const checkIfSteady = (results:DetectedQuadResultItem[]) => {
    console.log(results);
    if (results.length>0) {
      let result = results[0];
      if (previousResults.current.length >= 3) {
        if (steady() == true) {
          console.log("steady");
          takePhotoAndStop();
        }else{
          console.log("shift and add result");
          previousResults.current.shift();
          previousResults.current.push(result);
        }
      }else{
        console.log("add result");
        previousResults.current.push(result);
      }
    }
  }

  const steady = () => {
    if (previousResults.current[0] && previousResults.current[1] && previousResults.current[2]) {
      let iou1 = intersectionOverUnion(previousResults.current[0].location.points,previousResults.current[1].location.points);
      let iou2 = intersectionOverUnion(previousResults.current[1].location.points,previousResults.current[2].location.points);
      let iou3 = intersectionOverUnion(previousResults.current[2].location.points,previousResults.current[0].location.points);
      if (iou1>0.9 && iou2>0.9 && iou3>0.9) {
        return true;
      }else{
        return false;
      }
    }
    return false;
  }


  const switchCamera = async () => {
    let currentCamera = (await CameraPreview.getSelectedCamera()).selectedCamera;
    let result = await CameraPreview.getAllCameras();
    let cameras = result.cameras;
    let currentCameraIndex = cameras.indexOf(currentCamera);
    let desiredIndex = 0
    if (currentCameraIndex < cameras.length - 1) {
      desiredIndex = currentCameraIndex + 1;
    }
    await CameraPreview.selectCamera({cameraID:cameras[desiredIndex]});
  }

  const toggleTorch = () => {
    if (initialized) {
      torchOn.current = !torchOn.current;
      CameraPreview.toggleTorch({on:torchOn.current});
    }
  }

  const updateViewBox = async () => {
    let res = (await CameraPreview.getResolution()).resolution;
    let width = parseInt(res.split("x")[0]);
    let height = parseInt(res.split("x")[1]);
    let orientation = (await CameraPreview.getOrientation()).orientation;
    let box:string;
    if (orientation === "PORTRAIT") {
      if (!Capacitor.isNativePlatform()) {
        box = "0 0 "+width+" "+height;
      }else{
        box = "0 0 "+height+" "+width;
      }
    }else{
      box = "0 0 "+width+" "+height;
    }
    console.log(box);
    setViewBox(box);
  }

  return (
    <div className="container" ref={container}>
      <IonLoading isOpen={!initialized} message="Loading..." />
      <div className="dce-video-container"></div>
      {quadResultItem &&
        <SVGOverlay viewBox={viewBox} quad={quadResultItem}></SVGOverlay>
      }
      <IonFab slot="fixed" vertical="bottom" horizontal="end">
          <IonFabButton>
            <IonIcon icon={chevronUpCircle}></IonIcon>
          </IonFabButton>
          <IonFabList side="top">
            <IonFabButton onClick={()=>{stopCamera(true)}}>
              <IonIcon icon={stop}></IonIcon>
            </IonFabButton>
            <IonFabButton onClick={switchCamera}>
              <IonIcon icon={cameraReverse}></IonIcon>
            </IonFabButton>
            <IonFabButton onClick={toggleTorch}>
              <IonIcon icon={flashlight}></IonIcon>
            </IonFabButton>
          </IonFabList>
        </IonFab>
    </div>
  );
};

export default DocumentScanner;
An SVG overlay component is used to highlight the detected document:
import React from 'react';
import { DetectedQuadResultItem } from 'dynamsoft-document-normalizer'
import './SVGOverlay.css';
import { Capacitor } from '@capacitor/core';

export interface OverlayProps {
  quad:DetectedQuadResultItem;
  viewBox:string;
}

const SVGOverlay = (props:OverlayProps): React.ReactElement => {
  const getPointsData = () => {
    let points = props.quad.location.points;
    let pointsData = points[0].x+","+ points[0].y + " ";
    pointsData = pointsData+ points[1].x +"," + points[1].y + " ";
    pointsData = pointsData+ points[2].x +"," + points[2].y + " ";
    pointsData = pointsData+ points[3].x +"," + points[3].y;
    return pointsData;
  }

  return (
    <svg
      id="overlay"
      className={Capacitor.isNativePlatform() ? "fixed" : "absolute"}
      preserveAspectRatio="xMidYMid slice"
      viewBox={props.viewBox}
      xmlns="<http://www.w3.org/2000/svg>">
        <polygon xmlns="<http://www.w3.org/2000/svg>"
          points={getPointsData()}
        />
    </svg>
  )
}

export default SVGOverlay;
Start Document Scanning in the Home Page
-
Initialize Document Normalizer’s license when the page is mounted.
await DocumentNormalizer.initLicense({license:"LICENSE-KEY"}); -
Add the following in
Home.tsx’s JSX to add the document scanner component.{scanning && <div className="scanner fullscreen"> <DocumentScanner onStopped={stopScanning} onScanned={onScanned} ></DocumentScanner> </div> } {!scanning && <div className="footer"> <button className="shutter-button round" onClick={startScanning}>Scan</button> </div> } -
Code to control the scanning. We have to set the background to transparent so that the webview will not be blocked by the camera view.
const startScanning = () => {
  document.documentElement.style.setProperty('--ion-background-color', 'transparent');
  setDisplayHeader(false);
  setScanning(true);
}

const stopScanning = () => {
  document.documentElement.style.setProperty('--ion-background-color', ionBackground.current);
  if (stayInEditViewer.current === false) {
    setDisplayHeader(true);
  }
  setScanning(false);
}

const onScanned = async (blob:Blob,detectionResults:DetectedQuadResultItem[]) => {
  stopScanning();
  await doc.current?.loadSource(blob);
  showCropper(detectionResults); //use the cropper to confirm the detected document
}

const showCropper = (detectionResults?:DetectedQuadResultItem[]) => {
  setDisplayHeader(false);
  setMode("crop");
  console.log(detectionResults);
  if (detectionResults && perspectiveViewer.current && doc.current) {
    if (detectionResults.length>0) {
      let result = detectionResults[0];
      let points = result.location.points;
      let quad:Quad = [
        [points[0].x,points[0].y],
        [points[1].x,points[1].y],
        [points[2].x,points[2].y],
        [points[3].x,points[3].y]
      ];
      perspectiveViewer.current.goToPage(doc.current.pages.length - 1)
      perspectiveViewer.current.setQuadSelection(quad);
    }
  }
}
All right, we’ve now completed the demo.
Turn the App to an Android or iOS App
With Capacitor, we can turn the app into an Android or iOS app.
-
Add platforms.
ionic cap add android ionic cap add ios -
Sync files to native projects.
ionic cap sync -
Run the app.
ionic cap run android
ionic cap run ios
Native Quirks
There are some native quirks we have to handle.
-
Camera permission.
For Android, add the following to
AndroidManifest.xml.<uses-permission android:name="android.permission.CAMERA" />For iOS, add the following to
Info.plist.<key>NSCameraUsageDescription</key> <string>For document scanning</string> -
Safe area.
The fullscreen scanner and cropper may be blocked by the status bar. We can set their top position to
env(safe-area-inset-top)..fullscreen { position: absolute; left:0; top:0; top: env(safe-area-inset-top); width: 100%; height: 100%; height: calc(100% - env(safe-area-inset-top)); }
Source Code
Get the source code of the demo to have a try:
https://github.com/xulihang/Ionic-React-Document-Scanner
Disclaimer:
The wrappers and sample code on Dynamsoft Codepool are community editions, shared as-is and not fully tested. Dynamsoft is happy to provide technical support for users exploring these solutions but makes no guarantees.


