


Merge Multiple Images into One PDF on iOS Using Swift
An iOS app written in Swift can pick multiple photos from the gallery, optionally auto-crop documents with Dynamsoft Document Normalizer, and merge the results into a single PDF file. This is useful for ID cards, receipts, or any workflow that needs several images combined into one shareable document.
What you’ll build: An iOS app in Swift that picks multiple photos from the gallery, optionally auto-crops documents, and merges them into a single PDF using the Dynamsoft Document Normalizer SDK.
Key Takeaways
- Dynamsoft Document Normalizer’s
CaptureVisionRoutercan detect document boundaries, normalize images, and save them to a multi-page PDF in a single pipeline. PHPickerViewControllerallows unlimited multi-image selection without requiring full photo library permission on iOS.- The SDK supports binary (black & white), grayscale, and color output modes — binary mode reduces file size significantly and cleans noisy backgrounds.
- This approach is ideal for ID card scanning, receipt archiving, and any workflow that combines camera-roll images into one shareable PDF.
Common Developer Questions
How do I merge multiple UIImages into one PDF file on iOS using Swift?
Pick multiple images with PHPickerViewController, process each image through the normalization pipeline if auto-cropping is enabled, and then save the resulting pages into one PDF through the SDK’s image-management workflow. That is the end-to-end merge path implemented in this Swift sample.
How can I auto-crop a document from a photo and save it as a PDF on iPhone?
Enable the auto-cropping option, run each selected photo through CaptureVisionRouter to detect the document boundaries, and then use the normalized output rather than the original full image when building the PDF. That gives you flatter pages and a cleaner final document.
What is the best Swift SDK for converting scanned images to PDF with edge detection?
Dynamsoft Document Normalizer is the SDK used in this tutorial because it combines document-boundary detection, normalization, color-mode control, and PDF generation in one iOS-oriented workflow. That makes it a stronger fit than stitching together separate edge-detection and PDF-writing libraries by hand.
Prerequisites
- Xcode 14 or later
- iOS 14+ deployment target (required for
PHPickerViewController) - CocoaPods installed (
gem install cocoapods) - Get a 30-day free trial license for Dynamsoft Document Normalizer
Step 1: Create a New Xcode Project
Open Xcode and create a new app project.
Step 2: Add Dynamsoft SDK Dependencies via CocoaPods
Next, add Dynamsoft Document Normalizer and its dependencies via CocoaPods.
-
Init a pod project.
pod init -
Add the following to
Podfile.target 'PDFCreator' do pod 'DynamsoftCaptureVisionRouter','2.2.30' pod 'DynamsoftCore','3.2.30' pod 'DynamsoftDocumentNormalizer','2.2.11' pod 'DynamsoftImageProcessing','2.2.30' pod 'DynamsoftLicense','3.2.20' pod 'DynamsoftUtility','1.2.20' end -
Install the pods.
pod install
Step 3: Design the Image Selection and PDF Settings UI
Open Main.storyboard and add the following controls:
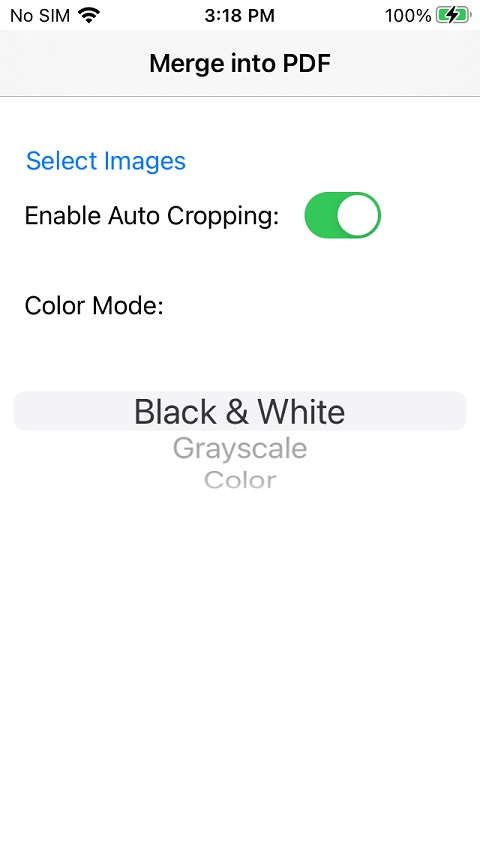
It contains a button to select images from the gallery, a switch to enable auto cropping of the document in the image and a picker view to select which color mode to use for the images in the PDF.
The picker view is configured with the following code:
@IBOutlet weak var colorModeUIPickerView: UIPickerView!
func numberOfComponents(in pickerView: UIPickerView) -> Int {
    return 1
}

func pickerView(_ pickerView: UIPickerView, numberOfRowsInComponent component: Int) -> Int {
    return 3
}

func pickerView(_ pickerView: UIPickerView, titleForRow row: Int,
                    forComponent component: Int) -> String? {
    if row == 0 {
        return "Black & White"
    }else if row == 1 {
        return "Grayscale"
    }else{
        return "Color"
    }
}


override func viewDidLoad() {
    super.viewDidLoad()
    // Do any additional setup after loading the view.
    colorModeUIPickerView.dataSource = self
    colorModeUIPickerView.delegate = self
}
Step 4: Pick Multiple Images from the Photo Gallery
Here, we use PHPickerViewController to pick multiple images.
@IBAction func selectImagesUIButton_clicked(_ sender: Any) {

    var configuration = PHPickerConfiguration(photoLibrary: .shared())
    //0 - unlimited 1 - default
    configuration.selectionLimit = 0
    configuration.filter = .images
    let pickerViewController = PHPickerViewController(configuration: configuration)
    pickerViewController.delegate = self
    present(pickerViewController, animated: true)
}

func picker(_ picker: PHPickerViewController, didFinishPicking results: [PHPickerResult]) {
    print(results.count)
    picker.dismiss(animated: true)
}
We can convert the results into an array of UIImage for further use.
DispatchQueue.main.async {
    var images:[UIImage] = []
    var processed = 0
    let size = results.count
    for item in results {
        if (item.itemProvider.canLoadObject(ofClass: UIImage.self)) {
            item.itemProvider.loadObject(ofClass: UIImage.self) { image , error  in
                if let error{
                    print(error)
                }
                if let selectedImage = image as? UIImage{
                    print(selectedImage.size)
                    images.append(selectedImage)
                    processed = processed + 1
                }
            }
        }
    }
}
Step 5: Merge Images into a PDF with Document Normalization
-
Initialize the license for Dynamsoft Document Normalizer in
AppDelegate.swift.import DynamsoftLicense func application(_ application: UIApplication, didFinishLaunchingWithOptions launchOptions: [UIApplication.LaunchOptionsKey: Any]?) -> Bool { // Override point for customization after application launch. let oneDayTrial = "LICENSE-KEY" LicenseManager.initLicense(oneDayTrial, verificationDelegate: self) return true } func onLicenseVerified(_ isSuccess: Bool, error: (any Error)?) { if isSuccess == false { print("license invalid") }else{ print("license valid") } } -
Create an instance of Capture Vision Router to call Dynamsoft Document Normalizer.
import DynamsoftCore import DynamsoftCaptureVisionRouter let cvr:CaptureVisionRouter = CaptureVisionRouter() -
Process images and save them to a PDF file. It uses Capture Vision Router to process the images, uses Image Manager to save them to a PDF file and then share it so that we can save the PDF file to
Files.If
enableAutoCroppingUISwitchis on, it will detect the document boundaries and get the cropped image. Otherwise, process the whole image.It also updates the color mode. Converting an image to black and white can clean the background and save the file’s size while converting to grayscale has a balance of details and size.
import DynamsoftDocumentNormalizer
import DynamsoftUtility
func mergeImagesIntoPDF(images:[UIImage]) {
    var enableAutoCropping = false
    var selectedColorModeIndex = 0
    DispatchQueue.main.sync {
        statusLabel.text = "Processing..."

        if enableAutoCroppingUISwitch.isOn {
            enableAutoCropping = true
        }
        selectedColorModeIndex = colorModeUIPickerView.selectedRow(inComponent: 0)
    }
    let templateName:String;
    if enableAutoCropping {
        templateName = PresetTemplate.detectAndNormalizeDocument.rawValue
    }else{
        templateName = PresetTemplate.normalizeDocument.rawValue
    }
    var settings = try? cvr.getSimplifiedSettings(templateName)

    if selectedColorModeIndex == 0 {
        settings?.documentSettings?.colourMode = ImageColourMode.binary
    }else if selectedColorModeIndex == 1 {
        settings?.documentSettings?.colourMode = ImageColourMode.grayscale
    }else{
        settings?.documentSettings?.colourMode = ImageColourMode.colour
    }
    if enableAutoCropping == false {
        settings?.roi = Quadrilateral(pointArray: [CGPoint(x:0,y:0),CGPoint(x:100,y:0),CGPoint(x:100,y:100),CGPoint(x:0,y:100)])
        settings?.roiMeasuredInPercentage = true
    }
    try? cvr.updateSettings(templateName, settings: settings!)

    let imageManager = ImageManager()
    let url = FileManager.default.temporaryDirectory
                                                    .appendingPathComponent(UUID().uuidString)
                                                    .appendingPathExtension("pdf")
    for image in images {
        let capturedResult:CapturedResult = cvr.captureFromImage(image, templateName: templateName)
        let items = capturedResult.items ?? []
        for item in items {
            if item.type == CapturedResultItemType.normalizedImage {
                let image:NormalizedImageResultItem = item as! NormalizedImageResultItem
                try? imageManager.saveToFile(image.imageData!, path: url.path, overWrite: true)
            }
        }
    }
    DispatchQueue.main.async {
        self.statusLabel.text = ""
        let objectsToShare = [url]
        let activityVC = UIActivityViewController(activityItems: objectsToShare, applicationActivities: nil)

        self.present(activityVC, animated: true, completion: nil)
    }

}
Screenshot of converted files:

Common Issues and Edge Cases
- Large images cause memory pressure: If users select many high-resolution photos, the app may run out of memory. Consider down-sampling
UIImageinstances before passing them toCaptureVisionRouter. - Auto-crop fails on plain backgrounds: The document boundary detection works best when there is contrast between the document and the surface. On a white document against a white desk, disable auto-cropping or guide users to use a darker background.
- PDF file not appearing in share sheet: Ensure the temporary file URL has the
.pdfextension.UIActivityViewControlleruses the file extension to determine available share targets.