


How to Build an iOS QR Code and Barcode Scanner with SwiftUI on Apple Silicon
SwiftUI is a robust UI framework designed for constructing native applications across all Apple platforms. This article will guide you through developing an iOS QR code scanner utilizing SwiftUI, Dynamsoft Camera Enhancer and Dynamsoft Barcode Reader on an Apple Silicon Mac (M1/M2/M3/M4).
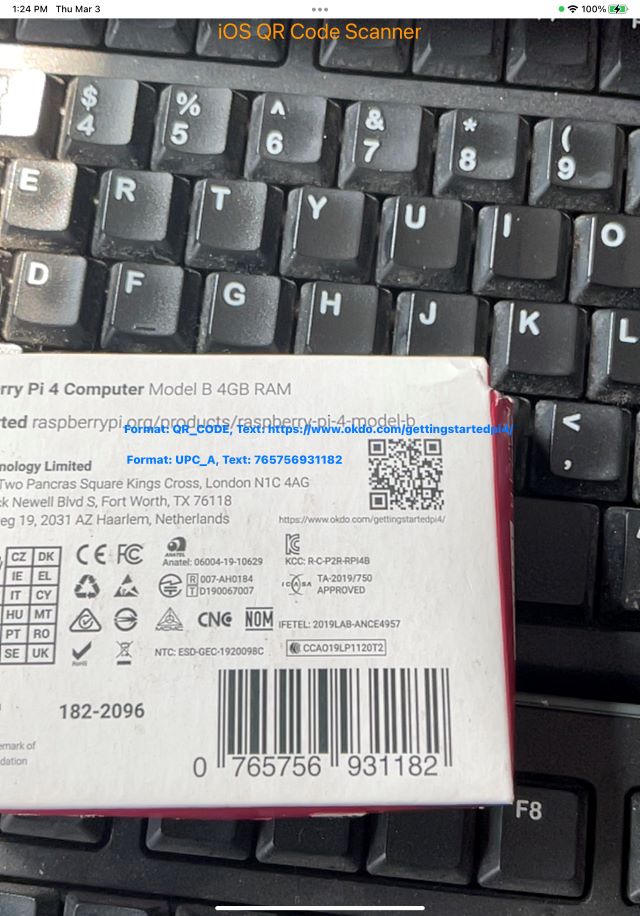
What you’ll build: A native iOS app that opens the camera, detects barcodes and QR codes in real time, and overlays decoded text on the preview — all built with SwiftUI, Dynamsoft Camera Enhancer, and Dynamsoft Barcode Reader.
Key Takeaways
- SwiftUI apps can integrate a full-featured barcode and QR code scanner by wrapping Dynamsoft’s
CameraViewin aUIViewRepresentablestruct. - Dynamsoft Camera Enhancer manages the camera session while Dynamsoft Barcode Reader decodes QR Code, DataMatrix, PDF417, and 20+ other symbologies from each frame.
- The
CapturedResultReceiverprotocol delivers decoded results asynchronously, making it straightforward to update the SwiftUI view in real time. - This approach works on all Apple Silicon Macs (M1 through M4) and deploys to any iPhone or iPad running iOS 13+.
Common Developer Questions
How do I scan QR codes from the camera in a SwiftUI iOS app?
Initialize Dynamsoft Camera Enhancer for the camera session, connect it to Capture Vision Router, and implement CapturedResultReceiver so decoded barcodes update SwiftUI state in real time. That is the core scanning loop used in this app.
What is the fastest way to add barcode scanning to an iOS project using CocoaPods?
Use CocoaPods to add the Dynamsoft Core, License, Barcode Reader, Capture Vision Router, and Camera Enhancer modules, then open the generated workspace and set the license during app startup. This article uses that path because it gets a working scanner into a SwiftUI project quickly.
How do I wrap a UIKit camera view in SwiftUI with UIViewRepresentable?
Expose the SDK’s CameraView from a manager object, then host it inside SwiftUI through a UIViewRepresentable wrapper. That bridge lets SwiftUI own the screen layout while the UIKit camera preview continues to render natively.
This article is Part 1 in a 6-Part Series.
- Part 1 - How to Build an iOS QR Code and Barcode Scanner with SwiftUI on Apple Silicon
- Part 2 - Build an iOS Passport and ID MRZ Scanner with SwiftUI and Dynamsoft Capture Vision
- Part 3 - Build a macOS Barcode Scanner with SwiftUI and a C++ Barcode SDK
- Part 4 - Build a SwiftUI Barcode Scanner for iOS and macOS with Dynamsoft Capture Vision
- Part 5 - Build a Cross-Platform SwiftUI Document Scanner for macOS and iOS
- Part 6 - How to Build a macOS Framework Wrapping C++ in Objective-C++ for Swift Barcode Scanning
Demo Video: iOS SwiftUI Barcode and QR Code Scanner
Prerequisites
Before starting, ensure you have the following tools and resources:
- Xcode: The integrated development environment (IDE) for macOS, required for iOS app development.
-
CocoaPods: A dependency manager for Swift and Objective-C Cocoa projects. Follow these steps to install:
-
Install Homebrew (if not already installed) by running the following command in your terminal:
/bin/bash -c "$(curl -fsSL https://raw.githubusercontent.com/Homebrew/install/master/install.sh)" -
Install
CocoaPodsusing Homebrew with the command below:brew install cocoapods
-
- A Trial License Key for the Dynamsoft iOS Barcode SDK. Get a 30-day free trial license to unlock the full capabilities of the SDK for development and testing.
Build an iOS QR Code Scanner with SwiftUI Step by Step
Dynamsoft Camera Enhancer provides a camera view that simplifies starting a camera session with just a few lines of Swift code. The SDK can work alongside Dynamsoft Barcode Reader to decode various barcode types, including QR codes, DataMatrix, PDF417, and more, directly from the camera frame. The following sections will guide you through integrating the camera view and barcode reader into a SwiftUI project step by step.
Step 1: Initialize CocoaPods and Install Dependencies
- Create a new iOS SwiftUI project and name it
qrscanner. - Navigate to your Xcode project directory in the terminal.
-
Execute the following command to create a
Podfilefile, which will manage your project’s dependencies:pod init -
In the Podfile, include the
DynamsoftCore,DynamsoftImageProcessing,DynamsoftLicense,DynamsoftBarcodeReader,DynamsoftCaptureVisionRouterandDynamsoftCameraEnhancermodules:target 'qrscanner' do use_frameworks! pod 'DynamsoftCore','3.0.20' pod 'DynamsoftImageProcessing','2.0.21' pod 'DynamsoftLicense','3.0.30' pod 'DynamsoftBarcodeReader','10.0.21' pod 'DynamsoftCaptureVisionRouter','2.0.21' pod 'DynamsoftCameraEnhancer','4.0.2' end -
Install the specified dependencies:
pod install -
To proceed, open the
qrscanner.xcworkspacefile in Xcode:open qrscanner.xcworkspace
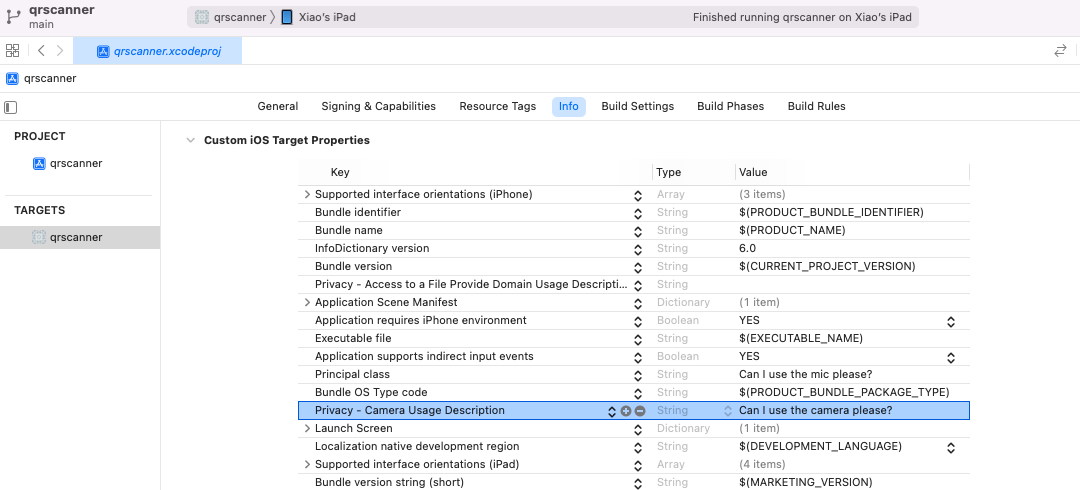
Step 2: Configure Camera Access Permission
Navigate to TARGETS > Info tab in Xcode and add the key Privacy - Camera Usage Description:
Privacy - Camera Usage Description
Step 3: Set the Dynamsoft Barcode Reader License Key
The official sample code for the Dynamsoft iOS Barcode SDK is written using Storyboard and UIKit, initializing the license key in the AppDelegate.swift file. Unlike UIKit, SwiftUI does not use an AppDelegate.swift file by default for app lifecycle management. However, you can still implement similar functionality in SwiftUI using the App protocol and the @UIApplicationDelegateAdaptor property wrapper to integrate UIKit AppDelegate functionality.
-
Add an
AppDelegate.swiftfile to your project and configure theDynamsoftBarcodeReaderlicense key within theapplication(_:didFinishLaunchingWithOptions:)method:import UIKit import DynamsoftLicense class AppDelegate: UIResponder, UIApplicationDelegate, LicenseVerificationListener { func onLicenseVerified(_ isSuccess: Bool, error: Error?) { if !isSuccess { if let error = error { print("\(error.localizedDescription)") } } } func application(_ application: UIApplication, didFinishLaunchingWithOptions launchOptions: [UIApplication.LaunchOptionsKey: Any]?) -> Bool { // Request a trial license: https://www.dynamsoft.com/customer/license/trialLicense/?product=dcv&package=cross-platform LicenseManager.initLicense("LICENSE-KEY", verificationDelegate: self) return true } }Remember to replace
LICENSE-KEYwith your actual Dynamsoft Barcode Reader license key. -
In your
qrscannerApp.swiftfile, utilize the@UIApplicationDelegateAdaptorto designate yourAppDelegateclass as the delegate forUIApplication. This step integrates yourAppDelegatewith the SwiftUI app lifecycle.import SwiftUI @main struct qrscannerApp: App { @UIApplicationDelegateAdaptor(AppDelegate.self) var appDelegate var body: some Scene { WindowGroup { ContentView() } } }
Step 4: Integrate the Barcode Reader with Camera Enhancer
-
Create a
CameraManager.swiftfile:import Foundation import UIKit import DynamsoftCameraEnhancer import DynamsoftCaptureVisionRouter import DynamsoftBarcodeReader import DynamsoftCore class CameraManager: NSObject, ObservableObject, CapturedResultReceiver { @Published var results = "No QR Code found" private var cameraView:CameraView! }The
CapturedResultReceiverprotocol is utilized to receive captured results from the camera frame.func onDecodedBarcodesReceived(_ result: DecodedBarcodesResult) { var message = "" if let items = result.items, items.count > 0 { let layer = cameraView.getDrawingLayer(DrawingLayerId.DBR.rawValue) layer?.clearDrawingItems() for item in items { message += String(format:"\nFormat: %@\nText: %@\n", item.formatString, item.text) let quadDrawingItem = QuadDrawingItem.init(quadrilateral: item.location) let textDrawingItem = TextDrawingItem.init(text: item.text, topLeftPoint: item.location.points[0] as! CGPoint, width: 100, height: 10) layer?.addDrawingItems([quadDrawingItem, textDrawingItem]) } } DispatchQueue.main.async { self.results = message } } -
Instantiate
DynamsoftCameraEnhancerand bind it with aCameraViewinstance. TheCameraViewis aUIViewsubclass that contains the camera view and drawing layers for displaying the barcode results. TheDynamsoftCaptureVisionRouterwraps the barcode reader to process the camera frames and decode the barcodes:private var dce = CameraEnhancer() private var cvr = CaptureVisionRouter() init(frame: CGRect) { super.init() setUpCamera(frame: frame) setUpDCV() } func setUpCamera(frame: CGRect) { cameraView = .init(frame: frame) cameraView.autoresizingMask = [.flexibleWidth, .flexibleHeight] let layer = cameraView.getDrawingLayer(DrawingLayerId.DBR.rawValue) layer?.visible = true dce.cameraView = cameraView } func setUpDCV() { // Set the camera enhancer as the input. try! cvr.setInput(dce) // Add CapturedResultReceiver to receive the result callback when a video frame is processed. cvr.addResultReceiver(self) } func getCameraView() -> CameraView { return cameraView } -
Manage the view lifecycle to switch the camera session on and off:
 func viewDidAppear() {
     dce.open()
     cvr.startCapturing(PresetTemplate.readBarcodes.rawValue) { isSuccess, error in
         if (!isSuccess) {
             if let error = error {
                 self.showResult("Error", error.localizedDescription)
             }
         }
     }
 }

 func viewDidDisappear() {
     dce.close()
     cvr.stopCapturing()
 }
Step 5: Create a SwiftUI Camera View for QR Code Scanning
Since CameraView is a UIView subclass, it needs to be wrapped in a UIViewRepresentable struct for use in SwiftUI.
import Foundation
import SwiftUI
import DynamsoftCameraEnhancer

struct DynamsoftCameraView: UIViewRepresentable {
    var cameraManager: CameraManager
    func makeUIView(context: Context) -> CameraView {
        let dceView = cameraManager.getCameraView()
        return dceView
    }

    func updateUIView(_ uiView: CameraView, context: Context) {

    }
}
Step 6: Construct the SwiftUI View Hierarchy
In the ContentView.swift file, create a ContentView struct containing a DynamsoftCameraView instance.
import SwiftUI

struct ContentView: View {
    @ObservedObject private var cameraManager = CameraManager(frame: CGRect(x: 0, y: 0, width: UIScreen.main.bounds.width, height: UIScreen.main.bounds.height))

    var body: some View {
        ZStack() {
            DynamsoftCameraView(cameraManager: cameraManager).onAppear() {
                cameraManager.viewDidAppear()
            }.onDisappear(){
                cameraManager.viewDidDisappear()
            }
            VStack {
                Text("iOS QR Code Scanner").font(.title).foregroundColor(.orange)
                Spacer()
            }
        }
    }
}

struct ContentView_Previews: PreviewProvider {
    static var previews: some View {
        ContentView()
    }
}
Step 7: Deploy and Test the Scanner on iPhone or iPad
Configure the signing settings for your Xcode project, then deploy and test the app on a physical device.
Common Issues and Edge Cases
- Camera permission denied at runtime: If the user taps “Don’t Allow” on the camera prompt, the preview stays black with no error. Check
AVCaptureDevice.authorizationStatus(for: .video)and show an alert directing the user to Settings > Privacy > Camera. - CocoaPods install fails on Apple Silicon: Running
pod installin a Rosetta terminal can produce architecture mismatches. Always use a native ARM terminal and ensure you runarch -arm64 pod installif you encounterCDN: trunkor linker errors. - Barcode overlay misaligned on different screen sizes: The
CameraViewframe is set fromUIScreen.main.boundsat init time. If the device rotates or the view resizes, the overlay coordinates may drift. Handle rotation by updating the frame inupdateUIViewor locking the orientation in your target settings.