


Building a Barcode and QR Code Detection Module for Node-RED with JavaScript
You can add barcode and QR code detection to your Node-RED flows with a custom node built on the dynamsoft-capture-vision-for-node package: point a file path (or a base64 string) at the node and it emits structured results — page, format, text, confidence, and corner locations — on msg.payload. The node decodes image files (PNG, JPG, BMP, GIF), multi-page documents (PDF, TIFF), and base64 strings, and it requires no native compilation because the SDK ships precompiled binaries for Windows, Linux, and macOS.
In this article, you’ll learn how to create this custom barcode detection node for Node-RED using the Dynamsoft Capture Vision SDK, enhancing your Node-RED workflows with robust barcode scanning capabilities.
What you’ll build: A Node-RED node that integrates Dynamsoft Capture Vision. After npm install and one click in the palette, an Inject → File → Barcode → Debug flow decodes barcodes from images or PDFs and prints each result’s format, text, confidence, and location — no native build step or C++ toolchain required.
Key Takeaways
- The barcode node is built on
dynamsoft-capture-vision-for-node(CaptureVisionRouter.captureAsync()/captureMultiPagesAsync()), the same SDK used by the official Node.js samples — no outdated wrapper or native build. - The node accepts an image file path, a PDF/TIFF path (decoded page by page), a base64 string in
msg.payload, or a file containing a base64 string, and emits an array of{ page, format, text, confidence, location }objects. - Preset templates are selectable in the node’s edit dialog:
PT_READ_BARCODES(default),PT_READ_BARCODES_SPEED_FIRST,PT_READ_BARCODES_READ_RATE_FIRST, andPT_READ_SINGLE_BARCODE. - The SDK ships precompiled binaries for Windows, Linux, and macOS, so
npm installalone is enough — there is no compilation step. CaptureVisionRouter.terminateIdleWorkers()is only needed in short-running scripts; inside Node-RED the process is long-lived, so the node never calls it.
Common Developer Questions
How do you read barcodes in Node-RED?
Install the custom node (this guide) or add it to your .node-red folder, then wire Inject → File → Barcode → Debug. The Barcode node takes a license key and template, decodes the incoming image or PDF, and sets msg.payload to an array of decoded barcode objects with page, format, text, confidence, and location.
Which Dynamsoft SDK does the Node-RED barcode node use?
The node uses dynamsoft-capture-vision-for-node — the official Dynamsoft Capture Vision SDK for Node.js — with LicenseManager.initLicense() and CaptureVisionRouter.captureAsync() / captureMultiPagesAsync(). The older barcode4nodejs wrapper used by previous versions of this sample is no longer required.
Can the node decode a PDF or another multi-page document?
Yes. When the input filename ends in .pdf, .tif, or .tiff, the node calls captureMultiPagesAsync(), which returns one result per page. Each item in the output payload includes a 1-based page number so you can tell which page every barcode came from.
What does the node’s output payload look like?
msg.payload is a JSON array, one object per decoded barcode:
[
  {
    "page": 1,
    "format": "QR_CODE",
    "text": "www.dynamsoft.com",
    "confidence": 100,
    "location": [{ "x": 545, "y": 72 }, { "x": 843, "y": 73 }, { "x": 843, "y": 173 }, { "x": 545, "y": 172 }]
  }
]
Do I need to compile anything to use this node?
No. dynamsoft-capture-vision-for-node ships precompiled N-API binaries for Windows (x86/x64), Linux (x64/arm64), and macOS (x64/arm64). Running npm install is all you need.
Node-RED Barcode Node Demo
Prerequisites
- Node.js: Install the current LTS release from the Node.js website.
-
Node-RED: Install Node-RED with the following commands:
  npm install -g --unsafe-perm node-red
  node-red
When you run
node-redfor the first time, a folder named.node-redwill be created in your home directory:- Windows:
%userprofile%\.node-red - Linux:
~/.node-red
If the default port
1880is occupied, modify it in.node-red/settings.jsto use a different port, such as18800. - Windows:
- Dynamsoft Capture Vision SDK: The
dynamsoft-capture-vision-for-nodenpm package and its model package are used for barcode decoding. Get a 30-day free trial license and paste your key into theLicensefield of the Barcode node (or leave the placeholder inbarcode.html).
Step 1: Create the Node-RED Barcode Module Project
Create a new directory for the module and initialize an npm project:
mkdir node-red-contrib-barcode
cd node-red-contrib-barcode
npm init -y
Install the Dynamsoft Capture Vision SDK — no native build step is involved:
npm install dynamsoft-capture-vision-for-node dynamsoft-capture-vision-for-node-model
Two packages are installed:
dynamsoft-capture-vision-for-node— the Capture Vision Router SDK that performs barcode decoding.dynamsoft-capture-vision-for-node-model— the AI model package used by the read-rate-first preset template.
In your package.json file, add a node-red section to specify the module configuration:
"node-red": {
  "nodes": {
    "barcode": "barcode.js"
  }
}
This configuration tells Node-RED where to find the node module. In this setup, barcode.js is the entry point that registers the node, and barcode.html defines its edit dialog.
Step 2: Write the Barcode Node Logic
Create barcode.js with the following code:
const path = require('node:path');
const fs = require('node:fs');
const {
  LicenseManager,
  CaptureVisionRouter,
  EnumPresetTemplate,
  EnumErrorCode,
} = require('dynamsoft-capture-vision-for-node');

module.exports = function (RED) {
  function BarcodeNode(config) {
    RED.nodes.createNode(this, config);
    this.license = config.license;
    this.template = config.template || EnumPresetTemplate.PT_READ_BARCODES;
    const node = this;

    // Decode a single image/path or a multi-page document.
    async function decode(inputData, templateName) {
      const isPath = typeof inputData === 'string';
      const ext = isPath ? path.extname(inputData).toLowerCase() : '';
      const isMultiPage = isPath && (ext === '.pdf' || ext === '.tif' || ext === '.tiff');

      if (isMultiPage) {
        return CaptureVisionRouter.captureMultiPagesAsync(inputData, templateName);
      }

      try {
        const result = await CaptureVisionRouter.captureAsync(inputData, templateName);
        return [result];
      } catch (err) {
        // PDF/TIFF bytes passed as Uint8Array: retry with the multi-page API.
        if (err && err.dcvErrorCode === EnumErrorCode.EC_MULTI_PAGES_NOT_SUPPORTED) {
          return CaptureVisionRouter.captureMultiPagesAsync(inputData, templateName);
        }
        throw err;
      }
    }

    // Convert SDK results into a plain JSON payload.
    function toPayload(results) {
      const payload = [];
      results.forEach((result, pageIndex) => {
        const items = result.barcodeResultItems || [];
        const page =
          result.originalImageTag && typeof result.originalImageTag.pageNumber === 'number'
            ? result.originalImageTag.pageNumber + 1
            : pageIndex + 1;
        for (const item of items) {
          payload.push({
            page,
            format: item.formatString,
            text: item.text,
            confidence: item.confidence,
            location: item.location.points.map((p) => ({ x: p.x, y: p.y })),
          });
        }
      });
      return payload;
    }

    node.on('input', async function (msg) {
      try {
        const templateName =
          EnumPresetTemplate[node.template] ||
          node.template ||
          EnumPresetTemplate.PT_READ_BARCODES;

        if (msg.filename && msg.filename.toLowerCase().indexOf('base64') > -1) {
          // The file contains a base64 string.
          LicenseManager.initLicense(node.license);
          const data = fs.readFileSync(msg.filename, 'utf8').trim();
          const bytes = new Uint8Array(Buffer.from(data, 'base64'));
          const results = await decode(bytes, templateName);
          msg.payload = toPayload(results);
          node.send(msg);
        } else if (msg.filename) {
          // Image file or PDF file.
          LicenseManager.initLicense(node.license);
          const results = await decode(msg.filename, templateName);
          msg.payload = toPayload(results);
          node.send(msg);
        } else if (msg.payload) {
          // Base64 string passed directly in the payload.
          LicenseManager.initLicense(node.license);
          const data = String(msg.payload).trim();
          const bytes = new Uint8Array(Buffer.from(data, 'base64'));
          const results = await decode(bytes, templateName);
          msg.payload = toPayload(results);
          node.send(msg);
        } else {
          node.warn('No filename or payload to decode.');
        }
      } catch (err) {
        node.error(`Barcode decoding failed: ${err.message || err}`, msg);
      }
    });
  }

  RED.nodes.registerType('barcode', BarcodeNode);
};
How it works:
- LicenseManager.initLicense() activates the Capture Vision license for the current machine. It accepts the key from the node’s
Licensefield. - CaptureVisionRouter.captureAsync() decodes a single image — from a file path or a
Uint8Arraybuilt from a base64 string — in a worker thread. - CaptureVisionRouter.captureMultiPagesAsync() decodes PDF and TIFF documents page by page and returns one
CapturedResultper page; the code readsoriginalImageTag.pageNumberto attach a 1-based page number to every barcode. - The results are normalized into plain JSON (
page,format,text,confidence,location) and emitted asmsg.payload, so downstream nodes can use them directly.
Step 3: Define the Node’s Edit Dialog
Create barcode.html to define the node’s edit dialog and help text:
<script type="text/javascript">
    RED.nodes.registerType('barcode',{
        category: 'Dynamsoft',
        color: '#a6bbcf',
        defaults: {
            name: {value:""},
            license: {value:""},
            template: {value: "PT_READ_BARCODES"}
        },
        inputs:1,
        outputs:1,
        icon: "function.png",
        label: function() {
            return this.name||"barcode";
        }
    });
</script>

<script type="text/x-red" data-template-name="barcode">
    <div class="form-row">
        <label for="node-input-name"><i class="icon-tag"></i> Name</label>
        <input type="text" id="node-input-name" placeholder="Barcode Reader">
    </div>
    <div class="form-row">
        <label for="node-input-license"><i class="icon-tag"></i> License</label>
        <input type="text" id="node-input-license" placeholder="DLS2eyJoYW5kc2hha2VDb2RlIjoiMjAwMDAxLTE2NDk4Mjk3OTI2MzUiLCJvcmdhbml6YXRpb25JRCI6IjIwMDAwMSIsInNlc3Npb25QYXNzd29yZCI6IndTcGR6Vm05WDJrcEQ5YUoifQ==">
    </div>
    <div class="form-row">
        <label for="node-input-template"><i class="icon-tag"></i> Template</label>
        <select type="text" id="node-input-template" style="width:70%">
            <option value="PT_READ_BARCODES" style="width:70%">PT_READ_BARCODES (default)</option>
            <option value="PT_READ_BARCODES_SPEED_FIRST" style="width:70%">PT_READ_BARCODES_SPEED_FIRST</option>
            <option value="PT_READ_BARCODES_READ_RATE_FIRST" style="width:70%">PT_READ_BARCODES_READ_RATE_FIRST</option>
            <option value="PT_READ_SINGLE_BARCODE" style="width:70%">PT_READ_SINGLE_BARCODE</option>
        </select>
    </div>
</script>

<script type="text/x-red" data-help-name="barcode">
    <p>Read barcodes and QR codes from image files (PNG, JPG, BMP, GIF), PDF and TIFF documents, or base64 strings using Dynamsoft Capture Vision.</p>
    <p>Output payload: an array of objects, each with <code>page</code>, <code>format</code>, <code>text</code>, <code>confidence</code>, and <code>location</code>.</p>
</script>
The template field is now a dropdown of the four preset templates instead of a free-form parameter-template URL — PT_READ_BARCODES is the default and covers all major 1D and 2D formats.
Step 4: Install the Module into Node-RED
Install the local project to the home directory of Node-RED:
Windows
cd %userprofile%\.node-red
npm install <path-to-node-red-contrib-barcode>
node-red
Linux
cd ~/.node-red
npm install <path-to-node-red-contrib-barcode>
node-red
Step 5: Test the Barcode Node in a Flow
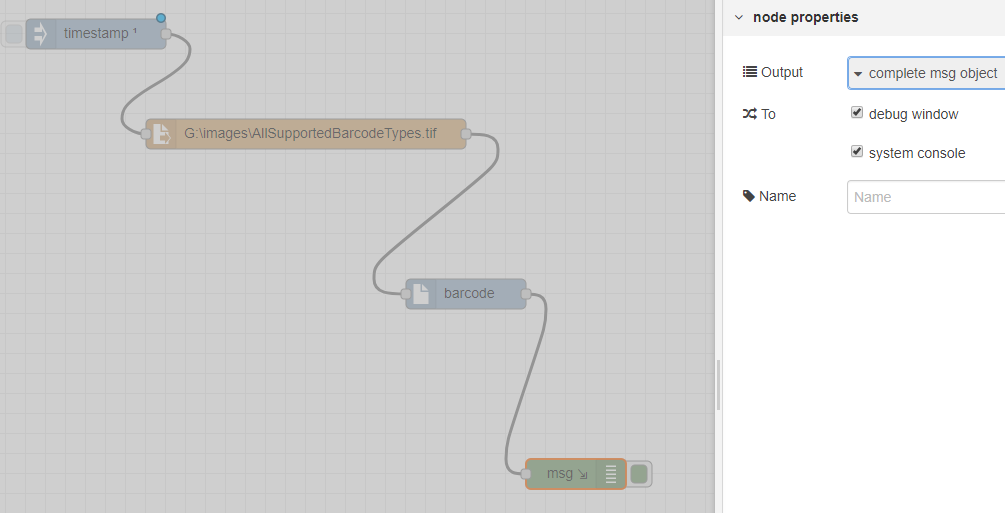
In the Node-RED web editor, add the following nodes to your flow:
- Inject Node
- File Node
- Barcode Node
- Debug Node
Configure the File Node to specify the path of the file you wish to read. Supported inputs include image files (PNG, JPG, BMP, GIF, TIFF), PDF documents, or files containing base64 strings. Enable the system console option in the Debug Node to view results.
Double-click the Barcode Node to set your license key and choose a preset template:
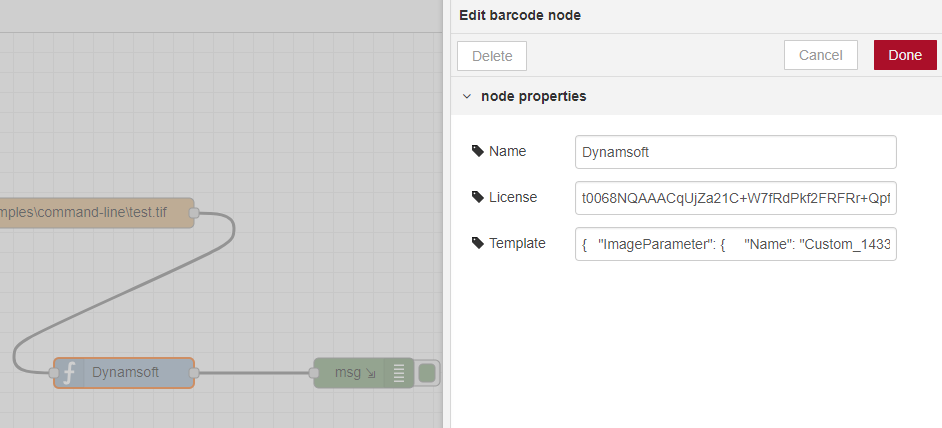
| Template | Purpose |
|---|---|
PT_READ_BARCODES (default) |
Balanced barcode reading |
PT_READ_BARCODES_SPEED_FIRST |
Speed-optimized reading |
PT_READ_BARCODES_READ_RATE_FIRST |
Read-rate-optimized reading (uses the AI model package) |
PT_READ_SINGLE_BARCODE |
Single-barcode detection |
Execute the flow. The Debug node prints the decoded results; here is real output from a test flow decoding a 5-page PDF with 17 barcodes:
msg.payload : Array[17]
[0] {"page":1,"format":"QR_CODE","text":"www.dynamsoft.com","confidence":85,"location":[{"x":2166,"y":36},{"x":2340,"y":36},{"x":2342,"y":212},{"x":2166,"y":210}]}
[1] {"page":2,"format":"QR_CODE","text":"www.dynamsoft.com","confidence":85,"location":[{"x":2166,"y":36},{"x":2340,"y":36},{"x":2342,"y":212},{"x":2166,"y":210}]}
...
[16] {"page":5,"format":"CODE_128","text":"CODE128","confidence":100,"location":[{"x":1498,"y":550},{"x":2094,"y":552},{"x":2094,"y":752},{"x":1498,"y":750}]}
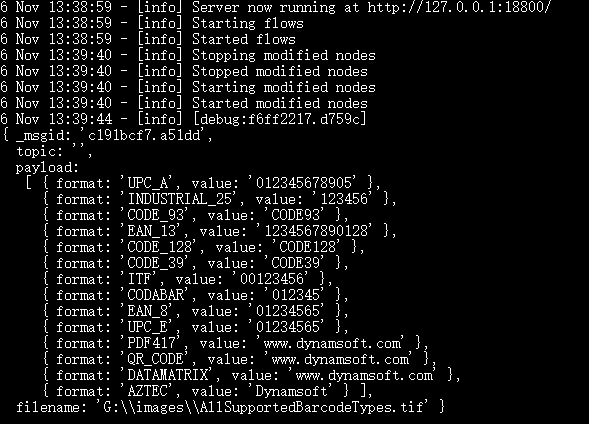
Each item’s page field tells you which page of the document the barcode came from, and location gives the four corner points of the barcode in the page’s pixel coordinates. For single images, every result reports page: 1.
Common Issues & Edge Cases
EC_LICENSE_INVALIDorEC_LICENSE_KEY_NOT_MATCHon the first input: The SDK validates the license against the value in the node’sLicensefield. Paste the Capture Vision trial or commercial key there — a Barcode Reader-only key that does not include Capture Vision won’t work.- The process exits nowhere in your flow: Long-lived Node.js processes such as Node-RED keep the SDK’s worker pool alive naturally. Do not call
CaptureVisionRouter.terminateIdleWorkers()from the node — it is meant for short-running scripts (like the official CLI sample) that must exit after one job. - Base64 input: The base64 string must be the raw encoded image bytes (PNG/JPG/BMP/GIF) without a
data:image/png;base64,prefix. Strip any data-URI prefix before injecting it into the node. - Slow decoding of large PDFs: Each page is rasterized internally before localization. Use
PT_READ_BARCODES_SPEED_FIRSTfor speed, or decode a heavy document in a separate Inject-triggered sub-flow so long jobs do not block the rest of your Node-RED flows.