


Python Document Edge Detection Tutorial: Detect, Auto-Crop, and Correct Document Orientation
Document detection is a key feature in many modern desktop, mobile and web applications. Recently, Dynamsoft unleashed its Python Capture Vision SDK, which provides a groundbreaking solution for developers working across Windows, Linux, and macOS. While the SDK also supports barcode and MRZ detection, this tutorial will focus on its robust document detection capabilities. We will walk you through how to integrate this feature into your Python projects, ensuring seamless and efficient document detection across platforms.
This article is Part 1 in a 4-Part Series.
- Part 1 - Python Document Edge Detection Tutorial: Detect, Auto-Crop, and Correct Document Orientation
- Part 2 - Extract Passport MRZ Data in Python on Windows, Linux, and macOS
- Part 3 - Build a Cross-Platform Python Barcode and QR Code Scanner with OpenCV and Dynamsoft SDK
- Part 4 - Python OCR Tutorial: Recognize SEMI Semiconductor Fonts with Dynamsoft Capture Vision SDK
What you’ll build: A Python application that detects document edges in images and webcam streams, applies perspective correction to auto-crop the document, and uses Tesseract OCR to fix orientation — all powered by the Dynamsoft Capture Vision SDK.
Key Takeaways
- The Dynamsoft Python Capture Vision SDK provides cross-platform document edge detection and perspective correction on Windows, Linux, and macOS with a single
CaptureVisionRouter.capture()call. PT_DETECT_AND_NORMALIZE_DOCUMENTis the preset template that detects document boundaries and outputs a deskewed, cropped image in one step.- Tesseract OCR’s orientation-and-script detection (OSD) reliably corrects 90°/180°/270° rotation after perspective transformation.
- Real-time document scanning from a webcam uses
ImageSourceAdapterandCapturedResultReceiverto process frames on a background thread with no main-thread blocking.
Common Developer Questions
How do I detect and auto-crop a document from an image in Python?
Call CaptureVisionRouter.capture() with the PT_DETECT_AND_NORMALIZE_DOCUMENT preset so the SDK finds the page boundary and returns a deskewed output image in one step. The normalized image can then be saved directly or sent into the orientation-fix stage.
How can I correct document orientation after perspective transformation in Python?
Run Tesseract’s orientation-and-script detection on the normalized document and rotate the image according to the returned angle. That post-process step fixes pages that are geometrically corrected but still upside down or sideways.
How do I perform real-time document edge detection from a webcam stream using Python?
Use OpenCV or another camera source to feed frames into the SDK’s image-source adapter and handle results through a receiver callback. This lets document boundaries be detected continuously without blocking the main Python thread.
Demo: Python Document Detection on macOS
Prerequisites
-
Dynamsoft Capture Vision Trial License: Obtain a 30-Day trial license key for the Dynamsoft Capture Vision SDK.
- Tesseract OCR: Follow the official documentation to download and install Tesseract OCR on your machine.
-
Tessdata: Download the language models for the desired languages.
-
Python Packages: Install the required Python packages using the following commands:
pip install dynamsoft-capture-vision-bundle opencv-python pytesseractWhat are these packages for?
dynamsoft-capture-vision-bundleis the Dynamsoft Capture Vision SDK for Python.opencv-pythoncaptures camera frames and displays processed image results.pytesseractis a Python wrapper for Tesseract OCR. It invokes the pre-installed Tesseract OCR engine to recognize text orientation in images.
Step 1: Detect and Normalize Documents from a Static Image
To quickly learn the basic API usage of the Dynamsoft Python Capture Vision SDK, you can refer to the official example on GitHub. The complete runnable source code is also available in the Source Code section. This example demonstrates how to detect document edges and perform perspective correction from a static image file.
from dynamsoft_capture_vision_bundle import *
import os
import sys
if __name__ == '__main__':
    errorCode, errorMsg = LicenseManager.init_license("LICENSE-KEY")
    if errorCode != EnumErrorCode.EC_OK and errorCode != EnumErrorCode.EC_LICENSE_CACHE_USED:
        print("License initialization failed: ErrorCode:", errorCode, ", ErrorString:", errorMsg)
    else:
        cvr = CaptureVisionRouter()
        while (True):
            image_path = input(
                ">> Input your image full path:\n"
                ">> 'Enter' for sample image or 'Q'/'q' to quit\n"
            ).strip('\'"')

            if image_path.lower() == "q":
                sys.exit(0)

            if image_path == "":
                image_path = "../Images/document-sample.jpg"

            if not os.path.exists(image_path):
                print("The image path does not exist.")
                continue
            result = cvr.capture(image_path, EnumPresetTemplate.PT_DETECT_AND_NORMALIZE_DOCUMENT.value)
            if result.get_error_code() != EnumErrorCode.EC_OK:
                print("Error:", result.get_error_code(), result.get_error_string())
            processed_document_result = result.get_processed_document_result()
            if processed_document_result is None or len(processed_document_result.get_deskewed_image_result_items()) == 0:
                print("No normalized documents.")
            else:
                items = processed_document_result.get_deskewed_image_result_items()
                print("Normalized", len(items), "documents.")
                for index, item in enumerate(processed_document_result.get_deskewed_image_result_items()):
                    out_path = "normalizedResult_" + str(index) + ".png"
                    image_io = ImageIO()
                    image = item.get_image_data()
                    if image != None:
                        errorCode, errorMsg = image_io.save_to_file(image, out_path)
                        if errorCode == 0:
                            print("Document " + str(index) + " file: " + out_path)
    input("Press Enter to quit...")
Explanation
- The
LicenseManager.init_licensemethod initializes the Dynamsoft Capture Vision SDK with a valid license key. - The
CaptureVisionRouterclass manages image processing tasks and coordinates image processing modules. Itscapturemethod processes the input image and returns the result.
To better understand the example’s functionality, we can use OpenCV to visualize the detected document edges and the perspective-corrected document.
Convert ImageData to OpenCV Mat for Visualization
In the above code, the image object is an instance of the ImageData class. To convert it to an OpenCV Mat format, you can use the following code snippet:
def convertImageData2Mat(normalized_image):
    ba = bytearray(normalized_image.get_bytes())
    width = normalized_image.get_width()
    height = normalized_image.get_height()

    channels = 3
    if normalized_image.get_image_pixel_format() == EnumImagePixelFormat.IPF_BINARY:
        channels = 1
        all = []
        skip = normalized_image.stride * 8 - width

        index = 0
        n = 1
        for byte in ba:

            byteCount = 7
            while byteCount >= 0:
                b = (byte & (1 << byteCount)) >> byteCount

                if index < normalized_image.stride * 8 * n - skip:
                    if b == 1:
                        all.append(255)
                    else:
                        all.append(0)

                byteCount -= 1
                index += 1

            if index == normalized_image.stride * 8 * n:
                n += 1

        mat = np.array(all, dtype=np.uint8).reshape(height, width, channels)
        return mat

    elif normalized_image.get_image_pixel_format() == EnumImagePixelFormat.IPF_GRAYSCALED:
        channels = 1

    mat = np.array(ba, dtype=np.uint8).reshape(height, width, channels)

    return mat
Extract the Corner Coordinates of the Detected Document
Each item is an instance of the NormalizedImageResultItem class. It contains the corners of the detected document. Use the following code snippet to extract the coordinates of the four corners:
location = item.get_location()
x1 = location.points[0].x
y1 = location.points[0].y
x2 = location.points[1].x
y2 = location.points[1].y
x3 = location.points[2].x
y3 = location.points[2].y
x4 = location.points[3].x
y4 = location.points[3].y

del location
Ensure that you use del location to release the memory allocated for the location object, preventing memory leaks by properly releasing the memory allocated for the C++ structure.
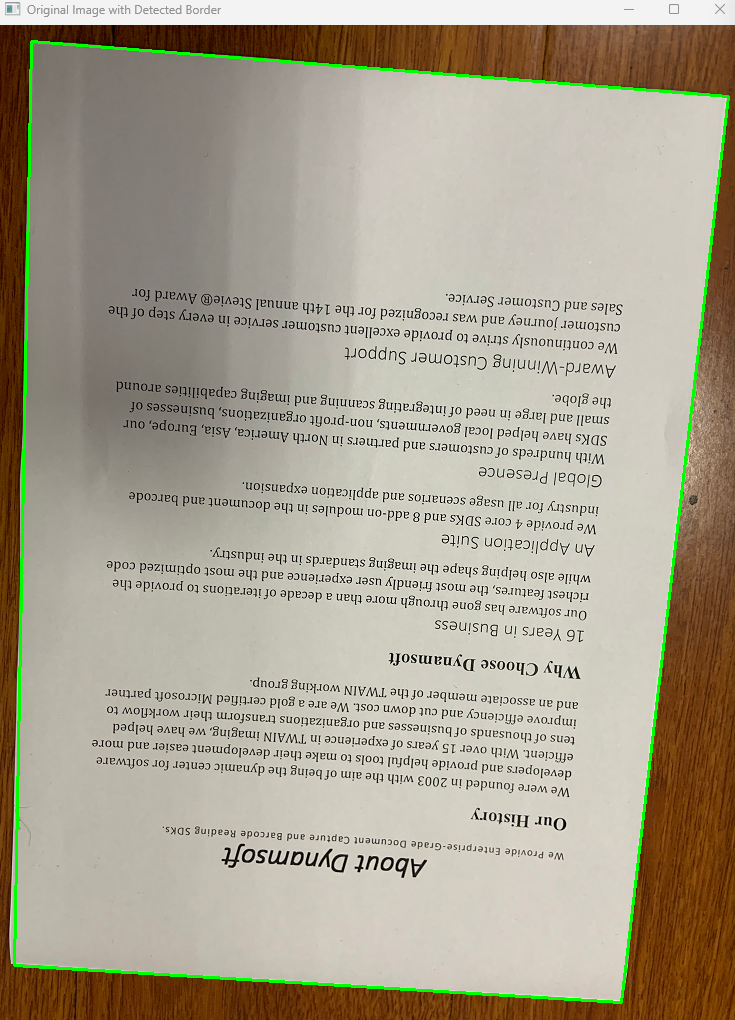
Draw the Document Edge Contours with OpenCV
cv2.drawContours(cv_image, [np.intp([(x1, y1), (x2, y2), (x3, y3), (x4, y4)])], 0, (0, 255, 0), 2)
Display the Perspective-Corrected Document
cv2.imshow("Normalized Image", mat)
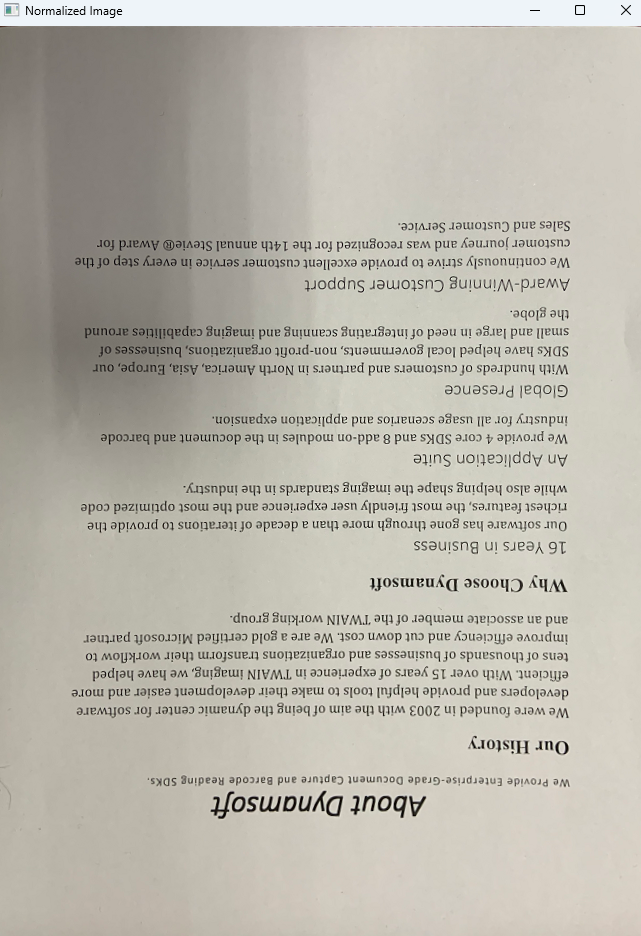
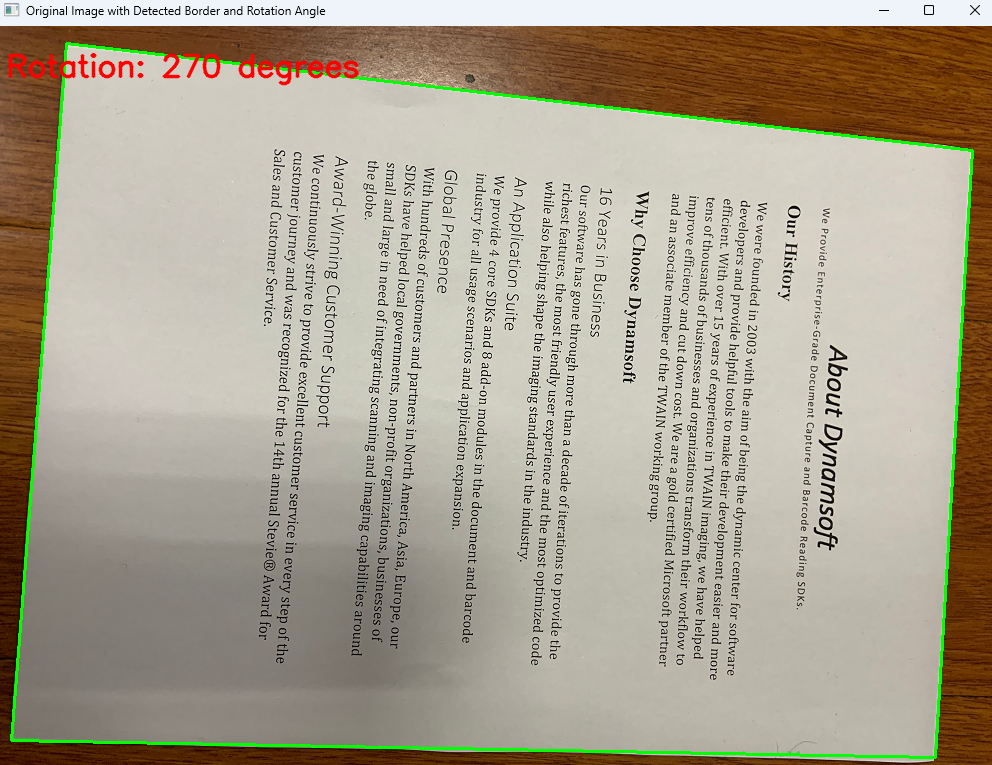
In common scanning scenarios, the document’s angle and orientation may deviate slightly, but this won’t affect the document’s direction after the perspective transformation. Here, we deliberately provide a document with a large rotation angle. After the perspective transformation, the document will rotate 180°. To solve this issue, we can use Tesseract’s text orientation detection to get the rotation angle and then adjust the document accordingly. In the next section, we will share the solution.
Step 2: Correct Document Orientation with Tesseract OCR
After installing pytesseract and the Tesseract OCR engine, you can use the following code snippet to detect the text orientation in the document:
osd_data = pytesseract.image_to_osd(
                            mat, output_type=Output.DICT)
print(osd_data)
rotation_angle = osd_data['rotate']

print(
    f"Detected Character Orientation: {rotation_angle} degrees")
To improve the accuracy of text orientation detection, you need to download specific language models for Tesseract OCR. For example, to detect English text, download the eng model from the GitHub repository. Then copy the eng.traineddata file to the tessdata directory. After that, update the detection parameters with the language model:
osd_data = pytesseract.image_to_osd(
                            mat, lang='eng', output_type=Output.DICT)
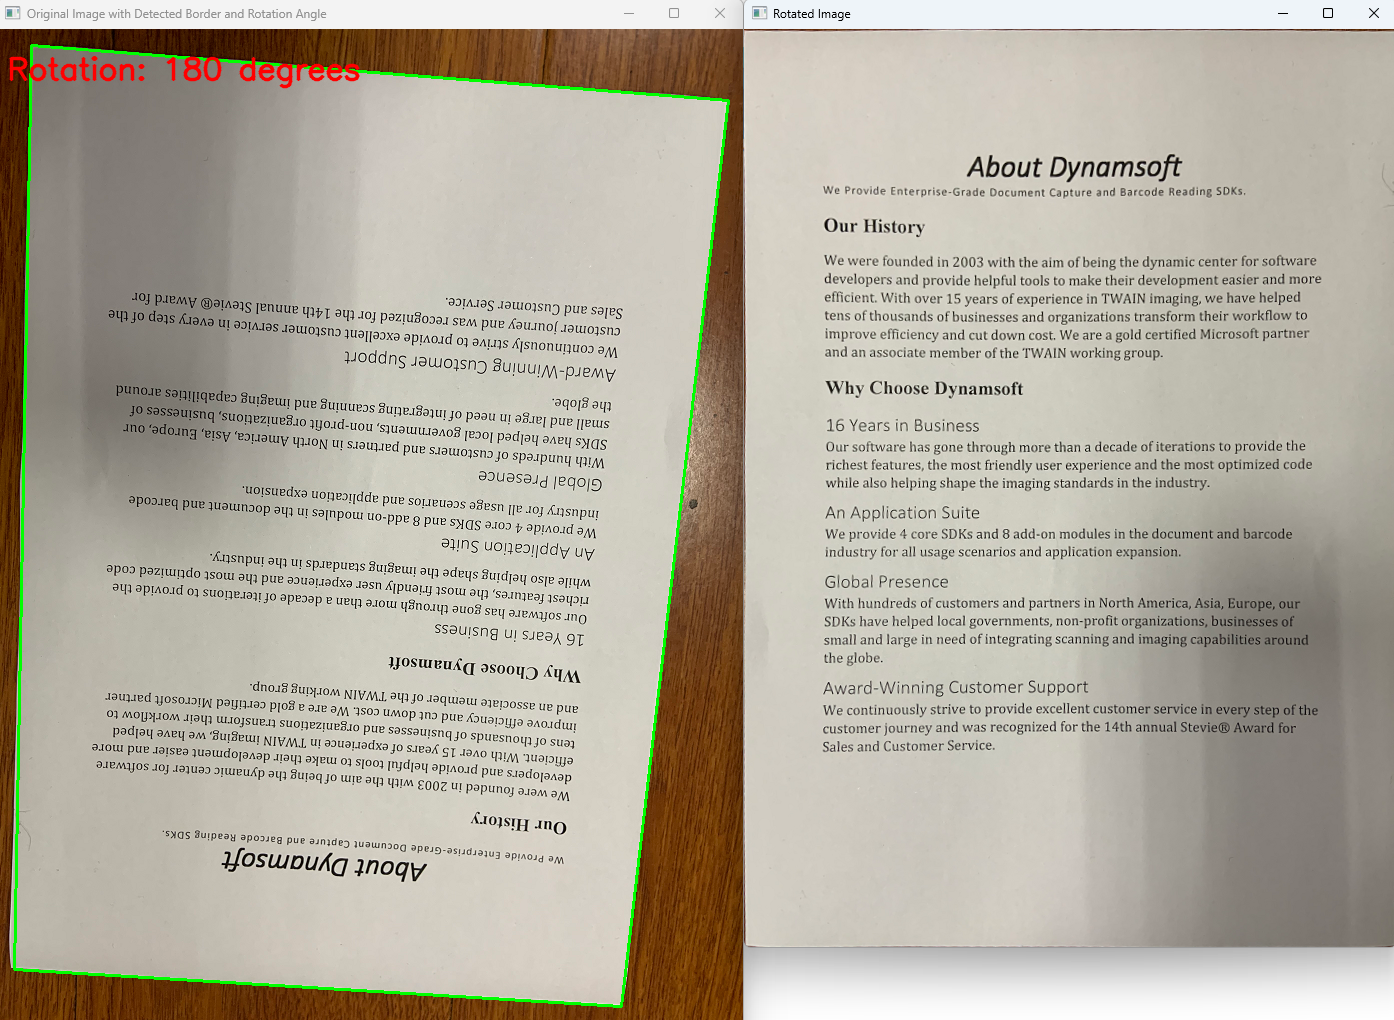
Based on the detected rotation angle, you can adjust the document’s orientation:
if rotation_angle == 90:
    mat = cv2.rotate(
        mat, cv2.ROTATE_90_CLOCKWISE)
elif rotation_angle == 180:
    mat = cv2.rotate(mat, cv2.ROTATE_180)
elif rotation_angle == 270:
    mat = cv2.rotate(
        mat, cv2.ROTATE_90_COUNTERCLOCKWISE)

cv2.imshow("Rotated Image", mat)
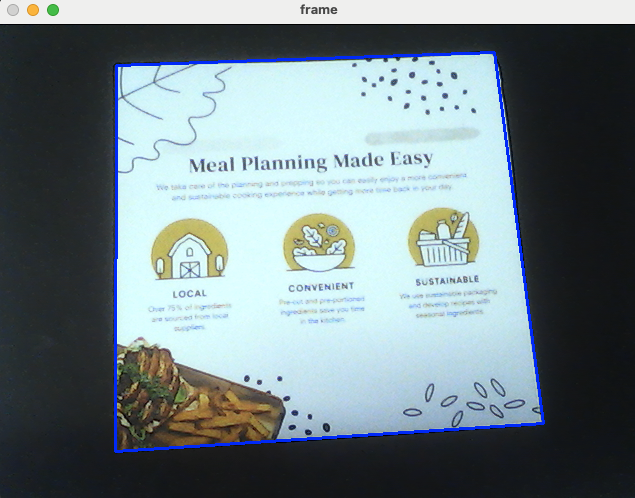
Step 3: Detect Documents in Real Time from a Webcam Stream
Besides detecting documents from static images, scanning documents in real time through a camera’s video stream is also a common scenario. You can use OpenCV to capture video frames and process them with the Dynamsoft Capture Vision SDK. The full code is as follows:
from dynamsoft_capture_vision_bundle import *
import cv2
import numpy as np
import queue
from utils import *


class FrameFetcher(ImageSourceAdapter):
    def has_next_image_to_fetch(self) -> bool:
        return True

    def add_frame(self, imageData):
        self.add_image_to_buffer(imageData)


class MyCapturedResultReceiver(CapturedResultReceiver):
    def __init__(self, result_queue):
        super().__init__()
        self.result_queue = result_queue

    def on_captured_result_received(self, captured_result):
        self.result_queue.put(captured_result)


if __name__ == '__main__':
    errorCode, errorMsg = LicenseManager.init_license(
        "LICENSE-KEY")
    if errorCode != EnumErrorCode.EC_OK and errorCode != EnumErrorCode.EC_LICENSE_CACHE_USED:
        print("License initialization failed: ErrorCode:",
              errorCode, ", ErrorString:", errorMsg)
    else:
        vc = cv2.VideoCapture(0)
        if not vc.isOpened():
            print("Error: Camera is not opened!")
            exit(1)

        cvr = CaptureVisionRouter()
        fetcher = FrameFetcher()
        cvr.set_input(fetcher)

        # Create a thread-safe queue to store captured items
        result_queue = queue.Queue()

        receiver = MyCapturedResultReceiver(result_queue)
        cvr.add_result_receiver(receiver)

        errorCode, errorMsg = cvr.start_capturing("Default")

        if errorCode != EnumErrorCode.EC_OK:
            print("error:", errorMsg)

        while True:
            ret, frame = vc.read()
            if not ret:
                print("Error: Cannot read frame!")
                break

            fetcher.add_frame(convertMat2ImageData(frame))

            # Check if there are any new captured items from the queue
            if not result_queue.empty():
                captured_result = result_queue.get_nowait()
                items = captured_result.get_items()
                for item in items:

                    if item.get_type() == EnumCapturedResultItemType.CRIT_BARCODE:
                        text = item.get_text()
                        location = item.get_location()
                        x1 = location.points[0].x
                        y1 = location.points[0].y
                        x2 = location.points[1].x
                        y2 = location.points[1].y
                        x3 = location.points[2].x
                        y3 = location.points[2].y
                        x4 = location.points[3].x
                        y4 = location.points[3].y
                        cv2.drawContours(
                            frame, [np.intp([(x1, y1), (x2, y2), (x3, y3), (x4, y4)])], 0, (0, 255, 0), 2)

                        cv2.putText(frame, text, (x1, y1),
                                    cv2.FONT_HERSHEY_SIMPLEX, 1, (0, 255, 0), 2)

                        del location

                    elif item.get_type() == EnumCapturedResultItemType.CRIT_DESKEWED_IMAGE:
                        location = item.get_source_deskew_quad()
                        x1 = location.points[0].x
                        y1 = location.points[0].y
                        x2 = location.points[1].x
                        y2 = location.points[1].y
                        x3 = location.points[2].x
                        y3 = location.points[2].y
                        x4 = location.points[3].x
                        y4 = location.points[3].y
                        cv2.drawContours(
                            frame, [np.intp([(x1, y1), (x2, y2), (x3, y3), (x4, y4)])], 0, (255, 0, 0), 2)

                        cv2.putText(frame, "Edge Detection", (x1, y1),
                                    cv2.FONT_HERSHEY_SIMPLEX, 1, (255, 0, 0), 2)

                        del location

            if cv2.waitKey(1) & 0xFF == ord('q'):
                break

            cv2.imshow('frame', frame)

        cvr.stop_capturing()
        vc.release()
        cv2.destroyAllWindows()
Explanation
-
The
FrameFetcherclass implements theImageSourceAdapterinterface to add frame data to the built-in buffer. TheMatobject needs to be converted toImageDatabefore being added to the buffer.def convertMat2ImageData(mat): if len(mat.shape) == 3: height, width, channels = mat.shape pixel_format = EnumImagePixelFormat.IPF_RGB_888 else: height, width = mat.shape channels = 1 pixel_format = EnumImagePixelFormat.IPF_GRAYSCALED stride = width * channels imagedata = ImageData(mat.tobytes(), width, height, stride, pixel_format) return imagedata -
The
MyCapturedResultReceiverclass implements theCapturedResultReceiverinterface. Theon_captured_result_receivedmethod, running on a native C++ worker thread, returns the processed result to the main thread and stores it in a thread-safe queue. In the main thread, we can check the queue for new results and display them in the OpenCV window.
Run the Real-Time Document Detection Demo on macOS
Common Issues and Edge Cases
- Tesseract OSD fails with “Too few characters”: If the deskewed document contains very little text (e.g., a mostly-blank form), Tesseract’s
image_to_osdmay throw an error. Wrap the call in a try/except and fall back to 0° rotation when OSD cannot determine orientation. - Memory leak from unreleased
locationobjects: Thelocationreturned byget_location()orget_source_deskew_quad()allocates memory in the C++ layer. Always calldel locationafter extracting coordinates to prevent leaks in long-running webcam loops. - Webcam frame drops on slower hardware: If
CaptureVisionRouterprocesses frames slower than the camera produces them, the internal buffer can grow. SetImageSourceAdapter’s max buffer size or skip frames when the result queue is empty to keep latency low.