


How to Read QR Codes from Screen Capture in Python with Qt and Dynamsoft Barcode SDK
In everyday life, we often use our smartphones to scan QR codes. However, when working on a computer, using a smartphone isn’t always the most convenient option for scanning QR codes that appear on your screen. Photos taken from monitors can have Moiré patterns, which can interfere with QR code recognition. Additionally, you might want to use the decoded information directly on your PC, such as a URL to open a website. This article will guide you through creating a simple Python barcode reader that makes QR code scanning directly from your desktop screen easy and efficient.
This article is Part 3 in a 7-Part Series.
- Part 1 - Build a Python GUI Barcode Scanner on Raspberry Pi with Qt PySide6
- Part 2 - How to Build a Cross-Platform GUI Python Barcode and QR Code Reader with PySide6 and Qt Designer
- Part 3 - How to Read QR Codes from Screen Capture in Python with Qt and Dynamsoft Barcode SDK
- Part 4 - How to Integrate a Barcode Scanner in a Django Web App with Python
- Part 5 - How to Build a Python Flet Chat App with Barcode Scanning and Gemini AI
- Part 6 - How to Dockerize a Python Barcode Reader for ARM64 and ARM32 Devices
- Part 7 - ZXing vs ZBar vs Dynamsoft: Python Barcode Reader Comparison with Accuracy and Speed Benchmarks
What you’ll build: A Python desktop application that lets you snip any area of your screen (or capture the full screen) and instantly decode all QR codes and barcodes in the captured region using PySide6, OpenCV, and the Dynamsoft Barcode Reader SDK.
Key Takeaways
- Python can read QR codes directly from screen captures without a camera, eliminating Moiré pattern issues caused by photographing monitors.
- The Dynamsoft Capture Vision SDK provides a cross-platform Python API for high-accuracy barcode and QR code decoding from in-memory images.
- PySide6 (Qt for Python) combined with PIL’s
ImageGrabenables pixel-perfect screen region selection and capture on Windows, macOS, and Linux. - This approach is ideal for desktop automation, QA testing, and any workflow where decoded QR data needs to stay on the PC.
Common Developer Questions
How do I read a QR code from a screen capture in Python?
Capture the selected screen region first, convert the grabbed pixels into an OpenCV image, and then feed that in-memory frame into the barcode SDK instead of using a camera. That lets the desktop app read QR codes directly from what is already displayed on screen.
Can I decode multiple QR codes from a screenshot using Python?
Yes. Once the screenshot is captured as an image, the SDK can scan the whole region and return every barcode or QR code found inside that frame, not just the first symbol. That makes full-screen or partial-screen capture useful for QA and desktop automation workflows.
How do I build a screen snipping tool with PySide6 and decode barcodes from the captured area?
Create a transparent full-screen overlay widget, track mouse drag coordinates in the press-move-release cycle, grab the selected region with ImageGrab, and then pass the captured frame into the decoder once the overlay closes. That combines PySide6 screen snipping with immediate barcode recognition.
Prerequisites
-
OpenCV
python3 -m pip install opencv-python -
PySide6
python3 -m pip install PySide6 -
Dynamsoft Barcode Reader
python3 -m pip install dynamsoft-capture-vision-bundle -
Get a 30-day free trial license for Dynamsoft Barcode Reader
How to Build a Screen QR Code Reader in Python
To enhance the GUI Python barcode reader built with Qt for Python, OpenCV, and Dynamsoft Barcode Reader, we’ll add screen snipping functionality. Drawing inspiration from this snipping tool implementation, we’ll follow these steps to implement screenshot functionality:
- Create a custom Qt widget that overlays the screen.
- Draw the selected area in the
paintEvent()function as the mouse moves. - Capture the image of the selected area using
PIL.ImageGrab.grab()when the mouse is released.
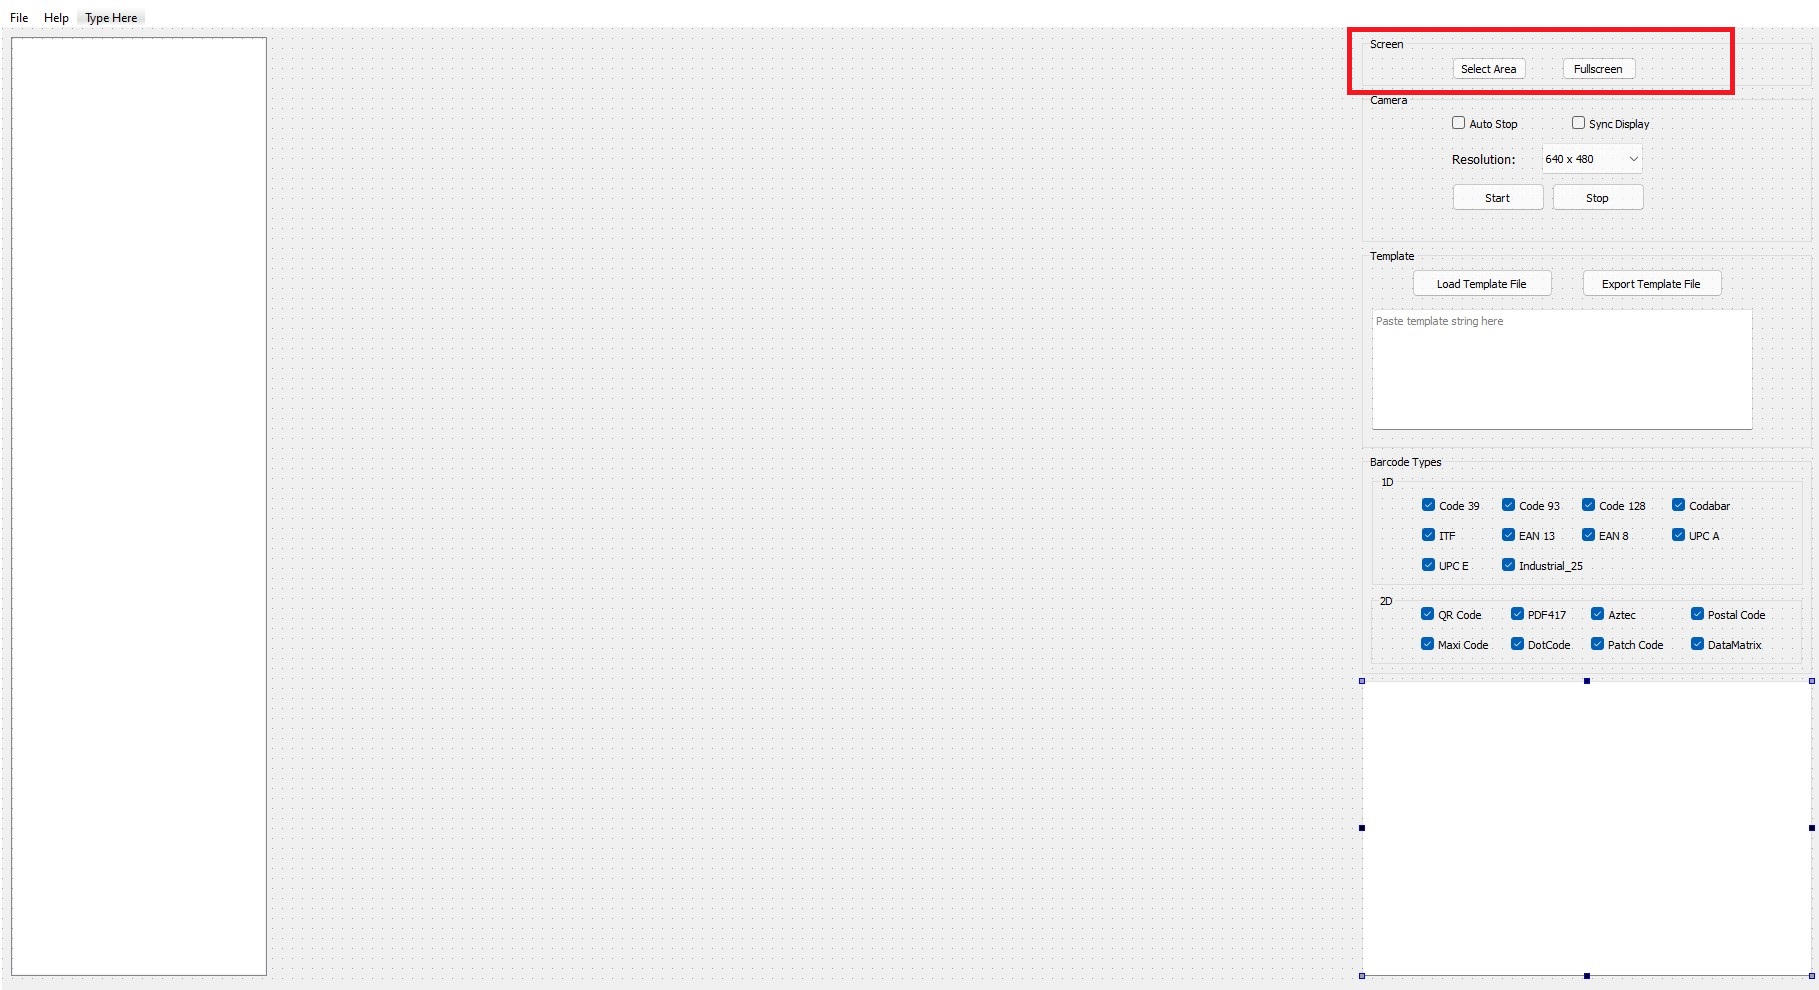
Step 1: Add Buttons for Screen Snipping Events
Open the design.ui file in Qt Designer and add two buttons to trigger snipping events.
After saving the updated layout, compile the UI file to a Python file:
PySide6-uic design.ui -o design.py
In app_advanced.py, connect the new buttons to their respective slot functions:
self.ui.pushButton_area.clicked.connect(self.snipArea)
self.ui.pushButton_full.clicked.connect(self.snipFull)
Step 2: Create a Custom Qt Snipping Widget
Create a new file SnippingTool.py and define a custom Qt widget for screen snipping:
import numpy as np
import cv2
from PIL import ImageGrab
from PySide6 import QtWidgets, QtCore, QtGui
from PySide6.QtCore import Qt

class SnippingWidget(QtWidgets.QWidget):
    is_snipping = False

    def __init__(self, parent=None, app=None):
        super(SnippingWidget, self).__init__()
        self.parent = parent
        self.setWindowFlags(Qt.WindowStaysOnTopHint)

        self.screen = app.primaryScreen()
        self.setGeometry(0, 0, self.screen.size().width(), self.screen.size().height())
        self.begin = QtCore.QPoint()
        self.end = QtCore.QPoint()
        self.onSnippingCompleted = None

    def start(self):
        SnippingWidget.is_snipping = True
        self.setWindowOpacity(0.3)
        QtWidgets.QApplication.setOverrideCursor(QtGui.QCursor(QtCore.Qt.CrossCursor))
        self.show()
Ensure the widget’s size matches the screen resolution obtained from the primaryScreen() function.
Step 3: Handle Mouse Events for Area Selection
Implement the mouse event handlers to define the selected area:
def mousePressEvent(self, event):
    self.begin = event.pos()
    self.end = self.begin
    self.update()

def mouseMoveEvent(self, event):
    self.end = event.pos()
    self.update()

def mouseReleaseEvent(self, event):
    SnippingWidget.is_snipping = False
    QtWidgets.QApplication.restoreOverrideCursor()
    x1 = min(self.begin.x(), self.end.x())
    y1 = min(self.begin.y(), self.end.y())
    x2 = max(self.begin.x(), self.end.x())
    y2 = max(self.begin.y(), self.end.y())

    self.repaint()
    QtWidgets.QApplication.processEvents()
    self.close()
Draw a rectangle to indicate the selected area in the paintEvent() function:
def paintEvent(self, event):
    if SnippingWidget.is_snipping:
        brush_color = (128, 128, 255, 100)
        lw = 3
        opacity = 0.3
    else:
        self.begin = QtCore.QPoint()
        self.end = QtCore.QPoint()
        brush_color = (0, 0, 0, 0)
        lw = 0
        opacity = 0

    self.setWindowOpacity(opacity)
    qp = QtGui.QPainter(self)
    qp.setPen(QtGui.QPen(QtGui.QColor('black'), lw))
    qp.setBrush(QtGui.QColor(*brush_color))
    rect = QtCore.QRectF(self.begin, self.end)
    qp.drawRect(rect)
Step 4: Capture Screen Images with PIL
Use the PIL library to capture images from the screen after releasing the mouse:
-
Capture a selected area:
img = ImageGrab.grab(bbox=(x1, y1, x2, y2)) try: img = cv2.cvtColor(np.array(img), cv2.COLOR_RGB2BGR) except: img = None -
Capture the full screen:
img = ImageGrab.grab(bbox=(0, 0, self.screen.size().width(), self.screen.size().height()))
Step 5: Minimize and Restore the Application Window
To avoid blocking the snipping area, minimize the application window before starting the snipping widget and restore it afterward:
def onSnippingCompleted(self, frame):
    self.setWindowState(Qt.WindowMaximized)
    if frame is None:
        return

    frame, self._results = self._barcodeManager.decode_frame(frame)
    self.showResults(frame, self._results)

def snipArea(self):
    self.setWindowState(Qt.WindowMinimized)
    self.snippingWidget.start()

def snipFull(self):
    self.setWindowState(Qt.WindowMinimized)
    self.snippingWidget.fullscreen()
Step 6: Test the Screen QR Code Reader
-
Run the barcode recognition program:
python3 app_advanced.py - Search Google for QR code.
-
Click the
Select Areabutton to scan one or multiple QR codes displayed in the search results.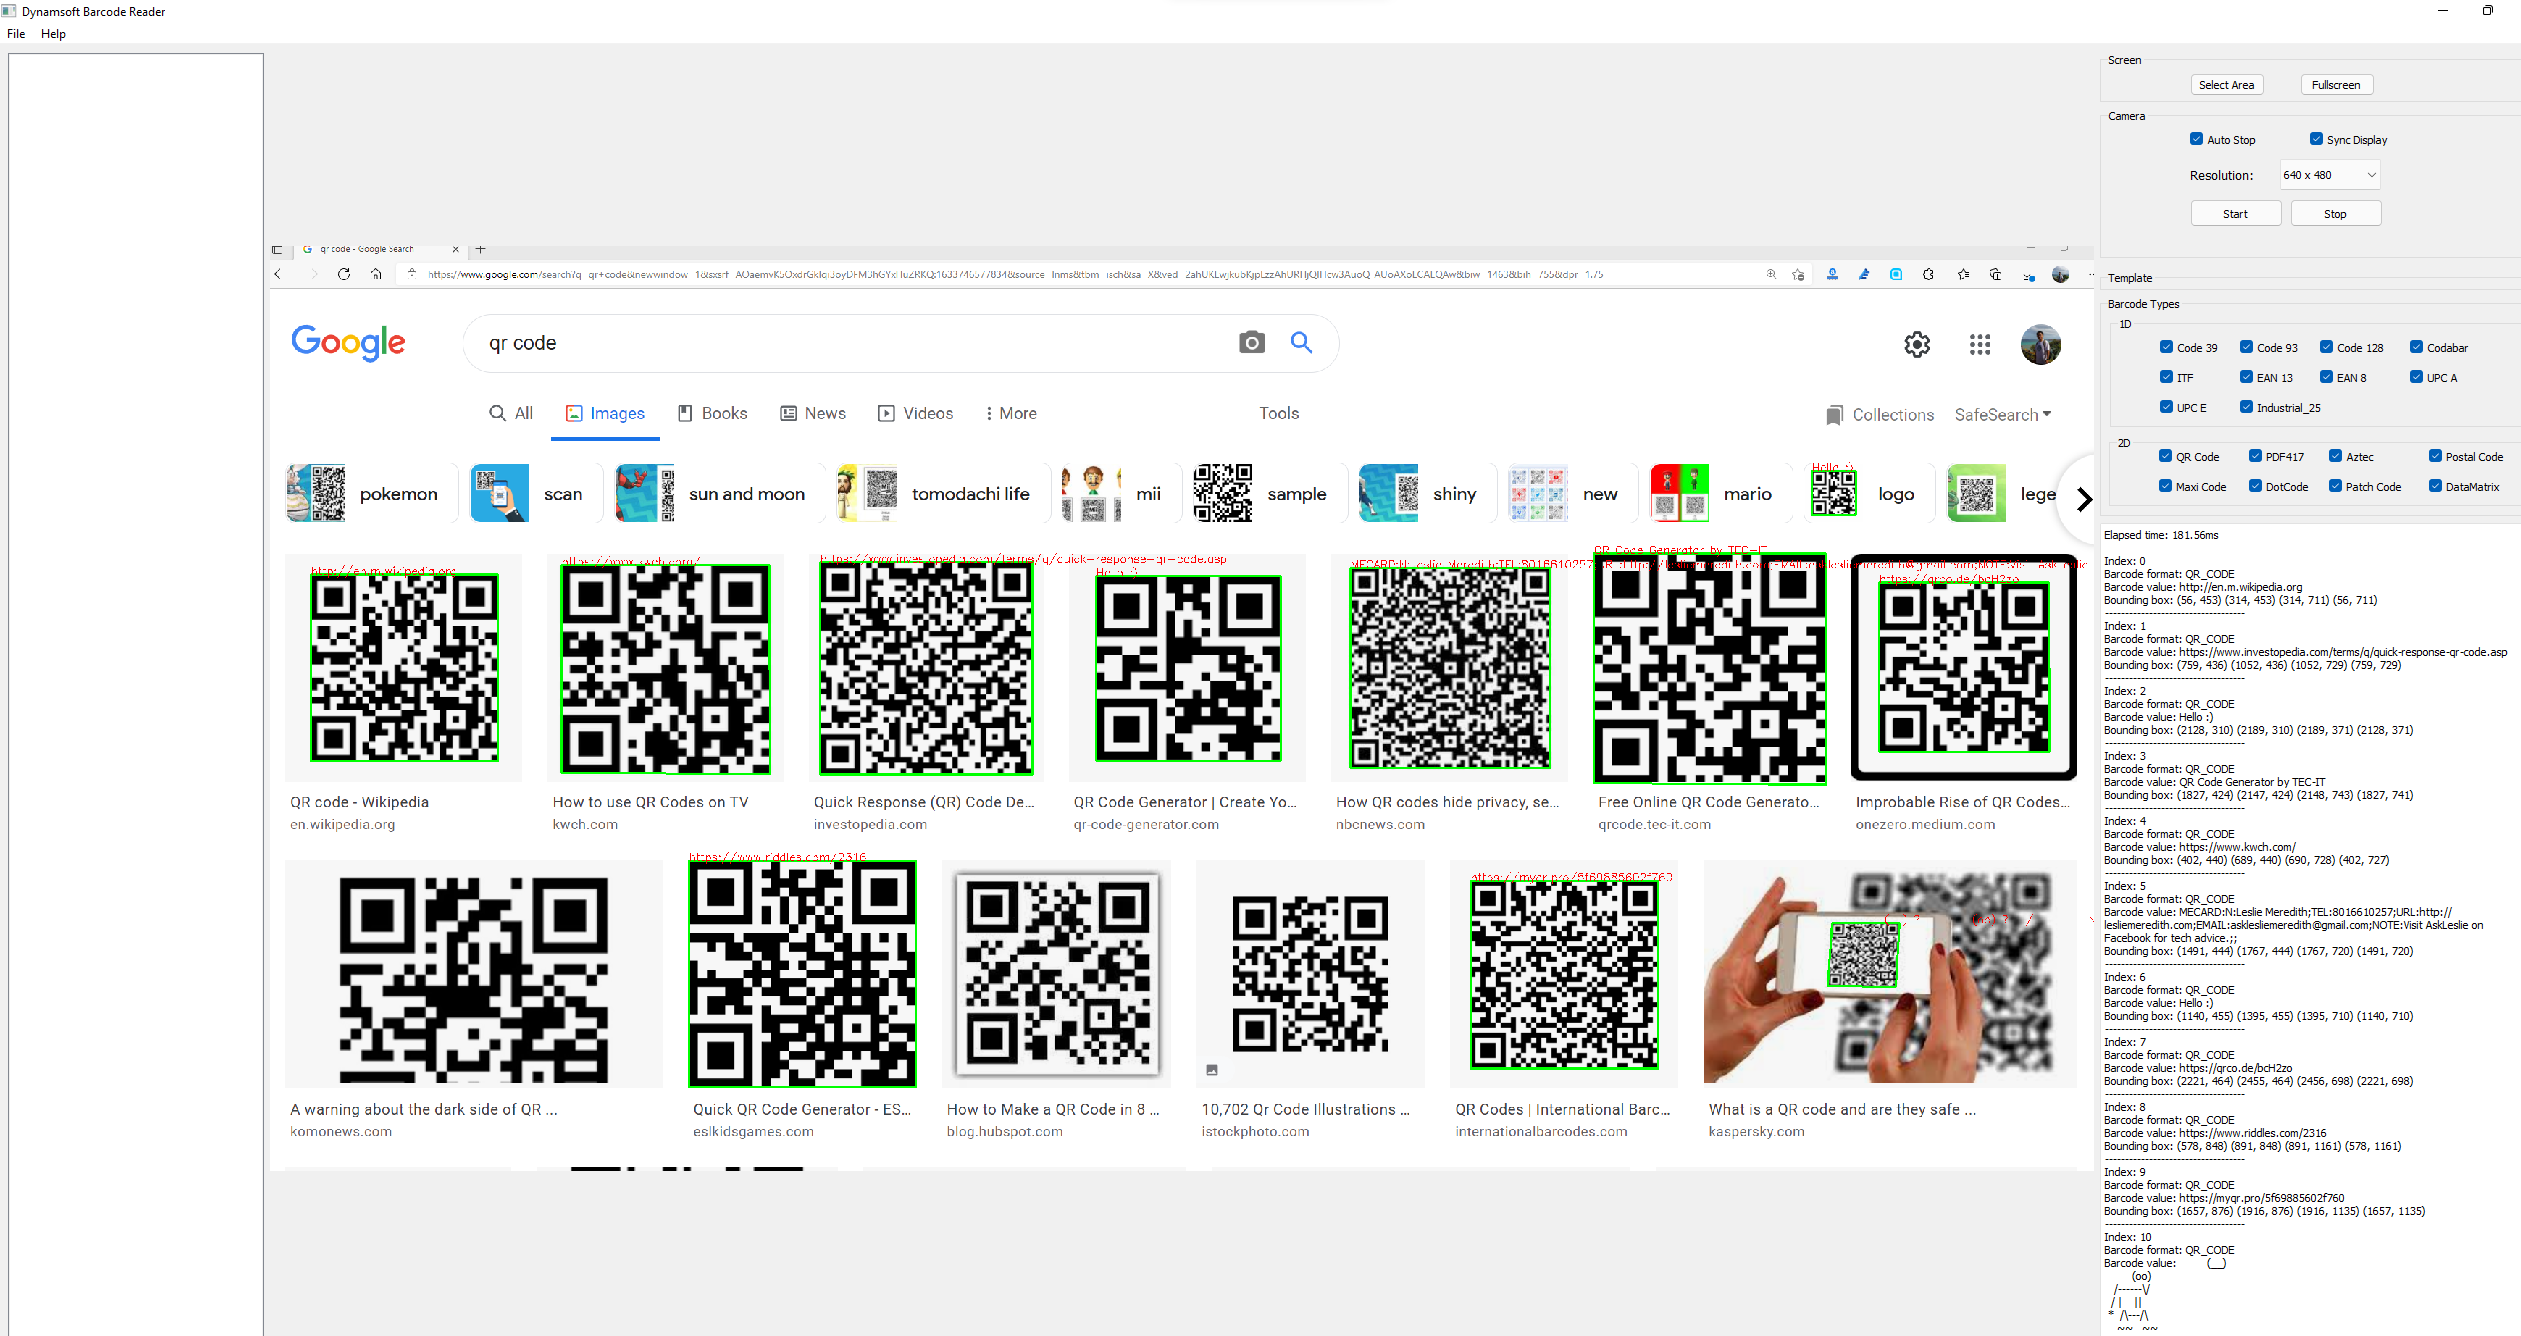
Alternatively, you can perform a full-screen barcode scan with a single click.
Common Issues and Edge Cases
- Moiré patterns on high-DPI screens: If you capture QR codes displayed on a monitor at non-native resolution, Moiré interference can reduce decode accuracy. Capture at native screen resolution for best results.
- DPI scaling mismatch on Windows: On multi-monitor setups with different DPI scales,
ImageGrab.grab()coordinates may not match the Qt widget coordinates. Set your Python process to DPI-aware mode (ctypes.windll.shcore.SetProcessDpiAwareness(2)) before creating the QApplication. - Empty or black captures on Wayland (Linux):
PIL.ImageGrab.grab()relies on X11; on Wayland-based desktops it may return a black image. Use a Wayland-compatible screenshot tool (e.g.,grim) as a fallback.