


Build a JavaScript Barcode, MRZ, and Document Scanner Using Dynamsoft Capture Vision SDK
Modern web applications increasingly require advanced image processing capabilities. Technologies like barcode detection, Machine Readable Zone (MRZ) recognition, and document rectification have become essential across industries from retail checkout systems to airport passport scanners and digital document management solutions. This comprehensive guide demonstrates how to implement all three capabilities in a single web application using the Dynamsoft Capture Vision JavaScript SDK.
What you’ll build: A single-page web app that uses Dynamsoft Capture Vision to scan barcodes, read MRZ fields from passports/IDs, and detect and rectify document boundaries — from both uploaded image files and a live camera feed.
Key Takeaways
- Dynamsoft Capture Vision is a JavaScript SDK for barcode scanning, MRZ reading, and document detection — unified in a single browser integration with no native plugins required.
- The
CaptureVisionRouterAPI routes the same camera or image input to different recognition pipelines (ReadBarcodes_Default,ReadMRZ,DetectDocumentBoundaries_Default) based on the selected mode. - WASM modules are loaded on-demand after license activation to minimize initial page load time and avoid blocking the UI.
- This pattern applies in identity verification, logistics, and any workflow requiring multi-format document capture from a browser.
Common Developer Questions
- How do I scan barcodes and read MRZ from a webcam using JavaScript?
- How do I detect and rectify document boundaries in the browser without a backend?
- How do I parse MRZ data from a passport or ID card into structured fields using JavaScript?
Demo Video: Scan Barcodes, QR Codes, MRZ, and Documents in the Browser
Online Demo
https://yushulx.me/javascript-barcode-qr-code-scanner/examples/barcode_mrz_document/
Prerequisites
- Obtain a License: Get a 30-day FREE Trial License for Dynamsoft Capture Vision.
-
Include the SDK: Add the Dynamsoft Capture Vision Bundle Module to your HTML page.
<script src="https://cdn.jsdelivr.net/npm/dynamsoft-capture-vision-bundle@3.2.5000/dist/dcv.bundle.min.js"></script>
Step 1: Configure License Activation, Input Source, and Scanning Mode
Activate the SDK License
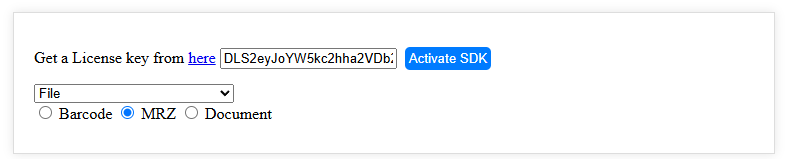
To optimize performance, the core WebAssembly (WASM) modules are loaded on-demand when the user clicks the Activate SDK button with a valid license key. This lazy-loading approach reduces initial page load time.
<div>
    <label>
        Get a License key from <a href="https://www.dynamsoft.com/customer/license/trialLicense/?product=dcv&package=cross-platform"
            target="_blank">here</a>
    </label>
    <input type="text" id="license_key"
        value="LICENSE-KEY"
        placeholder="LICENSE-KEY">
    <button onclick="activate()">Activate SDK</button>
</div>

<script>
    let cvr;
    let reader;
    let cameraEnhancer;
    let isSDKReady = false;
    let img = new Image();
    let globalPoints;
    let cameras;
    let resolution;
    let isDetecting = false;
    let isCaptured = false;
    let parser;

    async function activate() {
        toggleLoading(true);
        let divElement = document.getElementById("license_key");
        let licenseKey = divElement.value == "" ? divElement.placeholder : divElement.value;

        try {
            await Dynamsoft.License.LicenseManager.initLicense(
                licenseKey,
                true
            );

            Dynamsoft.Core.CoreModule.loadWasm(["DBR", "DLR", "DDN"]);

            parser = await Dynamsoft.DCP.CodeParser.createInstance();

            await Dynamsoft.DCP.CodeParserModule.loadSpec("MRTD_TD1_ID");
            await Dynamsoft.DCP.CodeParserModule.loadSpec("MRTD_TD2_FRENCH_ID");
            await Dynamsoft.DCP.CodeParserModule.loadSpec("MRTD_TD2_ID");
            await Dynamsoft.DCP.CodeParserModule.loadSpec("MRTD_TD2_VISA");
            await Dynamsoft.DCP.CodeParserModule.loadSpec("MRTD_TD3_PASSPORT");
            await Dynamsoft.DCP.CodeParserModule.loadSpec("MRTD_TD3_VISA");
            await Dynamsoft.CVR.CaptureVisionRouter.appendDLModelBuffer("MRZCharRecognition");
            await Dynamsoft.CVR.CaptureVisionRouter.appendDLModelBuffer("MRZTextLineRecognition");

            cvr = await Dynamsoft.CVR.CaptureVisionRouter.createInstance();

            cvr.addResultReceiver({
                onCapturedResultReceived: (result) => {

                    showCameraResult(result);
                },
            });

            isSDKReady = true;
        }
        catch (ex) {
            console.error(ex);
        }

        toggleLoading(false);
    }
</script>
Select the Input Source and Scanning Mode
The application supports two input sources: static image files and live camera feed. Users can switch between these modes using a dropdown menu, which dynamically shows or hides the corresponding UI containers.
<div class="row">
    <div>
        <select onchange="selectChanged()" id="dropdown">
            <option value="file">File</option>
            <option value="camera">Camera</option>
        </select>
        <input type="checkbox" id="barcode_checkbox" checked>Barcode
        <input type="checkbox" id="mrz_checkbox">MRZ
        <input type="checkbox" id="document_checkbox" onchange="checkChanged()">Document
    </div>
</div>

<script>
    async function selectChanged() {
        if (dropdown.value === 'file') {
            if (cameraEnhancer != null) {
                closeCamera(cameraEnhancer);

                if (cvr != null) {
                    await cvr.stopCapturing();
                }

                scanButton.innerHTML = "Scan";
                isDetecting = false;
            }
            let divElement = document.getElementById("file_container");
            divElement.style.display = "block";

            divElement = document.getElementById("camera_container");
            divElement.style.display = "none";
        }
        else {
            if (cameraEnhancer == null) {
                await initCamera();
            }
            let divElement = document.getElementById("camera_container");
            divElement.style.display = "block";

            divElement = document.getElementById("file_container");
            divElement.style.display = "none";

            await cameraChanged();
        }
    }

</script>
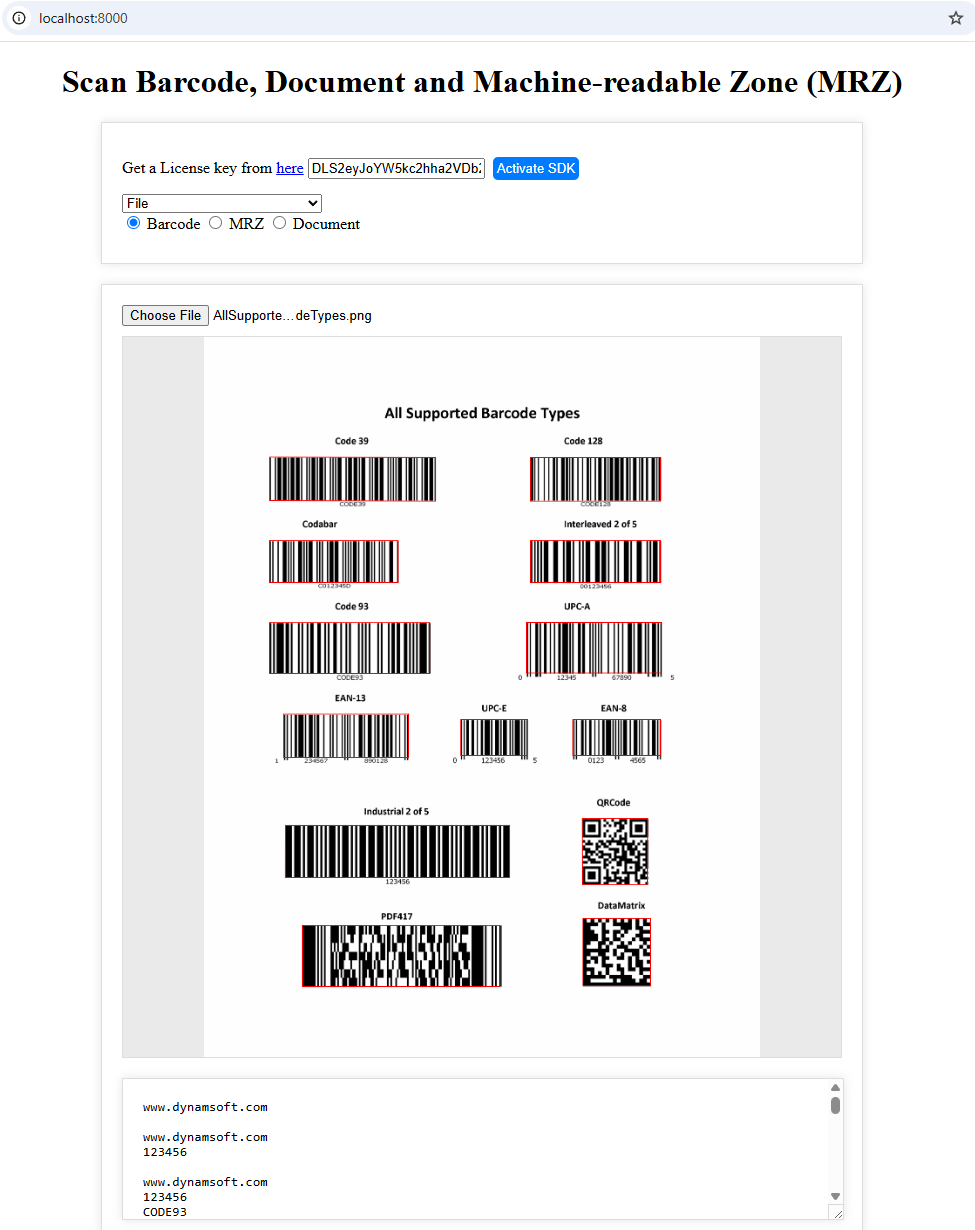
Step 2: Detect Barcodes, MRZ, and Documents from Image Files
To enable detection from static images, follow these steps:
-
Construct the UI (User Interface) for file input and result display. This involves creating a section for users to upload an image file and another section to show the detection outcomes.
<div class="container" id="file_container"> <div> <input type="file" id="pick_file" accept="image/*" /> <button onclick="detect()">Detect</button> </div> <div class="row"> <div class="imageview"> <img id="image_file" src="default.png" /> <canvas id="overlay_canvas" class="overlay"></canvas> </div> </div> <div class="row"> <div> <textarea id="detection_result"></textarea> </div> </div> <div class="row"> <div> <img id="document-rectified-image" /> </div> </div> </div> -
Load the uploaded image onto an HTML canvas. The canvas serves dual purposes: displaying the image and overlaying detection results to visualize detected regions.
document.getElementById("pick_file").addEventListener("change", function () { let currentFile = this.files[0]; if (currentFile == null) { return; } var fr = new FileReader(); fr.onload = function () { loadImage2Canvas(fr.result); } fr.readAsDataURL(currentFile); }); function loadImage2Canvas(base64Image) { imageFile.src = base64Image; img.src = base64Image; img.onload = async function () { let width = img.width; let height = img.height; overlayCanvas.width = width; overlayCanvas.height = height; targetCanvas.width = width; targetCanvas.height = height; ... }; } -
Use Dynamsoft Capture Vision APIs to detect barcodes, MRZ, or document boundaries based on the selected mode. Detection results are then rendered on the canvas as visual overlays.
 let selectedMode = document.querySelector('input[name="scanMode"]:checked').value;

 let context = overlayCanvas.getContext('2d');
 context.clearRect(0, 0, overlayCanvas.width, overlayCanvas.height);
 try {
     if (selectedMode == "barcode") {
         await cvr.resetSettings();
         cvr.capture(img.src, "ReadBarcodes_Default").then((result) => {
             showFileResult(selectedMode, context, result, img, Dynamsoft.Core.EnumCapturedResultItemType.CRIT_BAR_CODE);
         });
     }
     else if (selectedMode == "mrz") {
         await cvr.initSettings("./full.json");
         cvr.capture(img.src, "ReadMRZ").then((result) => {
             showFileResult(selectedMode, context, result, img, Dynamsoft.Core.EnumCapturedResultItemType.CRIT_TEXT_LINE);
         });
     }
     else if (selectedMode == "document") {
         await cvr.resetSettings();
         cvr.capture(img.src, "DetectDocumentBoundaries_Default").then((result) => {
             showFileResult(selectedMode, context, result, img, Dynamsoft.Core.EnumCapturedResultItemType.CRIT_DETECTED_QUAD);
         });
     }
 }
 catch (ex) {
     console.error(ex);
 }

 async function showFileResult(selectedMode, context, result, img, type) {
     let parseResults = '';
     let detection_result = document.getElementById('detection_result');
     detection_result.innerHTML = "";
     let txts = [];
     let items = result.items;
     if (items.length > 0) {
         for (var i = 0; i < items.length; ++i) {

             if (items[i].type !== type) {
                 continue;
             }

             let item = items[i];
             txts.push(item.text);
             localization = item.location;

             context.strokeStyle = '#ff0000';
             context.lineWidth = 2;

             let points = localization.points;
             globalPoints = points;
             context.beginPath();
             context.moveTo(points[0].x, points[0].y);
             context.lineTo(points[1].x, points[1].y);
             context.lineTo(points[2].x, points[2].y);
             context.lineTo(points[3].x, points[3].y);
             context.closePath();
             context.stroke();

             if (selectedMode == "barcode") {
                 if (txts.length > 0) {
                     detection_result.innerHTML += txts.join('\n') + '\n\n';
                 }
                 else {
                     detection_result.innerHTML += "Recognition Failed\n";
                 }
             }
             else if (selectedMode == "mrz") {
                 if (txts.length > 0) {
                     detection_result.innerHTML += txts.join('\n') + '\n\n';
                     parseResults = await parser.parse(item.text);
                     detection_result.innerHTML += JSON.stringify(extractMrzInfo(parseResults));
                 }
                 else {
                     detection_result.innerHTML += "Recognition Failed\n";
                 }

             }
             else if (selectedMode == "document") {
                 openEditor(img.src);
             }


         }
     }
     else {
         detection_result.innerHTML += "Nothing found\n";
     }
 }
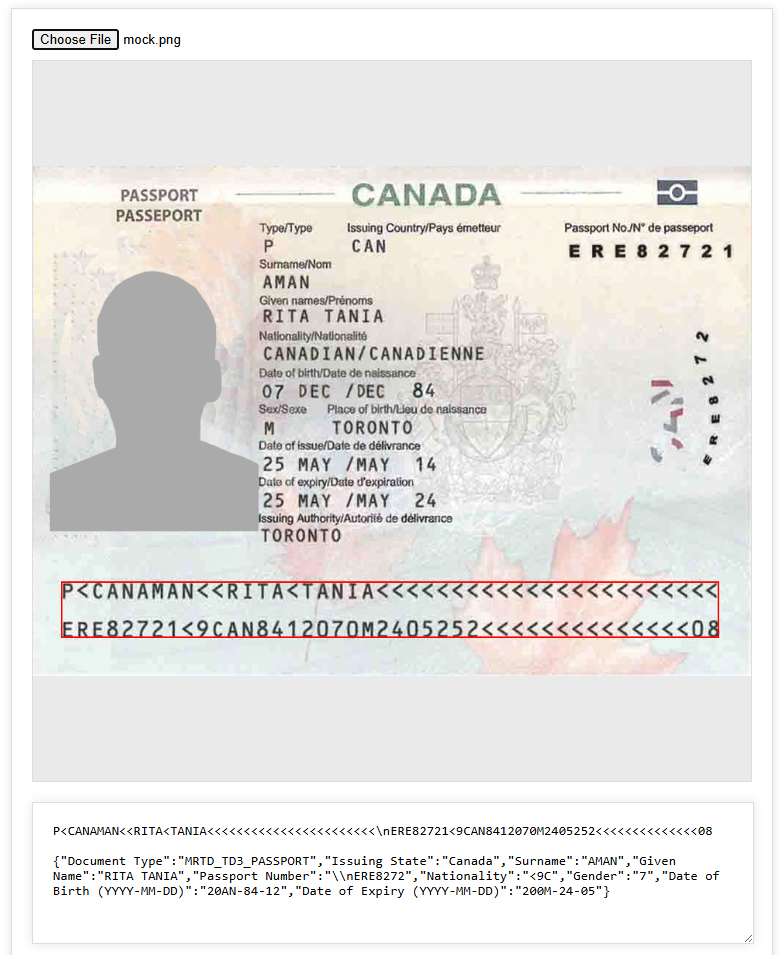
Parse MRZ Data into Structured Fields
Once the MRZ text is recognized, parse it to extract structured information such as the holder’s name, passport number, date of birth, nationality, and expiration date. The CodeParser module handles the complex parsing logic automatically.
function extractMrzInfo(result) {
    const parseResultInfo = {};
    let type = result.getFieldValue("documentCode");
    parseResultInfo['Document Type'] = JSON.parse(result.jsonString).CodeType;
    let nation = result.getFieldValue("issuingState");
    parseResultInfo['Issuing State'] = nation;
    let surName = result.getFieldValue("primaryIdentifier");
    parseResultInfo['Surname'] = surName;
    let givenName = result.getFieldValue("secondaryIdentifier");
    parseResultInfo['Given Name'] = givenName;
    let passportNumber = type === "P" ? result.getFieldValue("passportNumber") : result.getFieldValue("documentNumber");
    parseResultInfo['Passport Number'] = passportNumber;
    let nationality = result.getFieldValue("nationality");
    parseResultInfo['Nationality'] = nationality;
    let gender = result.getFieldValue("sex");
    parseResultInfo["Gender"] = gender;
    let birthYear = result.getFieldValue("birthYear");
    let birthMonth = result.getFieldValue("birthMonth");
    let birthDay = result.getFieldValue("birthDay");
    if (parseInt(birthYear) > (new Date().getFullYear() % 100)) {
        birthYear = "19" + birthYear;
    } else {
        birthYear = "20" + birthYear;
    }
    parseResultInfo['Date of Birth (YYYY-MM-DD)'] = birthYear + "-" + birthMonth + "-" + birthDay;
    let expiryYear = result.getFieldValue("expiryYear");
    let expiryMonth = result.getFieldValue("expiryMonth");
    let expiryDay = result.getFieldValue("expiryDay");
    if (parseInt(expiryYear) >= 60) {
        expiryYear = "19" + expiryYear;
    } else {
        expiryYear = "20" + expiryYear;
    }
    parseResultInfo["Date of Expiry (YYYY-MM-DD)"] = expiryYear + "-" + expiryMonth + "-" + expiryDay;
    return parseResultInfo;
}
Build an Interactive Document Edge Editor
Use a div element to create a document edge editor.
<div class="container" id="document_editor">
    <div>
        <button onclick="edit()">Edit</button>
        <button onclick="rectify()">Rectify</button>
        <button onclick="save()">Save</button>
    </div>
    <div class="imageview" id="edit_view">
        <img id="target_file" src="default.png" />
        <canvas id="target_canvas" class="overlay"></canvas>
    </div>
    <div class="imageview" id="rectify_view">
        <img id="rectified_image" src="default.png" />
    </div>
</div>
The editor enables manual refinement of detected document boundaries when automatic detection isn’t perfect. The four corner points are stored in the globalPoints array. Users can click and drag any corner to adjust the boundary, with the quadrilateral redrawn in real-time to provide visual feedback.
function openEditor(image) {
    let target_context = targetCanvas.getContext('2d');
    targetCanvas.addEventListener("mousedown", (event) => updatePoint(event, target_context, targetCanvas));
    targetCanvas.addEventListener("touchstart", (event) => updatePoint(event, target_context, targetCanvas));
    drawQuad(target_context, targetCanvas);
    targetFile.src = image;
}

function updatePoint(e, context, canvas) {
    if (!globalPoints) {
        return;
    }

    function getCoordinates(e) {
        let rect = canvas.getBoundingClientRect();

        let scaleX = canvas.clientWidth / canvas.width;
        let scaleY = canvas.clientHeight / canvas.height;

        let clientX = e.clientX;
        let clientY = e.clientY;

        if (e.touches && e.touches.length > 0) {
            clientX = e.touches[0].clientX;
            clientY = e.touches[0].clientY;
        }

        let mouseX = clientX;
        let mouseY = clientY;

        if (scaleX < scaleY) {
            mouseX = clientX - rect.left;
            mouseY = clientY - rect.top - (canvas.clientHeight - canvas.height * scaleX) / 2;

            mouseX = mouseX / scaleX;
            mouseY = mouseY / scaleX;
        }
        else {
            mouseX = clientX - rect.left - (canvas.clientWidth - canvas.width * scaleY) / 2;
            mouseY = clientY - rect.top;

            mouseX = mouseX / scaleY;
            mouseY = mouseY / scaleY;
        }

        return { x: Math.round(mouseX), y: Math.round(mouseY) };
    }

    let delta = 20;
    let coordinates = getCoordinates(e);

    for (let i = 0; i < globalPoints.length; i++) {
        if (Math.abs(globalPoints[i].x - coordinates.x) < delta && Math.abs(globalPoints[i].y - coordinates.y) < delta) {
            e.preventDefault();
            canvas.addEventListener("mousemove", dragPoint);
            canvas.addEventListener("mouseup", releasePoint);
            canvas.addEventListener("touchmove", dragPoint);
            canvas.addEventListener("touchend", releasePoint);
            function dragPoint(e) {
                e.preventDefault();
                coordinates = getCoordinates(e);
                globalPoints[i].x = coordinates.x;
                globalPoints[i].y = coordinates.y;
                drawQuad(context, canvas);
            }
            function releasePoint() {
                canvas.removeEventListener("mousemove", dragPoint);
                canvas.removeEventListener("mouseup", releasePoint);
                canvas.removeEventListener("touchmove", dragPoint);
                canvas.removeEventListener("touchend", releasePoint);
            }
            break;
        }
    }
}

function drawQuad(context, canvas) {
    context.clearRect(0, 0, canvas.width, canvas.height);
    context.strokeStyle = "#00ff00";
    context.lineWidth = 2;
    for (let i = 0; i < globalPoints.length; i++) {
        context.beginPath();
        context.arc(globalPoints[i].x, globalPoints[i].y, 10, 0, 2 * Math.PI);
        context.stroke();
    }
    context.beginPath();
    context.moveTo(globalPoints[0].x, globalPoints[0].y);
    context.lineTo(globalPoints[1].x, globalPoints[1].y);
    context.lineTo(globalPoints[2].x, globalPoints[2].y);
    context.lineTo(globalPoints[3].x, globalPoints[3].y);
    context.lineTo(globalPoints[0].x, globalPoints[0].y);
    context.stroke();
}
Step 3: Run Real-Time Scanning from a Camera Stream
-
Create a container
divelement for the camera view, which will display the live video feed and detection results.<div class="container" id="camera_container"> <div> <select onchange="cameraChanged()" id="camera_source"> </select> <button onclick="scan()" id="scan_button">Start</button> <button onclick="capture()">Capture a document</button> <div id="videoview"> <div id="camera_view"></div> </div> <div class="row"> <div> <textarea id="scan_result"></textarea> </div> </div> </div> </div> -
Select and activate a camera device from the available options.
async function cameraChanged() { if (cameras != null && cameras.length > 0) { let index = cameraSource.selectedIndex; await openCamera(cameraEnhancer, cameras[index]); } } async function openCamera(cameraEnhancer, cameraInfo) { if (!Dynamsoft) return; try { await cameraEnhancer.selectCamera(cameraInfo); cameraEnhancer.on("played", function () { resolution = cameraEnhancer.getResolution(); }); await cameraEnhancer.open(); } catch (ex) { console.error(ex); } } -
Start continuous scanning on the camera feed. Detection results are delivered asynchronously through the
onCapturedResultReceivedcallback, enabling real-time processing without blocking the UI.cvr.addResultReceiver({ onCapturedResultReceived: (result) => { showCameraResult(result); }, }); async function startScanning() { if (!isSDKReady) { alert("Please activate the SDK first."); return; } if (isDetecting) { return; // Already scanning } let selectedMode = document.querySelector('input[name="scanMode"]:checked').value; if (selectedMode == "mrz") { let scanRegion = { x: 10, y: 30, width: 80, height: 40, isMeasuredInPercentage: true }; cameraEnhancer.setScanRegion(scanRegion); } else { cameraEnhancer.setScanRegion(null); } isDetecting = true; cvr.setInput(cameraEnhancer); if (selectedMode == "mrz") { await cvr.initSettings("./full.json"); cvr.startCapturing("ReadMRZ"); } else if (selectedMode == "barcode") { await cvr.resetSettings(); cvr.startCapturing("ReadBarcodes_Default"); } else if (selectedMode == "document") { await cvr.resetSettings(); let params = await cvr.getSimplifiedSettings("DetectDocumentBoundaries_Default"); params.outputOriginalImage = true; await cvr.updateSettings("DetectDocumentBoundaries_Default", params); cvr.startCapturing("DetectDocumentBoundaries_Default"); } } async function stopScanning() { if (!isDetecting) { return; // Not scanning } isDetecting = false; if (cvr != null) { await cvr.stopCapturing(); } if (cameraView) { cameraView.clearAllInnerDrawingItems(); } } -
Display the detection results in real-time:
 async function showCameraResult(result) {
     let selectedMode = document.querySelector('input[name="scanMode"]:checked').value;
     let items = result.items;
     let scan_result = document.getElementById('scan_result');
     scan_result.innerHTML = "";
     let txts = [];

     clearOverlay(cameraEnhancer);

     let type;
     if (selectedMode == "barcode") {
         type = Dynamsoft.Core.EnumCapturedResultItemType.CRIT_BARCODE;
     }
     else if (selectedMode == "mrz") {
         type = Dynamsoft.Core.EnumCapturedResultItemType.CRIT_TEXT_LINE;
     }
     else if (selectedMode == "document") {
         type = Dynamsoft.Core.EnumCapturedResultItemType.CRIT_DETECTED_QUAD
     }

     if (items != null && items.length > 0) {
         for (var i = 0; i < items.length; ++i) {
             let item = items[i];
             if (items[i].type === type) {
                 txts.push(item.text);
                 globalPoints = item.location.points;

                 if (selectedMode == "barcode") {
                     if (txts.length > 0) {
                         scan_result.innerHTML += txts.join('\n') + '\n\n';
                     }
                     else {
                         scan_result.innerHTML += "Recognition Failed\n";
                     }
                 }
                 else if (selectedMode == "mrz") {
                     if (txts.length > 0) {
                         scan_result.innerHTML += txts.join('\n') + '\n\n';
                         parseResults = await parser.parse(item.text);
                         scan_result.innerHTML += JSON.stringify(extractMrzInfo(parseResults));
                     }
                     else {
                         scan_result.innerHTML += "Recognition Failed\n";
                     }

                 }
             }
             else if (items[i].type === Dynamsoft.Core.EnumCapturedResultItemType.CRIT_ORIGINAL_IMAGE) {
                 if (selectedMode == "document") {
                     if (isCaptured) {
                         isCaptured = false;
                         await stopScanning();
                         targetCanvas.width = resolution.width;
                         targetCanvas.height = resolution.height;
                         openEditor(item.imageData.toCanvas().toDataURL());
                     }
                 }
             }
         }

     }
     else {
         scan_result.innerHTML += "Nothing found\n";
     }
 }
Common Issues & Edge Cases
- MRZ not detected on worn or low-contrast documents: The DLR model requires a minimum resolution and contrast. Ensure the camera is at least 720p and the document is well-lit. Use
setScanRegionto focus the scan area and reduce false negatives. - Document boundary detection selects wrong edges: Automatic quad detection can fail on cluttered backgrounds or partial occlusion. The built-in edge editor lets users manually drag corner points to correct boundaries before rectification.
- WASM modules fail to load with a license error: WASM files are fetched from CDN on first activation. If the license key is invalid or the network is blocked,
initLicensethrows an exception. Always wrap activation in atry/catchand surface the error message to the user.
View the Detection Results
Barcode Scanner
MRZ Scanner
Document Scanner
