


Integrate a Document Scanner API in a Laravel PHP Project
Laravel is a PHP Framework. This article shares how to use Dynamic Web TWAIN to scan and upload documents in a Laravel project, enhancing web document management capabilities.
What you’ll build: A Laravel web application that scans physical documents via a TWAIN-compatible scanner and uploads the captured images to your server using Dynamic Web TWAIN.
Key Takeaways
- Dynamic Web TWAIN integrates hardware document scanners into Laravel web apps through a JavaScript SDK and a lightweight local service.
- The upload flow uses Laravel’s CSRF protection and a dedicated controller route to receive scanned images as standard multipart POST requests.
- The SDK’s
GetDevicesAsync/AcquireImageAsyncAPI handles scanner enumeration and image capture without native browser plugins. - This approach works on Windows and macOS with any TWAIN, WIA, or SANE-compatible scanner.
Common Developer Questions
- How do I scan documents from a hardware scanner in a Laravel PHP web app?
- How do I handle CSRF token errors when uploading scanned images in Laravel?
- What is the easiest way to integrate a document scanner API in a PHP project?
This article is Part 5 in a 5-Part Series.
- Part 1 - How to Implement Web Document Scanning in ASP.NET Core MVC with Dynamic Web TWAIN
- Part 2 - How to Upload Scanned Documents in Node.js with Dynamic Web TWAIN
- Part 3 - How to Upload Scanned Documents to a Go Server with Dynamic Web TWAIN
- Part 4 - How to Build an Online Document Scanner with Python Django and Dynamic Web TWAIN
- Part 5 - Integrate a Document Scanner API in a Laravel PHP Project
Prerequisites
- PHP
- Composer
-
Laravel:
composer global require laravel/installer - Get a 30-day free trial license for Dynamic Web TWAIN
Step 1: Create the Laravel Project
Create a new Laravel project skeleton:
composer create-project --prefer-dist laravel/laravel web-document-scan
Next, add the controller, blade template, and routes to enable document scanning.
Step 2: Create the Upload Controller
To create a controller:
php artisan make:controller DWTUploadController
This command generates a new file - app\Http\Controllers\DWTUploadController.php. In this file, add a page() function to render the blade template and an upload() function to save uploaded files to the images folder:
<?php

namespace App\Http\Controllers;

use Illuminate\Http\Request;
use Validator;

class DWTUploadController extends Controller
{
    function page()
    {
     return view('dwt_upload');
    }

    function upload(Request $request)
    {
     $validation = Validator::make($request->all(), [
      'RemoteFile' => 'required'
     ]);
     if($validation->passes())
     {
      $image = $request->file('RemoteFile');
      $image->move(public_path('images'), $image->getClientOriginalName());
      return response()->json([
       'message'   => 'Successfully uploaded.'
      ]);
     }
     else
     {
      return response()->json([
       'message'   => $validation->errors()->all()
      ]);
     }
    }
}
Step 3: Build the Blade Template for Document Scanning
Create a blade template at resources\views\dwt_upload.blade.php. This template contains the front-end code for document scanning and uploading:
<!DOCTYPE html>
<html>

<head>
    <title>Dynamic Web TWAIN for Laravel</title>
    <script type="text/javascript" src="https://unpkg.com/dwt/dist/dynamsoft.webtwain.min.js"> </script>
    <meta name="_token" content="{{csrf_token()}}" />
</head>

<body>
    <h3>Dynamic Web TWAIN for Laravel</h3>
    <select id="source"></select>
    <div id="dwtcontrolContainer"></div>
    <input type="button" value="Load Image" onclick="loadImage();" />
    <input type="button" value="Scan Image" onclick="acquireImage();" />
    <input id="btnUpload" type="button" value="Upload Image" onclick="upload()">

    <script>
        var dwtObject;
        var deviceList = [];

        window.onload = function() {
            if (Dynamsoft) {
                Dynamsoft.DWT.AutoLoad = false;
                Dynamsoft.DWT.UseLocalService = true;
                Dynamsoft.DWT.Containers = [{
                    ContainerId: 'dwtcontrolContainer',
                    Width: '640px',
                    Height: '640px'
                }];
                Dynamsoft.DWT.RegisterEvent('OnWebTwainReady', Dynamsoft_OnReady);
                // https://www.dynamsoft.com/customer/license/trialLicense/?product=dcv&package=cross-platform
                Dynamsoft.DWT.ProductKey =
                    'LICENSE-KEY';
                Dynamsoft.DWT.ResourcesPath = 'https://unpkg.com/dwt/dist/';

                Dynamsoft.DWT.Load();
            }

        };

        function Dynamsoft_OnReady() {
            dwtObject = Dynamsoft.DWT.GetWebTwain('dwtcontrolContainer');
            var token = document.querySelector("meta[name='_token']").getAttribute("content");
            dwtObject.SetHTTPFormField('_token', token);

            let count = dwtObject.SourceCount;
            let select = document.getElementById("source");

            dwtObject.GetDevicesAsync().then(function(devices) {
                for (var i = 0; i < devices.length; i++) { // Get how many sources are installed in the system
                    let option = document.createElement('option');
                    option.value = devices[i].displayName;
                    option.text = devices[i].displayName;
                    deviceList.push(devices[i]);
                    select.appendChild(option);
                }
            }).catch(function(exp) {
                alert(exp.message);
            });
        }

        function loadImage() {
            var OnSuccess = function() {};
            var OnFailure = function(errorCode, errorString) {};

            if (dwtObject) {
                dwtObject.IfShowFileDialog = true;
                dwtObject.LoadImageEx("", Dynamsoft.DWT.EnumDWT_ImageType.IT_ALL, OnSuccess, OnFailure);
            }
        }

        function acquireImage() {
            if (dwtObject) {
                var sources = document.getElementById('source');
                if (sources) {
                    dwtObject.SelectDeviceAsync(deviceList[sources.selectedIndex]).then(function() {
                        return dwtObject.AcquireImageAsync({
                            IfShowUI: false,
                            IfCloseSourceAfterAcquire: true
                        });
                    }).catch(function(exp) {
                        alert(exp.message);
                    });
                }
            }
        }

        function upload() {
            var OnSuccess = function(httpResponse) {
                alert("Succesfully uploaded");
            };

            var OnFailure = function(errorCode, errorString, httpResponse) {
                alert(httpResponse);
            };

            var date = new Date();
            dwtObject.HTTPUploadThroughPostEx(
                "{{ route('dwtupload.upload') }}",
                dwtObject.CurrentImageIndexInBuffer,
                '',
                date.getTime() + ".jpg",
                1, // JPEG
                OnSuccess, OnFailure
            );
        }
    </script>

</body>

</html>
Note: Replace the LICENSE-KEY with your own Dynamsoft license key.
Dynamsoft.DWT.ProductKey = "LICENSE-KEY";
Step 4: Define Routes and Run the Web Server
Define routes in routes\web.php:
Route::get('/dwt_upload', 'DWTUploadController@page');
Route::post('/dwt_upload/upload', 'DWTUploadController@upload')->name('dwtupload.upload');
To run the web server:
composer update
composer install
php artisan serve
Open http://127.0.0.1:8000/dwt_upload in your web browser to start using your web document management application.

Common Issues and Edge Cases
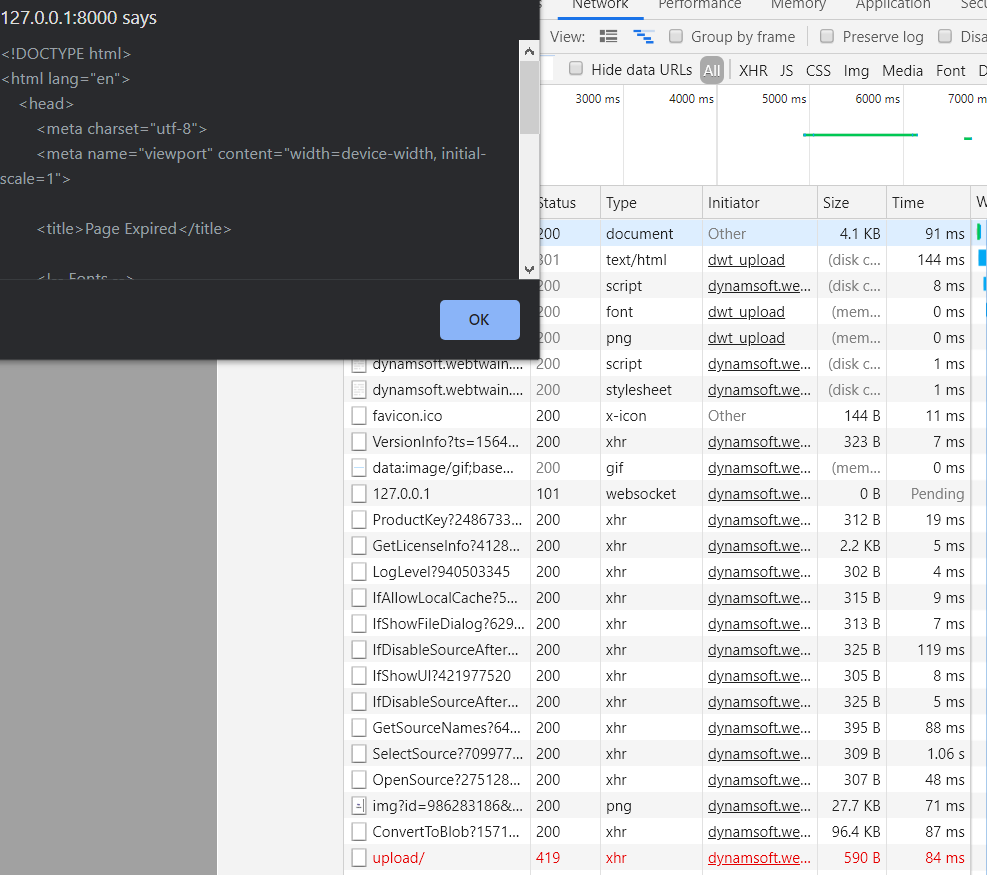
CSRF 419 Error When Uploading
If the CSRF token is not set in the header, attempting to send the post request will result in a 419 status code.
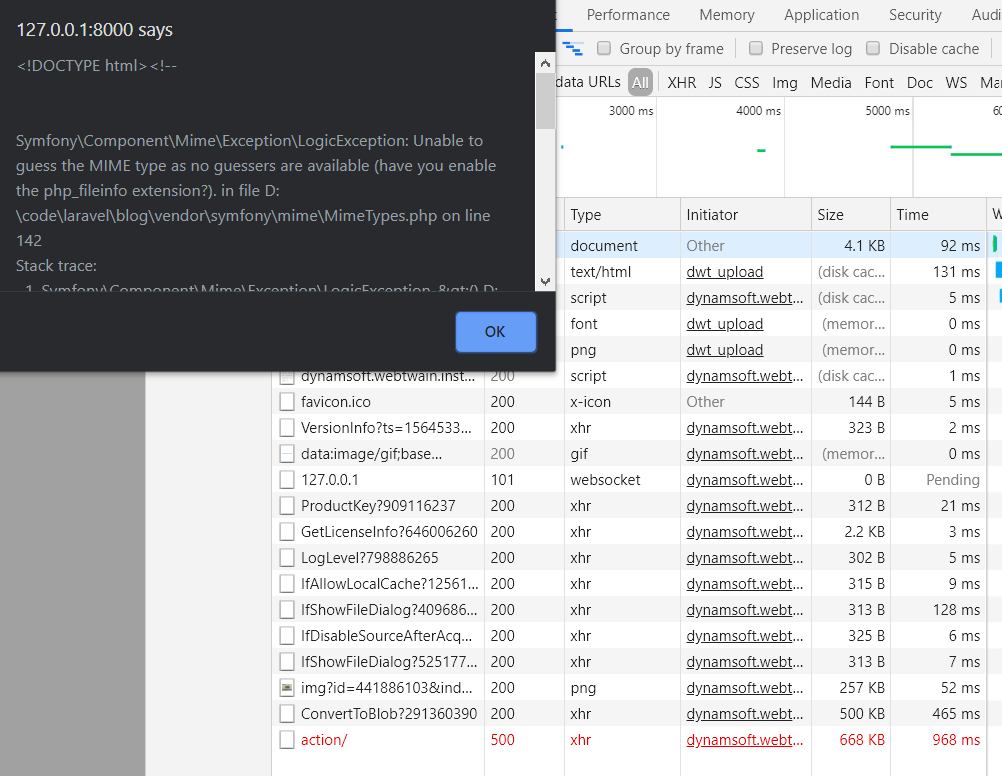
500 Error: Missing php_fileinfo Extension
An exception like Symfony\Component\Mime\Exception\LogicException: Unable to guess the MIME type as no guessers are available indicates that the php_fileinfo extension is disabled.
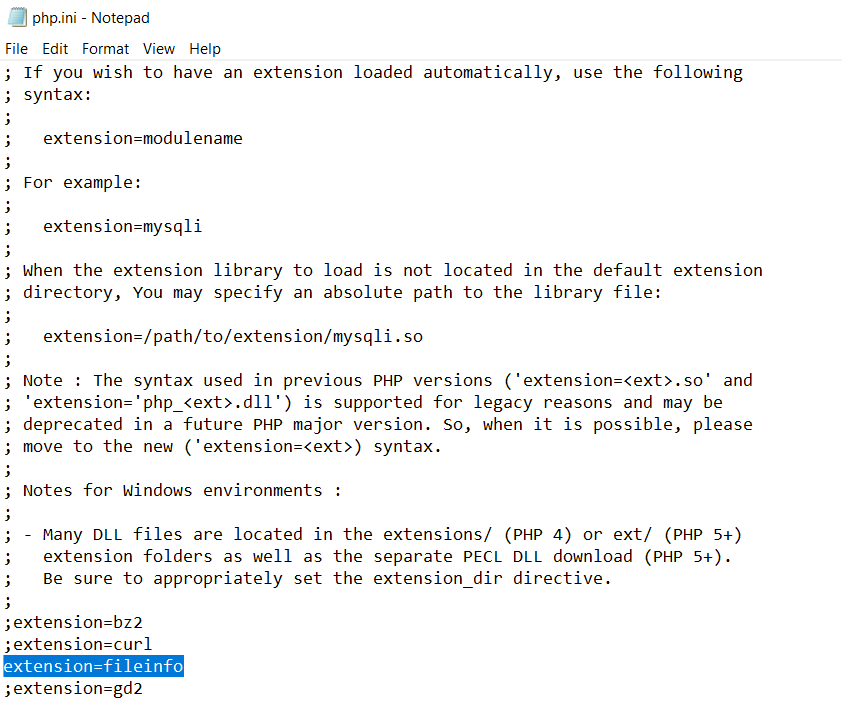
To resolve this, enable extension=fileinfo in your php.ini file.
Scanner Not Detected in the Browser
If the scanner dropdown is empty, verify that:
- The Dynamsoft Service is installed and running on the client machine.
- The scanner is connected and powered on before loading the page.
- You are accessing the page over
http://127.0.0.1orhttps://— browsers block local service access from other origins.
Source Code
https://github.com/yushulx/web-twain-document-scan-management/tree/main/examples/php_laravel