How to Scan and Upload Documents with Dynamic Web TWAIN and Node.js
In the digital era, managing documents efficiently is crucial for businesses and individuals alike. With the rise of web technologies, scanning and uploading documents through web applications has become a sought-after feature. This article introduces a practical way to implement document scanning and uploading in a web application using Dynamic Web TWAIN SDK and Node.js. Whether you’re developing an application for document management, archival, or processing, integrating these technologies can streamline your document handling processes.
This article is Part 2 in a 5-Part Series.
- Part 1 - Building Web Document Scanning Applications with ASP.NET Core MVC
- Part 2 - How to Scan and Upload Documents with Dynamic Web TWAIN and Node.js
- Part 3 - Scanning and Uploading Documents with Dynamic Web TWAIN and Go
- Part 4 - Online Document Scanning Using Python Django and Dynamic Web TWAIN
- Part 5 - How to Scan and Upload Documents in PHP Laravel Project
What is Dynamic Web TWAIN?
Dynamic Web TWAIN is a powerful browser-based document scanning SDK that enables developers to quickly implement document scanning, uploading, editing, and processing functionalities within web applications. It supports a wide range of scanners and provides a seamless user experience, making it a popular choice for businesses and developers looking to enhance their web applications with document imaging capabilities.
Implementing Document Scanning and Uploading with Dynamic Web TWAIN and Node.js
Before diving into the implementation, ensure you have Node.js installed on your development machine. You can download and install Node.js from the official website.
Once Node.js is set up, you’ll also need to download and integrate the Dynamic Web TWAIN SDK into your project. There are three ways to obtain the SDK:
- Download the SDK package from the official website. The package includes the JavaScript library, documentation, sample code, and a 30-day free trial license.
-
Download the SDK from the npm registry. You can install the package using the following command:
npm install dwtThe npm package does not include a trial license. You’ll need to request a trial license from the Dynamsoft Customer Portal.
-
Use the CDN link to include the SDK in your web application.
<script src="https://unpkg.com/dwt/dist/dynamsoft.webtwain.min.js"></script>
Here’s a step-by-step guide to setting up a web server with Node.js:
-
Install Express and Formidable. Express is a widely used web application framework for Node.js, and Formidable is a module for parsing form data, particularly useful for handling file uploads.
npm install formidable express -
Create a file named server.js to initialize the web server using Express.
var formidable = require('formidable'); var util = require('util'); var express = require('express'); var fs = require('fs'); var app = express(); app.use(express.static(__dirname)); app.use(express.static(__dirname + '/Resources')); // load static resources app.use(function (req, res, next) { res.header("Access-Control-Allow-Origin", "*"); res.header("Access-Control-Allow-Methods", "PUT, POST, GET, DELETE, OPTIONS"); res.header("Access-Control-Allow-Headers", "X-Requested-With, content-type"); res.header("Access-Control-Allow-Credentials", true); next(); }); -
Incorporate a route that manages file uploads. Utilize Formidable to parse the uploaded file information and store the file in a designated directory.
app.post('/upload', function (req, res) { var form = new formidable.IncomingForm(); form.parse(req, function (err, fields, files) { fs.readdir(__dirname + "/UploadedImages/", function (err, readfiles) { if (err) { fs.mkdir(__dirname + "/UploadedImages/", function (err) { }); } fs.readFile(files.RemoteFile.path, function (err, data) { // save file from temp dir to new dir var newPath = __dirname + "/UploadedImages/" + files.RemoteFile.name; fs.writeFile(newPath, data, function (err) { if (err) throw err; console.log('file saved'); res.end(); }); }); }); }); }) -
Assign a port number for the server to listen on.
 var server = app.listen(2024, function () {
 	var host = server.address().address;
 	var port = server.address().port;
 	console.log('listening at http://%s:%s', host, port);
 })
After setting up the server, you can create a web page to enable scanning and uploading documents with Dynamic Web TWAIN:
-
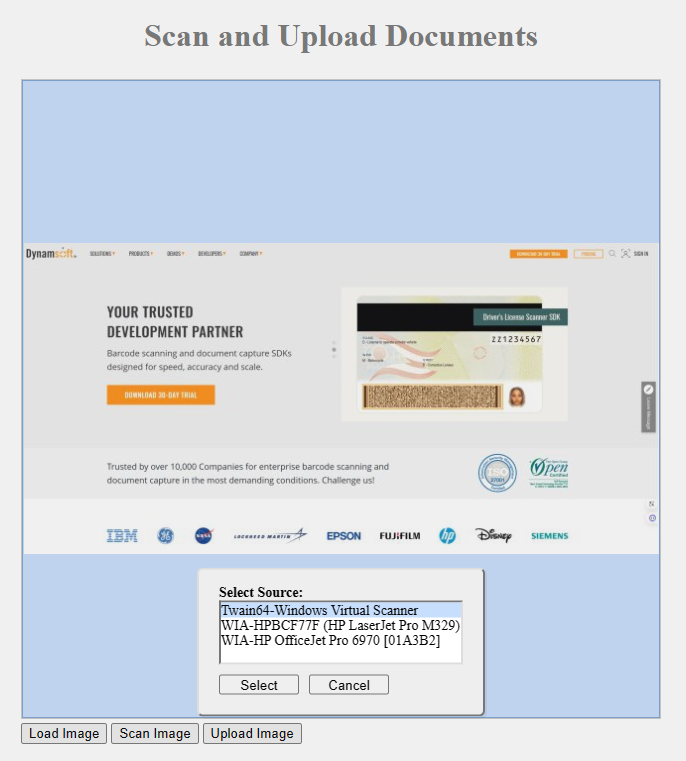
Construct a web page featuring a content container and three buttons. This content container will display the scanned images, while the buttons will facilitate loading, scanning, and uploading document images.
<html> <head> <script src="https://unpkg.com/dwt/dist/dynamsoft.webtwain.min.js"> </script> </head> <body> <table> <tr> <td> <div id="dwtcontrolContainer"></div> </td> </tr> <tr> <td> <input type="button" value="Load Image" onclick="LoadImages();" /> <input type="button" value="Scan Image" onclick="AcquireImage();" /> <input id="btnUpload" type="button" value="Upload Image" onclick="btnUpload_onclick()"> </td> </tr> </table> </body> </html> -
Insert a snippet of code to initialize Dynamic Web TWAIN, ensuring the
ResourcesPathproperty is directed to the location of the Dynamic Web TWAIN resources.var DWObject; window.onload = function () { Dynamsoft.DWT.AutoLoad = false; Dynamsoft.DWT.UseLocalService = true; Dynamsoft.DWT.Containers = [{ ContainerId: 'dwtcontrolContainer', Width: '640px', Height: '640px' }]; Dynamsoft.DWT.RegisterEvent('OnWebTwainReady', Dynamsoft_OnReady); // https://www.dynamsoft.com/customer/license/trialLicense/?product=dcv&package=cross-platform Dynamsoft.DWT.ProductKey = 'LICENSE-KEY'; Dynamsoft.DWT.ResourcesPath = 'https://unpkg.com/dwt/dist/'; Dynamsoft.DWT.Load(); }; function Dynamsoft_OnReady() { DWObject = Dynamsoft.DWT.GetWebTwain('dwtcontrolContainer'); } -
Implement additional lines of code to define the actions for each button.
-
Load images:
function LoadImages() { if (DWObject) { DWObject.LoadImageEx('', 5, function () { }, function (errorCode, errorString) { alert('Load Image:' + errorString); } ); } } -
Scan images:
function AcquireImage() { if (DWObject) { DWObject.SelectSourceAsync().then(function () { return DWObject.AcquireImageAsync({ IfCloseSourceAfterAcquire: true }); }).catch(function (exp) { alert(exp.message); }); } } -
Upload images:
  function btnUpload_onclick() {
      var strHTTPServer = location.hostname;
      DWObject.IfSSL = Dynamsoft.Lib.detect.ssl;
      var _strPort = location.port == "" ? 80 : location.port;
      if (Dynamsoft.Lib.detect.ssl == true)
          _strPort = location.port == "" ? 443 : location.port;
      DWObject.HTTPPort = _strPort;
      var CurrentPathName = unescape(location.pathname);
      var CurrentPath = CurrentPathName.substring(0, CurrentPathName.lastIndexOf("/") + 1);
      var strActionPage = CurrentPath + "upload";
      var sFun = function () {
          alert('success to upload!');
      }, fFun = function () {
          alert('fail to upload!');
      };
      var Digital = new Date();
      var uploadfilename = Digital.getMilliseconds();
      DWObject.HTTPUploadThroughPost(
          strHTTPServer,
          DWObject.CurrentImageIndexInBuffer,
          strActionPage,
          uploadfilename + ".jpg",
          sFun, fFun
      );
  }
-
-
Save this web page as index.html and launch the server.
node server.js -
Navigate to http://localhost:2024 in your web browser to begin scanning and uploading documents.

Source Code
https://github.com/yushulx/web-twain-document-scan-management/tree/main/examples/node_upload


