


How to Build a Browser Document Scanner with OpenCV.js and JavaScript
OpenCV is an open-source computer vision and machine learning software library. It provides various image processing methods for us to solve different tasks.
In this article, we are going to build a web document scanner with the JavaScript version of OpenCV. A JavaScript library is made first and then used together with Dynamsoft Document Viewer to create a document scanner with features like live detection, auto capture, and document polygon editing.
Demo video:
What you’ll build: A browser-based document scanner using OpenCV.js for edge detection and perspective correction, integrated with Dynamsoft Document Viewer for live camera capture and polygon editing.
Key Takeaways
- OpenCV.js can detect document boundaries in the browser using grayscale conversion, Gaussian blur, thresholding, and contour detection — no server required.
- Perspective transformation with
cv.warpPerspectivecorrects skewed document photos into flat, cropped images directly in JavaScript. - Dynamsoft Document Viewer’s Capture Viewer and Perspective Viewer provide camera auto-capture and interactive polygon editing on top of any detection library.
- The basic OpenCV.js algorithm works well for high-contrast scenes (white document on dark background) but struggles with complex backgrounds — Dynamsoft Document Normalizer handles those cases.
Common Developer Questions
How do I build a document scanner in the browser using OpenCV.js?
Build a detection pipeline that reads the source image into OpenCV.js, converts it to grayscale, blurs it, thresholds it, finds contours, and then picks the largest document-like boundary. This article packages that workflow into a DocumentScanner class and then connects it to a browser UI.
How do I correct perspective distortion on a scanned document image with JavaScript?
Once you have the four document corners, compute the target rectangle and use cv.warpPerspective to map the skewed quadrilateral into a flat page image. That is the core step that turns a photographed document into a usable scan.
How do I add live camera document detection and auto-capture to a web app?
Use Dynamsoft Document Viewer’s Capture Viewer for live camera input and auto-capture logic, then hand the detected polygon to Perspective Viewer for adjustment and cropping. That combination lets OpenCV.js focus on detection while the viewer layer handles the interactive scanning workflow.
Prerequisites
To follow this tutorial you need:
- Node.js (v16 or later) and npm installed
- A modern browser with WebAssembly support (Chrome, Firefox, Edge, Safari)
- A Dynamsoft Document Viewer license — Get a 30-day free trial license to use Capture Viewer and Perspective Viewer
Step 1: Create a New Vite Project
Create a new project with Vite and the typescript template:
npm create vite@latest OpenCVDocumentScanner -- --template vanilla-ts
Step 2: Include OpenCV.js in Your Project
In index.html which is used for development, include OpenCV.
<script type="text/javascript">
  var Module = {
    // https://emscripten.org/docs/api_reference/module.html#Module.onRuntimeInitialized
    onRuntimeInitialized() {
      document.getElementById('status').innerHTML = 'OpenCV.js is ready.';
    }
  };
</script>
<script async src="https://docs.opencv.org/4.8.0/opencv.js" type="text/javascript"></script>
Step 3: Build the Document Scanner Class
Next, create a document-scanner.ts file for the DocumentScanner class.
export class DocumentScanner {
  private cv:any;
  constructor() {
    if (!("cv" in window)) {
      throw new Error("OpenCV not found");
    }else{
      this.cv = window["cv"];
    }
  }
}
In the constructor, add a property called cv to use the cv namespace to perform related functions.
Detect Document Boundaries Using Contours
Next, add a detect method to return the four corner points of a document.
export interface Point {
  x: number;
  y: number;
}

export class DocumentScanner {
  detect(source:HTMLImageElement|HTMLCanvasElement):Point[]{}
}
Then, let’s implement the method in steps.
-
Read the image as mat from an image element or a canvas element.
let cv = this.cv; const img = cv.imread(source); -
Convert the image to grayscale.
const gray = new cv.Mat(); cv.cvtColor(img, gray, cv.COLOR_RGBA2GRAY); -
Perform Gaussian blur to remove noise.
const blur = new cv.Mat(); cv.GaussianBlur(gray,blur,new cv.Size(5, 5),0,0,cv.BORDER_DEFAULT); -
Perform threshold to get a binary image.
const thresh = new cv.Mat(); cv.threshold(blur,thresh,0,255,cv.THRESH_BINARY + cv.THRESH_OTSU); -
Find the contours and get the biggest one as the document candidate.
let contours = new cv.MatVector(); let hierarchy = new cv.Mat(); cv.findContours(thresh,contours,hierarchy,cv.RETR_CCOMP, cv.CHAIN_APPROX_SIMPLE); let maxArea = 0; let maxContourIndex = -1; for (let i = 0; i < contours.size(); ++i) { let contourArea = cv.contourArea(contours.get(i)); if (contourArea > maxArea) { maxArea = contourArea; maxContourIndex = i; } } const maxContour = contours.get(maxContourIndex); -
Get the corner points by calculating the distance of points to the center point. Store them in an array according to the clockwise direction.
const points = this.getCornerPoints(maxContour);The functions needed:
distance(p1:Point, p2:Point) { return Math.hypot(p1.x - p2.x, p1.y - p2.y); } getCornerPoints(contour:any):Point[] { let cv = this.cv; let points:Point[] = []; let rect = cv.minAreaRect(contour); const center = rect.center; let topLeftPoint; let topLeftDistance = 0; let topRightPoint; let topRightDistance = 0; let bottomLeftPoint; let bottomLeftDistance = 0; let bottomRightPoint; let bottomRightDistance = 0; for (let i = 0; i < contour.data32S.length; i += 2) { const point = { x: contour.data32S[i], y: contour.data32S[i + 1] }; const distance = this.distance(point, center); if (point.x < center.x && point.y < center.y) { if (distance > topLeftDistance) { topLeftPoint = point; topLeftDistance = distance; } } else if (point.x > center.x && point.y < center.y) { if (distance > topRightDistance) { topRightPoint = point; topRightDistance = distance; } } else if (point.x < center.x && point.y > center.y) { if (distance > bottomLeftDistance) { bottomLeftPoint = point; bottomLeftDistance = distance; } } else if (point.x > center.x && point.y > center.y) { if (distance > bottomRightDistance) { bottomRightPoint = point; bottomRightDistance = distance; } } } points.push(topLeftPoint as Point); points.push(topRightPoint as Point); points.push(bottomRightPoint as Point); points.push(bottomLeftPoint as Point); return points; } -
Release the memory and return the points.
img.delete();
gray.delete();
blur.delete();
thresh.delete();
contours.delete();
hierarchy.delete();
return points;
Crop and Deskew the Document with Perspective Transformation
Next, add a crop method to run perspective transformation to get a deskewed and cropped image.
crop(source:HTMLImageElement|HTMLCanvasElement,points?:Point[],width?:number,height?:number):HTMLCanvasElement{}
Let’s talk about the details in steps.
-
Run
detectto get the points if it is not provided in the argument.if (!points) { points = this.detect(source); } -
Determine the width and height of the output image.
If the width and height are not specified by the user, then use the longest vertical edge for the height and the longest horizontal edge for the width.
if (!width) { width = Math.max(this.distance(points[0],points[1]),this.distance(points[2],points[3])); } if (!height) { height = Math.max(this.distance(points[0],points[3]),this.distance(points[1],points[2])); } -
Create a transformation matrix.
let srcTri = cv.matFromArray(4, 1, cv.CV_32FC2, [ points[0].x, points[0].y, points[1].x, points[1].y, points[3].x, points[3].y, points[2].x, points[2].y, ]); let dstTri = cv.matFromArray(4, 1, cv.CV_32FC2, [ 0, 0, width, 0, 0, height, width, height, ]); let M = cv.getPerspectiveTransform(srcTri, dstTri); -
Perform perspective transformation.
let warpedDst = new cv.Mat(); let dsize = new cv.Size(width, height); cv.warpPerspective(img,warpedDst,M,dsize,cv.INTER_LINEAR, cv.BORDER_CONSTANT, new cv.Scalar() ); -
Draw the result into a canvas element.
const canvas = document.createElement("canvas"); cv.imshow(canvas, warpedDst); -
Release the memory and return the canvas.
img.delete()
warpedDst.delete()
return canvas;
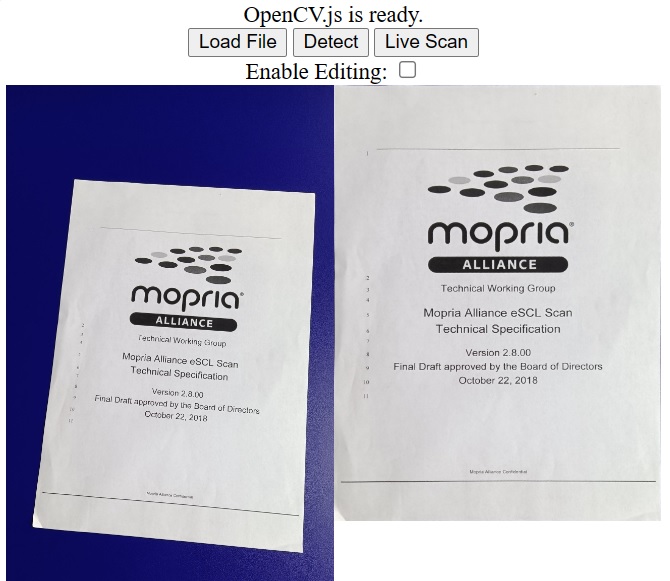
Run the Document Scanner on an Image
We can now use the document scanner to get the cropped document image.
const img = document.getElementById("photo");
const documentScanner = new DocumentScanner();
const points = documentScanner.detect(img);
const canvas = documentScanner.crop(img,points);
document.getElementById("output").src = canvas.toDataURL();
Example:
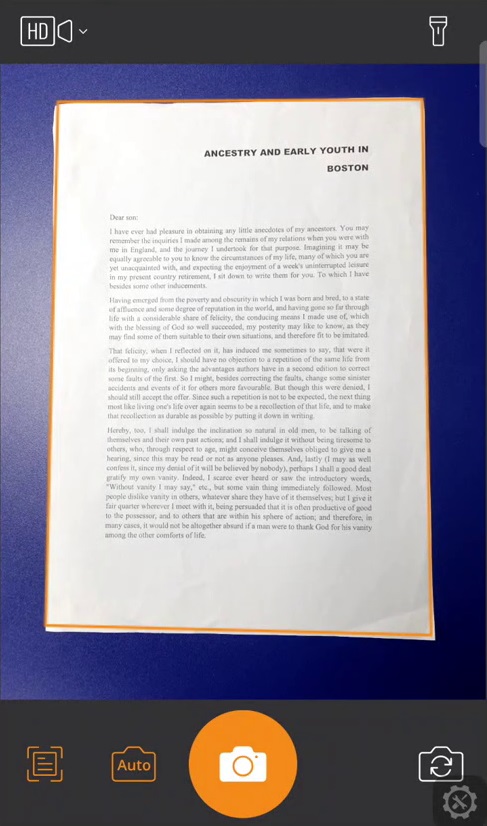
Step 4: Add Live Camera Scanning with Dynamsoft Document Viewer
Dynamsoft Document Viewer provides several viewers for the document scanning process. We can use its Capture Viewer to create a live document scanner with the camera and its Perspective Viewer to edit the detected document polygon.
Enable Live Document Scanning with Auto-Capture
Dynamsoft Document Viewer allows integrating third-party document-detecting libraries by defining a processing handler. You can find an example of using Dynamsoft Document Normalizer here.
We are going to write a processing handler for the OpenCV version we just created so that we can use Capture Viewer to scan documents. Capture Viewer can open the camera, draw the detected document boundaries and automatically take a photo if the detected results are steady.
Define a Document Detection Handler
-
Create a new file named
dynamsoft-document-viewer-handler.tswith the following template:import { DocumentScanner } from "."; let DDV; //allows setting the DDV namespace. It is needed if Dynamsoft Document Viewer (DDV) is installed with NPM. export function setDDV(DocumentViewer:any) { DDV = DocumentViewer; } if ((window as any)["Dynamsoft"]) { const Dynamsoft = (window as any)["Dynamsoft"]; DDV = Dynamsoft.DDV; } // Inherit DocumentDetect class export class OpenCVDocumentDetectHandler extends DDV.DocumentDetect { private documentScanner:DocumentScanner; constructor(documentScanner:DocumentScanner){ super(); this.documentScanner = documentScanner; } // Rewrite the detect method async detect(image:any, detectConfig:any) {} } -
Scale down the image if its height is larger than 720 pixels to improve performance.
async detect(image:any, detectConfig:any) { let width = image.width; let height = image.height; let ratio = 1; let data; const thresh = 720 if (height > thresh) { ratio = height / thresh; height = thresh; width = Math.floor(width / ratio); data = this.compress(image.data, image.width, image.height, width, height); } else { data = image.data.slice(0); } } compress( imageData:any, imageWidth:number, imageHeight:number, newWidth:number, newHeight:number, ) { let source:any = null; try { source = new Uint8ClampedArray(imageData); } catch (error) { source = new Uint8Array(imageData); } const scaleW = newWidth / imageWidth; const scaleH = newHeight / imageHeight; const targetSize = newWidth * newHeight * 4; const targetMemory = new ArrayBuffer(targetSize); let distData = null; try { distData = new Uint8ClampedArray(targetMemory, 0, targetSize); } catch (error) { distData = new Uint8Array(targetMemory, 0, targetSize); } const filter = (distCol:number, distRow:number) => { const srcCol = Math.min(imageWidth - 1, distCol / scaleW); const srcRow = Math.min(imageHeight - 1, distRow / scaleH); const intCol = Math.floor(srcCol); const intRow = Math.floor(srcRow); let distI = (distRow * newWidth) + distCol; let srcI = (intRow * imageWidth) + intCol; distI *= 4; srcI *= 4; for (let j = 0; j <= 3; j += 1) { distData[distI + j] = source[srcI + j]; } }; for (let col = 0; col < newWidth; col += 1) { for (let row = 0; row < newHeight; row += 1) { filter(col, row); } } return distData; } -
Draw the image data onto a canvas for OpenCV to use.
const canvas = document.createElement('canvas'); export class OpenCVDocumentDetectHandler extends DDV.DocumentDetect { private documentScanner:DocumentScanner; constructor(documentScanner:DocumentScanner){ super(); this.documentScanner = documentScanner; } // Rewrite the detect method async detect(image:any, detectConfig:any) { const quad:any[] = []; try { //... canvas.width = width; canvas.height = height; const context = canvas.getContext('2d'); if (context) { const imageData = context.createImageData(width, height); var pixelData = imageData.data; var inputArrayBuffer = data; var inputUint8Array = new Uint8Array(inputArrayBuffer); pixelData.set(inputUint8Array); context.putImageData(imageData, 0, 0); const points = this.documentScanner.detect(canvas); points.forEach(p => { quad.push([p.x * ratio, p.y * ratio]); }); } } catch (error) { console.log(error); quad.push([0, 0]); quad.push([0, 0]); quad.push([0, 0]); quad.push([0, 0]); } } } -
Post process and return the results. The
processDetectResultmethod will check whether the detected polygon’s size is like a document.const result:any = { location: quad, width: image.width, height: image.height, config: detectConfig, }; const ret = this.processDetectResult(result); return Promise.resolve(ret);
Set Up Capture Viewer for Auto-Capture
-
In
index.html, include the library of Dynamsoft Document Viewer and add a container for Capture Viewer.<script src="https://cdn.jsdelivr.net/npm/dynamsoft-document-viewer@1.0.0/dist/ddv.js"></script> <link rel="stylesheet" href="https://cdn.jsdelivr.net/npm/dynamsoft-document-viewer@1.0.0/dist/ddv.css"> <style> .fullscreen { display: none; position: fixed; top: 0; left: 0; width: 100%; height: 100%; } </style> <div id="captureViewer" class="fullscreen"></div> -
Set it up with the following code. You can apply for your own license here.
let docManager;
let doc;
let captureViewer;
async function initDDV(){
  await Dynamsoft.DDV.setConfig({
      license: "LICENSE-KEY", // Public trial license which is valid for 24 hours
      engineResourcePath: "https://cdn.jsdelivr.net/npm/dynamsoft-document-viewer@1.0.0/dist/engine", // Lead to a folder containing the distributed WASM files
  });
  docManager = Dynamsoft.DDV.documentManager;
  doc = docManager.createDocument({
    name: "doc"
  });
  captureViewer = new Dynamsoft.DDV.CaptureViewer({
    container: document.getElementById("captureViewer"),
    viewerConfig: {
      enableAutoCapture: true,
      enableAutoDetect: true
    }
  });
  captureViewer.openDocument(doc.uid);
}
A document object is created which is opened by the viewers. We can add images into it and they will be displayed in the viewers.
-
Set the document detecting handler with the one we just created.
let documentScanner = new DocumentScanner(); const detectHandler = new OpenCVDocumentDetectHandler(documentScanner); Dynamsoft.DDV.setProcessingHandler("documentBoundariesDetect", detectHandler); -
Create a function to get the cropped document image.
function getCroppedImage(points){ let canvas = documentScanner.crop(document.getElementById("photoRaw"),points); document.getElementById("output").src = canvas.toDataURL(); } -
Add a listener for the
capturedevent of Capture Viewer. When a photo is taken, load it into an image element and get the cropped image.captureViewer.on("captured", async (e) => { // Stop video stream and hide capture viewer's container captureViewer.stop(); document.getElementById("captureViewer").style.display = "none"; const pageData = await captureViewer.currentDocument.getPageData(e.pageUid); // Original image let url = URL.createObjectURL(pageData.raw.data); await loadImage(document.getElementById("photoRaw"), url); getCroppedImage(); captureViewer.currentDocument.deleteAllPages(); }); async function loadImage(img,src) { return new Promise((resolve, reject) => { img.onload = function(){ resolve(); } img.src = src; }) } -
Start Capture Viewer if the
live scanbutton is clicked.document.getElementById("liveScanBtn").addEventListener("click",function(){ if (captureViewer) { document.getElementById("captureViewer").style.display = "block"; captureViewer.play({fill:true}); //pass fill to make set the object-fit style of the video to cover } })
We can see that the detection handler we define can work with Capture Viewer now.
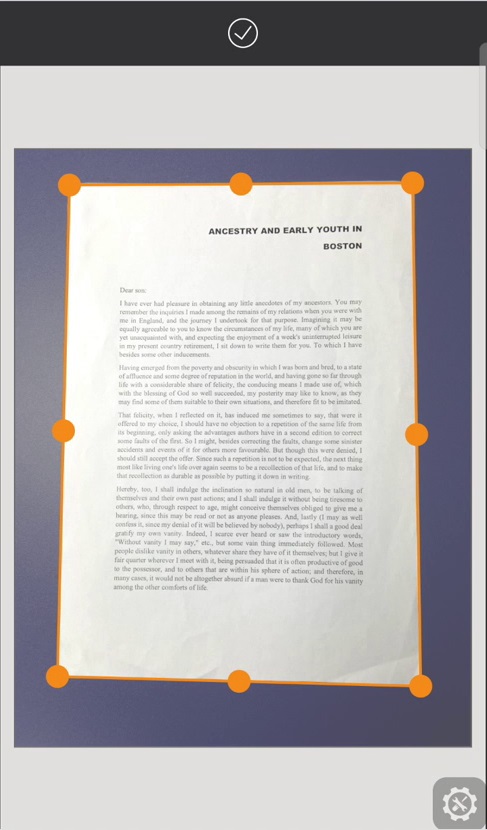
Fine-Tune Document Edges with Polygon Editing
Sometimes, we may need to fine-tune the detected polygon of the document. We can use Perspective Viewer to do this.
-
Add a container for Perspective Viewer.
<div id="perspectiveViewer" class="fullscreen"></div> -
Set it up with the following code.
let perspectiveViewer = new Dynamsoft.DDV.PerspectiveViewer({
  container: document.getElementById("perspectiveViewer"),
  uiConfig: isMobile()? mobilePerspectiveUiConfig : pcPerspectiveUiConfig
});
perspectiveViewer.openDocument(doc.uid);
Its UI like the buttons on the toolbar can be customized with UIConfig. Here, we just keep the
perspectiveAllbutton as the button for confirmation.function isMobile(){ return "ontouchstart" in document.documentElement; } const mobilePerspectiveUiConfig = { type: Dynamsoft.DDV.Elements.Layout, flexDirection: "column", children: [ { type: Dynamsoft.DDV.Elements.Layout, className: "ddv-perspective-viewer-header-mobile", children: [ { // Bind event for "PerspectiveAll" button // The event will be registered later. type: Dynamsoft.DDV.Elements.PerspectiveAll, events:{ click: "done" } }, ], }, Dynamsoft.DDV.Elements.MainView ], }; //Pc PerspectiveViewer const pcPerspectiveUiConfig = { type: Dynamsoft.DDV.Elements.Layout, flexDirection: "column", children: [ { type: Dynamsoft.DDV.Elements.Layout, className: "ddv-perspective-viewer-header-desktop", children: [ { // Bind event for "PerspectiveAll" button // The event will be registered later. type: Dynamsoft.DDV.Elements.PerspectiveAll, className: "ddv-perspective-viewer-perspective-desktop", events:{ click: "done" } }, ], }, Dynamsoft.DDV.Elements.MainView, ], }; -
Add a listener for the
doneevent of Perspective Viewer. When the editing is done, use the adjusted points of the polygon to get the cropped image.perspectiveViewer.on("done", async () => { const quad = perspectiveViewer.getQuadSelection(); const points = []; quad.forEach(p => { points.push({x:p[0],y:p[1]}) }); getCroppedImage(points); document.getElementById("perspectiveViewer").style.display = "none"; perspectiveViewer.currentDocument.deleteAllPages(); }); -
Modify the listener for the
capturedevent of Capture Viewer to use Perspective Viewer to edit the polygon.+let points = documentScanner.detect(document.getElementById("photoRaw")); +await loadImageToDoc(document.getElementById("photoRaw").src); +showPerspectiveViewer(points); -getCroppedImage(); captureViewer.currentDocument.deleteAllPages();Added functions:
//load an image to the document and it will be displayed in the viewers
async function loadImageToDoc(dataURL) {
  const response = await fetch(dataURL);
  const blob = await response.blob();
  await doc.loadSource(blob);
}

function showPerspectiveViewer(points){
  document.getElementById("perspectiveViewer").style.display = "block";
  const quad = [];
  points.forEach(point => {
    quad.push([point.x,point.y]);
  });
  perspectiveViewer.setQuadSelection(quad);
}
Screenshot:
Step 5: Package the Scanner as an NPM Library
We can publish it as a library onto NPM for ease of use.
-
Install
devDependencies:npm install -D @types/node vite-plugin-dts -
Create a new
vite.config.tsfile:// vite.config.ts import { resolve } from 'path'; import { defineConfig } from 'vite'; import dts from 'vite-plugin-dts'; // https://vitejs.dev/guide/build.html#library-mode export default defineConfig({ build: { lib: { entry: resolve(__dirname, 'src/index.ts'), name: 'opencv-document-scanner', fileName: 'opencv-document-scanner', }, }, plugins: [dts()], }); -
Add the entry points of our package to
package.json.{ "main": "./dist/opencv-document-scanner.umd.cjs", "module": "./dist/opencv-document-scanner.js", "types": "./dist/index.d.ts", "exports": { "import": { "types": "./dist/index.d.ts", "default": "./dist/opencv-document-scanner.js" }, "require": { "types": "./dist/index.d.ts", "default": "./dist/opencv-document-scanner.umd.cjs" } }, "files": [ "dist/*.css", "dist/*.js", "dist/*.cjs", "dist/*.d.ts" ] }
Run npm run build. Then, we can have the packaged files in the dist.
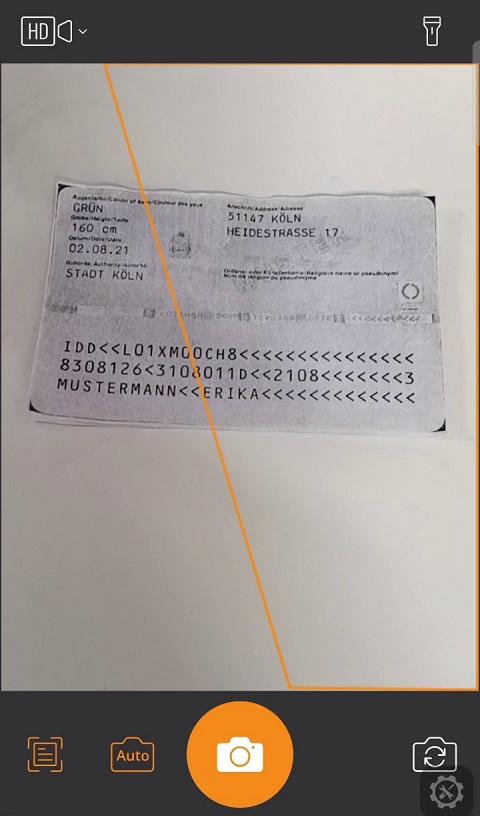
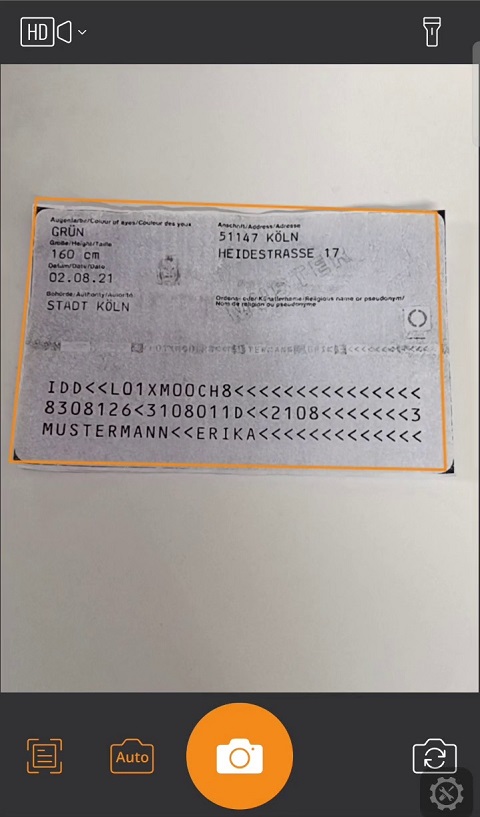
Limitations and Accuracy Comparison
The algorithm is very basic. It works well scanning a white document on a dark background. But it does not scanning on a complex background. For more complicated cases, we can use Dynamsoft Document Normalizer instead to achieve a better result.
Scanning Test with OpenCV (demo link):
Scanning Test with Dynamsoft Document Normalizer (demo link):
Common Issues and Edge Cases
- Detection fails on complex or cluttered backgrounds. The Otsu thresholding and largest-contour approach assumes the document is the dominant shape. On busy backgrounds, smaller objects may merge into larger contours. Workaround: pre-crop the image to reduce background clutter, or switch to Dynamsoft Document Normalizer for ML-based detection.
- Corner points return
undefinedwhen the document is partially obscured. If one corner falls outside the frame or overlaps with the edge, the distance-to-center heuristic cannot classify it. Always check forundefinedin the returned points array before passing them tocrop. - OpenCV.js WASM file is large (~8 MB) and blocks page load. Load it with the
asyncattribute and gate your scanner initialization behind theonRuntimeInitializedcallback to avoid UI freezes.