Real-time QR Code Recognition on Android with YOLO and Dynamsoft Barcode Reader
In my previous article, I demonstrated how to create a simple Android QR code scanner. Building on that foundation, I’m taking things a step further by integrating the YOLOv4 Tiny model that I trained specifically for QR code detection into the Android project. But how effective is YOLO Tiny for real-time QR code detection? Is it a better solution than traditional computer vision methods? Let’s find out through an experiment.
Demo Video
This article is Part 5 in a 7-Part Series.
- Part 1 - High-Speed Barcode and QR Code Detection on Android Using Camera2 API
- Part 2 - Optimizing Android Barcode Scanning with NDK and JNI C++
- Part 3 - Choosing the Best Tool for High-Density QR Code Scanning on Android: Google ML Kit vs. Dynamsoft Barcode SDK
- Part 4 - The Quickest Way to Create an Android QR Code Scanner
- Part 5 - Real-time QR Code Recognition on Android with YOLO and Dynamsoft Barcode Reader
- Part 6 - Accelerating Android QR Code Detection with TensorFlow Lite
- Part 7 - How to Build a US Driver's License Scanner for Android with PDF417 Barcode Recognition
Prerequisites
Integrating OpenCV SDK into Your Android Project
- Download and unzip opencv-4.5.5-android-sdk.zip.
- Copy the
sdkfolder to the root of your project and rename it toopencv. -
In your
settings.gradlefile, add:include ':opencv' -
Add the OpenCV dependency to your
app/build.graldefile:dependencies { ... implementation project(path: ':opencv') } -
Load the OpenCV library in the
onCreate()method:private BaseLoaderCallback mLoaderCallback = new BaseLoaderCallback(this) { @Override public void onManagerConnected(int status) { switch (status) { case LoaderCallbackInterface.SUCCESS: { Log.i(TAG, "OpenCV loaded successfully"); } break; default: { super.onManagerConnected(status); } break; } } }; private void loadOpenCV() { if (!OpenCVLoader.initDebug()) { Log.d(TAG, "Internal OpenCV library not found. Using OpenCV Manager for initialization"); OpenCVLoader.initAsync(OpenCVLoader.OPENCV_VERSION_3_0_0, this, mLoaderCallback); } else { Log.d(TAG, "OpenCV library found inside package. Using it!"); mLoaderCallback.onManagerConnected(LoaderCallbackInterface.SUCCESS); } } protected void onCreate(Bundle savedInstanceState) { ... loadOpenCV(); }
Deploying the YOLOv4 Tiny Model to Your Android Project
- Copy
backup/yolov4-tiny-custom-416_last.weights,yolov4-tiny-custom-416.cfg, anddata/obj.namesto the assets folder of your Android project. -
Load and initialize the YOLOv4 Tiny model:
 private Net loadYOLOModel() {
     InputStream inputStream = null;
     MatOfByte cfg = new MatOfByte(), weights = new MatOfByte();

     // Load class names
     try {
         inputStream = this.getAssets().open("obj.names");
         try {
             BufferedReader reader = new BufferedReader(new InputStreamReader(inputStream));
             try {

                 String line;
                 while ((line = reader.readLine()) != null) {
                     classes.add(line);
                 }
             } finally {
                 reader.close();
             }
         } finally {
             inputStream.close();
         }
     } catch (IOException e) {
         e.printStackTrace();
     }

     // Load cfg
     try {
         inputStream = new BufferedInputStream(this.getAssets().open("yolov4-tiny-custom-416.cfg"));
         byte[] data = new byte[inputStream.available()];
         inputStream.read(data);
         inputStream.close();
         cfg.fromArray(data);
     } catch (IOException e) {
         e.printStackTrace();
     }

     // Load weights
     try {
         inputStream = new BufferedInputStream(this.getAssets().open("yolov4-tiny-custom-416_last.weights"));
         byte[] data = new byte[inputStream.available()];
         inputStream.read(data);
         inputStream.close();
         weights.fromArray(data);
     } catch (IOException e) {
         e.printStackTrace();
     }

     return Dnn.readNetFromDarknet(cfg, weights);
 }

 net = loadYOLOModel();
 model = new DetectionModel(net);
 model.setInputParams(1 / 255.0, new Size(416, 416), new Scalar(0), false);
QR Code Detection with YOLOv4 Tiny on Android
Before diving in, it’s important to note that deep learning, in this context, is used as an alternative to the localization algorithm in Dynamsoft Barcode SDK, not as a replacement for the entire barcode SDK. The QR code decoding itself still relies on Dynamsoft Barcode Reader.
Three Steps to Detect QR Codes with YOLOv4 Tiny
-
Convert Android camera frame (YUV420 byte array) to an OpenCV Mat. Here’s a function based on a solution from StackOverflow:
public static Mat imageToMat(ImageProxy image) { ByteBuffer buffer; int rowStride; int pixelStride; int width = image.getWidth(); int height = image.getHeight(); int offset = 0; ImageProxy.PlaneProxy[] planes = image.getPlanes(); byte[] data = new byte[image.getWidth() * image.getHeight() * ImageFormat.getBitsPerPixel(ImageFormat.YUV_420_888) / 8]; byte[] rowData = new byte[planes[0].getRowStride()]; for (int i = 0; i < planes.length; i++) { buffer = planes[i].getBuffer(); rowStride = planes[i].getRowStride(); pixelStride = planes[i].getPixelStride(); int w = (i == 0) ? width : width / 2; int h = (i == 0) ? height : height / 2; for (int row = 0; row < h; row++) { int bytesPerPixel = ImageFormat.getBitsPerPixel(ImageFormat.YUV_420_888) / 8; if (pixelStride == bytesPerPixel) { int length = w * bytesPerPixel; buffer.get(data, offset, length); if (h - row != 1) { buffer.position(buffer.position() + rowStride - length); } offset += length; } else { if (h - row == 1) { buffer.get(rowData, 0, width - pixelStride + 1); } else { buffer.get(rowData, 0, rowStride); } for (int col = 0; col < w; col++) { data[offset++] = rowData[col * pixelStride]; } } } } Mat mat = new Mat(height + height / 2, width, CvType.CV_8UC1); mat.put(0, 0, data); return mat; } -
Convert
YUV420toRGB:Mat yuv = ImageUtils.imageToMat(imageProxy, yBytes); Mat rgbOut = new Mat(imageProxy.getHeight(), imageProxy.getWidth(), CvType.CV_8UC3); Imgproc.cvtColor(yuv, rgbOut, Imgproc.COLOR_YUV2RGB_I420);If the image is in portrait mode, rotate it 90 degrees clockwise:
Mat rgb = new Mat(); if (isPortrait) { Core.rotate(rgbOut, rgb, Core.ROTATE_90_CLOCKWISE); } else { rgb = rgbOut; } -
Use the YOLO model to detect QR codes and obtain the results:
 MatOfInt classIds = new MatOfInt();
 MatOfFloat scores = new MatOfFloat();
 MatOfRect boxes = new MatOfRect();
 model.detect(rgb, classIds, scores, boxes, 0.6f, 0.4f);

 if (classIds.rows() > 0) {
     for (int i = 0; i < classIds.rows(); i++) {
         Rect box = new Rect(boxes.get(i, 0));
         Imgproc.rectangle(rgb, box, new Scalar(0, 255, 0), 2);

         int classId = (int) classIds.get(i, 0)[0];
         double score = scores.get(i, 0)[0];
         String text = String.format("%s: %.2f", classes.get(classId), score);
         Imgproc.putText(rgb, text, new org.opencv.core.Point(box.x, box.y - 5),
                 Imgproc.FONT_HERSHEY_SIMPLEX, 1, new Scalar(0, 255, 0), 2);
     }
 }
You can save the processed image to verify the detection results:
 public static void saveRGBMat(Mat rgb) {
     final Bitmap bitmap = Bitmap.createBitmap(rgb.cols(), rgb.rows(), Bitmap.Config.ARGB_8888);
     Utils.matToBitmap(rgb, bitmap);
     String filename = "test.png";
     File sd = Environment.getExternalStorageDirectory();
     File dest = new File(sd, filename);

     try {
       FileOutputStream out = new FileOutputStream(dest);
       bitmap.compress(Bitmap.CompressFormat.PNG, 90, out);
       out.flush();
       out.close();
     } catch (Exception e) {
       e.printStackTrace();
     }
   }
Decoding QR Codes and Drawing Overlays
Leveraging the results from YOLO detection, we can optimize QR code decoding with Dynamsoft Barcode Reader by specifying the barcode format and expected barcode count. By default, the SDK decodes all supported 1D and 2D barcode formats. Here’s how to focus on QR codes for faster processing:
TextResult[] results = null;
int nRowStride = imageProxy.getPlanes()[0].getRowStride();
int nPixelStride = imageProxy.getPlanes()[0].getPixelStride();
try {
    PublicRuntimeSettings settings = reader.getRuntimeSettings();
    settings.barcodeFormatIds = EnumBarcodeFormat.BF_QR_CODE;
    settings.expectedBarcodesCount = 1;
    reader.updateRuntimeSettings(settings);
} catch (BarcodeReaderException e) {
    e.printStackTrace();
}

try {
    results = reader.decodeBuffer(yBytes, imageProxy.getWidth(), imageProxy.getHeight(), nRowStride * nPixelStride, EnumImagePixelFormat.IPF_NV21, "");
} catch (BarcodeReaderException e) {
    e.printStackTrace();
}
Using the Bounding Box
While you can use the YOLO-detected bounding box as a decoding region, be aware that the accuracy of your model directly affects the decoding result. Ensure that the model is robust enough before applying this approach.
Drawing Overlays on the Camera Preview
To visualize the QR code detection results, you can overlay them on the camera preview. Android’s ML Kit demo provides an excellent GraphicOverlay class, so you don’t need to create one from scratch:
<androidx.camera.view.PreviewView
    android:id="@+id/camerax_viewFinder"
    android:layout_width="match_parent"
    android:layout_height="match_parent" />

<com.example.qrcodescanner.GraphicOverlay
    android:id="@+id/camerax_overlay"
    android:layout_width="0dp"
    android:layout_height="0dp"
    app:layout_constraintLeft_toLeftOf="@id/camerax_viewFinder"
    app:layout_constraintRight_toRightOf="@id/camerax_viewFinder"
    app:layout_constraintTop_toTopOf="@id/camerax_viewFinder"
    app:layout_constraintBottom_toBottomOf="@id/camerax_viewFinder"/>
In your activity or fragment, initialize the overlay:
GraphicOverlay overlay = findViewById(R.id.camerax_overlay);
Customizing BarcodeGraphic for QR Code Scanning
You can modify the BarcodeGraphic class to make it compatible with your QR code scanning results:
BarcodeGraphic(GraphicOverlay overlay, RectF boundingBox, TextResult barcode, boolean isPortrait) {
    super(overlay);

    this.barcode = barcode;
    this.rect = boundingBox;
    this.overlay = overlay;
    this.isPortrait = isPortrait;
    rectPaint = new Paint();
    rectPaint.setColor(MARKER_COLOR);
    rectPaint.setStyle(Paint.Style.STROKE);
    rectPaint.setStrokeWidth(STROKE_WIDTH);

    barcodePaint = new Paint();
    barcodePaint.setColor(TEXT_COLOR);
    barcodePaint.setTextSize(TEXT_SIZE);

    labelPaint = new Paint();
    labelPaint.setColor(MARKER_COLOR);
    labelPaint.setStyle(Paint.Style.FILL);
}

@Override
public void draw(Canvas canvas) {
    // Draws the bounding box around the BarcodeBlock.
    if (rect != null) {
        float x0 = translateX(rect.left);
        float x1 = translateX(rect.right);
        rect.left = min(x0, x1);
        rect.right = max(x0, x1);
        rect.top = translateY(rect.top);
        rect.bottom = translateY(rect.bottom);
        canvas.drawRect(rect, rectPaint);
        // Draws other object info.
        if (barcode != null) {
            float lineHeight = TEXT_SIZE + (2 * STROKE_WIDTH);
            float textWidth = barcodePaint.measureText(barcode.barcodeText);
            canvas.drawRect(
                    rect.left - STROKE_WIDTH,
                    rect.top - lineHeight,
                    rect.left + textWidth + (2 * STROKE_WIDTH),
                    rect.top,
                    labelPaint);
            // Renders the barcode at the bottom of the box.
            canvas.drawText(barcode.barcodeText, rect.left, rect.top - STROKE_WIDTH, barcodePaint);
        }
    }
}
Displaying the QR Code Bounding Box and Text
Here’s how to get the QR code detection results and display them with an overlay:
overlay.clear();
if (classIds.rows() > 0) {

    for (int i = 0; i < classIds.rows(); i++) {
        ...

        TextResult result =  null;
        if (results != null && results.length > 0) {
            for (int index = 0; i < results.length; i++) {
                result = results[i];
            }
        }

        overlay.add(new BarcodeGraphic(overlay, rect, result, isPortrait));
    }

}

overlay.postInvalidate();
Deep Learning vs. Traditional Computer Vision
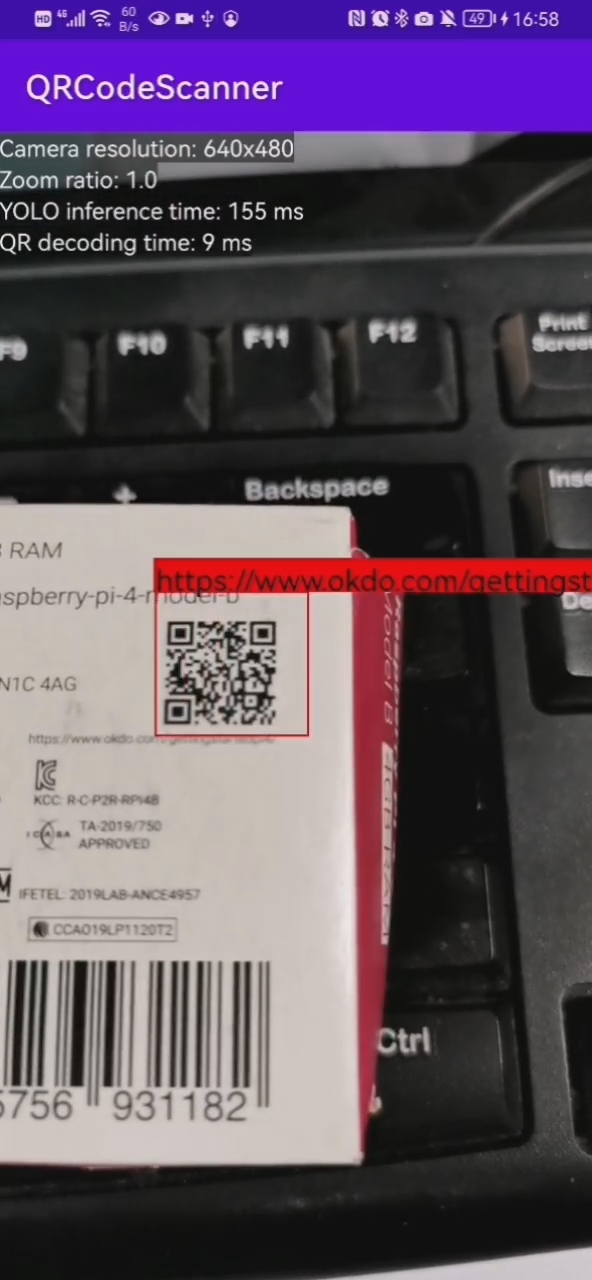
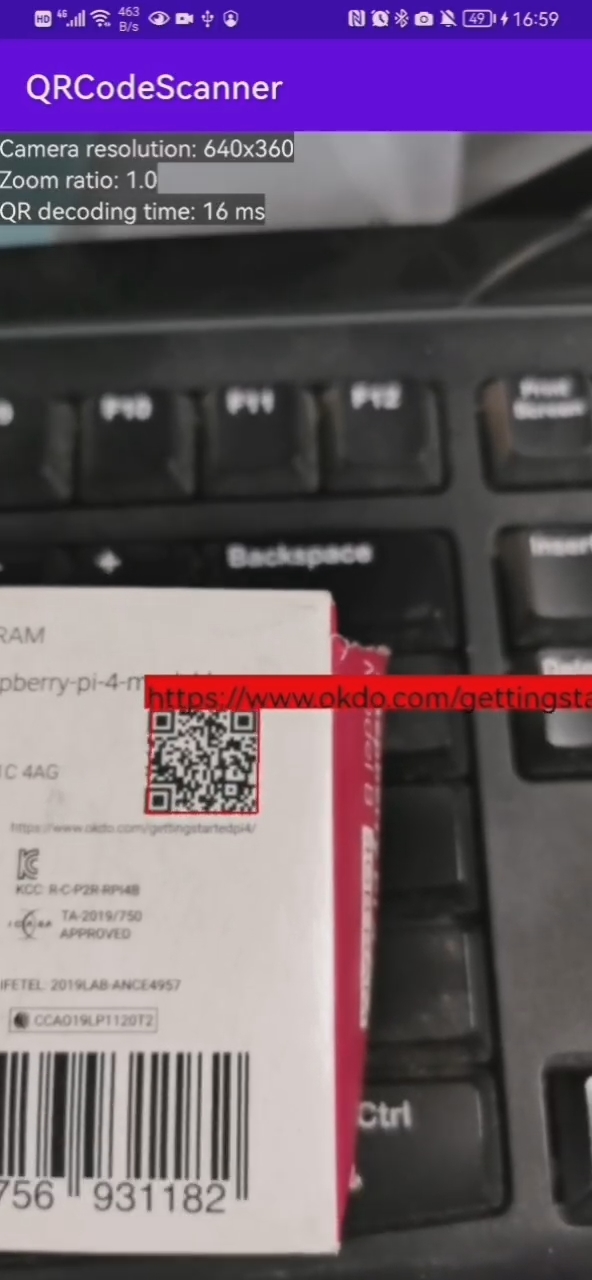
To compare the performance of deep learning and traditional computer vision in QR code scanning, we ran the QR code scanner app using both approaches, with the computations done on the CPU.
YOLO (QR code localization) + Computer Vision (QR code decoding)

In this mixed approach, YOLOv4 Tiny took over 100 ms for localization, while traditional computer vision completed decoding in less than 10 ms.
Computer Vision (QR code localization) + Computer Vision (QR code decoding)

In contrast, using traditional computer vision for both localization and decoding took less than 20 ms.
Conclusion
A well-trained deep neural network (DNN) model can excel at object detection, especially in scenarios involving multiple objects. However, when running on a CPU, it typically requires more processing time compared to traditional computer vision methods. For real-time single QR code scanning on mobile devices, traditional computer vision remains the more efficient option.


