


How to Build an Angular Document Scanner with Edge Detection and Auto-Crop
The Dynamsoft Capture Vision SDK offers advanced features for document detection and rectification. In this article, we will integrate document detection and rectification capabilities into the Angular project created in the previous tutorial.
This article is Part 3 in a 5-Part Series.
- Part 1 - How to Implement Web TWAIN Document Scanning in an Angular Application
- Part 2 - Build an Angular Barcode and QR Code Scanner Component with Dynamsoft Capture Vision
- Part 3 - How to Build an Angular Document Scanner with Edge Detection and Auto-Crop
- Part 4 - How to Build an Angular MRZ Scanner and Passport Reader App
- Part 5 - How to Build an Angular PDF Viewer with Image Annotation and PDF Export
What you’ll build: An Angular web application that detects document edges and auto-crops documents from both uploaded images and live camera streams using the Dynamsoft Capture Vision SDK.
Key Takeaways
- Dynamsoft Capture Vision SDK provides
DetectDocumentBoundaries_DefaultandNormalizeDocument_Defaulttemplates to detect and rectify document edges entirely in the browser. - Angular components can integrate document edge detection from both static image files and live camera streams via
CaptureVisionRouter. - Users can manually adjust detected corner points on a canvas overlay before rectification for higher accuracy.
- The SDK’s WebAssembly engine runs client-side, keeping document images private and eliminating server round-trips.
Common Developer Questions
How do I detect and auto-crop document edges in an Angular app?
Initialize CaptureVisionRouter once, then pass the selected File object to capture() with the DetectDocumentBoundaries_Default template. Read the first DetectedQuadResultItem, extract location.points, and draw those points on your canvas overlay for user adjustment.
Can I use Dynamsoft Capture Vision SDK for real-time document scanning from a webcam in Angular?
Yes. The Angular components can use CaptureVisionRouter with live camera input so the same browser-side pipeline handles both uploaded files and webcam frames without a server round-trip.
How do I let users adjust detected document corners before cropping in a web application?
Store the detected quad in component state and bind it to the overlay manager so users can drag each corner on the canvas. After adjustment, run rectification with the updated points instead of the original detection result.
Angular Document Scanner Demo
Prerequisites
- Node.js
-
Angular CLI
npm install -g @angular/cli ng --version -
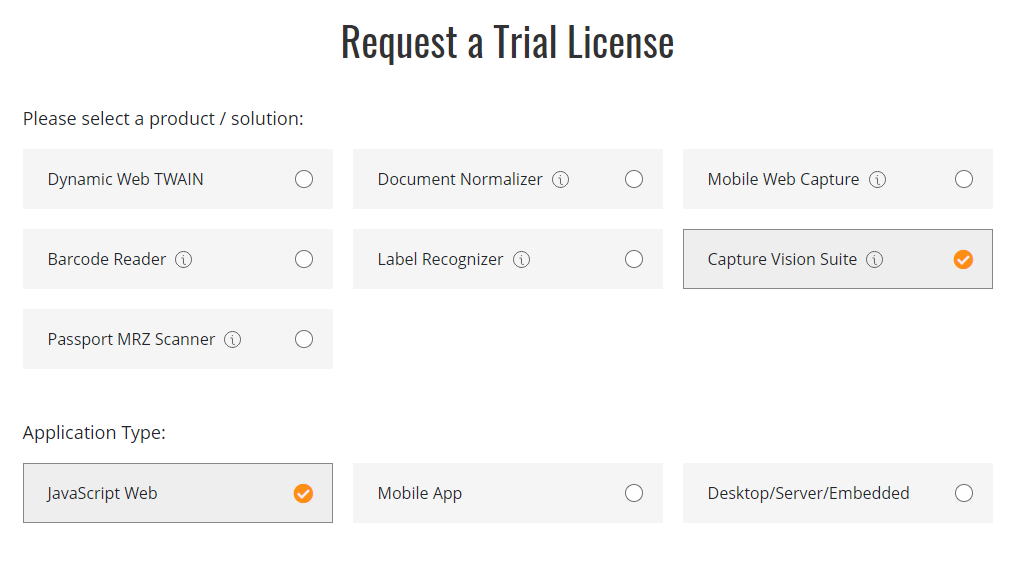
Get a 30-day free trial license for Dynamsoft Capture Vision
Step 1: Install the Dynamsoft Capture Vision SDK
-
Install the SDK: Download and install
Dynamsoft Capture Visionusing npm.npm i dynamsoft-capture-vision-bundle dynamsoft-capture-vision-data -
Configure Asset Path: Update
angular.jsonto include the asset path for Dynamsoft Document Normalizer."assets": [ "src/favicon.ico", "src/assets", { "glob": "**/*", "input": "./node_modules/dynamsoft-capture-vision-bundle/dist", "output": "assets/dynamsoft-capture-vision-bundle" }, { "glob": "**/*", "input": "./node_modules/dynamsoft-capture-vision-data", "output": "assets/dynamsoft-capture-vision-data" }, ... ], -
Update Resource Paths: Add the SDK resource path to
CoreModule.engineResourcePathsin theproduct-list.component.tsfile.CoreModule.engineResourcePaths = { dcvBundle: getFullUrl('assets/dynamsoft-capture-vision-bundle/'), dcvData: getFullUrl('assets/dynamsoft-capture-vision-data/'), }; -
Preload WASM Files: Preload the WebAssembly (WASM) files to speed up the initialization process.
await CoreModule.loadWasm(['DBR', 'DDN']);
Step 2: Create Angular Components for Detection and Rectification
-
Generate Components: Use the Angular CLI to create two new components for document detection and rectification.
ng generate component file-detection ng generate component camera-detection -
Configure Routing: Add the new components to the
app-routing.module.tsfile.import { NgModule } from '@angular/core'; import { RouterModule, Routes } from '@angular/router'; import { ProductListComponent } from './product-list/product-list.component'; import { BarcodeReaderComponent } from './barcode-reader/barcode-reader.component'; import { BarcodeScannerComponent } from './barcode-scanner/barcode-scanner.component'; import { FileDetectionComponent } from './file-detection/file-detection.component'; import { CameraDetectionComponent } from './camera-detection/camera-detection.component'; const routes: Routes = [ { path: '', component: ProductListComponent }, { path: 'barcode-reader', component: BarcodeReaderComponent }, { path: 'barcode-scanner', component: BarcodeScannerComponent }, { path: 'file-detection', component: FileDetectionComponent }, { path: 'camera-detection', component: CameraDetectionComponent }, ]; @NgModule({ imports: [RouterModule.forRoot(routes)], exports: [RouterModule] }) export class AppRoutingModule { } -
Update Product List Template: Modify the
product-list.component.htmlfile to include links to the new components.<h3> <div> <ng-template [ngIf]="product.id === 'reader'"> <a [title]="product.name + ' details'" [routerLink]="['/barcode-reader']">> </a> </ng-template> </div> <div> <ng-template [ngIf]="product.id === 'scanner'"> <a [title]="product.name + ' details'" [routerLink]="['/barcode-scanner']">> </a> </ng-template> </div> <div> <ng-template [ngIf]="product.id === 'file-detection'"> <a [title]="product.name + ' details'" [routerLink]="['/file-detection']">> </a> </ng-template> </div> <div> <ng-template [ngIf]="product.id === 'camera-detection'"> <a [title]="product.name + ' details'" [routerLink]="['/camera-detection']">> </a> </ng-template> </div> </h3>
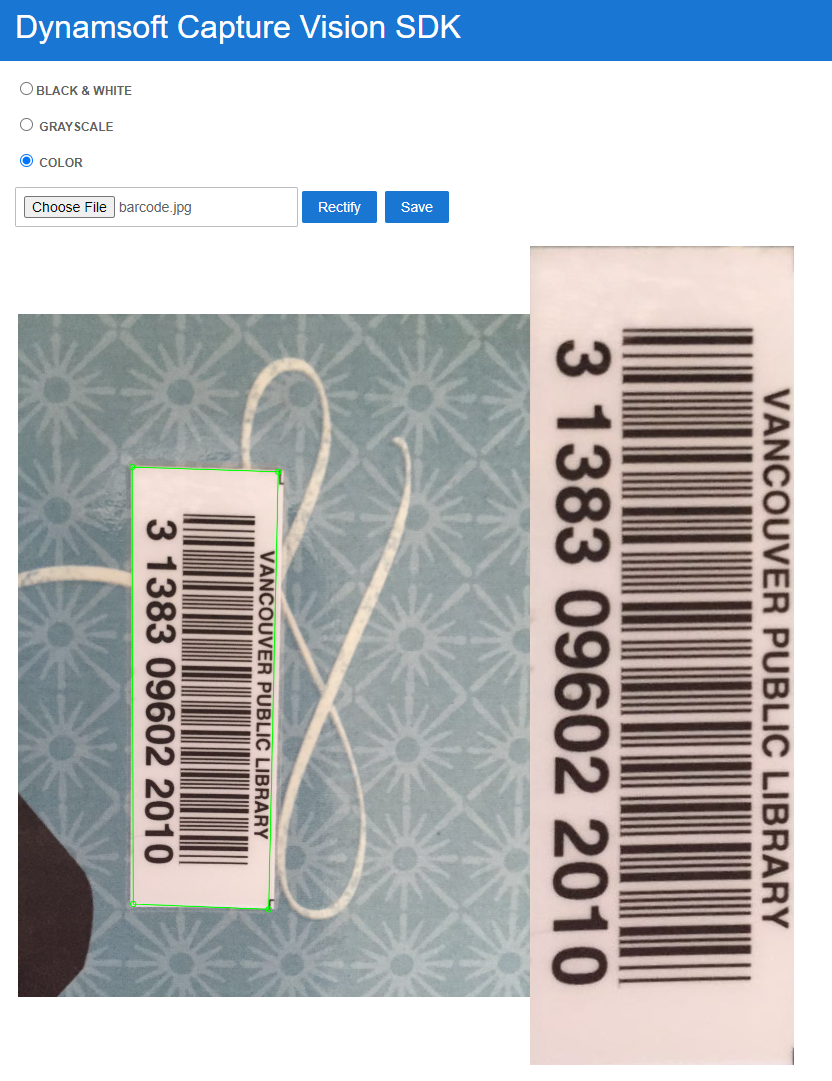
Step 3: Detect and Rectify Document Edges from Image Files
Workflow Overview
- Upload an image file.
- Detect the document edges with Dynamsoft Capture Vision SDK.
- Adjust the four corners of the document.
- Rectify the document.
Design the File Upload UI
Add the following HTML code to the file-detection.component.html file:
<div class="row">

    <label for="binary"> <input type="radio" name="templates" value="binary" (change)="onRadioChange($event)" />Black &
        White </label>


    <label for="grayscale"><input type="radio" name="templates" value="grayscale" (change)="onRadioChange($event)" />
        Grayscale </label>

    <label for="color"><input type="radio" name="templates" value="color" [checked]="true"
            (change)="onRadioChange($event)" /> Color </label>
</div>

<input type="file" title="file" id="file" accept="image/*" (change)="onChange($event)" />
<button (click)="rectify()">Rectify</button>
<button (click)="save()">Save</button>
<div class="container">
    <div id="imageview">
        <img id="image" alt="" />
        <canvas id="overlay" class="overlay"></canvas>
    </div>

    <div id="resultview" class="imageview">
        <img id="normalizedImage" alt="" />
    </div>

</div>
Explanation
- The
radiogroup is used to select the color mode. - The
<input type="file"/>element loads an image file from the local file system. - The
Rectifybutton rectifies the document. - The
Savebutton saves the rectified document. - The
imgelement displays the original image. - The
canvaselement draws the detected document edges and allows users to adjust the corners.
Implement the File Detection Logic
Load an Image and Detect Document Edges
Call the capture method with the DetectDocumentBoundaries_Default template to detect the document edges. Cast the CapturedResult to DetectedQuadResultItem and get the detected points.
onChange(event: Event) {
  const element = event.currentTarget as HTMLInputElement;
  let fileList: FileList | null = element.files;
  if (fileList) {
    let file = fileList.item(0) as any;
    if (file) {
      this.currentFile = file;
      let fr = new FileReader();
      fr.onload = (event: any) => {
        let image = document.getElementById('image') as HTMLImageElement;
        if (image) {
          image.src = event.target.result;
          const img = new Image();

          img.onload = async (event: any) => {
            this.overlayManager.updateOverlay(img.width, img.height);
            if (this.cvr) {
              let capturedResult: CapturedResult = await this.cvr.capture(file, 'DetectDocumentBoundaries_Default');
              if (capturedResult.items.length > 0) {
                let result = capturedResult.items[0] as DetectedQuadResultItem;
                this.points = result.location.points;
                this.overlayManager.setPoints(this.points);
              }
            }
          };
          img.src = event.target.result;
        }
      };
      fr.readAsDataURL(file);
    }
  }
}
Rectify the Detected Document
Call the capture method with the detected points and the NormalizeDocument_Default template to rectify the document. Cast the CapturedResult to NormalizedImageResultItem and then call the toImage method to get the rectified image.
async normalize(file: File, points: any) {
  if (this.cvr) {
    let settings: SimplifiedCaptureVisionSettings = await this.cvr.getSimplifiedSettings('NormalizeDocument_Default');
    settings.roi.points = points;
    settings.roiMeasuredInPercentage = false;
    await this.cvr!.updateSettings('NormalizeDocument_Default', settings);

    this.cvr.capture(file, 'NormalizeDocument_Default').then((normalizedImagesResult: CapturedResult) => {
      if (normalizedImagesResult.items.length === 0) { return; }
        for (let item of normalizedImagesResult.items) {
          if (item.type !== EnumCapturedResultItemType.CRIT_ENHANCED_IMAGE) {
            continue;
          }

          let result = item as EnhancedImageResultItem;
          let image = document.getElementById('normalizedImage') as HTMLImageElement;
          image.src = result.toImage("image/jpeg").src;
        }
    });
  }
}

async rectify() {
  await this.normalize(this.currentFile!, this.points);
}
Enable Corner Adjustment via Mouse Interaction
In the overlay.ts file, set the detected points and dynamically update the points based on mouse events.
setPoints(points: Point[]): void {
    this.globalPoints = points;
    this.overlay!.addEventListener("mousedown", (event) => this.updatePoint(event, this.context!, this.overlay!));
    this.overlay!.addEventListener("touchstart", (event) => this.updatePoint(event, this.context!, this.overlay!));
    this.drawQuad(this.context!, this.overlay!);
}

updatePoint(e: MouseEvent | TouchEvent, context: CanvasRenderingContext2D, canvas: HTMLCanvasElement): void {
    if (!this.globalPoints) {
        return;
    }
    let globalPoints = this.globalPoints;
    function getCoordinates(e: MouseEvent | TouchEvent): Point {
        let rect = canvas.getBoundingClientRect();

        let scaleX = canvas.clientWidth / canvas.width;
        let scaleY = canvas.clientHeight / canvas.height;

        let mouseX = (e instanceof MouseEvent ? e.clientX : e.touches[0].clientX);
        let mouseY = (e instanceof MouseEvent ? e.clientY : e.touches[0].clientY);
        if (scaleX < scaleY) {
            mouseX = mouseX - rect.left;
            mouseY = mouseY - rect.top - (canvas.clientHeight - canvas.height * scaleX) / 2;

            mouseX = mouseX / scaleX;
            mouseY = mouseY / scaleX;
        }
        else {
            mouseX = mouseX - rect.left - (canvas.clientWidth - canvas.width * scaleY) / 2;
            mouseY = mouseY - rect.top;

            mouseX = mouseX / scaleY;
            mouseY = mouseY / scaleY;
        }

        return { x: Math.round(mouseX), y: Math.round(mouseY) };
    }

    let delta = 10;
    let coordinates = getCoordinates(e);
    let ref = this;
    for (let i = 0; i < globalPoints.length; i++) {
        if (Math.abs(globalPoints[i].x - coordinates.x) < delta && Math.abs(globalPoints[i].y - coordinates.y) < delta) {
            canvas.addEventListener("mousemove", dragPoint);
            canvas.addEventListener("mouseup", releasePoint);
            canvas.addEventListener("touchmove", dragPoint);
            canvas.addEventListener("touchend", releasePoint);

            function dragPoint(e: MouseEvent | TouchEvent) {
                coordinates = getCoordinates(e);
                globalPoints[i].x = coordinates.x;
                globalPoints[i].y = coordinates.y;
                ref.drawQuad(context, canvas);
            }

            function releasePoint() {
                canvas.removeEventListener("mousemove", dragPoint);
                canvas.removeEventListener("mouseup", releasePoint);
                canvas.removeEventListener("touchmove", dragPoint);
                canvas.removeEventListener("touchend", releasePoint);
            }

            break;
        }
    }
}

drawQuad(context: CanvasRenderingContext2D, canvas: HTMLCanvasElement): void {
    let globalPoints = this.globalPoints;
    if (!globalPoints || globalPoints.length < 4) {
        return;
    }

    context.clearRect(0, 0, canvas.width, canvas.height);
    context.strokeStyle = "#00ff00";
    context.lineWidth = 2;
    for (let i = 0; i < globalPoints.length; i++) {
        context.beginPath();
        context.arc(globalPoints[i].x, globalPoints[i].y, 5, 0, 2 * Math.PI);
        context.stroke();
    }
    context.beginPath();
    context.moveTo(globalPoints[0].x, globalPoints[0].y);
    context.lineTo(globalPoints[1].x, globalPoints[1].y);
    context.lineTo(globalPoints[2].x, globalPoints[2].y);
    context.lineTo(globalPoints[3].x, globalPoints[3].y);
    context.lineTo(globalPoints[0].x, globalPoints[0].y);
    context.stroke();
}
Save the Rectified Document
Get the rectified image and save it to the local file system.
async save() {
  let image = document.getElementById('normalizedImage') as HTMLImageElement;

  let imageUrl = image.src;

  const a = document.createElement('a');
  a.href = imageUrl;
  a.download = Date.now() + '';
  document.body.appendChild(a);
  a.click();
  document.body.removeChild(a);
}
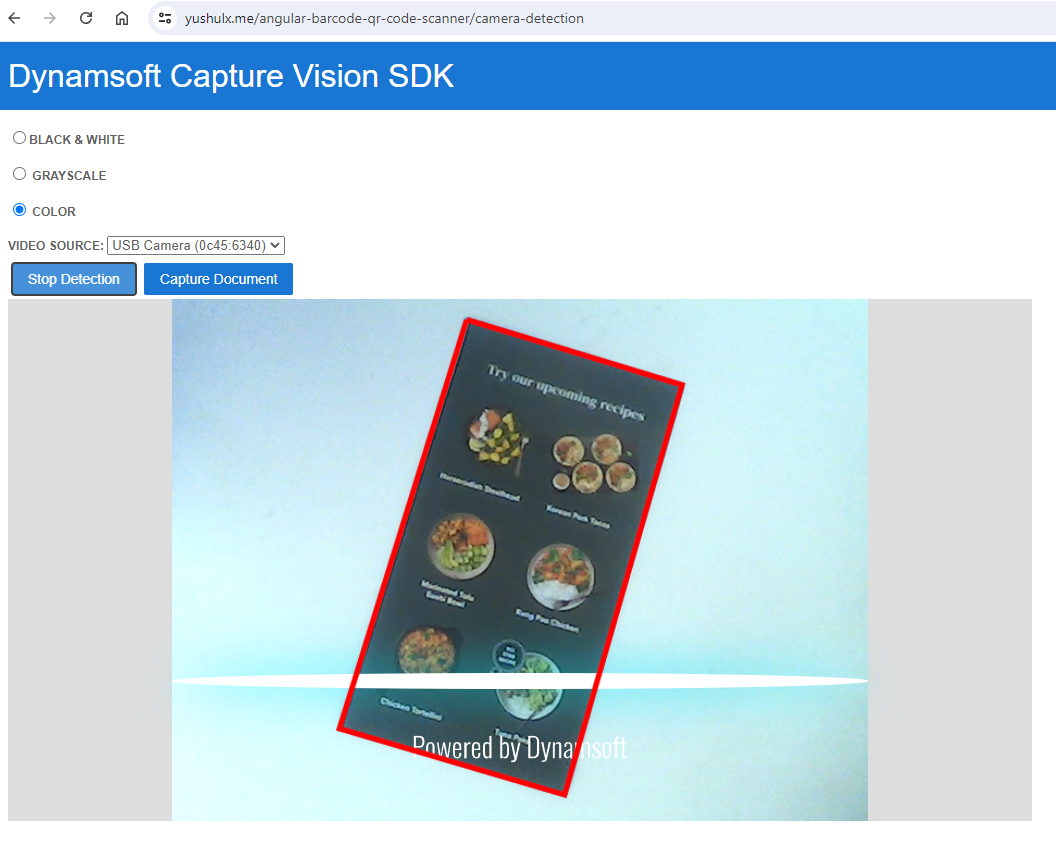
Step 4: Detect and Rectify Documents from a Live Camera Stream
Workflow Overview
- Register an event listener to
CaptureVisionRouterto receive the detected document edges. - Bind a
CameraEnhancerinstance to theCaptureVisionRouterinstance. - Start the camera stream and document detection.
- Click a button to rectify the document based on the detected edges.
Design the Camera Detection UI
Add the following HTML code to the camera-detection.component.html file:
<div id="document-scanner">
    <span id="loading-status" style="font-size:x-large" [hidden]="isLoaded">Loading Library...</span>
    <br />
    <div class="row">

        <label for="binary"> <input type="radio" name="templates" value="binary"
                (change)="onRadioChange($event)" />Black &
            White </label>


        <label for="grayscale"><input type="radio" name="templates" value="grayscale"
                (change)="onRadioChange($event)" />
            Grayscale </label>

        <label for="color"><input type="radio" name="templates" value="color" [checked]="true"
                (change)="onRadioChange($event)" /> Color </label>
    </div>

    <div>
        <label for="videoSource">Video Source:
            <select id="videoSource" (change)="openCamera()"></select></label>
        <button id="detectButton" (click)="toggleDetection()">Start Detection</button>
        <button id="captureButton" (click)="captureDocument()">Capture Document</button>
    </div>

    <div id="videoview">
        <div class="dce-video-container" id="videoContainer"></div>
        <canvas id="overlay"></canvas>
    </div>

    <div class="container">
        <div id="resultview">
            <canvas id="normalizedImage"></canvas>
        </div>
    </div>
</div>
Explanation
- The radio group is used to select the color mode.
- The
<select>element lists the available video sources. - The
Start Detectionbutton starts the document detection. - The
Capture Documentbutton captures the document. - The
overlaycanvas draws the detected document edges in real-time. - The
normalizedImagecanvas displays the rectified document.
Implement Camera-Based Detection
Set Up CaptureVisionRouter with Camera Input
Register a callback function to receive the detected document edges and bind a camera view to the CaptureVisionRouter instance.
ngOnInit(): void {
  this.videoSelect = document.querySelector('select#videoSource') as HTMLSelectElement;
  this.overlayManager.initOverlay(document.getElementById('overlay') as HTMLCanvasElement);
  (async () => {
    this.cameraView = await CameraView.createInstance();

    this.cameraEnhancer = await CameraEnhancer.createInstance(this.cameraView);

    this.isLoaded = true;
    let uiElement = document.getElementById('videoContainer');
    if (uiElement) {
      uiElement.append(this.cameraView.getUIElement());

      this.cameraView.getUIElement().shadowRoot?.querySelector('.dce-sel-camera')?.setAttribute('style', 'display: none');
      this.cameraView.getUIElement().shadowRoot?.querySelector('.dce-sel-resolution')?.setAttribute('style', 'display: none');

      let cameras = await this.cameraEnhancer.getAllCameras();
      this.listCameras(cameras);


      this.cvr = await CaptureVisionRouter.createInstance();
      if (this.isDestroyed) {
        throw Error(componentDestroyedErrorMsg);
      }
      this.cvr.setInput(this.cameraEnhancer);

      let settings: SimplifiedCaptureVisionSettings = await this.cvr.getSimplifiedSettings('DetectDocumentBoundaries_Default');
      settings.outputOriginalImage = true;
      await this.cvr!.updateSettings('DetectDocumentBoundaries_Default', settings);

      // Define a callback for results.
      this.cvr.addResultReceiver({
        onCapturedResultReceived: (result: CapturedResult) => {
          this.overlayManager.clearOverlay();

          let txts: any = [];
          try {
            let items = result.items
            if (items.length > 0) {
              for (var i = 0; i < items.length; ++i) {

                if (items[i].type === EnumCapturedResultItemType.CRIT_DETECTED_QUAD) {
                  this.detectedResult = items[i] as DetectedQuadResultItem;
                  this.points = this.detectedResult.location.points;

                  this.overlayManager.drawOverlay(
                    this.detectedResult.location,
                    ''
                  );
                }
                else if (items[i].type === EnumCapturedResultItemType.CRIT_ORIGINAL_IMAGE && !this.isNormalized) {
                  this.isNormalized = true;
                  let item = items[i] as OriginalImageResultItem;
                  this.currentData = item.imageData;
                  this.normalize(item.imageData, this.points);
                  this.toggleDetection();
                  break;
                }

              }
            }

          } catch (e) {
            throw (e);
          }
        },
      });

      this.cameraEnhancer.on('played', () => {
        this.updateResolution();
      });
      await this.openCamera();
      if (this.isDestroyed) {
        throw Error(componentDestroyedErrorMsg);
      }
      if (this.isDestroyed) {
        throw Error(componentDestroyedErrorMsg);
      }
    }
  })();
}
Start and Stop Real-Time Detection
Start or stop the document detection based on the button click event.
toggleDetection() {
  if (this.isDetecting) {
    this.isDetecting = false;
    this.cvr?.stopCapturing();
    this.cameraView?.clearAllInnerDrawingItems();
    this.overlayManager.clearOverlay();
    let button = document.getElementById('detectButton') as HTMLButtonElement;
    button.textContent = 'Start Detection';
  } else {
    this.isDetecting = true;
    let button = document.getElementById('detectButton') as HTMLButtonElement;
    button.textContent = 'Stop Detection';
    this.cvr?.startCapturing('DetectDocumentBoundaries_Default');
  }
}
Capture and Rectify a Document Frame
Call the capture method with the detected points and the NormalizeDocument_Default template to rectify the document.
async normalize(data: DSImageData, points: any) {
  if (this.cvr) {
    let settings: SimplifiedCaptureVisionSettings = await this.cvr.getSimplifiedSettings('NormalizeDocument_Default');
    settings.roi.points = points;
    settings.roiMeasuredInPercentage = false;
    await this.cvr!.updateSettings('NormalizeDocument_Default', settings);

    this.cvr.capture(data, 'NormalizeDocument_Default').then((normalizedImagesResult: CapturedResult) => {
      if (normalizedImagesResult.items.length === 0) { return; }
        for (let item of normalizedImagesResult.items) {
          if (item.type !== EnumCapturedResultItemType.CRIT_ENHANCED_IMAGE) {
            continue;
          }
          let result = item as EnhancedImageResultItem;
          let image = document.getElementById('normalizedImage') as HTMLCanvasElement;
          image.width = result.imageData.width;
          image.height = result.imageData.height;
          const destinationContext = image.getContext('2d');
          destinationContext?.drawImage(result.toCanvas(), 0, 0);
        }
    });
  }
}

captureDocument() {
  this.isNormalized = false;
}
Common Issues and Edge Cases
- WASM files not loading: Ensure
angular.jsonincludes the correct asset paths fordynamsoft-capture-vision-bundleanddynamsoft-capture-vision-data. Missing or incorrect paths cause silent initialization failures. - No document edges detected on low-contrast images: The default detection template works best with clearly defined document boundaries. For documents on similar-colored backgrounds, consider adjusting the
DetectDocumentBoundaries_Defaultsettings or placing a contrasting surface under the document. - Camera permission denied on mobile browsers: Some mobile browsers restrict camera access on non-HTTPS origins. Always serve the application over HTTPS in production to avoid
NotAllowedErrorfromgetUserMedia.