


Build an Angular Barcode and QR Code Scanner Component with Dynamsoft Capture Vision
Dynamsoft Capture Vision SDK consists of Dynamsoft Barcode Reader, Dynamsoft Label Recognizer, Dynamsoft Camera Enhancer, Dynamsoft Document Normalizer, and Dynamsoft Code Parser. Build Angular barcode and QR code scanner apps from scratch using the Dynamsoft Capture Vision JavaScript SDK to decode 1D/2D barcodes from image files and live camera streams in the browser.
What you’ll build: A complete Angular application that reads barcodes and QR codes from image files and live camera streams using the Dynamsoft Capture Vision JavaScript SDK.
Key Takeaways
- Dynamsoft Capture Vision SDK enables Angular apps to decode 1D/2D barcodes and QR codes from both static images and real-time camera feeds.
- The SDK’s WebAssembly engine runs entirely in the browser — no server-side processing is required.
CaptureVisionRouteris the single entry point for image decoding; pair it withCameraEnhancerfor live video scanning.- The project can be deployed as a static site on GitHub Pages using a simple GitHub Actions workflow.
Common Developer Questions
How do I build an Angular QR code and barcode scanner component?
Create Angular components for license activation and scanning, then initialize the SDK in your activation flow with engine resource paths, license validation, and WASM preload. In this article, the app shares activation state through a shared service so image decoding and camera scanning features can be shown only after license initialization succeeds.
How do I scan barcodes from a webcam in an Angular application?
Initialize CameraView, CameraEnhancer, and CaptureVisionRouter in the scanner component, bind the router input to the camera enhancer, and start capture with the barcode preset. The implementation also lists available cameras and updates the overlay size to match stream resolution so detection coordinates render correctly.
How do I configure Dynamsoft Capture Vision SDK with Angular CLI?
Add both Dynamsoft package asset directories to angular.json so WASM and model files are copied into your app assets at build time. Then set matching engineResourcePaths in TypeScript, otherwise the runtime will fail to load required files and barcode initialization can silently fail.
This article is Part 2 in a 5-Part Series.
- Part 1 - How to Implement Web TWAIN Document Scanning in an Angular Application
- Part 2 - Build an Angular Barcode and QR Code Scanner Component with Dynamsoft Capture Vision
- Part 3 - How to Build an Angular Document Scanner with Edge Detection and Auto-Crop
- Part 4 - How to Build an Angular MRZ Scanner and Passport Reader App
- Part 5 - How to Build an Angular PDF Viewer with Image Annotation and PDF Export
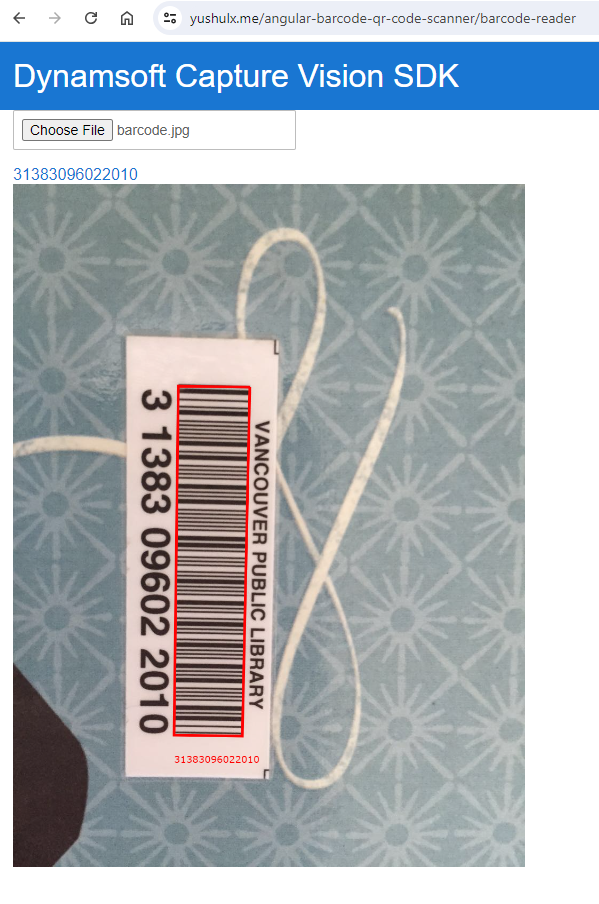
Angular Barcode and QR Code Scanner in Action
Try the Online Demo
Prerequisites
- Node.js
-
Install Angular CLI for Angular project development:
npm install -g @angular/cli ng --version - Get a 30-day free trial license for Dynamsoft Capture Vision.
Step 1: Scaffold the Angular Barcode Scanner Project
Create a New Angular Project
First, create a new Angular project named angular-barcode-qr-code-scanner using the Angular CLI:
ng new angular-barcode-qr-code-scanner
Install the Dynamsoft SDK Packages
Next, install the necessary Dynamsoft packages via npm:
npm i dynamsoft-capture-vision-bundle dynamsoft-capture-vision-data
- dynamsoft-capture-vision-bundle: The package contains the core library of Dynamsoft Capture Vision.
- dynamsoft-capture-vision-data: The package provides model files for Dynamsoft Capture Vision.
Configure Angular to Load Third-Party WASM Libraries
To make the third-party JavaScript libraries work in Angular, follow these steps:
-
Open the
angular.jsonfile and add the following configuration under thebuildsection:"build": { "builder": "@angular-devkit/build-angular:browser", "options": { ... "assets": [ "src/favicon.ico", "src/assets", { "glob": "**/*", "input": "./node_modules/dynamsoft-capture-vision-bundle/dist", "output": "assets/dynamsoft-capture-vision-bundle" }, { "glob": "**/*", "input": "./node_modules/dynamsoft-capture-vision-data", "output": "assets/dynamsoft-capture-vision-data" }, ... ], }, ... }, -
In your TypeScript code, set the resource output paths as follows:
 import { CoreModule, LicenseManager } from 'dynamsoft-capture-vision-bundle';

 CoreModule.engineResourcePaths = {
   dcvBundle: getFullUrl('assets/dynamsoft-capture-vision-bundle/'),
   dcvData: getFullUrl('assets/dynamsoft-capture-vision-data/'),
 };
Step 2: Set Up License Key Activation and Status Management
In this project, we will provide an input element for users to set a valid license key. Once the license key passes validation, the status is shared globally among different components: barcode reader and barcode scanner.
-
Generate a component and a shared service:
ng generate component product-list ng generate service shared -
Update the shared service to store the boolean value in the shared.service.ts file:
import { Injectable } from '@angular/core'; @Injectable({ providedIn: 'root' }) export class SharedService { private showDiv: boolean = false; getShowDiv(): boolean { return this.showDiv; } setShowDiv(value: boolean): void { this.showDiv = value; } toggleShowDiv(): void { this.showDiv = !this.showDiv; } } -
Update the component to use the shared service in the product-list.component.ts file:
import { Component } from '@angular/core'; import { products } from '../products'; import { CoreModule, LicenseManager } from 'dynamsoft-capture-vision-bundle'; import { SharedService } from '../shared.service'; @Component({ selector: 'app-product-list', templateUrl: './product-list.component.html', styleUrls: ['./product-list.component.css'], }) export class ProductListComponent { products = products; inputText: string = ''; processedText: string = ''; placeholderText: string = 'LICENSE-KEY'; constructor(private sharedService: SharedService) { } async activate(): Promise<void> { this.processedText = this.inputText.toUpperCase(); // Configure the paths where the .wasm files and other necessary resources for modules are located. CoreModule.engineResourcePaths = { dcvBundle: getFullUrl('assets/dynamsoft-capture-vision-bundle/'), dcvData: getFullUrl('assets/dynamsoft-capture-vision-data/'), }; try { // Visit https://www.dynamsoft.com/customer/license/trialLicense/?product=dcv&package=cross-platform let licenseKey: string = this.inputText === '' ? this.placeholderText : this.inputText; await LicenseManager.initLicense(licenseKey, { executeNow: true }); CoreModule.loadWasm(['DBR']); this.toggleDivVisibility(); } catch (error) { alert(error); } } toggleDivVisibility(): void { this.sharedService.toggleShowDiv(); } get showDiv(): boolean { return this.sharedService.getShowDiv(); } }Explanation:
- The
activatemethod is triggered when the user clicks theActivatebutton. It initializes the Dynamsoft JavaScript Barcode SDK with the license key. - The license key stored in the placeholder text is a one-day trial license key publicly available for all users.
- The
showDivproperty is used to toggle the visibility of barcode reader and scanner components after the license key is validated.
- The
-
Update the component template in the product-list.component.html file:
<div> <div> Get a License key from <a href="https://www.dynamsoft.com/customer/license/trialLicense/?product=dcv&package=cross-platform" target="_blank">here</a> </div> <input type="text" [(ngModel)]="inputText" [placeholder]="placeholderText"> <button (click)="activate()">Activate SDK</button> </div> <div *ngIf="showDiv"> <h2>Examples</h2> <div *ngFor="let product of products"> <h3> <div *ngIf="product.id === 'reader'; else elseBlock"> <a [title]="product.name + ' details'" [routerLink]="['/barcode-reader']">> </a> </div> <ng-template #elseBlock><a [title]="product.name + ' details'" [routerLink]="['/barcode-scanner']">> </a></ng-template> </h3> <p *ngIf="product.description">Description: </p> </div> </div>Explanation:
- The
inputelement is used to set the license key. - The
buttonelement is used to trigger theactivatemethod. - The
*ngIfdirective is used to toggle the visibility of the barcode reader and scanner components.
- The
Step 3: Decode Barcodes from Image Files
-
Create a
barcode-readercomponent via Angular CLI:ng generate component barcode-reader -
Construct the web page layout in the
barcode-reader.component.htmlfile:<input type="file" id="file" accept="image/*" (change)="onChange($event)" /> <div> <a id="result"></a> </div> <div id="imageview"> <img id="image" /> <canvas id="overlay"></canvas> </div>Explanation
- The
inputelement is used to select an image file. - The
aelement is used to display barcode and QR code results. - The
imgelement is used to display the selected image. - The
canvaselement is used to draw barcode and QR code results.
- The
-
Add TypeScript code to the
barcode-reader.component.tsfile.import { Component, OnInit } from '@angular/core'; import { OverlayManager } from '../overlay'; import { CapturedResult, CaptureVisionRouter, BarcodeResultItem, EnumCapturedResultItemType } from 'dynamsoft-capture-vision-bundle'; @Component({ selector: 'app-barcode-reader', templateUrl: './barcode-reader.component.html', styleUrls: ['./barcode-reader.component.css'], }) export class BarcodeReaderComponent implements OnInit { isLoaded = false; overlay: HTMLCanvasElement | undefined; context: CanvasRenderingContext2D | undefined; overlayManager: OverlayManager; cvr: CaptureVisionRouter | undefined; constructor() { this.overlayManager = new OverlayManager(); } ngOnInit(): void { this.overlayManager.initOverlay(document.getElementById('overlay') as HTMLCanvasElement); (async () => { this.cvr = await CaptureVisionRouter.createInstance(); this.isLoaded = true; })(); } onChange(event: Event) { const element = event.currentTarget as HTMLInputElement; let fileList: FileList | null = element.files; if (fileList) { let file = fileList.item(0) as any; if (file) { let fr = new FileReader(); fr.onload = (event: any) => { let image = document.getElementById('image') as HTMLImageElement; if (image) { image.src = event.target.result; const img = new Image(); img.onload = (event: any) => { this.overlayManager.updateOverlay(img.width, img.height); if (this.cvr) { this.cvr.capture(file, 'ReadBarcodes_Balance').then((result: CapturedResult) => { console.log(result); let txts: any = []; let elem = document.getElementById('result'); try { let localization; let items = result.items if (items.length > 0) { for (var i = 0; i < items.length; ++i) { if (items[i].type !== EnumCapturedResultItemType.CRIT_BARCODE) { continue; // check if captured result item is a barcode } let item = items[i] as BarcodeResultItem; txts.push(item.text); localization = item.location; console.log(localization); this.overlayManager.drawOverlay( localization, item.text ); } if (elem) { elem.innerHTML = txts.join(', '); } } else { if (elem) { elem.innerHTML = txts.join(', '); } } } catch (e) { alert(e); } }); } }; img.src = event.target.result; } }; fr.readAsDataURL(file); } } } }Explanation
- The
ngOnInitmethod initializes the overlay and CaptureVisionRouter object. - The
onChangemethod is triggered when the user selects an image file. It reads the barcode and QR code results from the image file.
- The
Step 4: Scan Barcodes from a Live Camera Stream
-
Create a
barcode-scannercomponent via Angular CLI:ng generate component barcode-scanner -
Construct the web page layout in the
barcode-scanner.component.htmlfile:<div class="select"> <label for="videoSource">Video source: </label> <select id="videoSource" (change)="openCamera()"></select> </div> <div id="videoview"> <div class="dce-video-container" id="videoContainer"></div> <canvas id="overlay"></canvas> </div>Explanation
- The
selectelement is used to list the available video sources. - The
divelement with thevideoContainerid is used to display the video stream. - The
canvaselement with theoverlayid is used to draw barcode and QR code results.
- The
-
Add TypeScript code to the
barcode-scanner.component.tsfile:import { Component, OnInit } from '@angular/core'; import { OverlayManager } from '../overlay'; import { BarcodeResultItem, CameraEnhancer, CameraView, CapturedResult, CaptureVisionRouter, EnumCapturedResultItemType, MultiFrameResultCrossFilter, Resolution } from 'dynamsoft-capture-vision-bundle'; const componentDestroyedErrorMsg = 'VideoCapture Component Destroyed'; @Component({ selector: 'app-barcode-scanner', templateUrl: './barcode-scanner.component.html', styleUrls: ['./barcode-scanner.component.css'], }) export class BarcodeScannerComponent implements OnInit { isLoaded = false; overlay: HTMLCanvasElement | undefined; context: CanvasRenderingContext2D | undefined; cameraInfo: any = {}; videoSelect: HTMLSelectElement | undefined; overlayManager: OverlayManager; cvr?: CaptureVisionRouter; cameraEnhancer?: CameraEnhancer; isDestroyed = false; constructor() { this.overlayManager = new OverlayManager(); } ngOnInit(): void { this.videoSelect = document.querySelector('select#videoSource') as HTMLSelectElement; this.overlayManager.initOverlay(document.getElementById('overlay') as HTMLCanvasElement); (async () => { await this.initBarcodeScanner(); })(); } ngOnDestroy(): void { this.isDestroyed = true; try { this.cvr?.dispose(); this.cameraEnhancer?.dispose(); } catch (_) { } } updateResolution(): void { if (this.cameraEnhancer && this.overlayManager) { let resolution: Resolution = this.cameraEnhancer.getResolution(); this.overlayManager.updateOverlay(resolution.width, resolution.height); } } async initBarcodeScanner(): Promise<void> { const cameraView: CameraView = await CameraView.createInstance(); this.cameraEnhancer = await CameraEnhancer.createInstance(cameraView); this.isLoaded = true; let uiElement = document.getElementById('videoContainer'); if (uiElement) { uiElement.append(cameraView.getUIElement()); cameraView.getUIElement().shadowRoot?.querySelector('.dce-sel-camera')?.setAttribute('style', 'display: none'); cameraView.getUIElement().shadowRoot?.querySelector('.dce-sel-resolution')?.setAttribute('style', 'display: none'); let cameras = await this.cameraEnhancer.getAllCameras(); this.listCameras(cameras); this.cvr = await CaptureVisionRouter.createInstance(); if (this.isDestroyed) { throw Error(componentDestroyedErrorMsg); } this.cvr.setInput(this.cameraEnhancer); // Define a callback for results. this.cvr.addResultReceiver({ onCapturedResultReceived: (result: CapturedResult) => { this.overlayManager.clearOverlay(); let txts: any = []; let resultElement = document.getElementById('result'); try { let localization; let items = result.items if (items.length > 0) { for (var i = 0; i < items.length; ++i) { if (items[i].type !== EnumCapturedResultItemType.CRIT_BARCODE) { continue; // check if captured result item is a barcode } let item = items[i] as BarcodeResultItem; txts.push(item.text); localization = item.location; console.log(localization); this.overlayManager.drawOverlay( localization, item.text ); } if (resultElement) { resultElement.innerHTML = txts.join(', '); } } else { if (resultElement) { resultElement.innerHTML = txts.join(', '); } } } catch (e) { alert(e); } }, }); this.cvr.addResultReceiver({ onDecodedBarcodesReceived: (result) => { if (!result.barcodeResultItems.length) return; console.log(result); }, }); this.cameraEnhancer.on('played', () => { this.updateResolution(); }); await this.openCamera(); if (this.isDestroyed) { throw Error(componentDestroyedErrorMsg); } await this.cvr.startCapturing('ReadSingleBarcode'); if (this.isDestroyed) { throw Error(componentDestroyedErrorMsg); } } } async openCamera(): Promise<void> { this.overlayManager.clearOverlay(); if (this.videoSelect) { let deviceId = this.videoSelect.value; if (this.cameraEnhancer) { await this.cameraEnhancer.selectCamera(deviceId); await this.cameraEnhancer.open(); } } } listCameras(deviceInfos: any): void { for (var i = 0; i < deviceInfos.length; ++i) { var deviceInfo = deviceInfos[i]; var option = document.createElement('option'); option.value = deviceInfo.deviceId; option.text = deviceInfo.label; this.cameraInfo[deviceInfo.deviceId] = deviceInfo; if (this.videoSelect) this.videoSelect.appendChild(option); } } }Explanation:
- The
ngOnInitmethod initializes the overlay,CameraView,CaptureVisionRouterandCameraEnhancerobjects. - The
updateResolutionmethod updates the overlay size according to the camera resolution. - The
openCameraopens the selected camera source. - The
listCamerasmethod lists the available camera sources. - The
ngOnDestroymethod destroys theCaptureVisionRouterandCameraEnhancerobjects when the component is destroyed.
- The
-
Run the Angular project:
ng serve --ssl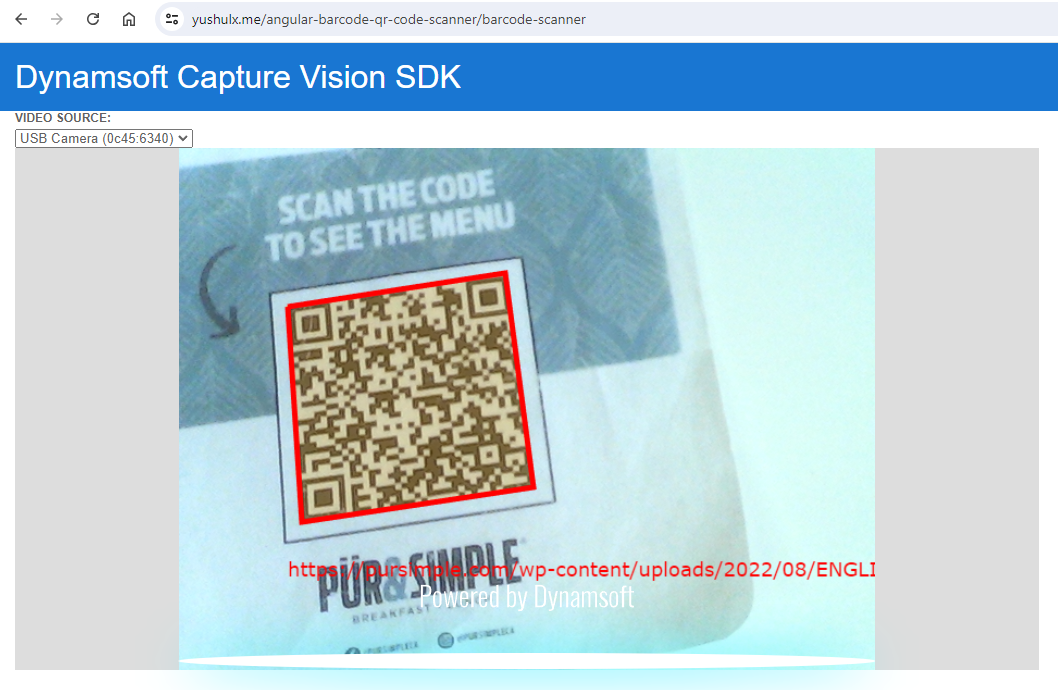
Step 5: Deploy to GitHub Pages
Deploying your Angular project to GitHub Pages can be automated using GitHub Actions. Follow these steps to set up the deployment process:
-
Create a GitHub Actions workflow file to automate the build and deployment process. This workflow uses the Angular Deploy gh-pages Actions:
name: Build and Deploy on: push: branches: - main jobs: build: runs-on: ubuntu-latest steps: - uses: actions/checkout@v2 - name: All things angular uses: AhsanAyaz/angular-deploy-gh-pages-actions@v1.3.2 with: github_access_token: $ build_configuration: production base_href: /angular-barcode-qr-code-scanner/ deploy_branch: gh-pages angular_dist_build_folder: dist/angular-barcode-qr-code-scannerNote: Replace
angular-barcode-qr-code-scannerwith your actual project name. -
After setting up the workflow file, enable GitHub Pages for your repository:
- Go to
Your GitHub repository > Settings > Pages. - Select the
gh-pagesbranch as the source for GitHub Pages. - Save the changes to launch the GitHub page.
- Go to
FAQ
What if ng serve fails with a PowerShell execution policy error on Windows?
If you see the error:
ng : File C:\Users\Admin\AppData\Roaming\npm\ng.ps1 cannot be loaded because running scripts is disabled on this system
. For more information, see about_Execution_Policies at https:/go.microsoft.com/fwlink/?LinkID=135170.
Temporarily bypass the execution policy for the current PowerShell session:
Set-ExecutionPolicy -Scope Process -ExecutionPolicy Bypass
Common Issues and Edge Cases
- Camera access requires HTTPS: Browsers block
getUserMedia()on non-HTTPS origins. Useng serve --sslduring development, or access vialocalhost. Deploying to GitHub Pages provides HTTPS automatically. - WASM files fail to load due to incorrect asset paths: If the barcode engine silently fails to initialize, verify that the
assetsblock inangular.jsoncorrectly maps thedynamsoft-capture-vision-bundleanddynamsoft-capture-vision-datadirectories. Check the browser DevTools Network tab for 404 errors on.wasmfiles. - Component destroyed before async initialization completes: If you navigate away from the scanner component while the camera is still opening, the
CaptureVisionRouterandCameraEnhancerinstances may leak. The code guards against this withisDestroyedchecks, but always calldispose()inngOnDestroy.