


Build a Blazor WebAssembly Barcode and QR Code Scanner with Dynamsoft
Blazor is a powerful framework by Microsoft that enables developers to build interactive web applications using C# instead of JavaScript, bringing the full power of .NET to the browser. While Blazor allows you to write most of your web app in C#, calling existing JavaScript APIs remains an inevitable part of enhancing Blazor functionalities, especially when integrating with powerful libraries like the Dynamsoft JavaScript Barcode SDK. In this tutorial, we will show you how to build a .NET Blazor application for scanning 1D/2D barcodes by leveraging the interop between C# and JavaScript.
This article is Part 2 in a 5-Part Series.
- Part 1 - How to Scan and Digitize Documents in Blazor WebAssembly with C# and .NET
- Part 2 - Build a Blazor WebAssembly Barcode and QR Code Scanner with Dynamsoft
- Part 3 - How to Build a Blazor WebAssembly PDF Annotation Viewer with Dynamsoft
- Part 4 - Build a C# Blazor WebAssembly Passport MRZ Scanner with Dynamsoft
- Part 5 - How to Implement TWAIN Document Scanning in a .NET Blazor WebAssembly App
What you’ll build: A Blazor WebAssembly application that reads barcodes and QR codes from both static images and a live device camera stream, using Dynamsoft Capture Vision and C#–JavaScript interop.
Key Takeaways
- Blazor WebAssembly integrates the Dynamsoft JavaScript Barcode SDK via
IJSRuntime, enabling 1D/2D barcode decoding without leaving the .NET ecosystem. - The
CaptureVisionRouterAPI provides a unifiedcapture()interface for both image-file and live-camera barcode scanning. - JS-to-C# callbacks are wired through
DotNetObjectReference, so real-time barcode results update Blazor component state directly. - This architecture runs in any modern browser without native plugins, making it suitable for inventory, logistics, and ID-scanning web apps.
Common Developer Questions
How do I build a Blazor WebAssembly barcode scanner using JavaScript interop?
Initialize the Dynamsoft SDK from JavaScript, then call those interop functions from Blazor with IJSRuntime after the component renders. In this sample, Blazor owns the page state while JavaScript handles scanner initialization, file selection, camera access, and decoding.
How do I decode QR codes and barcodes from a webcam stream in a .NET Blazor app?
Bind CameraEnhancer as the input to CaptureVisionRouter, then pass results back into C# through DotNetObjectReference callbacks whenever a barcode is decoded. That is how the live camera stream updates the Razor component without polling from .NET.
Why is the Dynamsoft WASM module slow to load on first use in Blazor WebAssembly?
The first scan is slower when the barcode WebAssembly module is downloaded on demand instead of being preloaded. Calling CoreModule.loadWasm(["dbr"]) during SDK setup shifts that cost earlier so the first real decode feels much faster.
See It in Action
Try the Live Demo Online
https://yushulx.me/blazor-barcode-mrz-document-scanner/
Prerequisites
-
Dynamsoft Capture Vision Bundle: This bundle includes all Dynamsoft JavaScript imaging SDKs, designed to work seamlessly together. It is available on npm.

-
Dynamsoft Capture Vision Trial License: A trial license supports all features (including Barcode, MRZ, Document recognition, and more) of the Dynamsoft Capture Vision Bundle for 30 days. You can apply for a trial license here.
Step 1: Integrate Dynamsoft Capture Vision Bundle into a Blazor WebAssembly Project
- Create a Blazor WebAssembly Project: Start a new Blazor WebAssembly project in Visual Studio or Visual Studio Code.
- Add the Capture Vision Bundle Script: In the
wwwroot/index.htmlfile, include the Dynamsoft Capture Vision Bundle script:<script src="https://cdn.jsdelivr.net/npm/dynamsoft-capture-vision-bundle@3.0.3001/dist/dcv.bundle.min.js"></script> - Create a JavaScript File for Interop: Create a file named
jsInterop.jsin thewwwrootfolder and include it in theindex.html:<script src="jsInterop.js"></script> - Configure JavaScript to Set the License: In
jsInterop.js, define asetLicensefunction that specifies the resource paths for the dependencies and sets the license key:window.jsFunctions = { setLicense: async function setLicense(license) { if (isInitialized) return true; try { Dynamsoft.Core.CoreModule.engineResourcePaths.rootDirectory = "https://cdn.jsdelivr.net/npm"; Dynamsoft.License.LicenseManager.initLicense(license, true); await Dynamsoft.Core.CoreModule.loadWasm(["dbr"]); ... } catch (e) { alert(e); return false; } return true; } };The
loadWasmmethod preloads the WebAssembly module for the Dynamsoft Barcode Reader SDK. If you don’t load it ahead of time, the SDK will load it on-demand, which may cause a delay in the first barcode scanning. -
Update the Blazor Page to Activate the SDK: Modify the
Pages/Home.razorfile to include HTML and C# code that allows users to activate the SDK with a valid license key:@page "/" @inject IJSRuntime JSRuntime <PageTitle>Home</PageTitle> <p>Click <a href="https://www.dynamsoft.com/customer/license/trialLicense/?product=dcv&package=cross-platform" target="_blank">here</a> to obtain a Dynamsoft Capture Vision Trial License.</p> <EditForm Model="@this"> <InputText @bind-Value="LicenseKey" placeholder="Enter your license key" /> <button type="button" class="btn btn-primary" @onclick="SetLicenseKey">Activate the SDK</button> </EditForm> @code { Boolean initialized = false; private string LicenseKey = "LICENSE-KEY"; private async Task SetLicenseKey() { initialized = await JSRuntime.InvokeAsync<Boolean>("jsFunctions.setLicense", LicenseKey); StateHasChanged(); } }
Step 2: Implement a Barcode Reader Razor Page
- Create the Barcode Reader Component: Create a new Razor component called
Reader.razorin the Pages folder and add it to your navigation menu inNavMenu.razor:<div class="nav-item px-3"> <NavLink class="nav-link" href="barcodereader"> <span class="bi bi-plus-square-fill-nav-menu" aria-hidden="true"></span> Barcode Reader </NavLink> </div>Ensure that the
hrefattribute value (barcodereader) matches the path specified in the Razor component. -
Implement the Barcode Reader in Reader.razor: Add the following code in
Reader.razorto set up the barcode reader functionality:@page "/barcodereader" @inject IJSRuntime JSRuntime <button @onclick="ReadBarcodes">Select an image</button> <p class="p-result">@result</p> <div id="imageview"> <img id="@imageId" /> <canvas id="@overlayId"></canvas> </div> @code { private String result = ""; private DotNetObjectReference<Reader>? objRef; private String imageId = "image"; private String overlayId = "overlay"; protected override void OnInitialized() { objRef = DotNetObjectReference.Create(this); } protected override async Task OnAfterRenderAsync(bool firstRender) { if (firstRender) { // Call the JavaScript function when the page is loaded await JSRuntime.InvokeVoidAsync("jsFunctions.initReader"); } } public async Task ReadBarcodes() { await JSRuntime.InvokeVoidAsync( "jsFunctions.selectFile", objRef, overlayId, imageId); } [JSInvokable] public void ReturnBarcodeResultsAsync(String text) { result = text; StateHasChanged(); } public void Dispose() { objRef?.Dispose(); } }Explanation
@page "/barcodereader"sets the route for the Razor component.OnInitialized()creates aDotNetObjectReference, enablingJavaScriptto callC#methods.OnAfterRenderAsync()triggers the JavaScript functioninitReaderwhen the page loads.ReadBarcodes()invokes the JavaScript functionselectFile, which opens a file dialog to select an image for barcode scanning.ReturnBarcodeResultsAsync()is a C# method that JavaScript calls to return barcode results to the Blazor component.
- Add JavaScript Functions in jsInterop.js: Add the corresponding JavaScript functions in
jsInterop.js:function showResults(result, dotnetRef) { clearOverlay(); let txts = []; try { let localization; let items = result.items if (items.length > 0) { for (var i = 0; i < items.length; ++i) { if (items[i].type !== Dynamsoft.Core.EnumCapturedResultItemType.CRIT_BARCODE) { continue; } let item = items[i]; txts.push(item.text); localization = item.location; drawOverlay( localization, item.text ); } } } catch (e) { alert(e); } let barcoderesults = txts.join(', '); if (txts.length == 0) { barcoderesults = 'No barcode found'; } if (dotnetRef) { dotnetRef.invokeMethodAsync('ReturnBarcodeResultsAsync', barcoderesults); } } function decodeImage(dotnetRef, url, data) { const img = new Image() img.onload = () => { updateOverlay(img.width, img.height); if (cvr) { cvr.capture(url, 'ReadBarcodes_Balance').then((result) => { showResults(result, dotnetRef); }); } } img.src = url } window.jsFunctions = { ... initReader: async function () { try { dispose(); cvr = await Dynamsoft.CVR.CaptureVisionRouter.createInstance(); } catch (e) { console.log(e); } }, selectFile: async function (dotnetRef, overlayId, imageId) { if (cameraEnhancer) { cameraEnhancer.dispose(); cameraEnhancer = null; } initOverlay(document.getElementById(overlayId)); if (cvr) { let input = document.createElement("input"); input.type = "file"; input.onchange = async function () { try { let file = input.files[0]; var fr = new FileReader(); fr.onload = function () { let image = document.getElementById(imageId); image.src = fr.result; image.style.display = 'block'; decodeImage(dotnetRef, fr.result, file); } fr.readAsDataURL(file); } catch (ex) { alert(ex.message); throw ex; } }; input.click(); } else { alert("The barcode reader is still initializing."); } }, };Explanation
initReader()initializes the Capture Vision Router.decodeImage()decodes barcodes from the selected image.showResults()displays the decoded barcode results.selectFile()allows users to select an image file, which is then processed for barcode scanning.
Step 3: Implement a Barcode Scanner Razor Page
- Create the Barcode Scanner Component: Create a new Razor component called
Scanner.razorin the Pages folder and add it to the navigation menu inNavMenu.razor:<div class="nav-item px-3"> <NavLink class="nav-link" href="barcodescanner"> <span class="bi bi-list-nested-nav-menu" aria-hidden="true"></span> Barcode Scanner </NavLink> </div> - Implement the Barcode Scanner in Scanner.razor: Add the following code in
Scanner.razorto set up the barcode scanner functionality:@page "/barcodescanner" @inject IJSRuntime JSRuntime <div class="select"> <button @onclick="GetCameras">Get Cameras</button> <label for="videoSource"></label> <select id="@videoSourceId"></select> <button @onclick="StartCamera">Open Camera</button> <button @onclick="StopCamera">Stop Camera</button> </div> <div id="videoview"> <div class="dce-video-container" id="@videoContainerId"></div> <canvas id="@overlayId"></canvas> </div> @code { private String result = ""; private DotNetObjectReference<Scanner>? objRef; private string videoSourceId = "videoSource"; private string overlayId = "overlay"; private string videoContainerId = "videoContainer"; protected override async Task OnAfterRenderAsync(bool firstRender) { if (firstRender) { objRef = DotNetObjectReference.Create(this); await JSRuntime.InvokeAsync<Boolean>("jsFunctions.initScanner", objRef, videoContainerId, videoSourceId, overlayId); } } [JSInvokable] public void ReturnBarcodeResultsAsync(String text) { result = text; StateHasChanged(); } public void Dispose() { objRef?.Dispose(); } public async Task GetCameras() { await JSRuntime.InvokeVoidAsync("jsFunctions.getCameras"); } public async Task StartCamera() { await JSRuntime.InvokeVoidAsync("jsFunctions.startCamera"); } public async Task StopCamera() { await JSRuntime.InvokeVoidAsync("jsFunctions.stopCamera"); } }Explanation
@page "/barcodescanner"defines the route for the Razor component.OnAfterRenderAsync()initializes the barcode scanner by calling the JavaScript functioninitScanneronce the page is loaded.GetCameras(),StartCamera(), andStopCamera()are methods that interact with JavaScript functions to manage the camera and barcode scanning operations.
-
Add JavaScript Functions in jsInterop.js: Add the corresponding JavaScript functions in your
jsInterop.jsfile:async function openCamera() { clearOverlay(); try { let deviceId = videoSelect.value; if (cameraEnhancer && deviceId !== "") { await cameraEnhancer.selectCamera(deviceId); await cameraEnhancer.open(); cvr.startCapturing('ReadSingleBarcode'); } } catch(e) { console.log(e); } } window.jsFunctions = { ... initScanner: async function (dotnetRef, videoId, selectId, overlayId) { let canvas = document.getElementById(overlayId); initOverlay(canvas); videoSelect = document.getElementById(selectId); videoSelect.onchange = openCamera; try { dispose(); let cameraView = await Dynamsoft.DCE.CameraView.createInstance(); cameraEnhancer = await Dynamsoft.DCE.CameraEnhancer.createInstance(cameraView); let uiElement = document.getElementById(videoId); uiElement.append(cameraView.getUIElement()); cameraView.getUIElement().shadowRoot?.querySelector('.dce-sel-camera')?.setAttribute('style', 'display: none'); cameraView.getUIElement().shadowRoot?.querySelector('.dce-sel-resolution')?.setAttribute('style', 'display: none'); cvr = await Dynamsoft.CVR.CaptureVisionRouter.createInstance(); cvr.setInput(cameraEnhancer); cvr.addResultReceiver({ onCapturedResultReceived: (result) => { showResults(result, dotnetRef); }, }); cvr.addResultReceiver({ onDecodedBarcodesReceived: (result) => { if (!result.barcodeResultItems.length) return; }, }); cameraEnhancer.on('played', () => { updateResolution(); }); } catch (e) { console.log(e); result = false; } return true; }, getCameras: async function () { if (cameraEnhancer) { let cameras = await cameraEnhancer.getAllCameras(); listCameras(cameras); } }, startCamera: async function() { openCamera(); }, stopCamera: async function () { try { if (cameraEnhancer) { cameraEnhancer.pause(); } } catch (e) { console.log(e); } } };Explanation
initScanner()initializes the camera view, camera enhancer, and Capture Vision Router, and registers callback functions to handle barcode results.getCameras()retrieves the list of available cameras.startCamera()opens the selected camera and starts barcode scanning.stopCamera()stops the camera preview, halting any ongoing image processing.
Step 4: Run the Blazor Barcode Reader and Scanner Application
To launch your Blazor application, press F5 in Visual Studio or use your preferred method to start debugging. Once the application is running, you can access the barcode reader and scanner pages to scan barcodes and QR codes effortlessly.
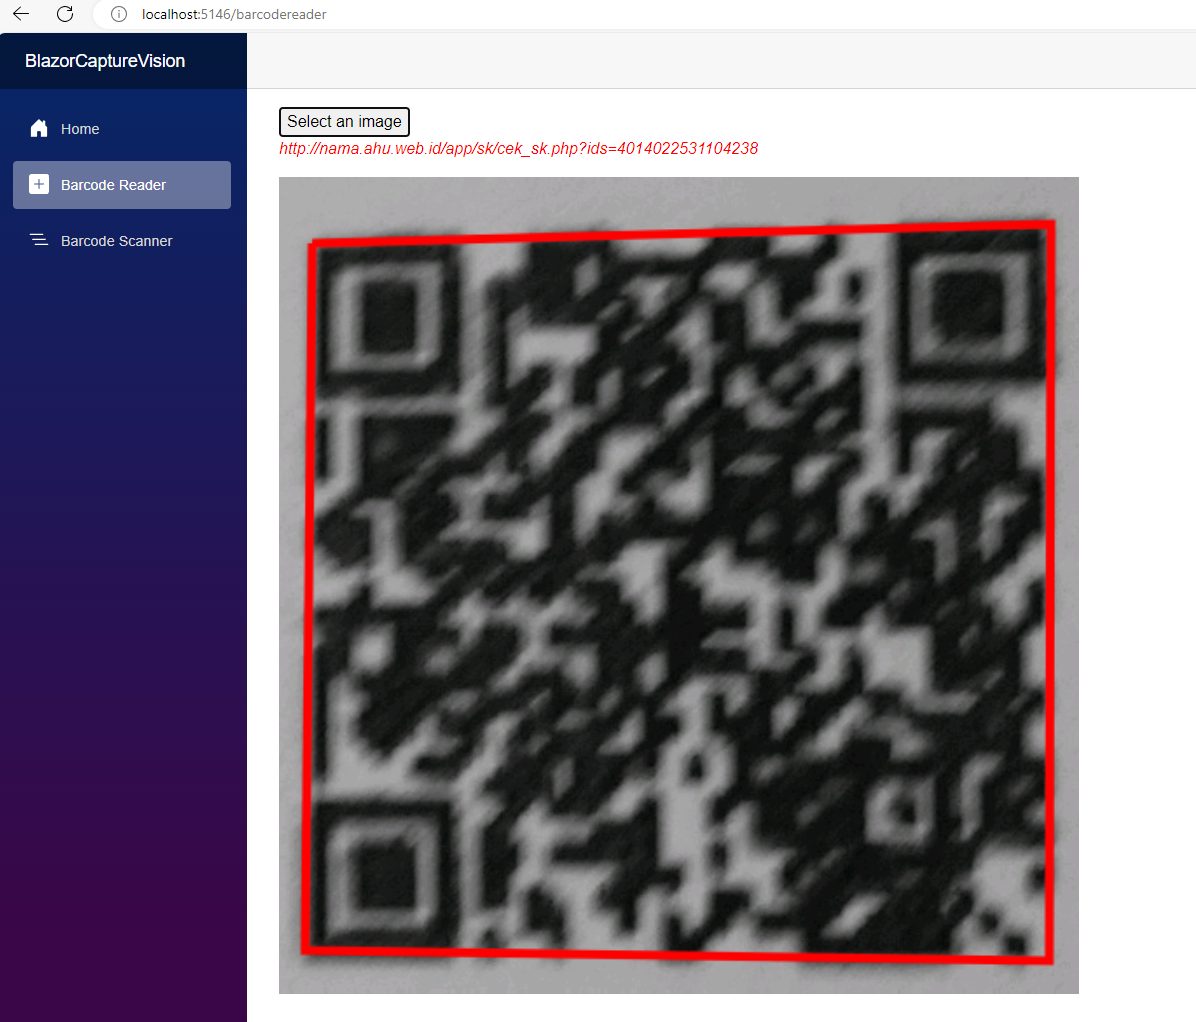
-
Barcode Reader: Use the barcode reader page to select image files for barcode detection.
-
Barcode Scanner: The barcode scanner page allows for real-time scanning using your device’s camera, making it easy to detect barcodes and QR codes.

Common Issues & Edge Cases
- WASM module loads slowly on first scan: Calling
CoreModule.loadWasm(["dbr"])in thesetLicensefunction preloads the WebAssembly binary ahead of time. Skipping this causes the SDK to download on-demand, adding a 3–5 second delay on the first barcode capture. - Camera blocked on non-HTTPS origins:
CameraEnhancerrequires a secure context (https://orlocalhost). Deploying to plain HTTP will prevent camera access. Always develop onlocalhostand serve over HTTPS in production. - No results from blurry or low-resolution images: Switch from
ReadSingleBarcodetoReadBarcodes_Balancein thecvr.capture()call to enable multi-pass decoding, which handles low-resolution and slightly blurry inputs more reliably.