


How to Build a React Native MRZ Passport Scanner for Android and iOS
Verifying travel documents manually is error-prone and slow. The Machine Readable Zone (MRZ) printed on passports, ID cards, and other ICAO-compliant travel documents encodes all key identity fields in a structured, machine-readable format — but extracting it on mobile requires both an accurate OCR engine and a live camera pipeline. The Dynamsoft MRZ Scanner SDK wraps both into a single React Native call that works on Android and iOS.
What you’ll build: A React Native app (Android API 21+ / iOS 13+) that opens a live camera scanner, reads the MRZ from any TD1/TD2/TD3 travel document, and displays the parsed fields — name, document number, nationality, dates — using dynamsoft-mrz-scanner-bundle-react-native v3.2.5002.
Demo Video: React Native MRZ Scanner in Action
Key Takeaways
- This tutorial shows how to integrate real-time MRZ scanning into a React Native app with a single SDK call and no native module boilerplate.
dynamsoft-mrz-scanner-bundle-react-nativeexposes aMRZScanner.launch()API that handles camera permissions, viewfinder UI, and OCR in one shot.- The SDK returns a fully parsed result object (
result.data) with named fields —firstName,lastName,documentNumber,nationality, and more — eliminating the need to parse MRZ lines manually. - This pattern is directly applicable to airport check-in kiosks, hotel registration systems, and any workflow that requires rapid, hands-free document verification.
Common Developer Questions
- How do I scan a passport MRZ in React Native without writing native Android/iOS code?
- Why does
MRZScanner.launch()fail on Android with a camera permission error even after granting permissions? - Does the Dynamsoft MRZ Scanner work offline, or does it need a network connection for every scan?
Prerequisites
Before you start, make sure you have the following:
- Node.js ≥ 18
- React Native 0.79 (uses the New Architecture)
- Android Studio (latest) with a connected device or emulator running Android 5.0 (API 21)+
- Xcode (latest, macOS only) for iOS 13.0+ builds
- JDK 17
- A Dynamsoft MRZ Scanner license key — the project ships with a time-limited trial key that requires a network connection.
Get a 30-day free trial license at dynamsoft.com/customer/license/trialLicense
Step 1: Install and Configure the SDK
Install the project dependencies with npm. The two Dynamsoft packages — the MRZ scanner bundle and the underlying Capture Vision engine — are declared in package.json and will be installed automatically.
npm install
The relevant SDK dependencies in package.json:
"dependencies": {
  "dynamsoft-capture-vision-react-native": "3.2.5002",
  "dynamsoft-mrz-scanner-bundle-react-native": "3.2.5002",
  "react": "19.0.0",
  "react-native": "0.79.0"
}
For iOS, install the CocoaPods dependencies after npm install:
cd ios && pod install && cd ..
Step 2: Configure the License and Launch the MRZ Scanner
Import MRZScanner, MRZScanConfig, and EnumResultStatus from the bundle package, then call MRZScanner.launch(config) with your license key. The SDK takes over the camera, presents its built-in scanning UI, and returns only when the user finishes or cancels.
import {
  EnumResultStatus,
  MRZScanConfig,
  MRZScanner,
} from 'dynamsoft-mrz-scanner-bundle-react-native';

const handleScan = async () => {
  setScanState({kind: 'scanning'});
  try {
    const config: MRZScanConfig = {
      // Trial license — network connection required.
      // Request an extension at:
      // https://www.dynamsoft.com/customer/license/trialLicense/?product=dcv&package=cross-platform
      license:
        'LICENSE-KEY',
    };
    const result = await MRZScanner.launch(config);
    // ... handle result
  } catch (e: unknown) {
    const message = e instanceof Error ? e.message : String(e);
    setScanState({kind: 'error', code: -1, message});
  }
};
Step 3: Handle Scan Result States
MRZScanner.launch() resolves with a result object whose resultStatus maps to one of three EnumResultStatus values. Check the status before accessing result.data to distinguish a successful scan from a user cancellation or an SDK-level error.
if (result.resultStatus === EnumResultStatus.RS_FINISHED) {
  setScanState({kind: 'result', data: result.data as Record<string, string>});
} else if (result.resultStatus === EnumResultStatus.RS_CANCELED) {
  setScanState({kind: 'cancelled'});
} else {
  setScanState({
    kind: 'error',
    code: result.errorCode ?? -1,
    message: result.errorString ?? 'An unknown error occurred.',
  });
}
Step 4: Display Parsed MRZ Fields in the UI
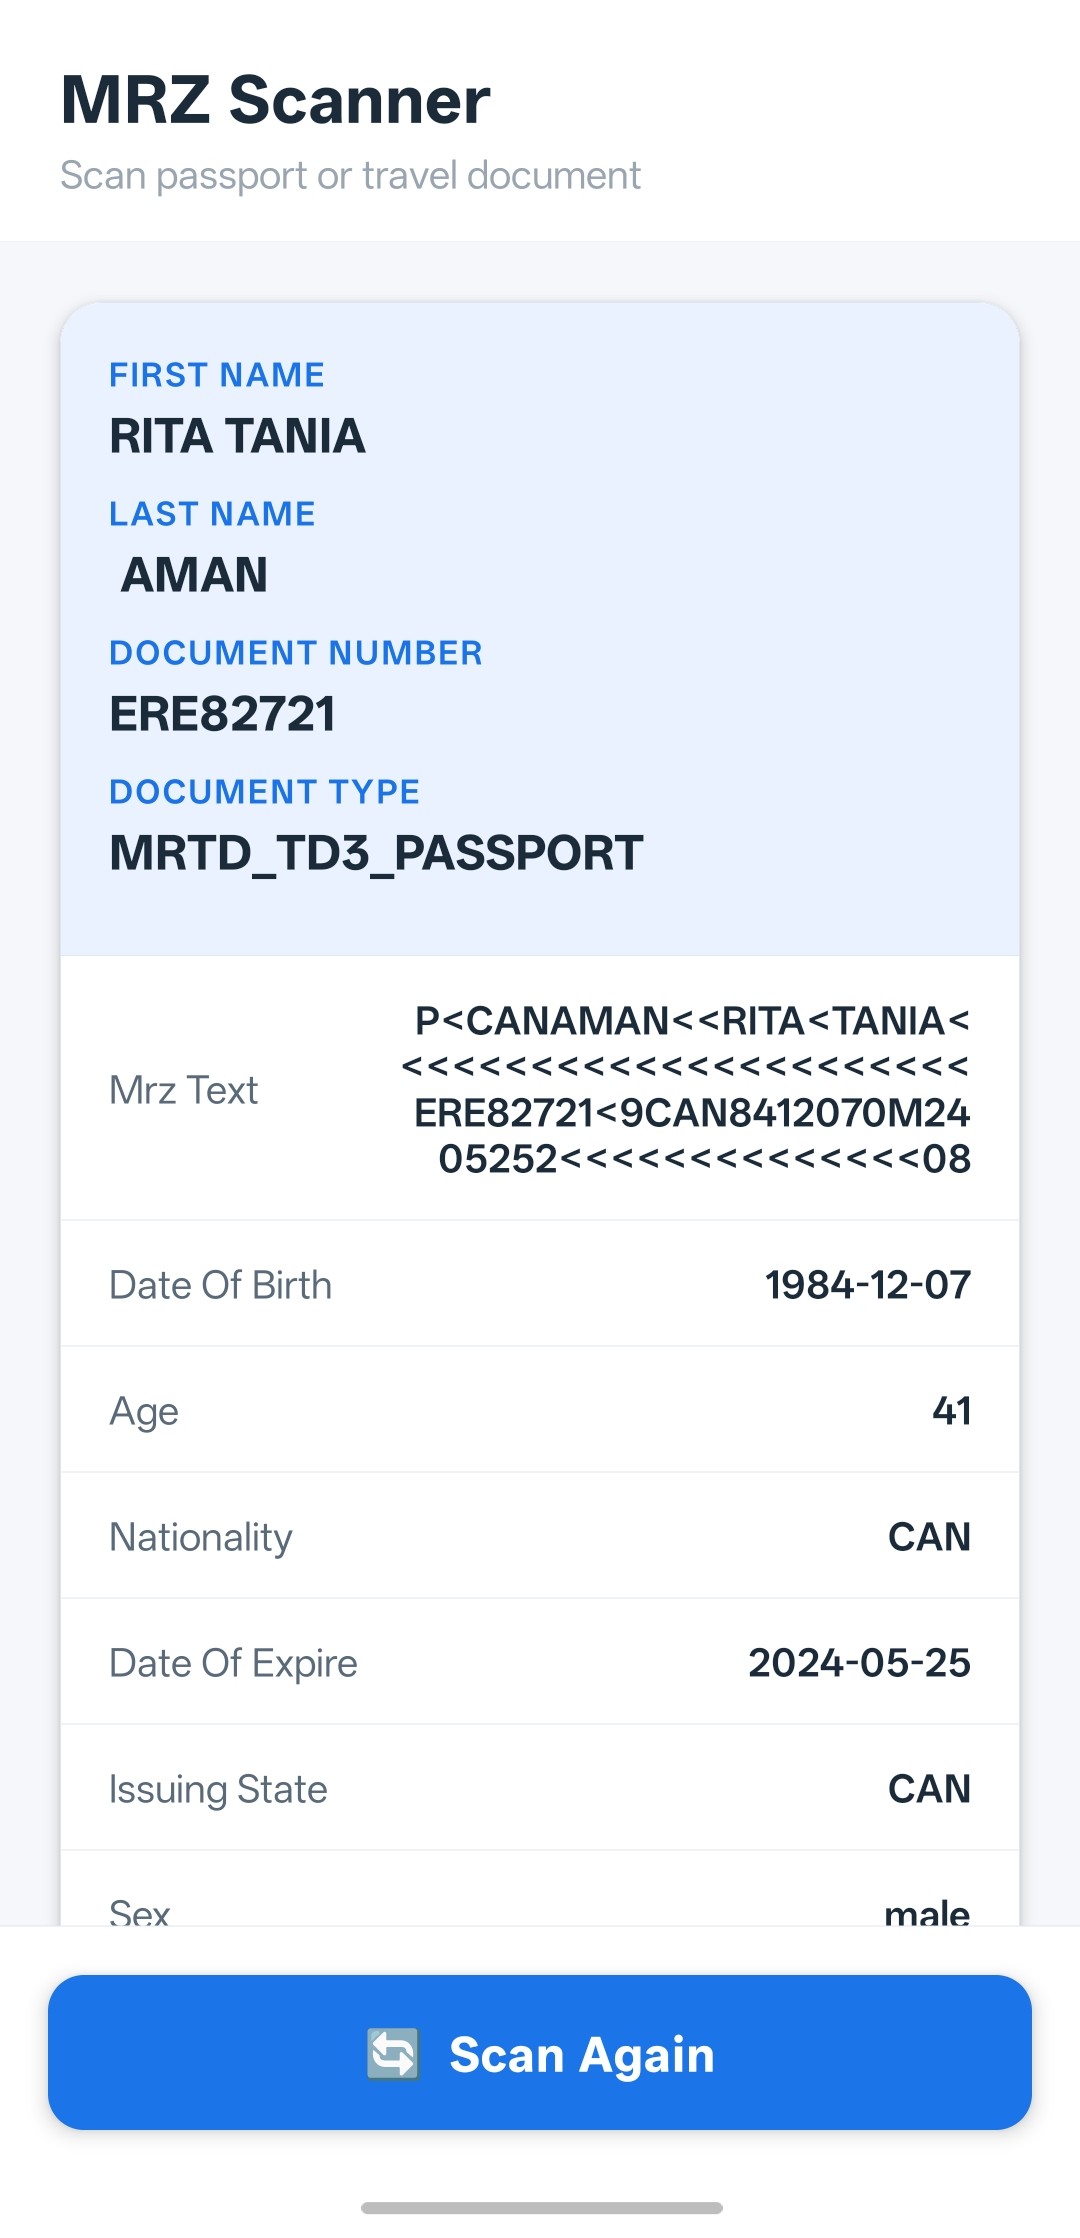
When the status is RS_FINISHED, result.data is a flat key-value map of parsed MRZ fields. The sample app promotes high-value fields — firstName, lastName, documentNumber, documentType — to a “hero” section and lists the rest in a scrollable card.
const HERO_FIELDS = ['firstName', 'lastName', 'documentNumber', 'documentType'];

function ResultCard({data}: ResultCardProps) {
  const heroEntries = HERO_FIELDS.map(k => [k, data[k]] as [string, string]).filter(
    ([, v]) => v != null && v !== '',
  );
  const otherEntries = Object.entries(data).filter(
    ([k, v]) => !HERO_FIELDS.includes(k) && v != null && v !== '',
  );

  return (
    <View style={styles.resultCard}>
      {heroEntries.length > 0 && (
        <View style={styles.heroSection}>
          {heroEntries.map(([key, value]) => (
            <View key={key} style={styles.heroRow}>
              <Text style={styles.heroLabel}>{formatLabel(key)}</Text>
              <Text style={styles.heroValue}>{value}</Text>
            </View>
          ))}
        </View>
      )}
      {/* other fields omitted for brevity */}
    </View>
  );
}
Step 5: Handle the Android Hardware Back Button
On Android the hardware back button exits the React Native app by default. The sample app intercepts it with BackHandler so users return to the idle state rather than closing the app mid-workflow.
useEffect(() => {
  const subscription = BackHandler.addEventListener('hardwareBackPress', () => {
    if (scanState.kind !== 'idle') {
      setScanState({kind: 'idle'});
      return true; // event handled — prevent default (app exit)
    }
    return false; // let the system handle it (idle → exit as normal)
  });
  return () => subscription.remove();
}, [scanState.kind]);
Common Issues & Edge Cases
- Trial license requires network access: The bundled trial key validates against Dynamsoft’s license server on each launch. If the device is offline the scanner will return an error status. Replace the key with a full license for offline use.
- Camera permission denied on Android 6+: React Native does not automatically request
CAMERApermission at launch. If your app targets API 23+, ensure the permission is declared inAndroidManifest.xmland prompted before callingMRZScanner.launch(). The SDK will return an error status — not throw — if permission is missing. - Blank result fields on TD1 cards: TD1 (credit-card-sized ID) documents have smaller MRZ lines than TD3 passports. Ensure adequate lighting and hold the document flat and fully within the viewfinder; partial captures will produce empty or malformed field values.
Conclusion
This tutorial walked through building a cross-platform MRZ scanner in React Native using the Dynamsoft MRZ Scanner SDK v3.2. With a single MRZScanner.launch() call and straightforward result-status handling, you get real-time MRZ reading on both Android and iOS without writing any native code. For next steps, explore the Dynamsoft Capture Vision documentation to customize the scanning UI, add barcode reading alongside MRZ, or integrate server-side document verification.