How to Build an Ionic ID Card Scanner
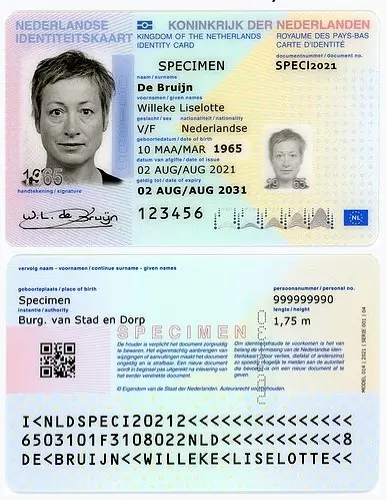
Many countries have now adopted an ID card design around 8.6 cm x 5.4 cm in size with three-line MRZ, like ID cards in Germany and the Netherlands.
Dutch ID Card Specimen:

In this article, we are going to talk about how to build an ID card scanner in Ionic Vue. The scanner can capture the front and the back of the ID card and extract the card owner’s info by recognizing the MRZ using OCR. Dynamsoft Label Recognizer is used to provide the OCR functionality.
Demo video:
New Project
Create a new Ionic Vue project:
npm install -g @ionic/cli
ionic start IDCardScanner --type vue
We can start a server to have a live test in the browser:
ionic serve
To run it on Android:
ionic capacitor add android
ionic capacitor copy android // sync files
ionic capacitor run android
To run it on iOS:
ionic capacitor add ios
ionic capacitor copy ios // sync files
ionic capacitor open ios // use XCode to open the project
Add Dependencies
-
Install
capacitor-plugin-dynamsoft-camera-previewfor accessing the camera.npm install capacitor-plugin-dynamsoft-camera-preview -
Install
capacitor-plugin-dynamsoft-label-recognizerfor recognizing the MRZ.npm install capacitor-plugin-dynamsoft-label-recognizer -
Install
localforageto store the scanned ID card in IndexedDB.npm install localforage -
Install
mrzfor MRZ parsing.npm install mrz
Add Camera Permission
For iOS, add the following to Info.plist.
<key>NSCameraUsageDescription</key>
<string>For document scanning</string>
Camera Component
We need to write a camera component for capturing photos.
-
Create a new
Camera.vuefile undercomponentswith the following template:<template> </template> <script lang="ts" setup> </script> <style scoped> </style> -
Define props and emits.
const props = defineProps<{ scanRegion?: ScanRegion active?: boolean desiredCamera?: string }>() const emit = defineEmits<{ (e: 'onPlayed',resolution:string): void }>(); -
When the component is mounted, make related setup and start the camera.
const initialized = ref(false); let onPlayedListener:PluginListenerHandle|undefined; onMounted(async () => { await CameraPreview.requestCameraPermission(); await CameraPreview.initialize(); if (onPlayedListener) { onPlayedListener.remove(); } onPlayedListener = await CameraPreview.addListener("onPlayed", async (result:{resolution:string}) => { emit("onPlayed",result.resolution); }); //set initial scan region await CameraPreview.setScanRegion({region:{left:10,right:90,top:20,bottom:50,measuredByPercentage:1}}); if (props.desiredCamera) { await selectDesiredCamera(); } if (props.active === true) { await CameraPreview.startCamera(); } initialized.value = true; }); const selectDesiredCamera = async () => { let camerasResult = await CameraPreview.getAllCameras(); if (camerasResult.cameras) { for (let index = 0; index < camerasResult.cameras.length; index++) { const cameraID = camerasResult.cameras[index]; let desiredCameraString = "back"; if (props.desiredCamera) { desiredCameraString = props.desiredCamera; } if (cameraID.toLowerCase().indexOf(desiredCameraString) != -1 ){ await CameraPreview.selectCamera({cameraID:cameraID}); break; } } } } -
Watch the changes of props to do related actions.
watch(() => props.scanRegion, async (newVal, oldVal) => { if (initialized.value) { if (newVal) { await CameraPreview.setScanRegion({region:newVal}); }else{ await CameraPreview.setScanRegion({region:{left:0,top:0,right:100,bottom:100,measuredByPercentage:1}}); } } }); watch(() => props.active, (newVal, oldVal) => { if (initialized.value) { if (newVal === true) { CameraPreview.startCamera(); }else if (newVal === false){ CameraPreview.stopCamera(); } } }); watch(() => props.desiredCamera, async (newVal, oldVal) => { if (initialized.value) { if (newVal) { selectDesiredCamera(); } } }); -
Stop the camera in the
beforeUnmountlifecycle.onBeforeUnmount(async () => { if (onPlayedListener) { onPlayedListener.remove(); } await CameraPreview.stopCamera(); });
ID Card Image Capturing Component
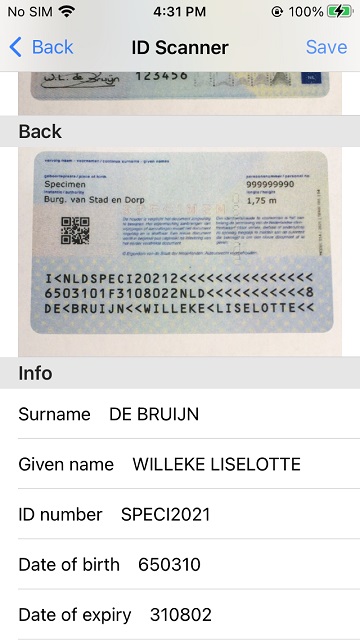
Next, we can build a new component to capture the photos for ID cards based on the camera component. The component has UIs to control the camera and sets a scan region which has the same ratio as an ID card.
A screenshot of the result:

-
Create a new
IDCardScanner.vueundercomponents.<template> <div class="scanner"> <Camera :active="true" :desiredCamera="desiredCamera" :scanRegion="scanRegion" @onPlayed="onPlayed" ></Camera> </div> </template> <script setup lang="ts"> import { ref } from 'vue'; import Camera from '../components/Camera.vue'; const desiredCamera = ref(""); const emit = defineEmits<{ (e: 'onCanceled'): void (e: 'onCaptured',base64:string): void }>(); const scanRegion = ref<ScanRegion>({ left:5, right:95, top:20, bottom:40, measuredByPercentage:1 }); </script> <style scoped> </style> -
Define UIs for controlling the camera. The scan region is calculated based on the camera’s resolution.
Template:
<div class="scannerHeader toolbar" style="justify-content: space-between;">
    <div class="closeButton" @click="close">
      <img class="icon" :src="crossSVG" alt="close"/>
    </div>
</div>
<div class="scannerFooter">
  <div class="switchButton" @click="switchCamera">
    <img class="icon" :src="switchSVG" alt="switch"/>
  </div>
  <div class="shutter">
    <div class="shutterButton" @click="capture"></div>
  </div>
  <div class="placeholder">
  </div>
</div>
JavaScript:
let frameWidth = 1280;
let frameHeight = 720;
const close = () => {
  emit("onCanceled");
}

const onPlayed = async (resolution:string) => {
  frameWidth =  parseInt(resolution.split("x")[0]);
  frameHeight =  parseInt(resolution.split("x")[1]);
  if (Capacitor.isNativePlatform()) {
    let orientation = await ScreenOrientation.orientation();
    console.log(orientation);
    if (orientation.type.toString().indexOf("portrait") != -1) {
      if (frameWidth>frameHeight) {
        let temp = frameWidth;
        frameWidth = frameHeight;
        frameHeight = temp;
      }
    }
  }
  updateScanRegion();
}

const updateScanRegion = () => {
  if (frameWidth>frameHeight) {
    let regionWidth = 0.7*frameWidth;
    let desiredRegionHeight = regionWidth/(85.6/54);
    let height = Math.ceil(desiredRegionHeight/frameHeight*100);
    scanRegion.value = {
      left:15,
      right:85,
      top:10,
      bottom:10+height,
      measuredByPercentage:1
    };
  }else{
    let regionWidth = 0.8*frameWidth;
    let desiredRegionHeight = regionWidth/(85.6/54);
    let height = Math.ceil(desiredRegionHeight/frameHeight*100);
    scanRegion.value = {
      left:10,
      right:90,
      top:20,
      bottom:20+height,
      measuredByPercentage:1
    };
  }
}

const switchCamera = async () => {
  let cameras = (await CameraPreview.getAllCameras()).cameras;
    let currentCameraName = (await CameraPreview.getSelectedCamera()).selectedCamera;
    if (cameras && currentCameraName) {
      let newIndex = 0;
      for (let index = 0; index < cameras.length; index++) {
        const name = cameras[index];
        if (name.toLowerCase().indexOf(currentCameraName.toLowerCase()) != -1) {
          if ((index + 1) > cameras.length -1) {
            newIndex = 0;
          }else{
            newIndex = index + 1;
          }
          break;
        }
      }
      desiredCamera.value = cameras[newIndex].toLowerCase();
    }
}

const capture = async () => {
  const result = await CameraPreview.takeSnapshot({quality:100})
  emit("onCaptured",result.base64);
}
CSS:
.scannerFooter {
  left: 0;
  bottom: 0;
  position: absolute;
  height: 6em;
  width: 100%;
  display: flex;
  align-items: center;
  flex-direction: row;
  justify-content: space-evenly;
  background: rgba(0, 0, 0, 0.8);
}

.icon {
  width: 2.5em;
  height: 2.5em;
  pointer-events: all;
  cursor: pointer;
}

.shutter {
  width: 4em;
  height: 4em;
  margin-top: calc(var(--shutter-size) / -2);
  margin-left: calc(var(--shutter-size) / -2);
  border-radius: 100%;
  background-color: rgb(198, 205, 216);
  padding: 12px;
  box-sizing: border-box;
  cursor: pointer;
}

.shutterButton {
  background-color: rgb(255, 255, 255);
  border-radius: 100%;
  width: 100%;
  height: 100%;
}

.shutterButton:active {
  background-color: rgb(220, 220, 220);
  border-radius: 100%;
  width: 100%;
  height: 100%;
}
.toolbar {
  position: absolute;
  top: 0;
  left: 0;
  height: 3em;
  width: 100%;
  background: rgba(0, 0, 0, 0.8);
  display: flex;
  align-items: center;
}
Scanner Page
Next, we can create a new page and use the ID card scanner component to fill in the front and the back images of the ID card and the card owner’s info like surname, given name, date of birth, date of expiry and card number.

After the back image of the ID card containing the MRZ is captured, we can use Dynamsoft Label Recognizer to recognize the MRZ and extract the info.
Here is the code for recognizing and parsing:
const readMRZ = async (base64:string) => {
  let DLRResults = (await LabelRecognizer.recognizeBase64String({base64:base64})).results;
  let MRZLines = [];
  for (let i = 0; i < DLRResults.length; i++) {
    const DLRResult = DLRResults[i];
    for (let j = 0; j < DLRResult.lineResults.length; j++) {
      const lineResult = DLRResult.lineResults[j];
      if (lineResult.confidence<50) { //filter out low confidence lines
        continue;
      }
      MRZLines.push(lineResult.text);
    }
  }
  try {
    const parsed = parse(MRZLines);
    parsedResult.value = {
      Surname:parsed.fields.lastName ?? "",
      GivenName:parsed.fields.firstName ?? "",
      IDNumber:parsed.fields.documentNumber ?? "",
      DateOfBirth:parsed.fields.birthDate ?? "",
      DateOfExpiry:parsed.fields.expirationDate ?? ""
    }
  } catch (error) {
    alert("Failed to read the info from the card.");
  }
}
We have to initialize Dynamsoft Label Recognizer before using it. We can put relevant code in App.vue. You can apply for a license here.
await LabelRecognizer.initLicense({license:"LICENSE-KEY"});
await LabelRecognizer.initialize();
We also need to update the runtime settings for MRZ.
if (Capacitor.isNativePlatform() === false) {
  await LabelRecognizer.updateRuntimeSettings({settings:{template:"MRZ"}});
  onResourceLoadedStartedListener = await LabelRecognizer.addListener("onResourcesLoadStarted",function(){ //download a remote MRZ OCR model on web
    console.log("loading started");
  });
  onResourceLoadedListener = await LabelRecognizer.addListener("onResourcesLoaded",function(){
    console.log("loading completed");
  });
}else{
  await LabelRecognizer.updateRuntimeSettings(
    {
      settings:
      {
        template: "{\"CharacterModelArray\":[{\"DirectoryPath\":\"\",\"Name\":\"MRZ\"}],\"LabelRecognizerParameterArray\":[{\"Name\":\"default\",\"ReferenceRegionNameArray\":[\"defaultReferenceRegion\"],\"CharacterModelName\":\"MRZ\",\"LetterHeightRange\":[5,1000,1],\"LineStringLengthRange\":[30,44],\"LineStringRegExPattern\":\"([ACI][A-Z<][A-Z<]{3}[A-Z0-9<]{9}[0-9][A-Z0-9<]{15}){(30)}|([0-9]{2}[(01-12)][(01-31)][0-9][MF<][0-9]{2}[(01-12)][(01-31)][0-9][A-Z<]{3}[A-Z0-9<]{11}[0-9]){(30)}|([A-Z<]{0,26}[A-Z]{1,3}[(<<)][A-Z]{1,3}[A-Z<]{0,26}<{0,26}){(30)}|([ACIV][A-Z<][A-Z<]{3}([A-Z<]{0,27}[A-Z]{1,3}[(<<)][A-Z]{1,3}[A-Z<]{0,27}){(31)}){(36)}|([A-Z0-9<]{9}[0-9][A-Z<]{3}[0-9]{2}[(01-12)][(01-31)][0-9][MF<][0-9]{2}[(01-12)][(01-31)][0-9][A-Z0-9<]{8}){(36)}|([PV][A-Z<][A-Z<]{3}([A-Z<]{0,35}[A-Z]{1,3}[(<<)][A-Z]{1,3}[A-Z<]{0,35}<{0,35}){(39)}){(44)}|([A-Z0-9<]{9}[0-9][A-Z<]{3}[0-9]{2}[(01-12)][(01-31)][0-9][MF<][0-9]{2}[(01-12)][(01-31)][0-9][A-Z0-9<]{14}[A-Z0-9<]{2}){(44)}\",\"MaxLineCharacterSpacing\":130,\"TextureDetectionModes\":[{\"Mode\":\"TDM_GENERAL_WIDTH_CONCENTRATION\",\"Sensitivity\":8}],\"Timeout\":9999}],\"LineSpecificationArray\":[{\"BinarizationModes\":[{\"BlockSizeX\":30,\"BlockSizeY\":30,\"Mode\":\"BM_LOCAL_BLOCK\",\"MorphOperation\":\"Close\"}],\"LineNumber\":\"\",\"Name\":\"defaultTextArea->L0\"}],\"ReferenceRegionArray\":[{\"Localization\":{\"FirstPoint\":[0,0],\"SecondPoint\":[100,0],\"ThirdPoint\":[100,100],\"FourthPoint\":[0,100],\"MeasuredByPercentage\":1,\"SourceType\":\"LST_MANUAL_SPECIFICATION\"},\"Name\":\"defaultReferenceRegion\",\"TextAreaNameArray\":[\"defaultTextArea\"]}],\"TextAreaArray\":[{\"Name\":\"defaultTextArea\",\"LineSpecificationNameArray\":[\"defaultTextArea->L0\"]}]}",
        customModelConfig:{
          customModelFolder:"MRZ",
          customModelFileNames:["MRZ"]
        }
      }
    }
  );
}
For Web, the MRZ OCR model is downloaded from a remote server.
For Android, we have to put the MRZ model files under assets.
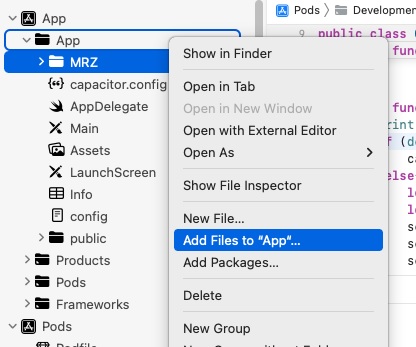
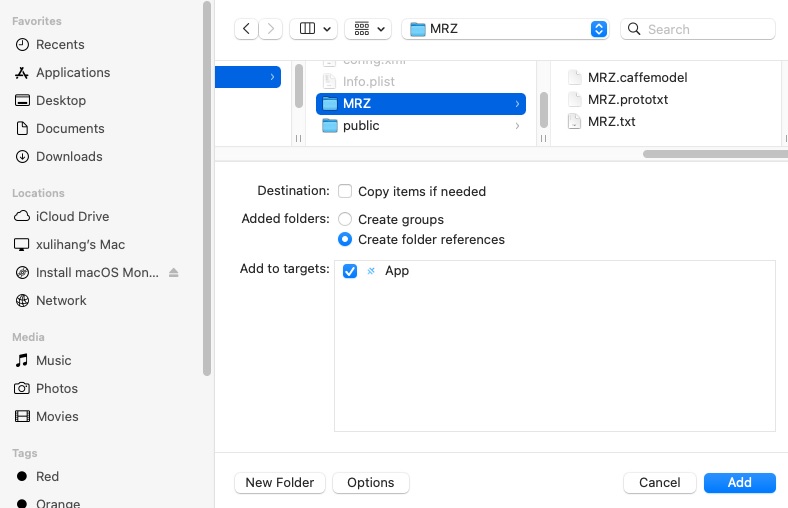
For iOS, add the MRZ model folder as a reference.


You can find the model files here.
Source Code
All right, we have covered the key parts of the Ionic ID card scanner. Check out the source code to have a try:
https://github.com/tony-xlh/ionic-id-card-scanner
Disclaimer:
The wrappers and sample code on Dynamsoft Codepool are community editions, shared as-is and not fully tested. Dynamsoft is happy to provide technical support for users exploring these solutions but makes no guarantees.


