


How to Scan Documents in an Oracle APEX Application
Oracle APEX (also known as APEX or Oracle Application Express) is an enterprise low-code development platform from Oracle Corporation that is used to develop and deploy web applications on Oracle databases. APEX provides a web-based integrated development environment (IDE) that uses wizards, drag-and-drop layout, and property editors to build applications and pages. APEX intends to simplify the process of creating web applications that serve as a frontend to a database server, among other things.1
In this article, we are going to create an Oracle APEX application which has the ability to scan documents using Dynamic Web TWAIN.
What you’ll build: An Oracle APEX application that opens a Dynamic Web TWAIN-powered scanning modal, captures pages from a physical scanner, and lets users use or upload the selected images inside the APEX workflow.
Key Takeaways
- Oracle APEX can integrate hardware document scanning by wrapping Dynamic Web TWAIN inside a custom region plugin.
- Building the scanner page separately first makes it easier to validate the JavaScript flow before adapting it to the APEX plugin model.
- Dynamic loading of the SDK scripts and styles helps the plugin stay self-contained inside the low-code APEX environment.
- A modal scanner UI is a practical fit for APEX because users can scan, edit, and confirm images without leaving the current page.
Common Developer Questions
How do I scan documents inside an Oracle APEX application?
Create an APEX plugin or embedded page that loads Dynamic Web TWAIN, opens a scanner modal, and runs the acquisition flow from JavaScript. That is the core integration pattern shown throughout this tutorial.
Why should I build the scanning page first before turning it into an APEX plugin?
Testing the scanner logic as a normal web page makes it much easier to verify script loading, modal behavior, acquisition, and upload before the extra complexity of APEX plugin plumbing is introduced. The article explicitly uses that staged approach.
How do I package Dynamic Web TWAIN into an Oracle APEX plugin?
Define the region plugin, implement the render function in PL/SQL, and then adapt the standalone scanner page logic so it can be injected and controlled from the plugin output. That lets APEX host the scanner experience while the JavaScript SDK still handles device access and image capture.
You can check out the video to see what it does.
Build an Oracle APEX Application to Scan Documents
Let’s do this in steps.
The following will cover how to create a plugin. If you would like to use the plugin already built, you can follow this guide.
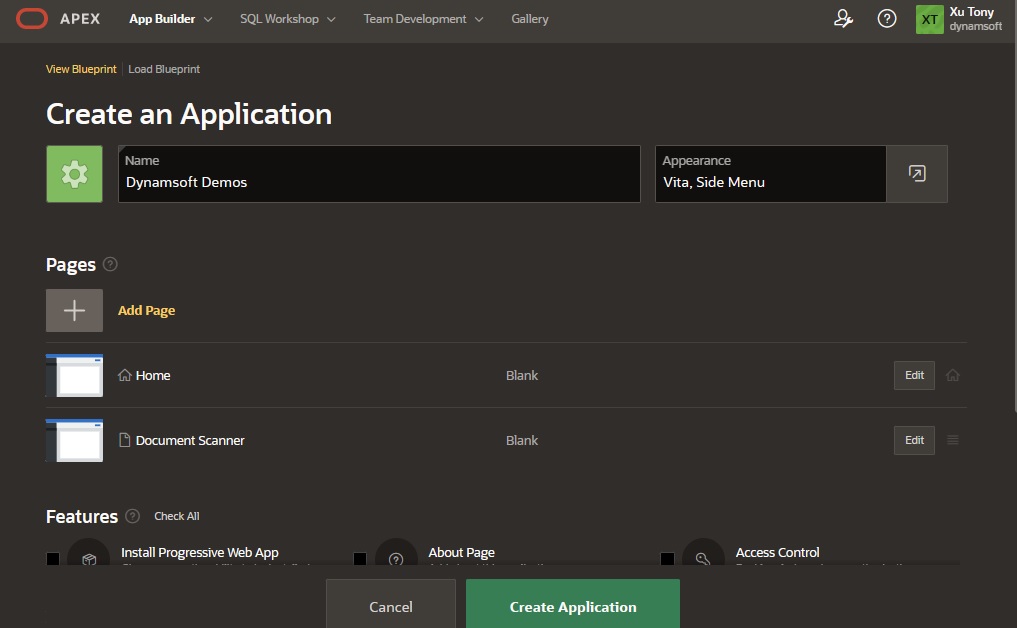
Start a New Application in App Builder
Open APEX’s online IDE and use its App Builder to create a new app with a new blank page named document scanner.
Build an APEX Plugin for Dynamic Web TWAIN
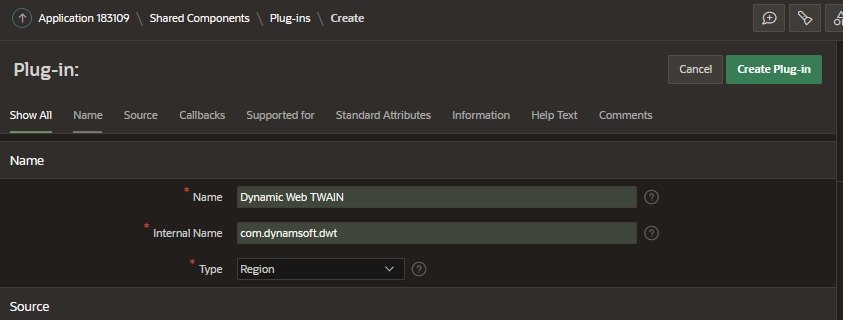
In order to use Dynamic Web TWAIN to scan documents, we need to create an APEX plugin first.
New Plugin
- On the app’s page, click shared components. Then click plug-ins in the other components section.
-
Create a new plugin from scratch. Here, we select the region type as we need to display something and run actions on the page.
-
Define the
f_renderfunction in the PL/SQL code.function f_render ( p_region in apex_plugin.t_region, p_plugin in apex_plugin.t_plugin, p_is_printer_friendly in boolean ) return apex_plugin.t_region_render_result isThen set
Render Procedure/Function NametoF_RENDERin the callbacks section.
Next, we are going to put the plugin aside, try to create a document scanning web page first and then adapt it as a plugin.
Build a Document Scanning App
The web page loads the libraries of Dynamic Web TWAIN via CDN. It can display a modal to scan documents and upload the scanned document image.
-
Create a new HTML file with the following content.
<!DOCTYPE html> <html> <head> <title>Dynamic Web TWAIN Sample</title> <meta name="viewport" content="width=device-width,initial-scale=1.0,maximum-scale=1.0,user-scalable=0" /> <style> img { max-height: 200px; } </style> <script src="script.js"></script> </head> <body> <script> window.onload = function(){ } </script> </body> </html> -
Create a new
script.jsfile. Define aDWTExtensionobject in it.let DWTExtension = {} -
Add functions to load external styles and JavaScript files.
let DWTExtension = { loadLibrary: function (src,type,id,data){ return new Promise(function (resolve, reject) { let scriptEle = document.createElement("script"); scriptEle.setAttribute("type", type); scriptEle.setAttribute("src", src); if (id) { scriptEle.id = id; } if (data) { for (let key in data) { scriptEle.setAttribute(key, data[key]); } } document.body.appendChild(scriptEle); scriptEle.addEventListener("load", () => { console.log(src+" loaded") resolve(true); }); scriptEle.addEventListener("error", (ev) => { console.log("Error on loading "+src, ev); reject(ev); }); }); }, loadStyle: function (url) { return new Promise(function (resolve, reject) { let linkEle = document.createElement('link') linkEle.type = 'text/css' linkEle.rel = 'stylesheet' linkEle.href = url let head = document.getElementsByTagName('head')[0] head.appendChild(linkEle) linkEle.addEventListener("load", () => { console.log(url+" loaded") resolve(true); }); linkEle.addEventListener("error", (ev) => { console.log("Error on loading "+url, ev); reject(ev); }); }); } } -
Add a load function to load needed styles and JavaScript files. It also sets some properties for Dynamic Web TWAIN.
let DWTExtension = { load: async function(pConfig){ await this.loadLibrary("https://unpkg.com/dwt/dist/dynamsoft.webtwain.min.js","text/javascript"); await this.loadStyle("https://tony-xlh.github.io/APEX-Dynamic-Web-TWAIN/style.css"); if (pConfig.license) { Dynamsoft.DWT.ProductKey = pConfig.license; } Dynamsoft.DWT.AutoLoad = false; Dynamsoft.DWT.ResourcesPath = "https://unpkg.com/dwt/dist"; }, } -
Add functions to display and hide a modal for scanning. The specific functions for operations are talked about in the following steps.
let DWTExtension = { modal:undefined, img:undefined, showModal: function(){ if (('Dynamsoft' in window) === false) { alert("Please wait for the loading of DWT."); return; } if (!this.modal) { this.modal = document.createElement("div"); this.modal.className = "dwt-modal"; document.body.appendChild(this.modal); const header = document.createElement("div"); const closeBtn = document.createElement("div"); closeBtn.className = "dwt-close-btn"; closeBtn.innerText = "x"; header.appendChild(closeBtn); header.className = "dwt-header"; closeBtn.addEventListener("click", () => { this.hideModal(); }); const body = document.createElement("div"); body.className = "dwt-body"; const viewer = document.createElement("div"); viewer.id = "dwtcontrolContainer"; const controls = document.createElement("div"); controls.className = "dwt-controls"; const scanBtn = document.createElement("button"); scanBtn.innerText = "Scan"; scanBtn.addEventListener("click", () => { this.scan(); }); const editBtn = document.createElement("button"); editBtn.innerText = "Edit"; editBtn.addEventListener("click", () => { this.edit(); }); const copyBtn = document.createElement("button"); copyBtn.innerText = "Copy selected"; copyBtn.addEventListener("click", () => { this.copy(); }); const useBtn = document.createElement("button"); useBtn.innerText = "Use selected"; useBtn.addEventListener("click", () => { this.useImage(); }); const saveBtn = document.createElement("button"); saveBtn.innerText = "Save"; saveBtn.addEventListener("click", () => { this.save(); }); const status = document.createElement("div"); status.className="dwt-status"; controls.appendChild(scanBtn); controls.appendChild(editBtn); controls.appendChild(copyBtn); controls.appendChild(useBtn); controls.appendChild(saveBtn); controls.appendChild(status); body.appendChild(viewer); body.appendChild(controls); this.modal.appendChild(header); this.modal.appendChild(body); if (!this.DWObject) { this.initDWT(); } } this.modal.style.display = ""; }, hideModal: function() { this.modal.style.display = "none"; }, } -
Add a function to initialize Dynamic Web TWAIN.
let DWTExtension = { DWObject:undefined, initDWT: function(){ const status = document.querySelector(".dwt-status"); Dynamsoft.DWT.Containers = [{ ContainerId: 'dwtcontrolContainer',Width: 270, Height: 350 }]; Dynamsoft.DWT.RegisterEvent('OnWebTwainReady', function () { status.innerText = ""; DWTExtension.DWObject = Dynamsoft.DWT.GetWebTwain('dwtcontrolContainer'); DWTExtension.DWObject.Viewer.width = "100%"; DWTExtension.DWObject.Viewer.height = "100%"; DWTExtension.DWObject.SetViewMode(2,2); }); status.innerText = "Loading..."; Dynamsoft.DWT.Load(); } } -
Add a function to scan documents.
let DWTExtension = { scan: function(){ if (this.DWObject) { let pThis = this; this.DWObject.SelectSourceAsync() .then(function () { return pThis.DWObject.AcquireImageAsync({ IfCloseSourceAfterAcquire: true, }); }) .catch(function (exp) { alert(exp.message); }); } } } -
Add a function to edit the documents.
let DWTExtension = { edit: function(){ if (this.DWObject) { let imageEditor = this.DWObject.Viewer.createImageEditor(); imageEditor.show(); } } } -
Add a function to copy the selected document image into the clipboard.
let DWTExtension = { copy: function(){ if (this.DWObject) { if (Dynamsoft.Lib.env.bMobile) { this.DWObject.ConvertToBlob( [this.DWObject.CurrentImageIndexInBuffer], Dynamsoft.DWT.EnumDWT_ImageType.IT_PNG, function(result) { DWTExtension.CopyBlobToClipboard(result); }, function(errorCode,errorString) { console.log("convert failed"); console.log(errorString); alert("Failed"); }); }else{ this.DWObject.CopyToClipboard(this.DWObject.CurrentImageIndexInBuffer); alert("Copied"); } } }, CopyBlobToClipboard: function(blob){ var data = [new ClipboardItem({ "image/png": blob})]; navigator.clipboard.write(data).then(function() { alert("Copied"); }, function() { alert("Failed"); }); } } -
Add a function to save the scanned documents as a PDF file.
let DWTExtension = { save: function () { if (this.DWObject) { this.DWObject.SaveAllAsPDF("Scanned"); } }, } -
Add a function to display the selected image in an img element and upload to a remote server. If it is running as an APEX plugin, append the img element to the plugin’s region. Otherwise, append it to the body. The
ConvertToBase64]API is used to convert the selected image to dataURL for display and theHTTPUploadThroughPostis used to upload the image.let DWTExtension = { host:undefined, port:undefined, useImage: function() { if (!this.img) { this.img = document.createElement("img"); if (this.width) { this.img.style.width = this.width; } if (this.height) { this.img.style.height = this.height; } this.img.style.objectFit = "contain"; if ('apex' in window) { const region = document.getElementById(this.regionID); region.appendChild(this.img); }else{ document.body.appendChild(this.img); } } let success = function (result, indices, type) { console.log("success"); const base64 = result.getData(0, result.getLength()); DWTExtension.img.src = "data:image/jpeg;base64,"+base64; DWTExtension.upload(); }; let error = function (errorCode, errorString) { console.log(errorString); }; //1 is B&W, 8 is Gray, 24 is RGB if (this.DWObject.GetImageBitDepth(this.DWObject.CurrentImageIndexInBuffer) == 1) { this.DWObject.ConvertToGrayScale(this.DWObject.CurrentImageIndexInBuffer); } this.DWObject.ConvertToBase64( [this.DWObject.CurrentImageIndexInBuffer], Dynamsoft.DWT.EnumDWT_ImageType.IT_JPG, success, error ); }, upload: function() { const server = this.host; const endPoint = "UploadFile" this.DWObject.IfSSL = true; // Set whether SSL is used this.DWObject.HTTPPort = this.port; if (!this.host) { return; } let OnEmptyResponse = function(){ console.log("empty response"); } let OnServerReturnedSomething = function(errorCode, errorString, sHttpResponse){ let response = JSON.parse(sHttpResponse); if (response.status === "success") { DWTExtension.img.setAttribute("data-filename",response["filename"]); console.log("Uploaded"); } } // Upload the image(s) to the server asynchronously //If the current image is B&W //1 is B&W, 8 is Gray, 24 is RGB if (this.DWObject.GetImageBitDepth(this.DWObject.CurrentImageIndexInBuffer) == 1) { //If so, convert the image to Gray this.DWObject.ConvertToGrayScale(this.DWObject.CurrentImageIndexInBuffer); } //Upload image in JPEG this.DWObject.HTTPUploadThroughPost(server, this.DWObject.CurrentImageIndexInBuffer, endPoint, "scanned.jpg", OnEmptyResponse, OnServerReturnedSomething); }, } -
Create a Python Flask app as the backend HTTP server to receive and serve the scanned documents. In order to access it from APEX via an intranet IP, we have to enable CORS and HTTPS.
from flask import Flask, request, send_file from flask_cors import CORS, cross_origin from PIL import Image import base64 from io import BytesIO import base64 import os import time import json app = Flask(__name__, static_url_path='/', static_folder='./') cors = CORS(app) app.config['CORS_HEADERS'] = 'Content-Type' @app.route('/UploadFile', methods=['POST','GET']) @cross_origin() def upload_file(): if request.method == 'POST': f = request.files['RemoteFile'] path = './uploaded/' if os.path.exists(path)==False: os.makedirs(path) filename = str(int(time.time()*1000))+'.jpg' f.save(os.path.join(path,filename)) response={"status": "success", "filename": filename} return json.dumps(response) else: return "" @app.route('/Get', methods=['GET']) def get(): filename = request.args.get('filename', '') path = os.path.join('./uploaded/',filename) if os.path.exists(path): return send_file(path,as_attachment=True, attachment_filename=filename) if __name__ == '__main__': app.run(host = "0.0.0.0", port = 8888, ssl_context='adhoc') -
Add the following scripts in the HTML file to start the scanner modal.
window.onload = async function(){
  await DWTExtension.load({});
  DWTExtension.host = "192.168.8.65";
  DWTExtension.port = "8888";
  DWTExtension.showModal();
}
All right, we have finished writing the web page. Next, we are going to adapt it for the APEX plugin.
Adapt the Web Page for APEX
-
Add two functions in
script.jsto get the base64 of the scanned image and get the filename of the uploaded image on the server.let DWTExtension = { getFilename: function(){ if (this.img) { return this.img.getAttribute("data-filename"); }else{ return ""; } }, getBase64: function(){ if (this.img) { return this.img.src.replace("data:image/jpeg;base64,",""); } else { return ""; } } } -
Add an
initfunction inscript.js. It can accept parameters passed from the APEX plugin and create a region with several functions we can call.let DWTExtension = { init: function(pConfig){ this.regionID = pConfig.regionID; this.width = pConfig.width; this.height = pConfig.height; this.host = pConfig.host; this.port = pConfig.port; if ('apex' in window) { apex.region.create( pConfig.regionID, { type: 'Dynamic Web TWAIN', getFilename: function(){ return DWTExtension.getFilename(); }, getBase64: function(){ return DWTExtension.getBase64(); }, showModal: function() { DWTExtension.showModal(); }, hideModal: function() { DWTExtension.hideModal(); } } ); } }, } -
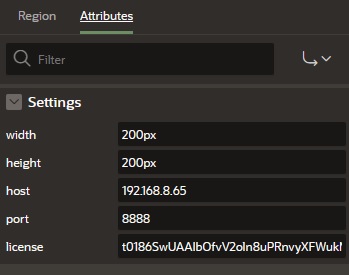
On the setup page of the plugin, add several custom attributes.
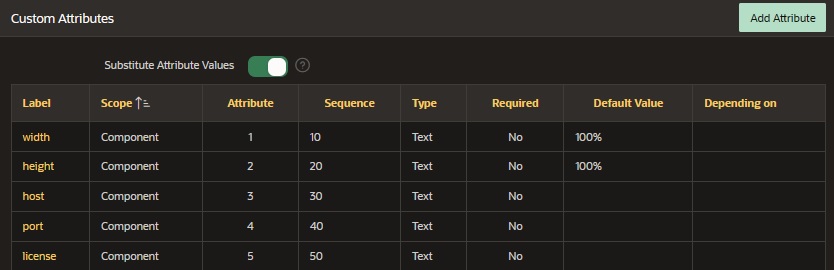
- width: width for the img element.
- height: height for the img element.
- host: host of the remote server.
- port: port of the remote server.
- license: license for Dynamic Web TWAIN. You can apply for a license here.
-
Upload the
script.jsfile and add it in the list of file URLs to load.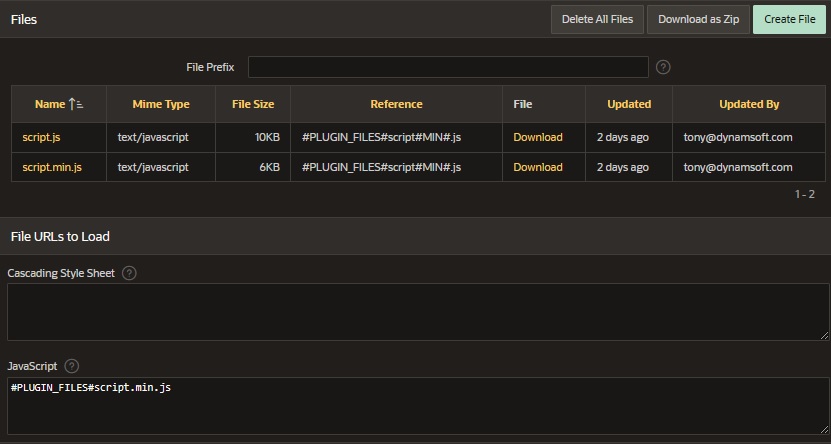
-
In the PL/SQL code, run the functions for initialization.
begin
  apex_javascript.add_onload_code (
      p_code => 'DWTExtension.load({' ||
          apex_javascript.add_attribute(p_name => 'license', p_value => p_region.attribute_05, p_add_comma => false ) ||
        '});
        DWTExtension.init({' ||
          apex_javascript.add_attribute(p_name => 'width', p_value => p_region.attribute_01, p_add_comma => true ) ||
          apex_javascript.add_attribute(p_name => 'height', p_value => p_region.attribute_02, p_add_comma => true ) ||
          apex_javascript.add_attribute(p_name => 'host', p_value => p_region.attribute_03, p_add_comma => true ) ||
          apex_javascript.add_attribute(p_name => 'port', p_value => p_region.attribute_04, p_add_comma => true ) ||
          apex_javascript.add_attribute(p_name => 'regionID', p_value => p_region.static_id, p_add_comma => false ) ||
        '});',
      p_key  => null );
  return null;
end;
Use the Plugin to Scan Documents
-
Open the page designer. Drag the document scanner region into the app and add three buttons. Set the region’s static ID to
DWT.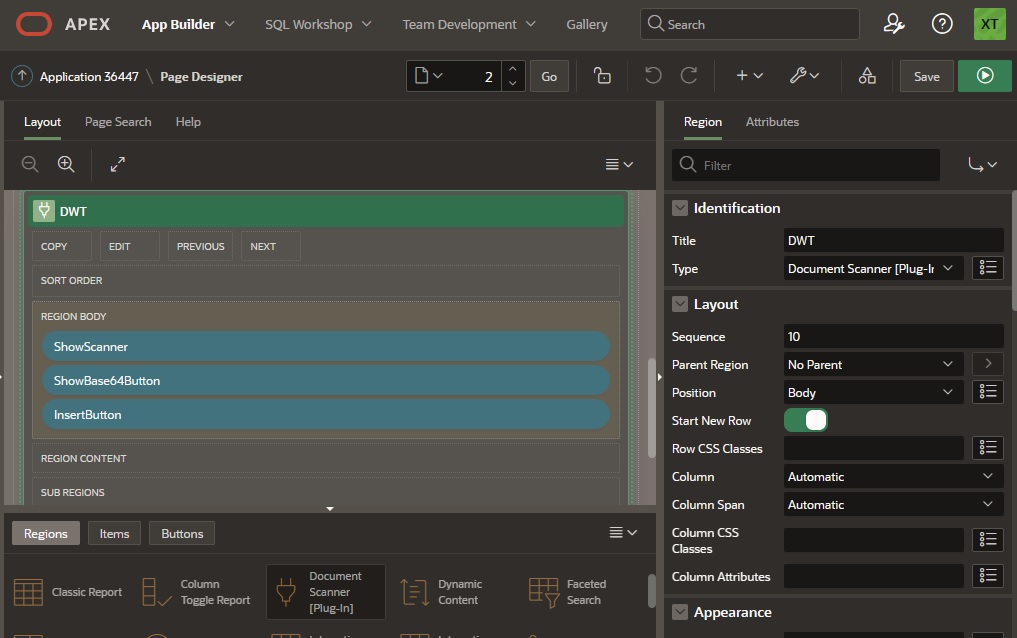
-
Set the attributes for the region.
-
Add a dynamic action for the
ShowScannerbutton. When it is clicked, execute the following JavaScript code:apex.region("DWT").showModal(); -
Add a dynamic action for the
ShowBase64button. When it is clicked, execute the following JavaScript code:alert(apex.region('DWT').getBase64()); -
Add a dynamic action for the
Insertbutton. When it is clicked, execute the following JavaScript code:const filename = apex.region("DWT").getFilename(); if (!filename) { alert("The image has not been uploaded"); }else{ apex.server.process("INSERT_IMAGE", {x01:filename}, {dataType: "text", success: function(){alert("Inserted")}}); }Then define an ajax callback named
INSERT_IMAGEto run the following PL/SQL code to insert a row to the database:declare file_name varchar2(32767); begin apex_debug.message('DEBUGMSG: process executed'); file_name := apex_application.g_x01; INSERT INTO DOCUMENTS (FILENAME) VALUES (file_name); apex_debug.message('DEBUGMSG: filename is: %s', file_name); end;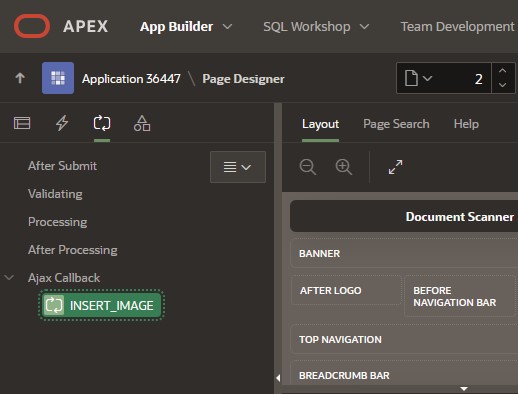
A table named
DOCUMENTSis created beforehand with a filename column.
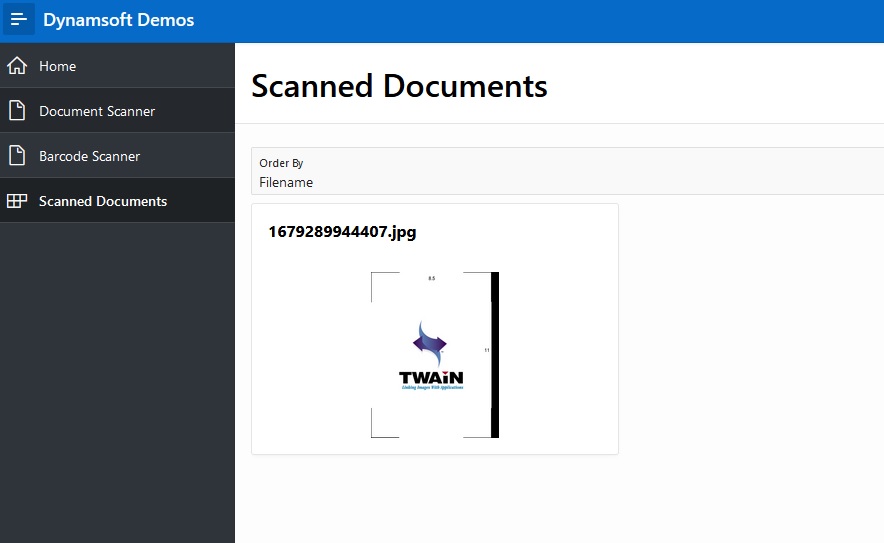
Create a Page to Display Scanned Documents
We can create a new page to display the scanned documents.
- Add a card to the page.
-
In the card’s media attribute, enable
Advanced Formattingto use the following HTML for display.<img src="https://192.168.8.65:8888/Get?filename=&FILENAME!ATTR." alt="&FILENAME!ATTR." style="object-fit:contain;width:128px;max-height:200px;">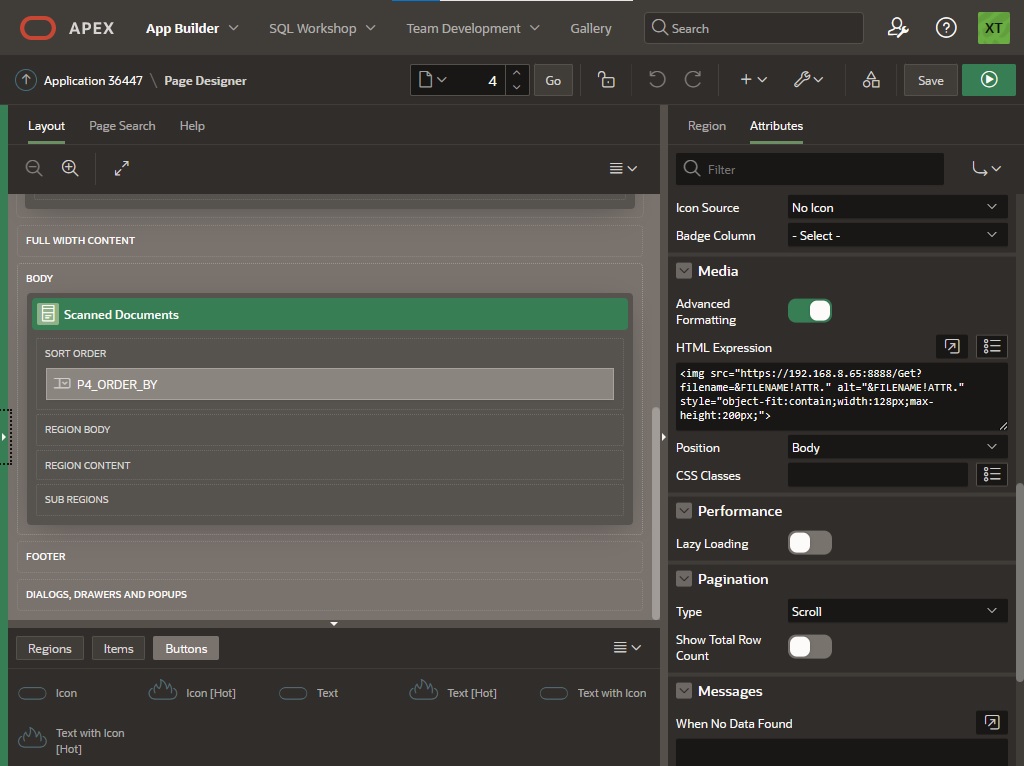
-
Then, we can see the scanned documents listed in the card.
Directly Upload Files to Oracle APEX
We can also directly upload files to Oracle APEX by creating a RESTful service. You can check out this tutorial: How to Create a REST API to Upload a BLOB into an APEX Schema.
You can use the following code to convert the scanned images as a PDF file and upload it to Oracle APEX.
let success = function (result, indices, type) {
  const upload = async () => {
    let timestamp = new Date().getTime().toString();
    let filename = timestamp+".pdf";
    const headers = new Headers();
    headers.append("Content-Type", "application/pdf");

    const requestOptions = {
      method: "POST",
      headers: headers,
      body: result,
      redirect: "follow"
    };

    const response = await fetch("your api URL?FILENAME"+filename, requestOptions)
    if (response.status == 201) {
      alert("Saved");
    }
  }
  console.log("success");
  upload();
};

let error = function (errorCode, errorString) {
  console.log(errorString);
};

this.DWObject.ConvertToBlob(
  this.DWObject.SelectAllImages(),
  Dynamsoft.DWT.EnumDWT_ImageType.IT_PDF,
  success,
  error
);
PL/SQL for the handler:
DECLARE
   BEGIN
     /*Insert the BLOB and return the trigger generated doc_id*/
     INSERT INTO SCANNED (FILENAME, FILECONTENT, MIMETYPE) VALUES (:FILENAME, :BODY, 'application/pdf');
     owa_util.status_line(201, '', false);
     owa_util.mime_header('application/json', true);
     htp.prn('{"status": "PDF Successfully Inserted"}');
   END;
Self-Hosting
You can put the files in the CDN in static files.
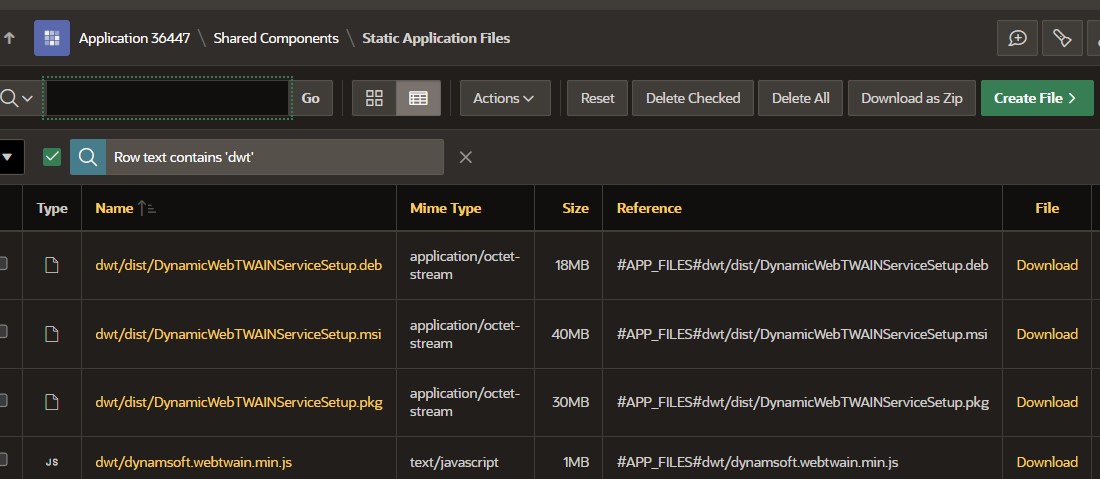
Then load them in the script.js file.
load: async function(pConfig){
    let jsLoadedFromStaticResources = false;
    try {
        console.log("try loading from static resources: "+"https://oracleapex.com/ords/"+apex.env.APP_FILES+"dwt/dynamsoft.webtwain.min.js");
        await this.loadLibrary("https://oracleapex.com/ords/"+apex.env.APP_FILES+"dwt/dynamsoft.webtwain.min.js","text/javascript");
        jsLoadedFromStaticResources = true;
    }catch (e) {
        console.log("fallback to using cdn");
        await this.loadLibrary("https://cdn.jsdelivr.net/npm/dwt@19.3.1/dist/dynamsoft.webtwain.min.js","text/javascript");
    }
     try {
        console.log("try loading from static resources: "+"https://oracleapex.com/ords/"+apex.env.APP_FILES+"dwt/style.css");
        await this.loadStyle("https://oracleapex.com/ords/"+apex.env.APP_FILES+"dwt/style.css");
    }catch (e) {
        console.log("fallback to using cdn");
        await this.loadStyle("https://tony-xlh.github.io/APEX-Dynamic-Web-TWAIN/style.css");
    }
    if (pConfig.license) {
      Dynamsoft.DWT.ProductKey = pConfig.license;
    }
    Dynamsoft.DWT.AutoLoad = false;
    if (jsLoadedFromStaticResources) {
        Dynamsoft.DWT.ResourcesPath = "https://oracleapex.com/ords/"+apex.env.APP_FILES+"dwt";
    }else{
        Dynamsoft.DWT.ServiceInstallerLocation = "https://demo.dynamsoft.com/history/dwt19.3.1/Resources/dist";
        Dynamsoft.DWT.ResourcesPath = "https://cdn.jsdelivr.net/npm/dwt@19.3.1/dist";
    }
},
Source Code
Get the complete sample project source code on GitHub
References
Disclaimer:
The wrappers and sample code on Dynamsoft Codepool are community editions, shared as-is and not fully tested. Dynamsoft is happy to provide technical support for users exploring these solutions but makes no guarantees.