


How to Integrate Document Scanning in Power Apps Canvas Using a REST API
Microsoft Power Apps is a low-code development platform that enables you to build custom apps tailored to your business needs. Within Power Apps, a ‘Canvas App’ is a specific type of app that allows you to design your interface by dragging and dropping elements onto a canvas, similar to designing a slide in PowerPoint. While Canvas Apps do not natively support the embedding or execution of JavaScript code, they do allow for the invocation of services through Power Automate (Flow). This article aims to assist developers in integrating document scanning functionalities into Power Apps Canvas by utilizing the Dynamic Web TWAIN Service REST API.
What you’ll build: A Power Apps Canvas App that scans documents from a connected scanner using the Dynamic Web TWAIN Service REST API, orchestrated through Power Automate flows.
Key Takeaways
- Power Apps Canvas Apps can integrate hardware document scanning through Power Automate flows calling a REST API, bypassing the JavaScript limitation.
- The Dynamic Web TWAIN Service REST API exposes local TWAIN/WIA/eSCL scanners over HTTP, enabling any HTTP-capable client—including Power Automate—to trigger scans.
- A lightweight Node.js proxy server bridges the gap between Power Apps (cloud) and the locally running Dynamic Web TWAIN Service.
- This pattern applies to any enterprise workflow that needs to capture paper documents directly into a Power Apps form or data pipeline.
Common Developer Questions
How do I integrate document scanning into a Power Apps Canvas App without JavaScript?
Move the scanner actions into Power Automate flows and call those flows from Canvas App buttons. The app stays low-code, while the flow handles the HTTP requests needed to list scanners and start a scan.
Can Power Automate call a local scanner REST API to scan documents from Power Apps?
Yes, but it usually needs a small proxy service between the cloud flow and the machine running Dynamic Web TWAIN Service. In this tutorial, a lightweight Node.js server forwards those requests to the local REST API and returns the results back to Power Automate.
How do I expose the Dynamic Web TWAIN Service to the Internet for use with Power Apps?
Run the local proxy server on the scanner host and publish that proxy through a public tunnel such as ngrok. Power Apps and Power Automate should call the public proxy URL rather than trying to reach the local scanner service directly.
This article is Part 1 in a 1-Part Series.
Prerequisites
- Dynamic Web TWAIN Service: Download and install Dynamic Web TWAIN Service onto your host machine.
- Get a 30-day free trial license for Dynamic Web TWAIN Service.
- Ngrok (optional): Download and install Ngrok to expose your local web server to the Internet.
Set Up a Web Server to Proxy Requests to the Dynamic Web TWAIN Service
Dynamic Web TWAIN Service is designed to operate within a local network via HTTP requests. To make it accessible from the Internet, a web server needs to be set up to forward requests to Dynamic Web TWAIN Service.
For a quick setup, you can download example code from the following GitHub repository: https://github.com/yushulx/dynamsoft-service-REST-API/tree/main/examples/REST.
To run the example code:
- Install Node.js.
-
Open
app.jsand replace the license key with your own.license: "LICENSE-KEY", -
open a terminal and run the following commands:
npm install node app.js > Server running at http://0.0.0.0:3000/ -
Use ngrok to expose the local web server to the Internet.
ngrok http 3000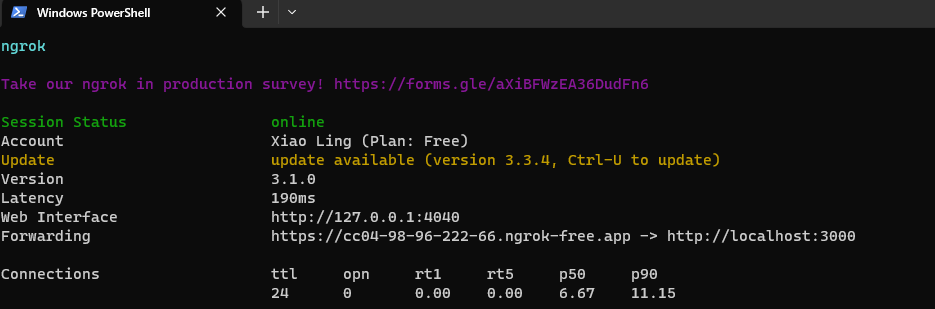
-
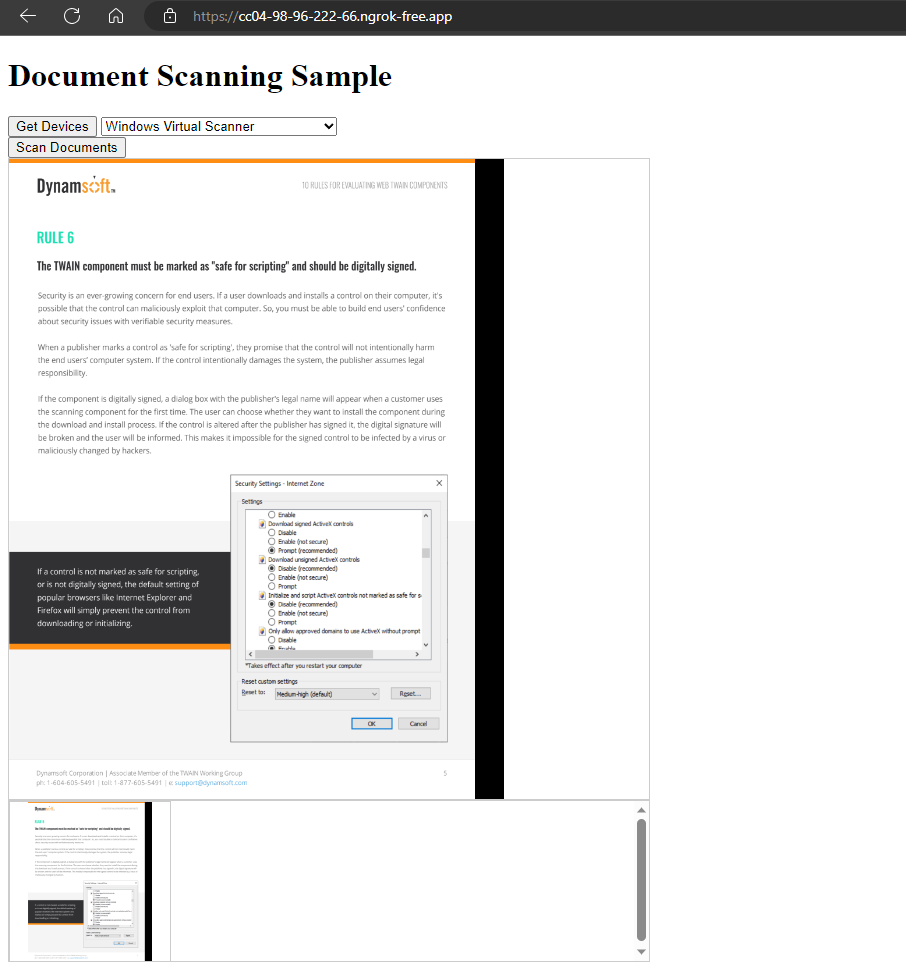
Visit the ngrok URL in a browser to verify that the web server is running properly.
Build a Document Scanning App with Power Apps Canvas
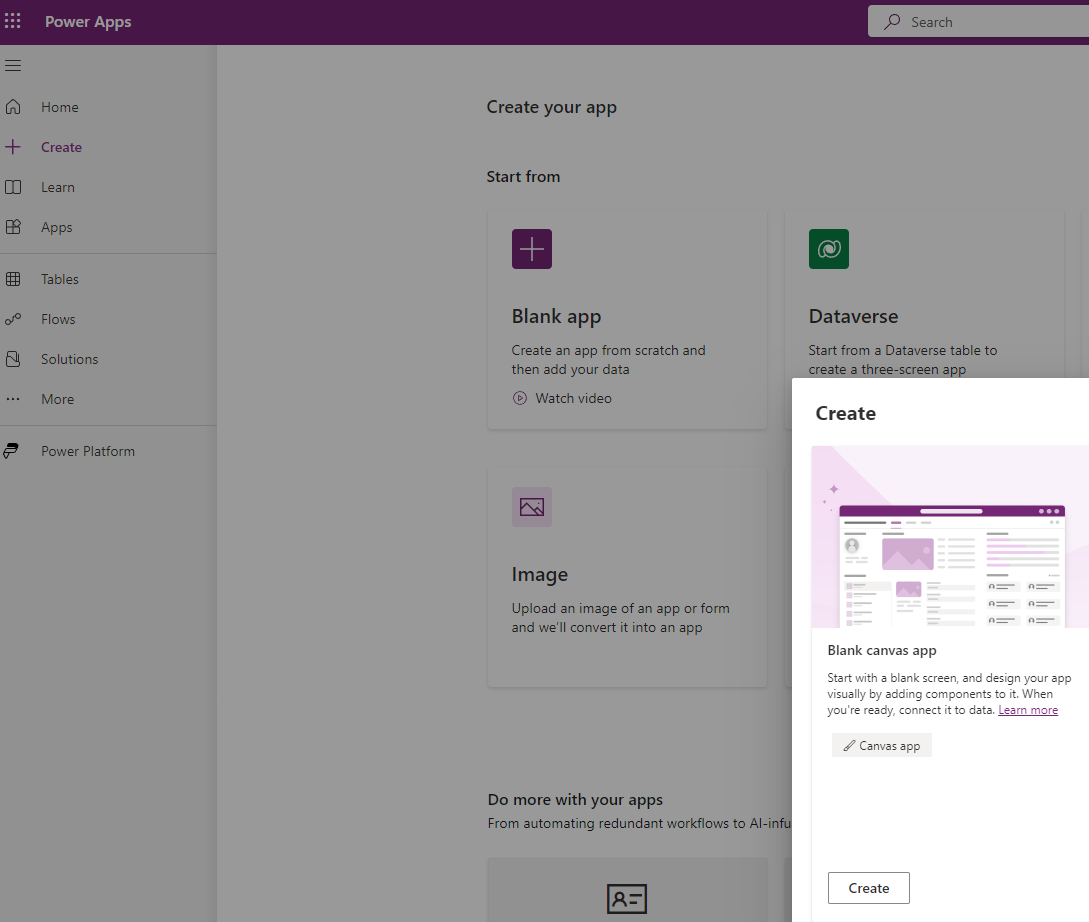
Step 1: Create a Blank Canvas App
Visit https://make.powerapps.com/ to create a Blank Canvas App.
Step 2: Add UI Elements
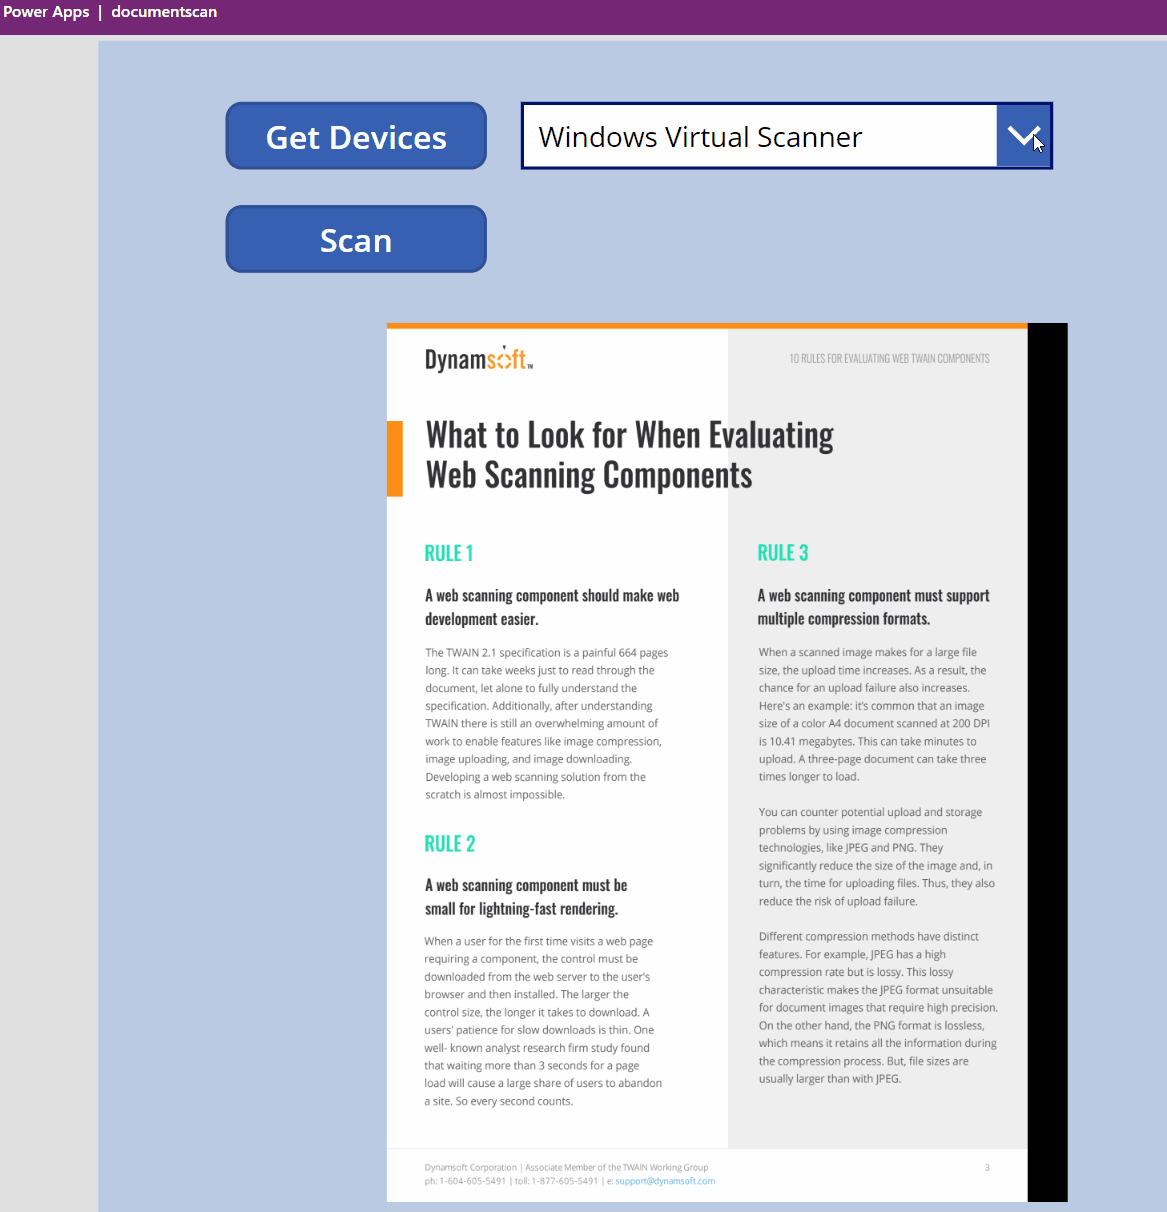
The UI consists of two buttons, a dropdown list, and an image control.
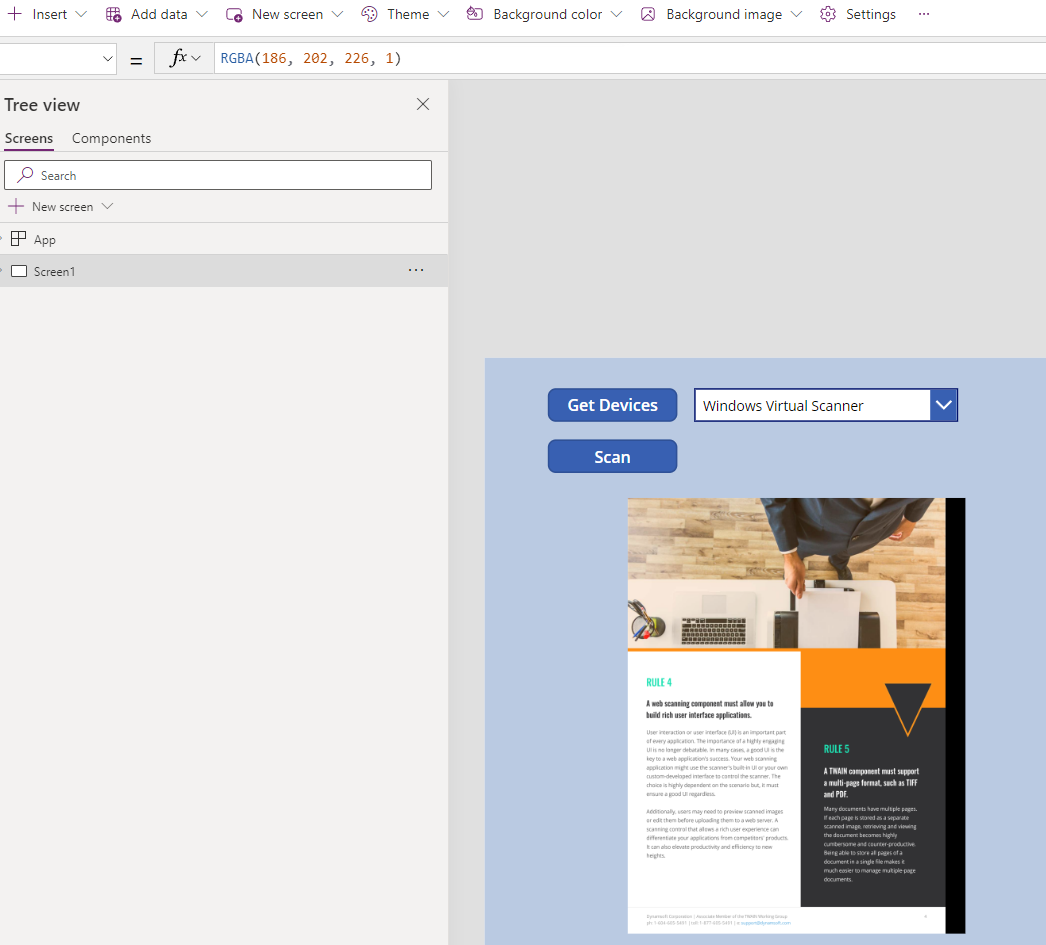
- The
Get Devicesbutton triggers an HTTP GET request to retrieve a list of available scanners. - The dropdown list displays the list of available scanners.
- The
Scantriggers an HTTP POST request to initiate document scanning. - The image control displays the scanned image.
Step 3: Create Power Automate Flows
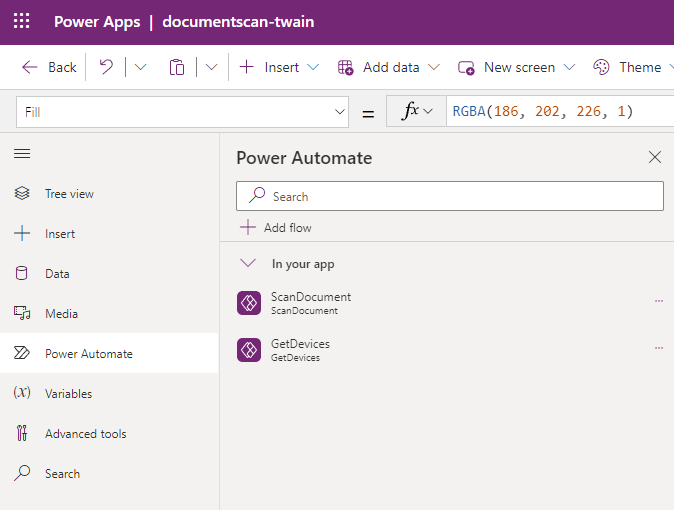
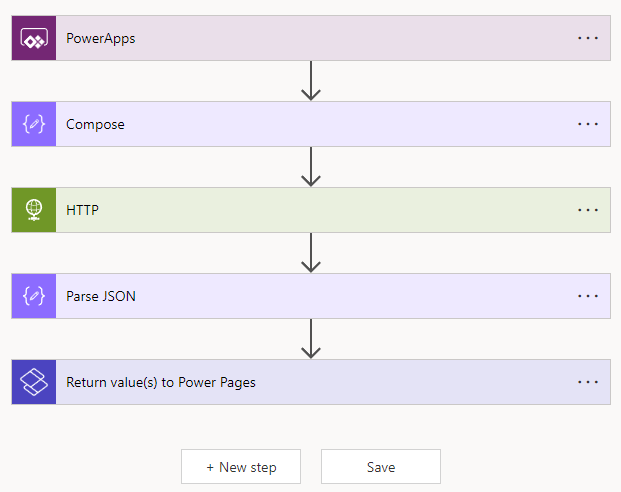
According to our requirements, we create two flows: ScanDocument and GetDevices in Power Automate panel.
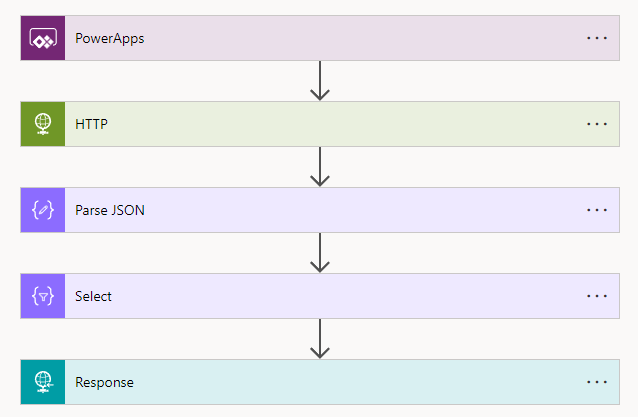
Create the GetDevices Flow (HTTP GET)
The GetDevices flow consists of four operations: HTTP, Parse JSON, Select, and Response.
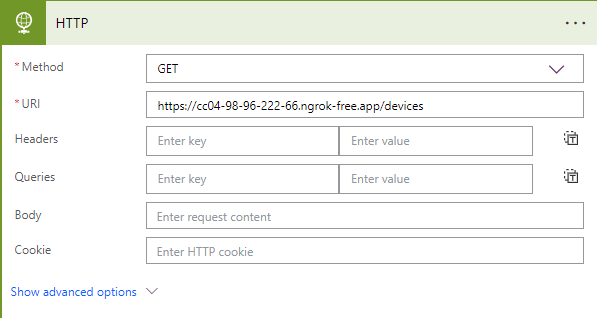
HTTP
Send an HTTP GET request to the web server. The URL is constructed with the ngrok URL and the /devices path.
Parse JSON
Parse the response body as JSON to extract the device information.
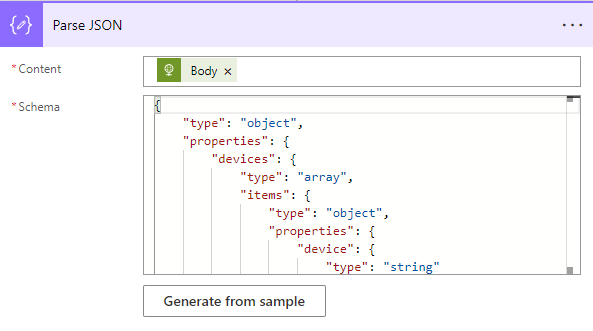
The schema of the JSON response is as follows:
{
    "type": "object",
    "properties": {
        "devices": {
            "type": "array",
            "items": {
                "type": "object",
                "properties": {
                    "device": {
                        "type": "string"
                    },
                    "name": {
                        "type": "string"
                    },
                    "type": {
                        "type": "integer"
                    }
                },
                "required": [
                    "device",
                    "name",
                    "type"
                ]
            }
        }
    }
}
It can be automatically generated from the example response body:
{"devices":[{"device":"{\n\t\"deviceInfo\" : \n\t{\n\t\t\"Manufacturer\" : \"VFdBSU4gV29ya2luZyBHcm91cA==\",\n\t\t\"ProductFamily\" : \"U29mdHdhcmUgU2Nhbg==\",\n\t\t\"ProductName\" : \"V2luZG93cyBWaXJ0dWFsIFNjYW5uZXI=\",\n\t\t\"ProtocolMajor\" : 2,\n\t\t\"ProtocolMinor\" : 5,\n\t\t\"SupportedGroups\" : 0,\n\t\t\"Version\" : \n\t\t{\n\t\t\t\"Country\" : 1,\n\t\t\t\"Info\" : \"Mi41LjAgc2FtcGxlIHJlbGVhc2UgNjRiaXQ=\",\n\t\t\t\"Language\" : 2,\n\t\t\t\"MajorNum\" : 2,\n\t\t\t\"MinorNum\" : 5\n\t\t}\n\t},\n\t\"deviceType\" : 64,\n\t\"isSystemDefaultPrinter\" : false,\n\t\"name\" : \"V2luZG93cyBWaXJ0dWFsIFNjYW5uZXI=\"\n}\n","name":"Windows Virtual Scanner","type":64},{"device":"{\n\t\"deviceInfo\" : \n\t{\n\t\t\"BaudRate\" : \"\",\n\t\t\"Description\" : \"WSD Scan Device\",\n\t\t\"Driver Version\" : \"10.0.19041.1806\",\n\t\t\"Hardware Configuration\" : 0,\n\t\t\"Manufacturer\" : \"Microsoft\",\n\t\t\"Name\" : \"HPBCF77F (HP LaserJet Pro M329)\",\n\t\t\"PnP ID String\" : \"\\\\\\\\?\\\\swd#dafwsdprovider#urn:uuid:f8262726-dc64-5cf1-89ab-5e257f2d0f3a#http:##f8262726-dc64-5cf1-89ab-5e257f2d0f3a#scanservice#{6bdd1fc6-810f-11d0-bec7-08002be2092f}\",\n\t\t\"Port\" : \"urn:uuid:f8262726-dc64-5cf1-89ab-5e257f2d0f3a/http://f8262726-dc64-5cf1-89ab-5e257f2d0f3a/ScanService\",\n\t\t\"Remote Device ID\" : \"\",\n\t\t\"STI Driver Version\" : 3,\n\t\t\"STI Generic Capabilities\" : 49,\n\t\t\"Server\" : \"local\",\n\t\t\"Type\" : 65537,\n\t\t\"UI Class ID\" : \"{00000000-0000-0000-0000-000000000000}\",\n\t\t\"Unique Device ID\" : \"{6BDD1FC6-810F-11D0-BEC7-08002BE2092F}\\\\0000\",\n\t\t\"WIA Version\" : \"2.0\"\n\t},\n\t\"deviceType\" : 32,\n\t\"isSystemDefaultPrinter\" : true,\n\t\"name\" : \"SFBCQ0Y3N0YgKEhQIExhc2VySmV0IFBybyBNMzI5KQ==\"\n}\n","name":"HPBCF77F (HP LaserJet Pro M329)","type":32},{"device":"{\n\t\"deviceInfo\" : \n\t{\n\t\t\"BaudRate\" : \"\",\n\t\t\"Description\" : \"HP OfficeJet Pro 6970 [01A3B2]\",\n\t\t\"Driver Version\" : \"10.0.19041.3271\",\n\t\t\"Hardware Configuration\" : 0,\n\t\t\"Manufacturer\" : \"Microsoft\",\n\t\t\"Name\" : \"HP OfficeJet Pro 6970 [01A3B2]\",\n\t\t\"PnP ID String\" : \"\\\\\\\\?\\\\swd#escl#59ca18cd-afb6-5c82-a201-23911ae167ea#{6bdd1fc6-810f-11d0-bec7-08002be2092f}\",\n\t\t\"Port\" : \"SWD\\\\Escl\\\\59ca18cd-afb6-5c82-a201-23911ae167ea\",\n\t\t\"Remote Device ID\" : \"\",\n\t\t\"STI Driver Version\" : 16777218,\n\t\t\"STI Generic Capabilities\" : 16,\n\t\t\"Server\" : \"local\",\n\t\t\"Type\" : 65537,\n\t\t\"UI Class ID\" : \"{00000000-0000-0000-0000-000000000000}\",\n\t\t\"Unique Device ID\" : \"SWD\\\\Escl\\\\59ca18cd-afb6-5c82-a201-23911ae167ea\",\n\t\t\"WIA Version\" : \"2.0\"\n\t},\n\t\"deviceType\" : 32,\n\t\"isSystemDefaultPrinter\" : false,\n\t\"name\" : \"SFAgT2ZmaWNlSmV0IFBybyA2OTcwIFswMUEzQjJd\"\n}\n","name":"HP OfficeJet Pro 6970 [01A3B2]","type":32},{"device":"{\n\t\"deviceInfo\" : \n\t{\n\t\t\"UUID\" : \"f8262726-dc64-5cf1-89ab-5e257f2d0f3a\",\n\t\t\"adminurl\" : \"http://HP6C02E0BCF77F.local.\",\n\t\t\"cs\" : \"binary,color,grayscale\",\n\t\t\"duplex\" : \"F\",\n\t\t\"is\" : \"platen,adf\",\n\t\t\"mopria-certified-scan\" : \"1.2\",\n\t\t\"name\" : \"HP LaserJet Pro M329 [BCF77F]\",\n\t\t\"pdl\" : \"application/octet-stream,application/pdf,image/jpeg\",\n\t\t\"representation\" : \"images/printer.png\",\n\t\t\"rs\" : \"eSCL\",\n\t\t\"service_type\" : 3,\n\t\t\"txtvers\" : \"1\",\n\t\t\"ty\" : \"HP LaserJet Pro M329\",\n\t\t\"vers\" : \"2.63\"\n\t},\n\t\"deviceType\" : 512,\n\t\"name\" : \"SFAgTGFzZXJKZXQgUHJvIE0zMjk=\"\n}\n","name":"HP LaserJet Pro M329","type":512}]}
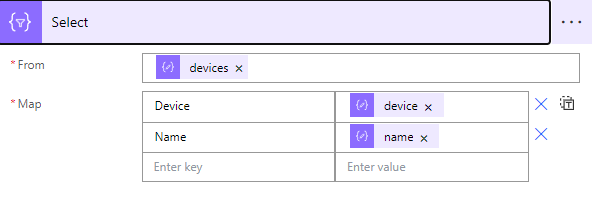
Select
This operation extracts device information from the JSON object as the output.
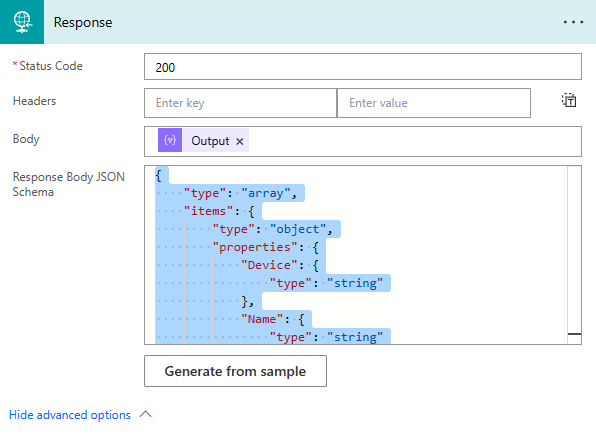
Response
Send the select output back to the Power App.
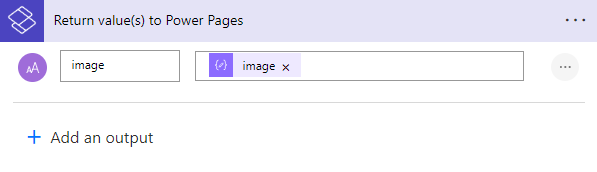
Create the ScanDocument Flow (HTTP POST)
The ScanDocument flow consists of four operations: Compose, HTTP, Parse JSON, and Return value(s) to Power Pages.
Compose
Input the selected scanner information from the Power App page.

HTTP
Append the compose output to the HTTP body and send an HTTP POST request to the web server. The URL is constructed with the ngrok URL and the /createJob path.
Parse JSON
Parse the response body as JSON to extract the scanned image.
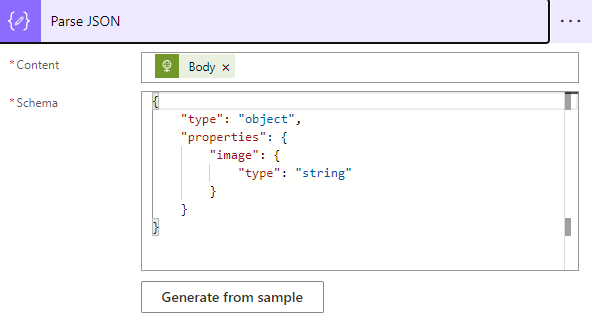
The schema of the JSON response is as follows:
{
    "type": "object",
    "properties": {
        "image": {
            "type": "string"
        }
    }
}
Return value(s) to Power Pages
Return the image name to the Power App page.
Step 4: Connect Power Automate Flows to the UI Elements
Get devices
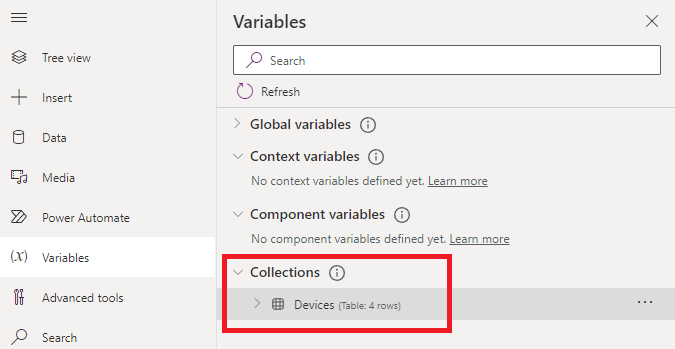
Click on the Get Devices button and then assign the following code to its OnSelect property.
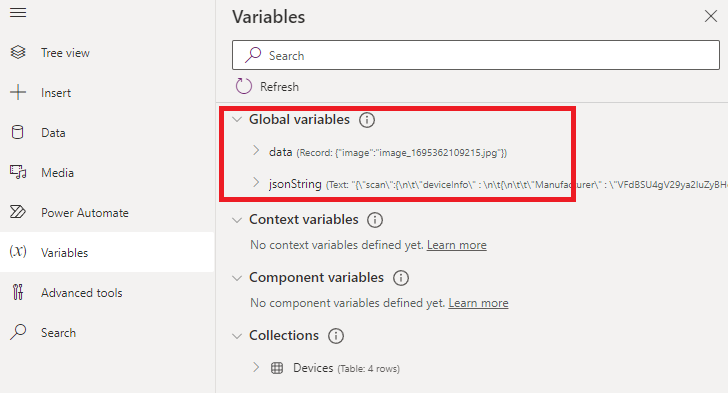
ClearCollect( Devices, GetDevices.Run());
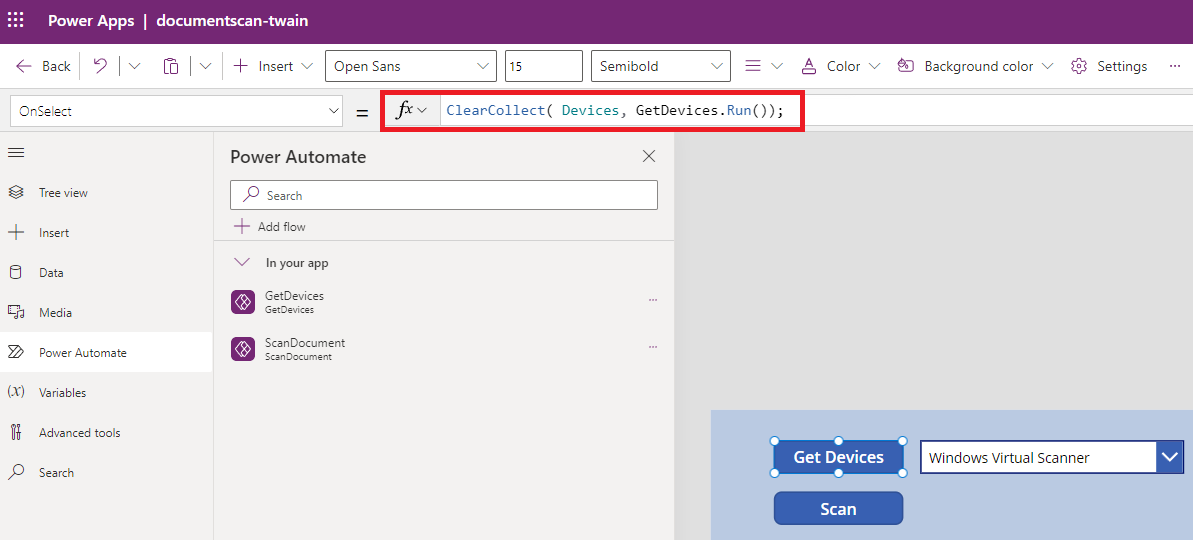
The code above will initiate the GetDevices flow when the Get Devices button is clicked. The flow’s response will populate the Devices collection, which can be found in the Variables panel.
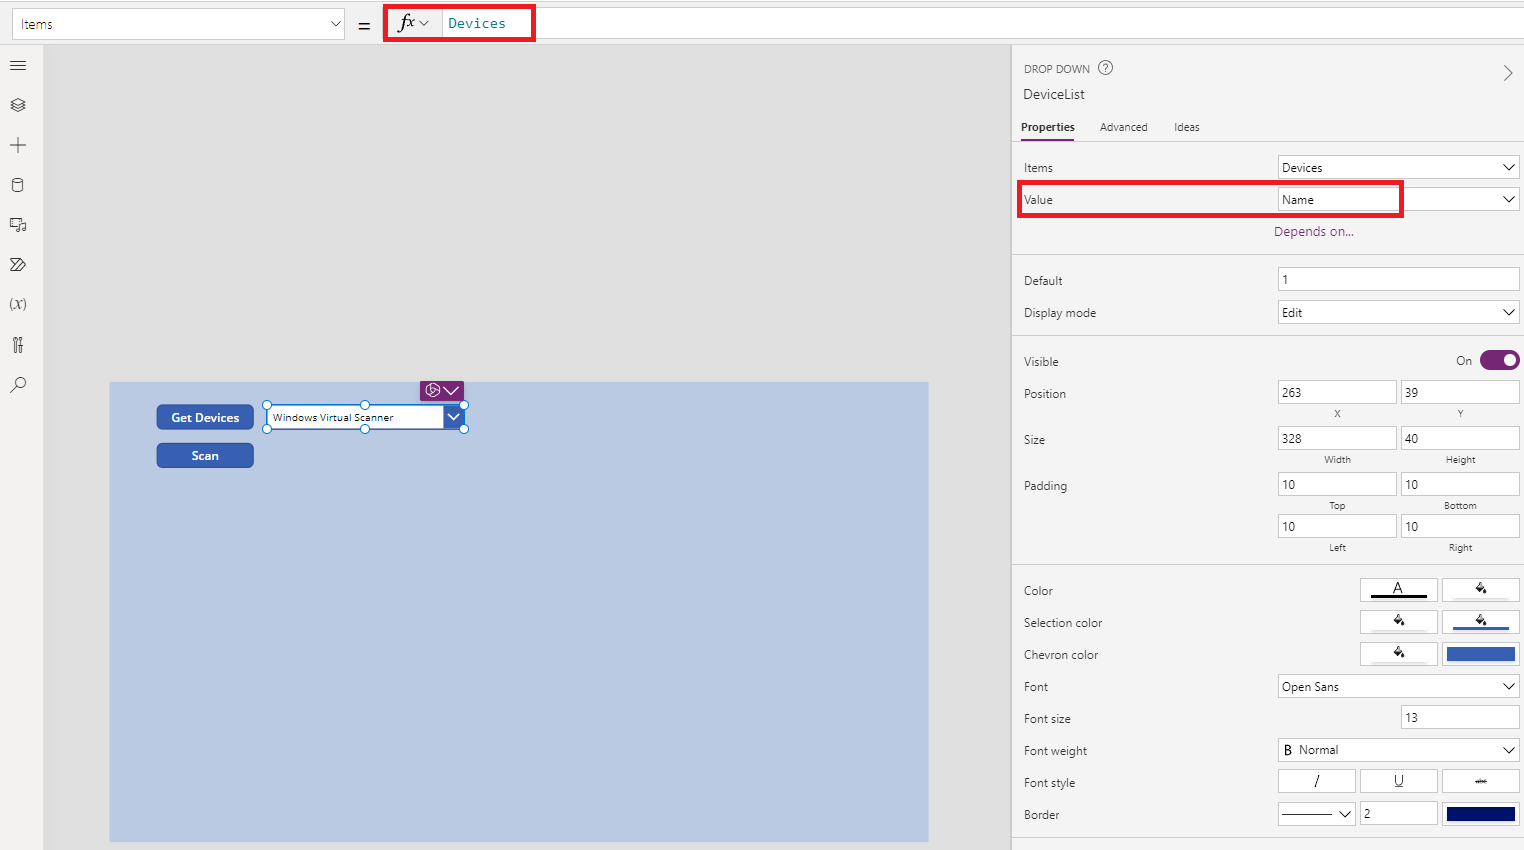
Display device list
Click on the dropdown list and then assign Devices collection to its Items property. Then, set the display value to name in the properties panel.
Acquire a document image
Click on the Scan button and then assign the following code to its OnSelect property.
Set(jsonString, Concatenate("{", """scan""", ":", DeviceList.Selected.Device, "}"));
Set(data, ScanDocument.Run(jsonString));
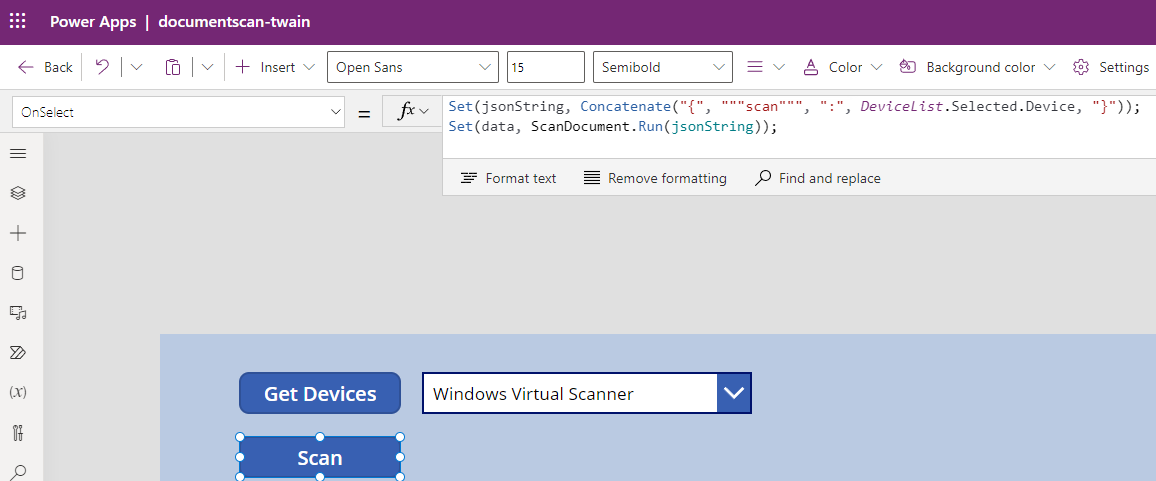
The code constructs a JSON string with the selected scanner information and then initiates the ScanDocument flow. The data variable will be populated with the response from the flow and can be found in the Variables panel.
Display the document image
Set the Image property using the URL of the scanned image. The URL is constructed by combining the ngrok URL with the image name.

Step 5: Test the App
Common Issues and Edge Cases
- Ngrok tunnel expires or disconnects: Free ngrok tunnels have session limits. If the Power Automate flow suddenly returns errors, restart ngrok and update the URL in your HTTP actions. For production use, consider a persistent reverse proxy or a static domain.
- Scanner not listed in the dropdown: Ensure the Dynamic Web TWAIN Service is running and the scanner driver is installed. WIA and TWAIN drivers must be present on the host machine for the device to appear in the
/devicesresponse. - CORS or connection refused errors from Power Automate: Power Automate HTTP actions do not enforce CORS, but the proxy server must be reachable from the Internet. Verify ngrok is forwarding to the correct local port and that no firewall is blocking the connection.