How to Use Barcode Scanner in iOS's WKWebView
iOS has added support for getUserMedia in WKWebView since iOS 14.3 and WebAssembly since iOS 11. So it is possible to use the JavaScript version of Dynamsoft Barcode Reader to scan barcodes and QR codes in WKWebView. In this article, we are going to build a demo app to illustrate how to use a barcode scanner in WKWebView.
This article is Part 2 in a 4-Part Series.
Use Barcode Scanner in iOS’s WKWebView
New Project and Configure
- Create a new Swift UIKit project with Xcode.
-
Open
Info.plistto add camera permission.<key>NSCameraUsageDescription</key> <string>For barcode scanning</string>
Design Layout
We are going to add three controls: a UILabel, a UIButton and a WKWebView.
The WKWebView control is used to load the JavaScript version of Dynamsoft Barcode Reader, open the camera, scan barcodes and then return the result.
Because we may need to scan multiple times, in order to quickly reopen the scanner, we put the WebView in the same view controller. When we need to scan, we set it visible, otherwise, we set it hidden.
Here is the relevant code:
var webView: WKWebView!
var button: UIButton!
var resultLabel: UILabel!
override func viewDidLoad() {

    self.webView = WKWebView(frame: .zero, configuration: configuration)

    self.button = UIButton(frame: .zero)
    self.button.setTitle("Scan Barcodes", for: .normal)
    self.button.setTitleColor(.systemBlue, for: .normal)
    self.button.setTitleColor(.lightGray, for: .highlighted)

    self.button.addTarget(self,
                     action: #selector(buttonAction),
                     for: .touchUpInside)


    self.resultLabel = UILabel()
    self.resultLabel.textAlignment = NSTextAlignment.center
    self.resultLabel.numberOfLines = 0
    self.resultLabel.lineBreakMode = .byCharWrapping

    self.view.addSubview(self.resultLabel)
    self.view.addSubview(self.button)
    self.view.addSubview(self.webView)
    self.webView.isHidden = true
}

override func viewDidLayoutSubviews() {
    super.viewDidLayoutSubviews()
    if let webView = self.webView {
        let insets = view.safeAreaInsets
        let width: CGFloat = view.frame.width
        let x = view.frame.width - insets.right - width
        let y = insets.top
        let height = view.frame.height - insets.top - insets.bottom
        webView.frame = CGRect.init(x: x, y: y, width: width, height: height)
    }
    if let button = self.button {
        let width: CGFloat = 300
        let height: CGFloat = 50
        let x = view.frame.width/2 - width/2
        let y = view.frame.height - 100
        button.frame = CGRect.init(x: x, y: y, width: width, height: height)
    }
    if let label = self.resultLabel {
        let width: CGFloat = 300
        let height: CGFloat = 200
        let x = view.frame.width/2 - width/2
        let y = 50.0
        label.frame = CGRect.init(x: x, y: y, width: width, height: height)
    }
}
Set up WebView
Extra settings are needed for the WebView so that we can show the camera preview in a video element. If we don’t set this, the video will be black.
let configuration = WKWebViewConfiguration()
configuration.allowsInlineMediaPlayback = true
if #available(iOS 9.0, *){
    configuration.requiresUserActionForMediaPlayback = false
}else{
    configuration.mediaPlaybackRequiresUserAction = false
}
Add Web Assets
We’ve created a demo web app using getUserMedia and Dynamsoft Barcode Reader in the previous article.
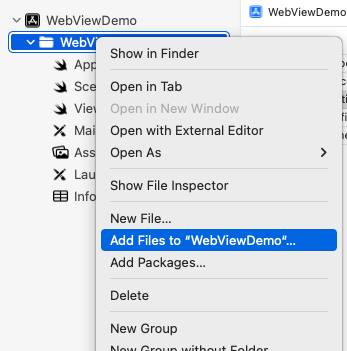
Here, we just put the files of the demo: scanner.html, scanner.css and scanner.js in a www folder and add it to the project so that we can load the web page in WebView.

Load Web Assets using HTTP URL
We can then load the web page with WKWebView’s loadFileURL function using the file protocol:
let indexURL = Bundle.main.url(forResource: "scanner",
                               withExtension: "html", subdirectory: "www") {
self.webView.loadFileURL(indexURL,
                         allowingReadAccessTo: indexURL)
However, we cannot host the library of Dynamsoft Barcode Reader locally as WebAssembly requires HTTP. Here, we are going to use the GCDWebServer to start an HTTP server to load local files using the http:// URL.
Here are the steps to start an HTTP server to serve static files.
-
Install GCDWebServer using CocoaPods.
-
Create a pod file.
pod init -
Add the followling line to the
Podfilepod "GCDWebServer", "~> 3.0" -
Run
pod install
-
-
Set up and start the server.
self.webServer = GCDWebServer() let websitePath = Bundle.main.path(forResource: "www", ofType: nil) self.webServer.addGETHandler(forBasePath: "/", directoryPath: websitePath!, indexFilename: nil, cacheAge: 3600, allowRangeRequests: true) self.webServer.start(withPort: 8888, bonjourName: "GCD Web Server") -
Then, we can load the web page with the following URL:
let url = URL(string:"http://localhost:8888/scanner.html") let request = URLRequest(url: url!) self.webView.load(request) -
We can now use the library of Dynamsoft Barcode Reader locally instead of using a CDN.
-
Download the library and put the
distfolder in the assets folder. -
Modify
scanner.htmlto use the local library.- <script src="https://unpkg.com/dynamsoft-javascript-barcode@9.0.2/dist/dbr.js"></script> + <script src="http://localhost:8888/dist/dbr.js"></script>
-
Call JavaScript Functions to Start Scanning from Swift
Now that we can load the web page, we are going to further integrate the web barcode scanner in the iOS project.
First, we need to call JavaScript functions from Swift to control the scanner. Here are the JavaScript functions we are going to call from Swift.
function resumeScan(){
  if (localStream) {
    var camera = document.getElementsByClassName("camera")[0];
    camera.play();
    startDecodingLoop();
  }
}

function pauseScan(){
  if (localStream) {
    clearInterval(interval);
    var camera = document.getElementsByClassName("camera")[0];
    camera.pause();
  }
}

function isCameraOpened(){
  if (localStream) {
    return "yes";
  }else{
    return "no";
  }
}

function startScan(){
  decoding = false;
  scannerContainer.style.display = "";
  home.style.display = "none";
  play(true);
}
We can use WKWebView’s evaluateJavaScript to do this.
Here, we set the action event for the scan barcodes button to start or resume the scanner.
@objc
func buttonAction() {
    if self.webView.isLoading {
        print("still loading")
    }else{
        self.webView.isHidden = false
        startScan();
    }
}

func startScan(){
    self.webView.evaluateJavaScript("isCameraOpened();") { (result, error) in
        if error == nil {
            if result as! String == "yes" {
                print("resume scan")
                self.webView.evaluateJavaScript("resumeScan();")
            }else{
                print("start scan")
                self.webView.evaluateJavaScript("startScan();")
            }
        }
    }
}
Return the Barcode Results to Swift
If the barcode scanner in the WebView finds a barcode, we need to pause scan and then display the barcode result in the UILabel. To do this, we need to install a new message handler to call from JavaScript.
-
Create a new
WKUserContentControllerinstance, add a handler namedonScannedand set it in theWKWebViewConfiguration.let contentController = WKUserContentController() contentController.add(self,name: "onScanned") configuration.userContentController = contentController -
Add the handler function:
func userContentController(_ userContentController: WKUserContentController, didReceive message: WKScriptMessage) { if message.name == "onScanned" { self.webView.isHidden = true self.resultLabel.text = message.body as? String } } -
Send the
onScannedmessage (the barcode result) from JavaScript.async function decode(){ if (decoding === false && barcodeReader) { var video = document.getElementsByClassName("camera")[0]; decoding = true; var barcodes = await barcodeReader.decode(video); drawOverlay(barcodes); if (barcodes.length > 0) { setTimeout(function(){ pauseScan(); try { webkit.messageHandlers.onScanned.postMessage(barcodes[0].barcodeText); } catch(err) { console.log('The native context does not exist yet'); } },timeoutAfterScan); return; } decoding = false; } }
Handle Lifecycle Events
We also need to handle lifecycle events.
When the app is sent to the background, stop scan. When the app is back alive, if the webview is visible, start scan.
-
Add observer.
override func viewDidLoad() { NotificationCenter.default.addObserver(self, selector: #selector(applicationDidBecomeActive), name: UIApplication.didBecomeActiveNotification, object: nil) NotificationCenter.default.addObserver(self, selector: #selector(applicationWillResignActive), name: UIApplication.willResignActiveNotification, object: nil) } -
Handle the events.
 @objc func applicationWillResignActive(notification: NSNotification){
     print("entering background")
     self.webView.evaluateJavaScript("stopScan();")
 }

 @objc func applicationDidBecomeActive(notification: NSNotification) {
     print("back active")
     if self.webView.isHidden == false {
         print("Scanner is on, start scan")
         self.webView.evaluateJavaScript("startScan();")
     }
 }
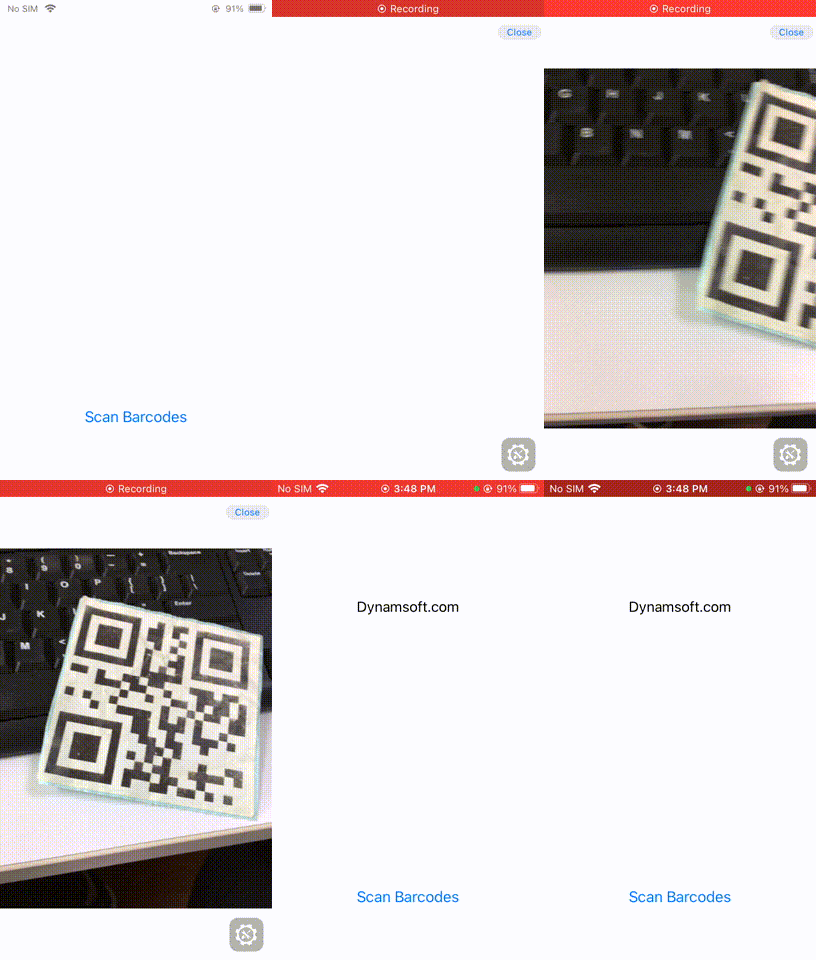
Here is a video of the final result:


