


Build a Flask Web Service for Barcode, MRZ, and Document Scanning with Power Automate Desktop
Microsoft Power Automate is a powerful service designed to automate workflows between various apps and services. Its Desktop version provides the added capability of automating desktop-centric operations, with or without user interface interactions. In this article, we will explore how to integrate Dynamsoft Barcode Reader, Dynamsoft Document Normalizer, and Dynamsoft Label Recognizer into a web service using Flask. By leveraging this web API, we can seamlessly invoke these Dynamsoft tools within Power Automate for Desktop. This enables you to transform the created flow into a convenient desktop application that significantly enhances your daily work efficiency.
This article is Part 1 in a 2-Part Series.
What you’ll build: A Python Flask REST API that wraps Dynamsoft Barcode Reader, Document Normalizer, and Label Recognizer, then a Power Automate Desktop flow that calls these endpoints to decode barcodes, scan MRZ, and rectify documents — all without writing IronPython.
Key Takeaways
- Power Automate Desktop uses IronPython, which cannot import pip packages — a local Flask web service is the recommended workaround for calling Python-based SDKs.
- Dynamsoft Capture Vision Bundle exposes barcode decoding, MRZ recognition, and document rectification through a single
CaptureVisionRouterAPI in Python. - The Flask server accepts both multipart file uploads and base64-encoded image data via POST, making it compatible with Power Automate’s “Invoke web service” action.
- This pattern generalizes to any desktop automation tool that supports HTTP calls, not just Power Automate.
Common Developer Questions
How do I call a Python barcode SDK from Power Automate Desktop?
Run the barcode SDK inside a normal CPython Flask service, then call that local HTTP endpoint from Power Automate Desktop with the Invoke web service action. In this article, the flow sends either a base64 image or uploaded file to /api/dbr/decode, and the Flask app returns JSON results that Power Automate can display.
Can Power Automate Desktop use external Python libraries like OpenCV or Dynamsoft?
Not through its built-in Python action, because Power Automate Desktop uses IronPython and cannot import pip-installed packages such as OpenCV or Dynamsoft Capture Vision. The practical workaround is to run those libraries in a separate Flask process and let Power Automate call that process over HTTP.
How do I build a local REST API for barcode decoding and document scanning with Flask?
Create a Flask app with dedicated POST routes such as /api/dbr/decode, /api/mrz/scan, and /api/document/rectify, then pass the incoming image bytes into the corresponding CaptureVisionRouter workflow. This sample shows how to accept both multipart uploads and base64 request bodies, call capture_multi_pages() for barcode, MRZ, and document tasks, and return the processed results as JSON.
Prerequisites
Before you begin, make sure you have Python 3.x and Power Automate for Desktop installed.
Get a 30-day free trial license for Dynamsoft Capture Vision.
Step 1: Install Python Packages
pip install dynamsoft-capture-vision-bundle opencv-python flask numpy
- dynamsoft-capture-vision-bundle: Dynamsoft Capture Vision Bundle (includes Barcode Reader, Document Normalizer, and Label Recognizer)
- opencv-python: OpenCV for Python
- flask: Flask web framework
- numpy: NumPy for array operations
Why Power Automate Desktop Cannot Use External Python Libraries
If you have tried to use Python script in Power Automate for Desktop, you may have noticed that it does not support external libraries installed via pip. This is because Power Automate Desktop uses IronPython, which is a .NET implementation of Python. IronPython is a subset of the Python language, and it does not support external libraries. To address this issue, we can create a web service using Flask, and then invoke the web API using Power Automate HTTP action.
Step 2: Set Up an HTTP Web Service with Flask
- Import the dependent packages:
from flask import Flask, request, jsonify import base64 import urllib.parse from dynamsoft_capture_vision_bundle import ( LicenseManager, CaptureVisionRouter, EnumPresetTemplate, EnumErrorCode, EnumImagePixelFormat ) import cv2 import numpy as np import time import os - Set the Dynamsoft license key and initialize the CaptureVisionRouter instances. You need to replace the license key with your own.
license_key = "LICENSE-KEY" # Initialize license LicenseManager.init_license(license_key) # Create CaptureVisionRouter instance for barcode detection cvr_barcode = CaptureVisionRouter() # Create CaptureVisionRouter instance for MRZ detection cvr_mrz = CaptureVisionRouter() # Create CaptureVisionRouter instance for document detection cvr_document = CaptureVisionRouter() - Create a Flask app and define the web API endpoints:
app = Flask(__name__) @app.route('/api/dbr/decode', methods=['POST']) def dbr_decode(): return handle_request(request, 'dbr') @app.route('/api/mrz/scan', methods=['POST']) def mrz_scan(): return handle_request(request, 'mrz') @app.route('/api/document/rectify', methods=['POST']) def document_rectify(): return handle_request(request, 'document') if __name__ == '__main__': # Use --host-all flag to allow external connections (requires admin on Windows) import sys host = '0.0.0.0' if '--host-all' in sys.argv else '127.0.0.1' app.run(host=host, port=5000) - Handle the HTTP request to get the image data from
request.filesor request body. The image data from the request body is encoded in base64 format, so we need to decode it first.def handle_request(request, sdk): output = [] request_body = request.data.decode('utf-8') if request_body != '': try: base64_content = urllib.parse.unquote(request_body) file_content = base64.b64decode(base64_content) except: return 'Invalid base64 string', 400 output = process_file(file_content, sdk) else: if 'file' not in request.files: return 'No file uploaded', 400 file = request.files['file'] if file.filename == '': return 'Empty file', 400 file_content = file.read() output = process_file(file_content, sdk) return jsonify(results=output) - Invoke the corresponding SDK methods to process the image data for barcode detection, document rectification and MRZ recognition respectively.
def decode_file_stream(file_content): output = [] try: results = cvr_barcode.capture_multi_pages(file_content, EnumPresetTemplate.PT_READ_BARCODES) result_list = results.get_results() for result in result_list: if result.get_error_code() == EnumErrorCode.EC_OK: items = result.get_items() for item in items: text = item.get_text() format_str = item.get_format_string() output.append({'format': format_str, 'text': text}) except Exception as error: output = str(error) return output def mrz_decode_file_stream(file_content): output = [] try: results = cvr_mrz.capture_multi_pages(file_content, "ReadPassportAndId") result_list = results.get_results() for result in result_list: if result.get_error_code() == EnumErrorCode.EC_OK: # Get recognized text lines (raw MRZ text) line_result = result.get_recognized_text_lines_result() if line_result: items = line_result.get_items() for item in items: text = item.get_text() output.append(text) # Get parsed results (structured MRZ data) parsed_result = result.get_parsed_result() if parsed_result: parsed_items = parsed_result.get_items() for item in parsed_items: code_type = item.get_code_type() # Extract key fields from parsed MRZ doc_id = item.get_field_value("passportNumber") or item.get_field_value("documentNumber") nationality = item.get_field_value("nationality") issuer = item.get_field_value("issuingState") dob = item.get_field_value("dateOfBirth") expiry = item.get_field_value("dateOfExpiry") gender = item.get_field_value("sex") surname = item.get_field_value("primaryIdentifier") given_name = item.get_field_value("secondaryIdentifier") parsed_info = f"Type: {code_type}" if doc_id: parsed_info += f", ID: {doc_id}" if surname: parsed_info += f", Name: {surname}" if given_name: parsed_info += f" {given_name}" if nationality: parsed_info += f", Nationality: {nationality}" if dob: parsed_info += f", DOB: {dob}" if expiry: parsed_info += f", Expiry: {expiry}" if gender: parsed_info += f", Gender: {gender}" output.append(parsed_info) except Exception as error: output = str(error) return output def convertImageData2Mat(normalized_image): """Convert ImageData to OpenCV Mat""" ba = bytearray(normalized_image.get_bytes()) width = normalized_image.get_width() height = normalized_image.get_height() channels = 3 if normalized_image.get_image_pixel_format() == EnumImagePixelFormat.IPF_BINARY: channels = 1 all_pixels = [] skip = normalized_image.stride * 8 - width index = 0 n = 1 for byte in ba: byteCount = 7 while byteCount >= 0: b = (byte & (1 << byteCount)) >> byteCount if index < normalized_image.stride * 8 * n - skip: if b == 1: all_pixels.append(255) else: all_pixels.append(0) byteCount -= 1 index += 1 if index == normalized_image.stride * 8 * n: n += 1 mat = np.array(all_pixels, dtype=np.uint8).reshape(height, width, channels) return mat elif normalized_image.get_image_pixel_format() == EnumImagePixelFormat.IPF_GRAYSCALED: channels = 1 mat = np.array(ba, dtype=np.uint8).reshape(height, width, channels) return mat def document_rectify_file_stream(file_content): output = [] try: results = cvr_document.capture_multi_pages(file_content, EnumPresetTemplate.PT_DETECT_AND_NORMALIZE_DOCUMENT) result_list = results.get_results() for result in result_list: if result.get_error_code() == EnumErrorCode.EC_OK: processed_doc_result = result.get_processed_document_result() if processed_doc_result: deskewed_items = processed_doc_result.get_deskewed_image_result_items() for item in deskewed_items: # Get the normalized image data normalized_image_data = item.get_image_data() if normalized_image_data: # Convert ImageData to OpenCV Mat normalized_image = convertImageData2Mat(normalized_image_data) image_path = os.path.join(os.getcwd(), str(time.time()) + '.png') cv2.imwrite(image_path, normalized_image) output.append(image_path) break except Exception as error: output = str(error) return output def process_file(file_content, sdk): output = [] if sdk == 'dbr': output = decode_file_stream(file_content) elif sdk == 'mrz': output = mrz_decode_file_stream(file_content) elif sdk == 'document': output = document_rectify_file_stream(file_content) return output - Start the Flask server and test the web API with curl commands (use
curl.exein PowerShell, orcurlin CMD/Git Bash):# Run server (localhost only) python app.py # Or run with external access (requires admin on Windows) python app.py --host-all # barcode curl.exe -X POST -F 'file=@./barcode.jpg' http://127.0.0.1:5000/api/dbr/decode # mrz curl.exe -X POST -F 'file=@./mrz.png' http://127.0.0.1:5000/api/mrz/scan # document curl.exe -X POST -F 'file=@./document.png' http://127.0.0.1:5000/api/document/rectify
Step 3: Invoke the Web Service in Power Automate for Desktop
In the following section, we will show you how to create a flow step by step.
-
Launch Power Automate for Desktop and create a new flow.
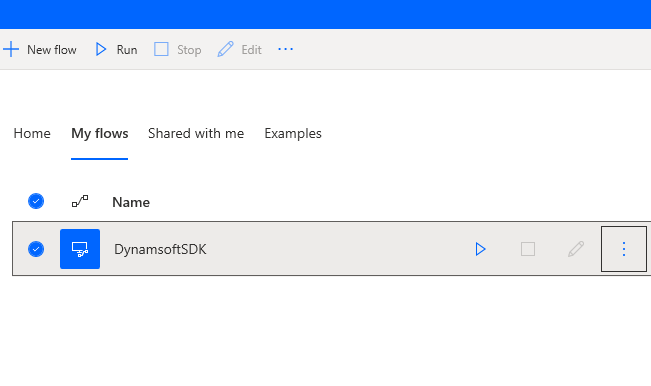
-
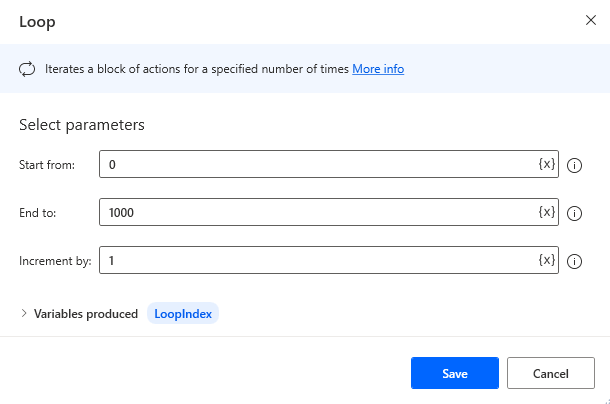
Create a loop. Since we want to keep the flow running as a tool, we can set a big number for the loop count.
-
In the loop, add a
Display custom formaction. OpenCustom form designerto addChoice set inputandSubmit. The ID of theChoice set inputisOptions, which will be used in the next step.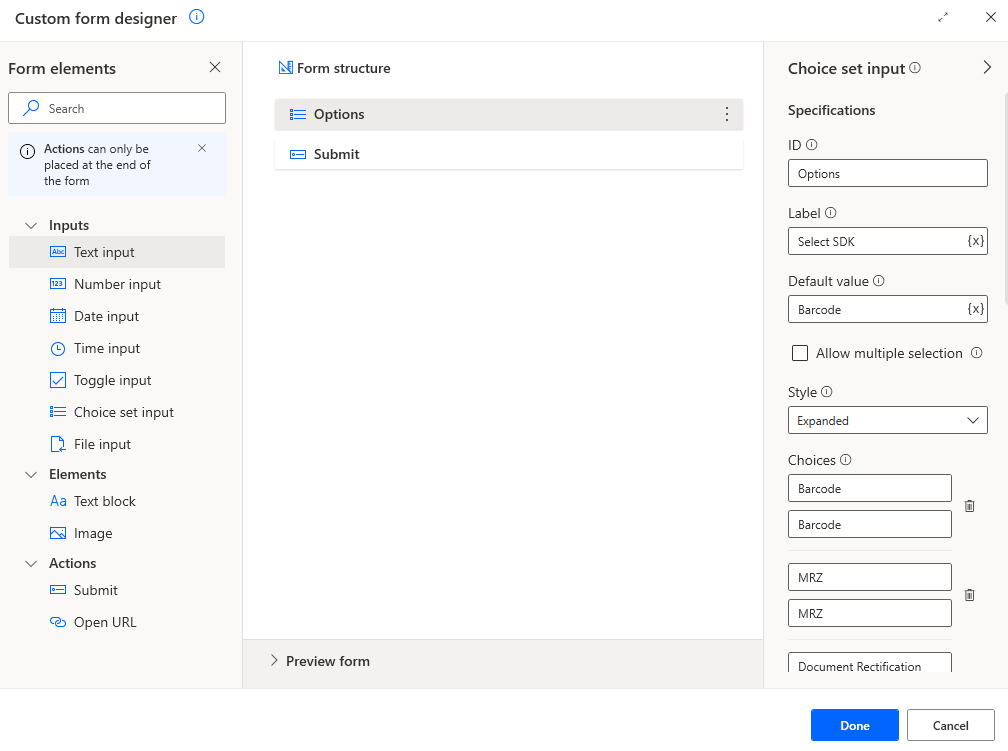
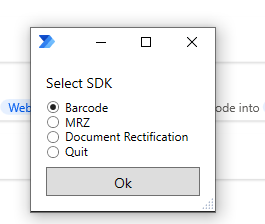
The custom form looks like this:
-
Create a
Switchaction to check the option value with%CustomFormData2['Options']%.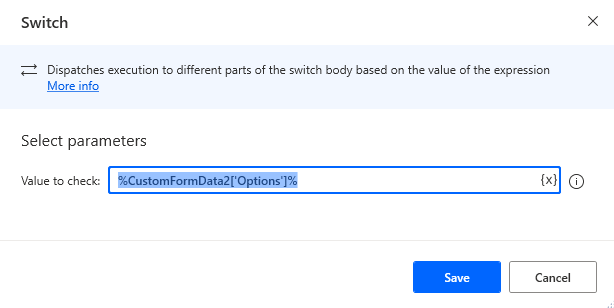
-
Create four cases:
Barcode,MRZ,Document, andQuit.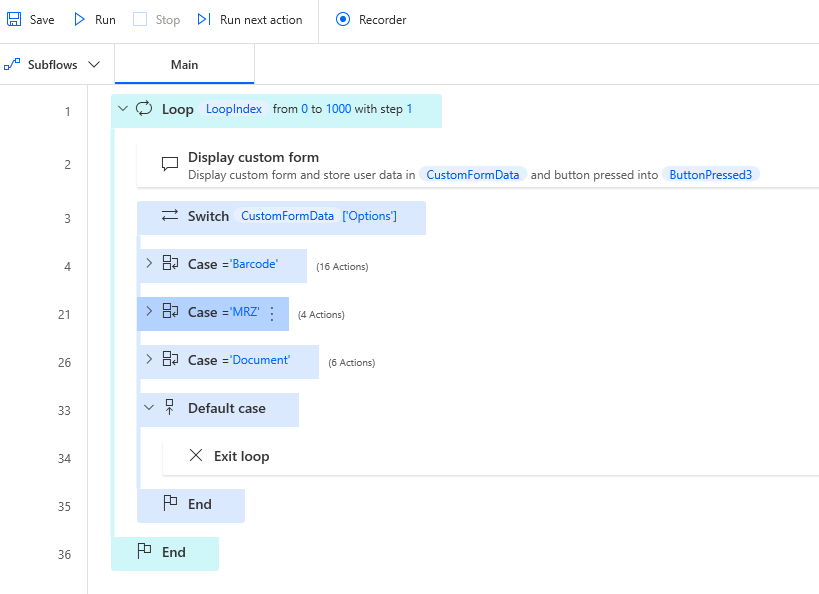
-
The
Barcodecase is used to decode 1D/2D barcodes from an image file or a screenshot.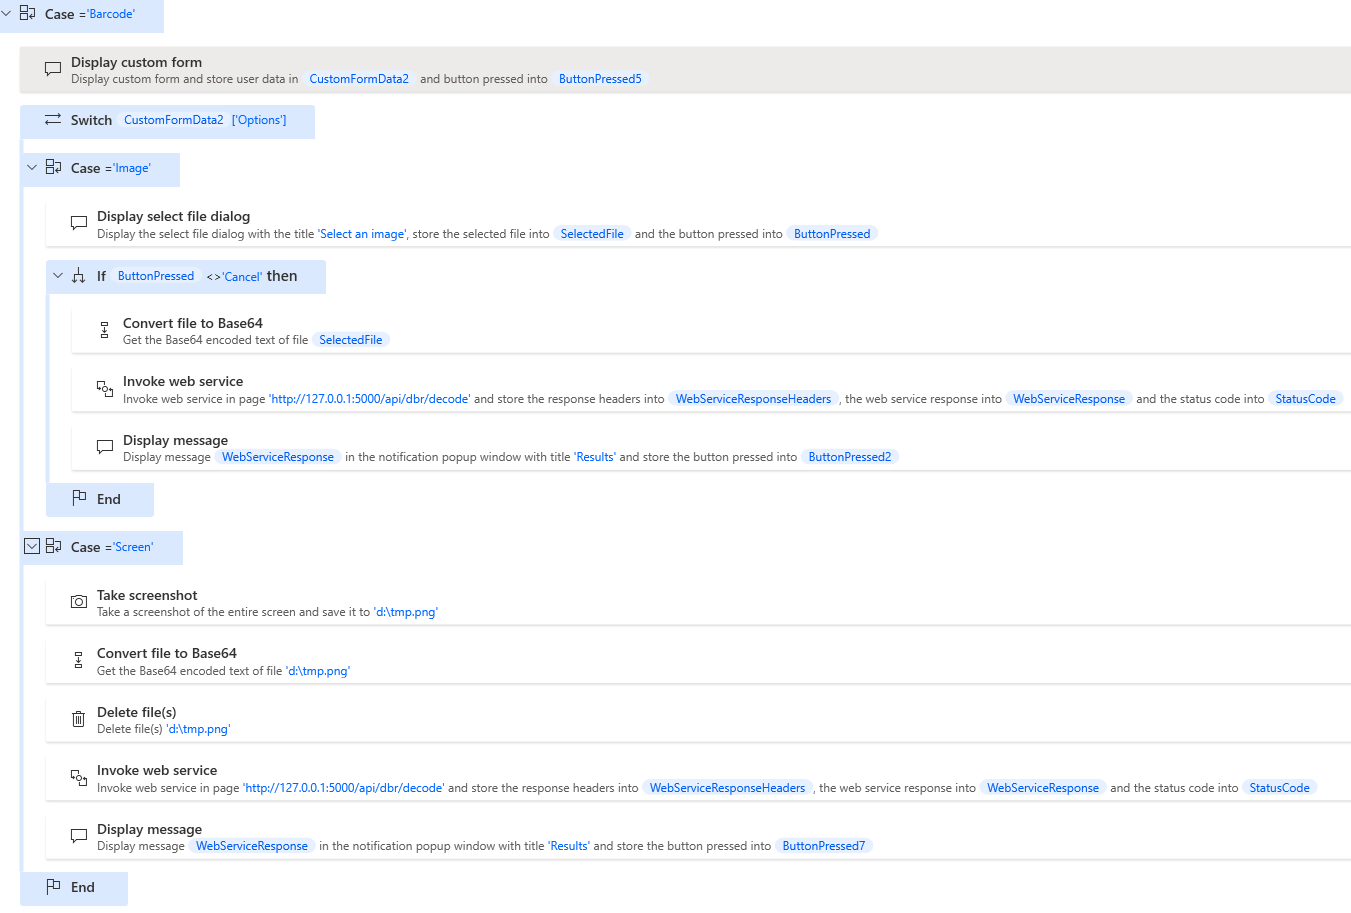
-
The
MRZcase is used to scan MRZ from an image file.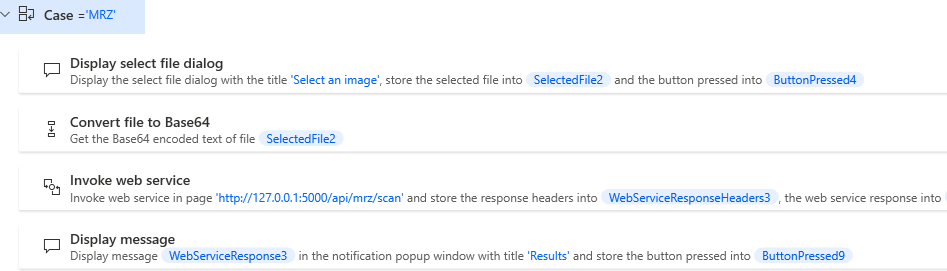
-
The
Documentcase is used to rectify a document image.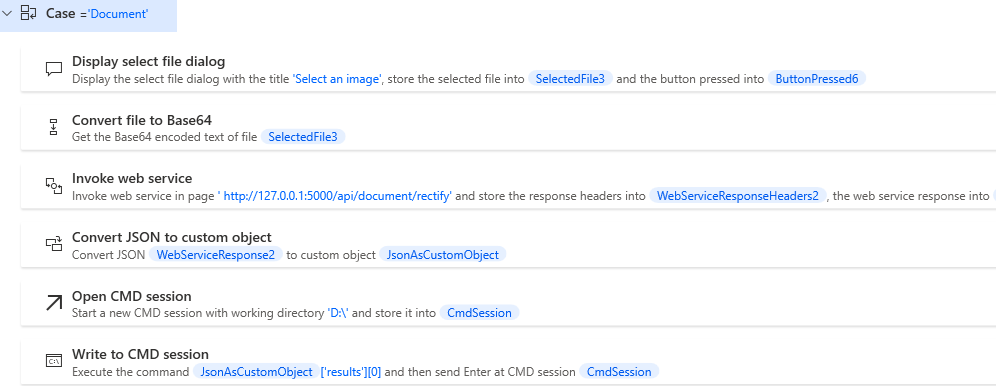
-
The default case is used to quit the loop when the selected option is
Quit.
-
Decode Barcodes from an Image or Screenshot
Image
-
Add a
Display select file dialogaction to let the user select an image file.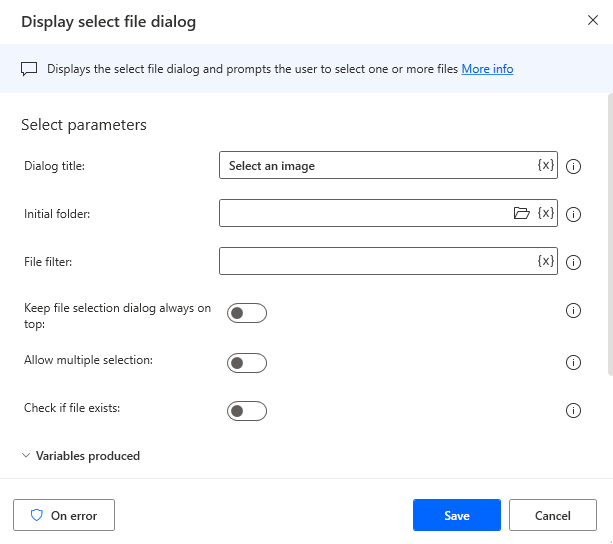
-
Add a
Convert file to Base64action to convert the image file to base64 format.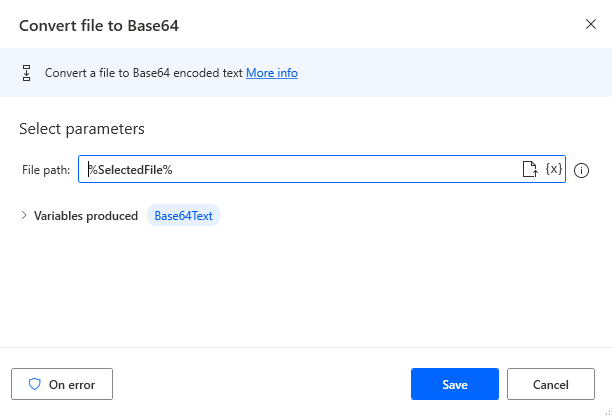
-
Add a
Invoke web serviceaction. Set theURLtohttp://127.0.0.1:5000/api/dbr/decode, theMethodtoPOST, theAccepttoapplication/json, theContent typetoapplication/jsonand theRequest bodyto%Base64Text%.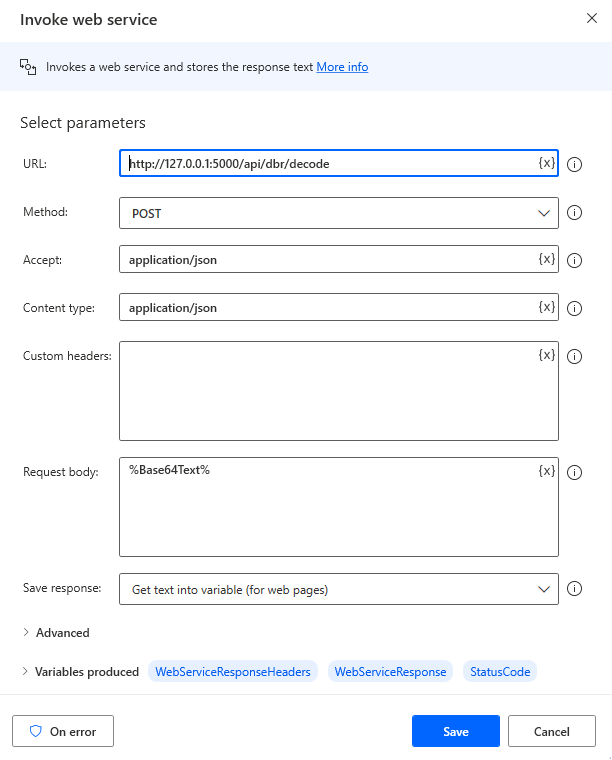
-
Add a
Display messageaction to show the decoded results.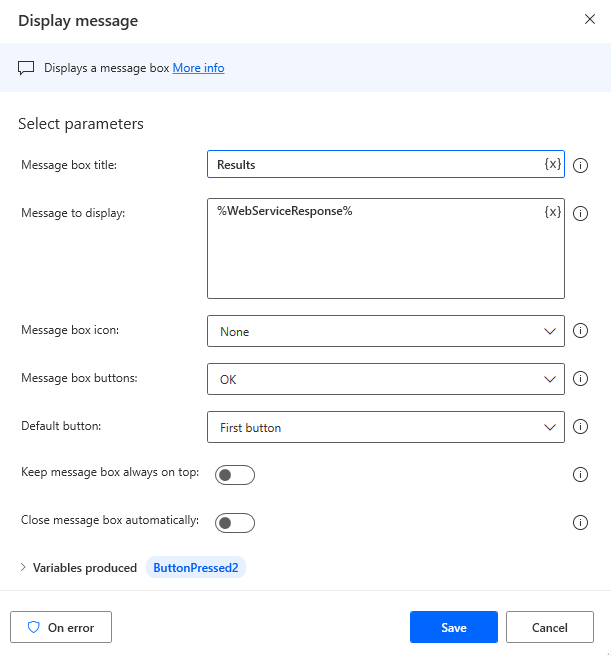
Screenshot
-
Add a
Take screenshotaction to take a screenshot. Set theCapturetoAll screens, theSave screenshot totoFile, theImage fileto any path you want, and theImage formattoPNG.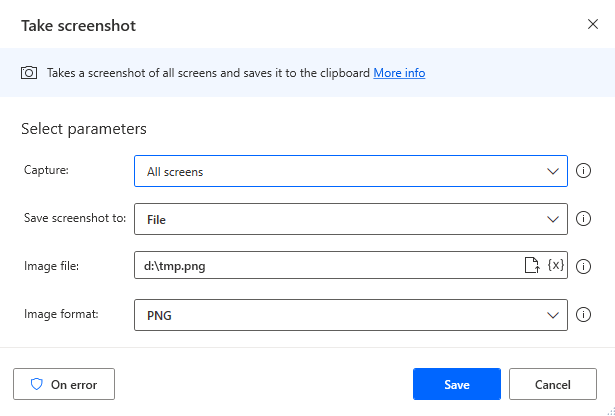
-
Take the same steps 2 through 4 in the image example we just mentioned.
Scan MRZ from an Image File Using Power Automate
The MRZ case is similar to the barcode case. The only difference is that we change URL to http://127.0.0.1:5000/api/mrz/scan instead of http://127.0.0.1:5000/api/dbr/decode.
Rectify and Deskew a Document Image
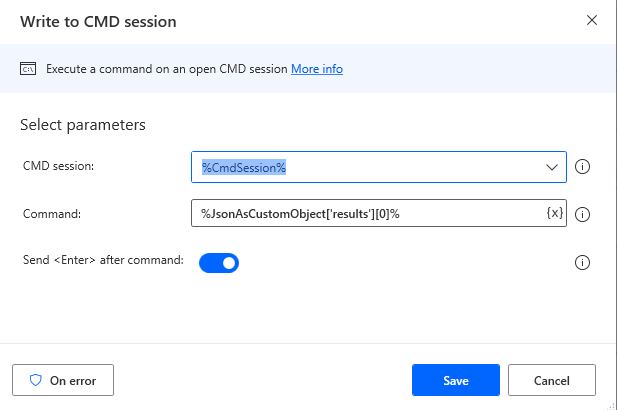
Just like the MRZ scenario, we modify the URL to http://127.0.0.1:5000/api/document/rectify. Once the web API is invoked, we acquire the path of the rectified image by using the Convert JSON to custom object action. Subsequently, we use the Write to CMD session action to display the rectified image.
Common Issues and Edge Cases
- Flask server not reachable from Power Automate: Ensure the Flask server is running before triggering the flow. If you see a connection error, verify that the port (5000) is not blocked by Windows Firewall and that no other process is using it.
- Base64 decoding failures: Power Automate’s
Convert file to Base64action may URL-encode the string. The server handles this withurllib.parse.unquote(), but if you send raw binary instead of base64, the request will fail with a 400 error. - Large file or multi-page PDF timeouts: Processing high-resolution images or multi-page PDFs can exceed Power Automate’s default HTTP timeout. Increase the timeout in the “Invoke web service” action settings, or resize images before sending.