


How to Build a Web Document Scanner on Chrome OS with Dynamic Web TWAIN
Since version 17.1, Dynamic Web TWAIN has supported Chrome OS, in addition to Windows, Linux, macOS, and Raspberry Pi OS.
This guide applies to versions 17.1 through 19.x. It covers installation, version-specific package names, and post-installation configuration such as certificate handling and host settings.
What you’ll build: A fully functional web document scanning application running on a Chromebook, connecting to a USB scanner through the Linux (Crostini) environment using Dynamic Web TWAIN.
Key Takeaways
- Dynamic Web TWAIN supports Chrome OS from version 17.1 onward, using the Linux (Crostini) container to expose physical USB scanners to web applications.
- The service package name changed in v19.0: use
DynamsoftServiceSetup.debfor v17.1–18.x andDynamicWebTWAINServiceSetup.debfor v19.0+. - Secure browser-to-service communication requires either adding a certificate exception for
127.0.0.1:18623or pointing the SDK host tolocal.dynamsoft.com. - Once installed, the Chrome OS scanning experience is identical to Windows, macOS, and Linux desktop platforms.
Common Developer Questions
How do I scan documents from a web app on a Chromebook?
Enable the Linux (Crostini) environment on the Chromebook, expose the USB scanner to that container, install the Dynamic Web TWAIN service there, and then open a normal browser-based scanning page. Once those pieces are in place, the Chromebook behaves much like a Linux desktop scanner host.
How do I install Dynamic Web TWAIN on Chrome OS using the Linux environment?
Copy the correct .deb installer into the Linux files area, install SANE first, and then run dpkg -i against the service package that matches your DWT version. The article calls out the version split explicitly because Chrome OS users need DynamsoftServiceSetup.deb on older releases and DynamicWebTWAINServiceSetup.deb on newer ones.
How do I fix the HTTPS certificate error when connecting to the Dynamic Web TWAIN local service on Chrome OS?
You can either trust the self-signed certificate exposed on https://127.0.0.1:18623 or configure the SDK to use local.dynamsoft.com before initialization. The second option is usually cleaner because it uses the certificate shipped with the service rather than relying on a manual browser exception.
Prerequisites
- A Chromebook running Chrome OS with Settings > Developers > Linux development environment enabled
- A compatible USB document scanner connected to your Chromebook
- Dynamic Web TWAIN v17.1 or later — Get a 30-day free trial license to get started
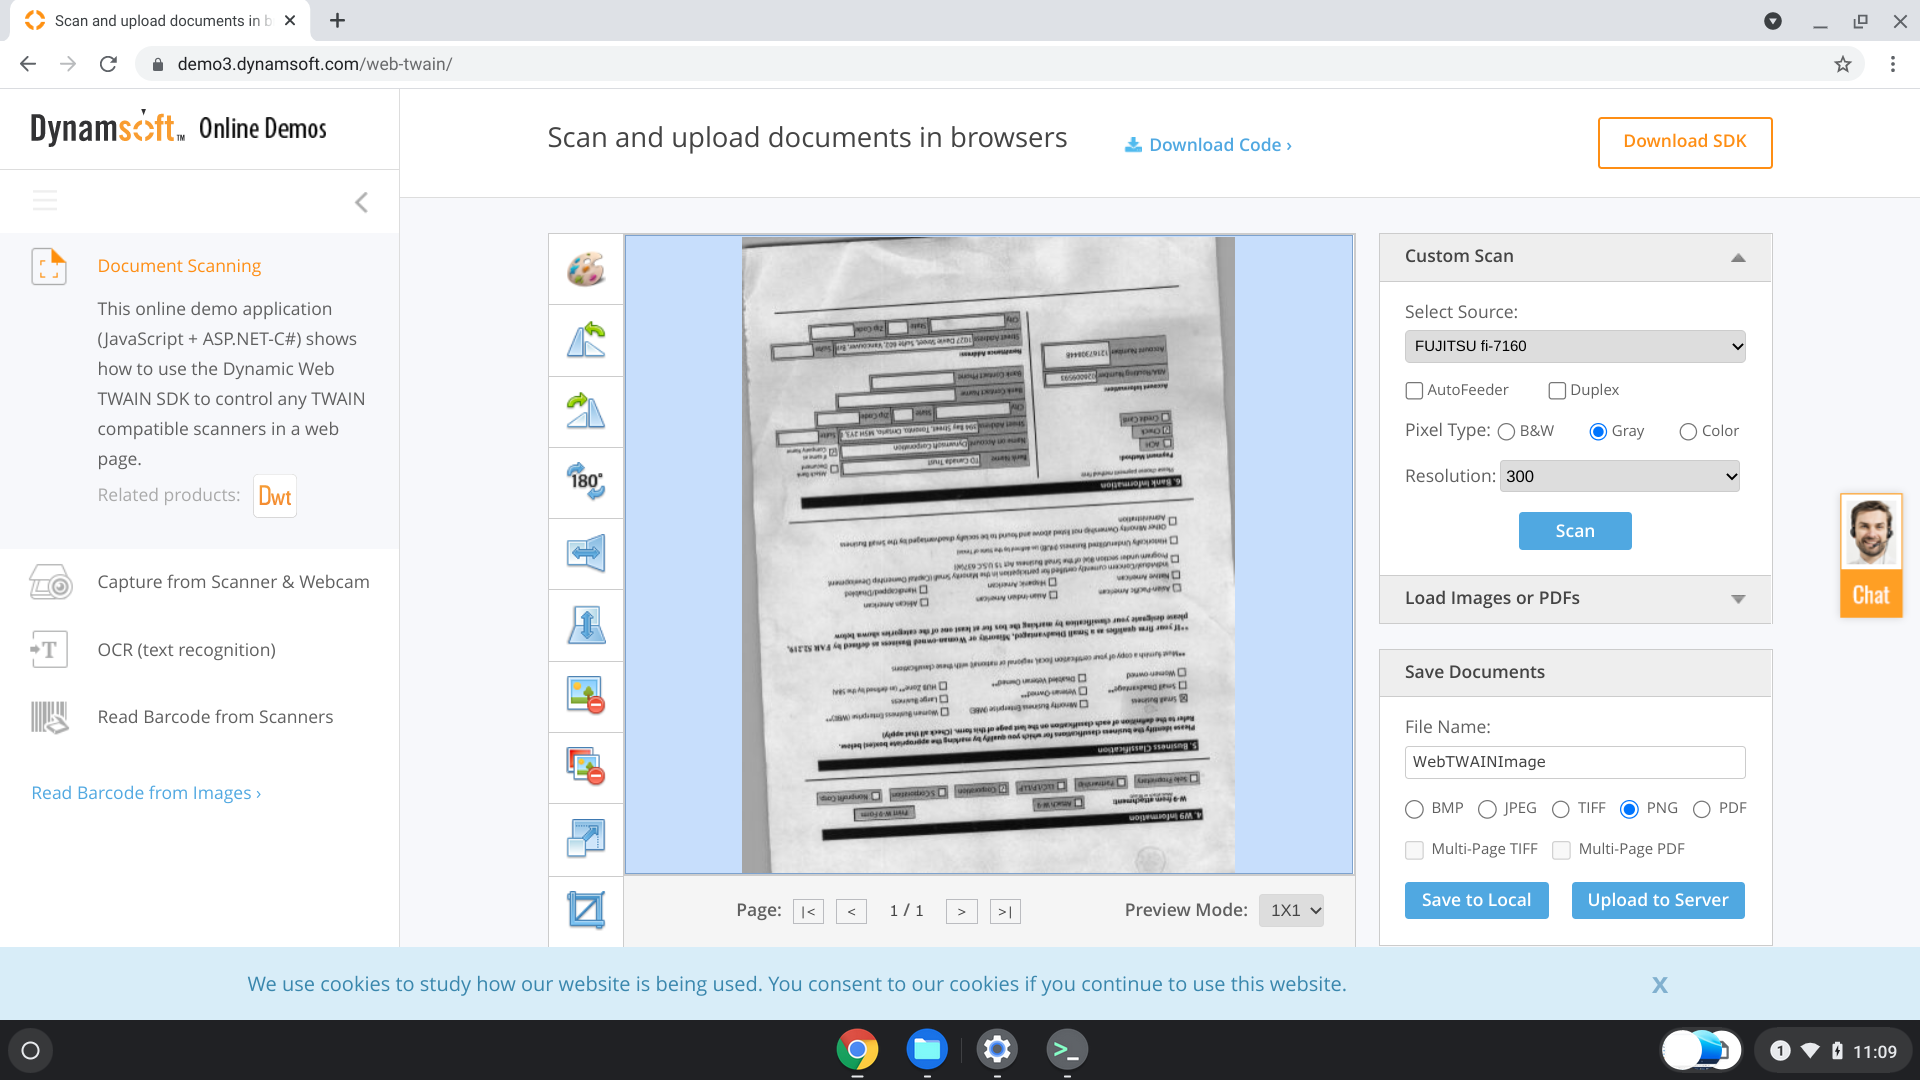
See It in Action: Chrome OS Web Scanning Demo
Version Note: Installation Package Name Change
- v17.1 – <19.0: the package name is
DynamsoftServiceSetup.deb - v19.0+: the package name is
DynamicWebTWAINServiceSetup.deb
Throughout this article, substitute the correct package name depending on your version.
Try the Online Demo on Your Chromebook
Try the free Dynamic Web TWAIN online demo directly on Chrome OS.
On first visit, you’ll be prompted to download the Debian package (*.deb) required for Chrome OS.

After downloading, the file will be saved to the Downloads folder. Install it using the Linux (Crostini) environment.
Step 1: Install Dynamic Web TWAIN Service on Chrome OS
- Go to Settings > Developers and enable the Linux development environment. Wait for setup to finish.
- A Linux terminal and a Linux files folder will appear.
- When you connect a document scanner, click the CONNECT TO LINUX notification so it’s exposed to the Linux container.
Step 2: Run the Installation Commands
- Copy the
.debfile fromDownloadstoLinux files.- v17.1 – <19.0:
DynamsoftServiceSetup.deb - v19.0+:
DynamicWebTWAINServiceSetup.deb
- v17.1 – <19.0:
-
Install SANE (scanner access):
sudo apt update sudo apt install sane - Install the Dynamic Web TWAIN service (use the correct filename):
 # v17.1 - <19.0
 sudo dpkg -i DynamsoftServiceSetup.deb

 # v19.0 and later
 sudo dpkg -i DynamicWebTWAINServiceSetup.deb
If dependencies are missing:
sudo apt -f install - Tip: Avoid using the file manager option “Install with Linux” for this package—it may not handle dependencies correctly.
Step 3: Verify the Service Is Running
Check if the service is running:
ps aux | grep -i dynamsoft
Step 4: Enable Secure HTTPS Communication
After installation, JavaScript must communicate with the local service over HTTPS. There are two ways to enable this:
Option 1: Add a Certificate Exception for 127.0.0.1
- Visit: https://127.0.0.1:18623
- The browser will warn about the self-signed certificate. Add an exception to allow it.
- Reload your web application.
Option 2: Use the Provided Certificate (local.dynamsoft.com)
Dynamic Web TWAIN includes a certificate for local.dynamsoft.com. Point the SDK host there.
If your project has dynamsoft.webtwain.config.js, set:
Dynamsoft.DWT.Host = "local.dynamsoft.com";
If no config file exists (e.g., framework samples via NPM), set the host before initialization:
Dynamsoft.DWT.Host = "local.dynamsoft.com";
Dynamsoft.DWT.Load(); // or your initialization call
Step 5: Test the Web Document Management App
Reload the demo page. Once the service is installed and secure communication is enabled, the experience on Chrome OS will match that of other desktop platforms.
Common Issues & Edge Cases
- Scanner not detected after installation: Confirm you clicked the CONNECT TO LINUX notification that appeared when you plugged in the device. Unplug and reconnect the scanner, then accept the notification again to expose it to the Linux container.
- HTTPS certificate error persists after adding exception: Switch to the
local.dynamsoft.comapproach and ensureDynamsoft.DWT.Host = "local.dynamsoft.com"is set beforeDynamsoft.DWT.Load()is called — not after. dpkg -ifails with unmet dependencies: Runsudo apt -f installimmediately after the failed install; this fetches and installs the missing library dependencies automatically.
Summary
- Installed the appropriate service package for your version (17.1–19.x).
- Verified the service is running.
- Enabled secure communication either by adding a localhost certificate exception or configuring
local.dynamsoft.com.
You can now build and run document management apps on Chrome OS just like on Windows, macOS, or Linux.