


Thanks for downloading Dynamsoft Label Recognizer Package!
Your download will start shortly. If your download does not begin, click here to retry.
Dynamsoft Label Recognizer - Android User Guide
Requirements
- Operating systems:
- Supported OS: Android 5 or higher (Android 7 or higher recommended)
- Supported ABI: armeabi-v7a, arm64-v8a, x86, x86_64
- Environment: Android Studio 3.4+.
Installation
If you don’t have SDK yet, please go to Dynamsoft website to get it. After the sdk is decompressed, the root directory of the DLR installation package is DynamsoftLabelRecognizer, which is represented by [INSTALLATION FOLDER].
Build Your First Application
The following sample will demonstrate how to take a picture and recognize it.
Note:
- The following steps are completed in Android Studio 4.2.
- You can download the similar complete source code from Here.
Create a New Project
-
Open Android Studio and select New Project… in the File > New > New Project… menu to create a new project.
-
Choose the correct template for your project. In this sample, we’ll use
Empty Activity. -
When prompted, choose your app name (
DLRAndroidSample) and set the Save location, Language, and Minimum SDK (21)Note: With minSdkVersion set to 21, your app is available on more than 94.1% of devices on the Google Play Store (last update: March 2021).
Include the Label Recognizer Library
There are two ways to include the Dynamsoft Label Recognizer SDK into your project:
Local Binary Dependency
-
Copy the file
[INSTALLATION FOLDER]\DynamsoftLabelRecognizerAndroid.aarand[INSTALLATION FOLDER]\DynamsoftCoreAndroid.aarto the target directoryDLRAndroidSample\app\libs - Open the file
DLRAndroidSample\app\build.gradle, and add reference in the dependencies:dependencies { implementation fileTree(dir: 'libs', include: ['*.aar']) } -
Click
Sync Now. After the synchronization completes, the SDK is added to the project. - import the package int the file
MainActivity.javaimport com.dynamsoft.dlr.*;
Remote Binary Dependency
- Open the file
DLRAndroidSample\app\build.gradle, and add the remote repository:repositories { maven { url "https://download2.dynamsoft.com/maven/dc/aar" } maven { url "https://download2.dynamsoft.com/maven/dlr/aar" } } - Add reference in the dependencies:
 dependencies {
     implementation 'com.dynamsoft:dynamsoftcore:{version-number}@aar'
     implementation 'com.dynamsoft:dynamsoftlabelrecognizer:{version-number}@aar'
 }
Note:Please replace {version-number} with the correct version number.
-
Click
Sync Now. After the synchronization completes, the SDK is added to the project. - import the package in the file
MainActivity.javaimport com.dynamsoft.dlr.*;
Initialize the Label Recognizer
-
Initialize the license
 LabelRecognizer.initLicense("DLS2eyJvcmdhbml6YXRpb25JRCI6IjIwMDAwMSIsInByb2R1Y3RzIjoyfQ==", new DLRLicenseVerificationListener() {
     @Override
     public void DLRLicenseVerificationCallback(boolean isSuccess, Exception error) {
         if(!isSuccess){
             error.printStackTrace();
         }
     }
 });
Note:
- Network connection is required for the license to work.
- “DLS2***” is a default free public trial license used in the sample.
- If the license has expired, please request a trial license through the customer portal.
-
Create an instance of Dynamsoft Label Recognizer
LabelRecognizer dlr = new LabelRecognizer();
Recognition Process and How to Use the Results
-
Recognizing text
DLRResult[] results = dlr.recognizeByFile(imgPath, "");The variable
imgPathrepresents the temporary storage location of the photos taken, which will be explained later. -
Get and output the recognition results
 if (results != null && results.length > 0) {
     String strCurResult = "";
     for (int i = 0; i < results.length; i++) {

         // Get result of each text area (also called label).
         DLRResult result = results[i];
         strCurResult += "Result " + i + ":\n";
         for (int j = 0; j < result.lineResults.length; j++) {

             // Get the result of each text line in the label.
             DLRLineResult lineResult = result.lineResults[j];
             strCurResult += ">>Line Result " + j + ": " + lineResult.text + "\n";
         }
     }
 }
The recognition results of SDK are organized into a four-tier structure:
DLRResult[]corresponds to the results of animageDLRResultcorresponds to the result of aTextArea(also called Label)DLRLineResultcorresponds to the result of eachTextLinein the LabelDLRCharacterResultcorresponds to the result of eachCharacterin theTextLine
The structure is shown in the figure below:
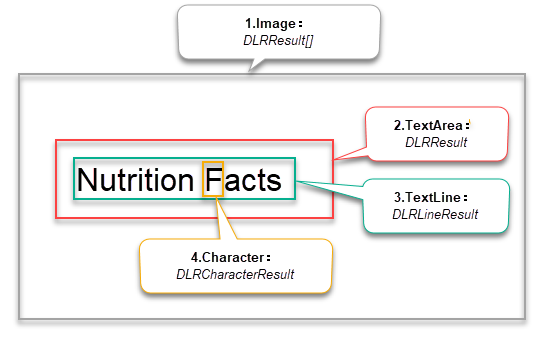
Figure 1 – DLR Result Structure
Additional Auxiliary Steps
- In the Project window, open app > res > layout > activity_main.xml, and add four controls (one
ImageView, oneTextViewand twoButtons). The following code shows the addition code ofactivity_main.xml.<LinearLayout android:layout_width="match_parent" android:layout_height="match_parent" android:orientation="vertical"> <ImageView android:id="@+id/imgView" android:layout_width="match_parent" android:layout_height="520dp"/> <TextView android:id="@+id/txtView" android:layout_width="match_parent" android:layout_height="100dp" android:background="#DEEEF6" android:text="Recognition Results" /> <LinearLayout android:layout_width="match_parent" android:layout_height="match_parent" android:orientation="horizontal"> <Button android:id="@+id/btnCapture" android:layout_width="wrap_content" android:layout_height="match_parent" android:layout_weight="1" android:text="Take a Photo" /> <Button android:id="@+id/btnRecognize" android:layout_width="wrap_content" android:layout_height="match_parent" android:layout_weight="1" android:text="Recognize Text" /> </LinearLayout> </LinearLayout> -
Add four UI variables and event response codes
 // Click to take a photo
 private Button btnCapture;
 // Click to recognize thext
 private Button btnRecognize;
 // Display the photo taken with Camera App
 private ImageView imgView;
 // Display the recognition results
 private TextView txtView;

 @Override
 protected void onCreate(Bundle savedInstanceState) {
     btnCapture =(Button)findViewById(R.id.btnCapture);
     btnRecognize =(Button)findViewById(R.id.btnRecognize);
     imgView = (ImageView)findViewById(R.id.imgView);
     txtView = (TextView)findViewById(R.id.txtView);

     btnCapture.setOnClickListener(new View.OnClickListener() {
         @Override
         public void onClick(View v) {
             // take a photo with Camera App
             takePhoto();
         }
     });

     btnRecognize.setOnClickListener(new View.OnClickListener() {
         @Override
         public void onClick(View v) {
             // recognize text in the photo
             recognizeText();
         }
     });
 }
Note: The implementation of the
recognizeTextfunction has been explained in Initialize the Dynamsoft Label Recognizer and Recognizing and output results. - Take a photo with the camera app.
// Uri of the captured photo private Uri imgUri; // The full path of the captured photo private String imgPath; private void takePhoto() { String status= Environment.getExternalStorageState(); if(status.equals(Environment.MEDIA_MOUNTED)) { try { File outputImage = new File(getExternalCacheDir(), "output_image.jpg"); imgPath = outputImage.getAbsolutePath(); if (outputImage.exists()) { outputImage.delete(); } outputImage.createNewFile(); if (Build.VERSION.SDK_INT >= 24) { imgUri = FileProvider.getUriForFile(this, "com.example.dlrandroidsample", outputImage); } else { imgUri = Uri.fromFile(outputImage); } Intent intent = new Intent(MediaStore.ACTION_IMAGE_CAPTURE); intent.putExtra(MediaStore.EXTRA_OUTPUT, imgUri); startActivityForResult(intent, Image_Capture_Code); } catch (Exception e) { e.printStackTrace(); } } } - Display the photo in the
ImageViewcontrol@Override protected void onActivityResult(int requestCode, int resultCode, Intent data) { super.onActivityResult(requestCode, resultCode, data); if (requestCode == Image_Capture_Code && resultCode == RESULT_OK) { try { Bitmap bitmap = BitmapFactory.decodeStream(getContentResolver().openInputStream(imgUri)); imgView.setImageBitmap(bitmap); } catch (Exception e) { e.printStackTrace(); } } } - Config the
FileProvdierin the fileAndroidManifest.xml<provider android:authorities="com.example.dlrandroidsample" android:name="androidx.core.content.FileProvider" android:exported="false" android:grantUriPermissions="true"> <meta-data android:name="android.support.FILE_PROVIDER_PATHS" android:resource="@xml/file_paths"> </meta-data> </provider>Note: Make sure that the authorities string matches the second argument to
getUriForFile. In the meta-data section of the provider definition, you can see that the provider expects eligible paths to be configured in a dedicated resource file, res/xml/file_paths.xml. Here is the content required for this particular example:<?xml version="1.0" encoding="utf-8"?> <paths xmlns:android="http://schemas.android.com/apk/res/android"> <external-cache-path name="my_images" path="." /> </paths>
You can download the similar complete source code from Here.
Build and Run the Project
-
Select the device that you want to run your app on from the target device drop-down menu in the toolbar.
-
Click
Run appbutton, then Android Studio installs your app on your connected device and starts it.