


How to Build a Document Scanning REST API in Node.js
Dynamsoft’s Web TWAIN SDK has long been a market leader in web-based document scanning, empowering numerous organizations to develop their own document management systems. The SDK consisted of two main components: a Dynamic Web TWAIN Service for scanner management and a JavaScript library for front-end development. Previously, this service could only be accessed via the JavaScript library. With the upcoming release, the Dynamic Web TWAIN Service will expose the core document scanning feature via REST API. This new feature enables developers to use various programming languages for document scanning tasks. Now, in addition to web-based applications, the SDK can also be used to create desktop and mobile document scanning apps, as well as server-side scanning services. In this article, I will guide you through the process of using the new REST API for document scanning in Node.js.
What you’ll build: A Node.js application that calls the Dynamic Web TWAIN Service REST API to discover scanners, acquire documents, and stream scanned images — both from the command line and through a browser-based Express + Socket.IO server.
Key Takeaways
- Dynamic Web TWAIN Service exposes a REST API at
http://127.0.0.1:18622that lets any language — not just JavaScript — control TWAIN, SANE, ICA, WIA, and eSCL scanners. - The
docscan4nodejsnpm package wraps five endpoints (getDevices,createJob,deleteJob,getImageFiles,getImageStreams) into ready-to-use async functions. - Server-side scanning with Express and Socket.IO enables browser-based document acquisition without installing any client-side software.
- This approach works cross-platform on Windows, macOS, and Linux, including ARM64 and MIPS64 architectures.
Common Developer Questions
How do I scan documents from a TWAIN scanner using Node.js?
Call the Dynamic Web TWAIN Service REST API from Node.js through helper functions such as getDevices(), createJob(), and getImageStreams(). The Node layer sends normal HTTP requests while the local service handles the TWAIN driver communication.
How to build a server-side document scanning API with Express and Socket.IO?
Expose scan endpoints through Express, run the acquisition on the server with the REST wrapper, and use Socket.IO to push scanned image events back to the browser in real time. That gives the web client live scan feedback without requiring scanner logic in the page itself.
Can I access a shared office scanner from a web browser without installing plugins?
Yes. If the browser talks to a Node.js server that already has access to Dynamic Web TWAIN Service, users can initiate scans and receive images through ordinary web requests and WebSocket updates instead of local browser plugins.
This article is Part 1 in a 8-Part Series.
- Part 1 - How to Build a Document Scanning REST API in Node.js
- Part 2 - How to Scan Documents from TWAIN, WIA, and eSCL Scanners in a Flutter App
- Part 3 - How to Scan Documents in Java Using TWAIN, WIA, eSCL, and SANE via REST API
- Part 4 - Build a Cross-Platform Python Document Scanner with TWAIN, WIA, and SANE
- Part 5 - How to Build a Cross-Platform .NET C# Document Scanner with TWAIN, WIA, SANE, and eSCL Support
- Part 6 - How to Scan Documents from a Web Page Using the Dynamic Web TWAIN REST API
- Part 7 - Build a SwiftUI Remote Document Scanner for macOS and iOS Using the Dynamic Web TWAIN REST API
- Part 8 - Build a Web Document Scanner with JavaScript: File, Camera, and TWAIN Scanner Support
NPM Package
https://www.npmjs.com/package/docscan4nodejs
Prerequisites
- Install Dynamic Web TWAIN Service.
- Get a 30-day free trial license for Dynamic Web TWAIN Service.
Explore the REST API Reference
https://www.dynamsoft.com/web-twain/docs/info/api/restful.html
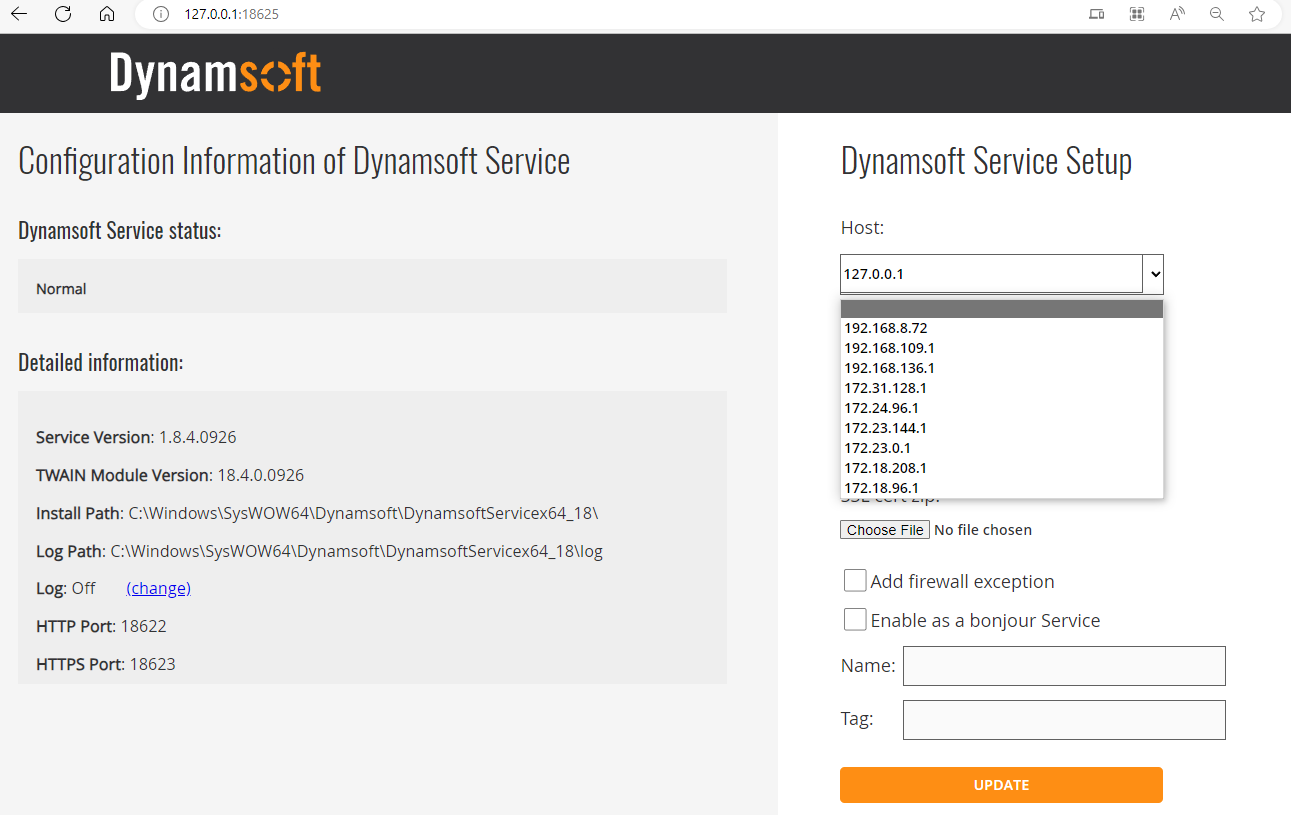
By default, the REST API’s host address is set to http://127.0.0.1:18622. To modify this to a LAN IP address, navigate to http://127.0.0.1:18625/ in your web browser.
To control the scanner’s behavior, visit Dynamic Web TWAIN documentation for detailed information. For instance, you can set the resolution to 200 DPI and the pixel type to color:
let parameters = {
    license: "LICENSE-KEY",
    device: device,
};

parameters.config = {
    IfShowUI: false,
    PixelType: 2, // color
    Resolution: 200,
    IfFeederEnabled: false,
    IfDuplexEnabled: false,
};
Step 1: Develop Node.js Functions to Call the REST API
Install Axios for sending HTTP requests directly from Node.js to RESTful APIs and retrieve their responses.
npm install axios
According to the REST API reference, we implement five functions: getDevices(), scanDocument(), deleteJob, getImageFiles and getImageStreams().
const axios = require('axios');
const fs = require('fs');
const path = require('path');

module.exports = {
    getDevices: async function (host) {
        return [];
    },
    createJob: async function (host, parameters) {
        return '';
    },
    deleteJob: async function (host, jobId) {
    },
    getImageFiles: async function (host, jobId, directory) {
        let images = [];
        return images;
    },
    getImageStreams: async function (host, jobId) {
        let streams = [];
        return streams;
    },
};
-
getDevices()retrieves a list of scanners.async function getDevices(host, scannerType) { let url = `${host}/api/device/scanners`; if (scannerType != null) url += `?type=${scannerType}`; try { const response = await request({ url, method: 'GET', json: true }); if (response.data.length > 0) { return response.data; } } catch (error) { console.error('Device discovery failed:', error.message); } return []; } -
createJob()creates a scan job and returns its ID.async function createJob(host, parameters) { const url = `${host}/api/device/scanners/jobs`; try { const response = await request({ url, method: 'POST', headers: { 'DWT-PRODUCT-KEY': parameters.license, 'Content-Type': 'application/json', 'Content-Length': Buffer.byteLength(JSON.stringify(parameters)) }, json: true, body: parameters }); if (response.status !== 201) { console.log('Job created:', response); } return response.data; } catch (error) { console.error('Scan job creation failed:', error.message); return ''; } } -
deleteJob()deletes a scan job.async function deleteJob(host, jobId) { if (!jobId) return; const url = `${host}/api/device/scanners/jobs/${jobId}`; try { await request({ url, method: 'DELETE' }); } catch (error) { console.error('Job deletion failed:', error.message); } } -
getImageFiles()retrieves the image files of a scan job.async function getImageFiles(host, jobId, directory) { const images = []; console.log('Starting image download...'); while (true) { const filename = await getImageFile(host, jobId, directory); if (!filename) break; images.push(filename); } return images; } async function getImageFile(host, jobId, directory) { const url = `${host}/api/device/scanners/jobs/${jobId}/next-page`; try { const response = await request({ url, method: 'GET', stream: true }); if (response.status === 200) { return new Promise((resolve, reject) => { const filename = `image_${Date.now()}.jpg`; const imagePath = path.join(directory, filename); const writer = fs.createWriteStream(imagePath); // Pipe response stream to file response.stream.pipe(writer); // Handle successful write writer.on('finish', () => { resolve(filename); }); // Handle errors const handleError = (err) => { writer.destroy(); reject(err); }; writer.on('error', handleError); response.stream.on('error', handleError); // Handle timeout (30 seconds) const timeout = setTimeout(() => { handleError(new Error('Download timeout')); }, 30000); writer.on('close', () => clearTimeout(timeout)); }); } } catch (error) { console.error('Image download failed:', error.message); return ''; } } -
getImageStreams()retrieves the image streams of a scan job.async function getImageStreams(host, jobId) { const streams = []; while (true) { const stream = await getImageStream(host, jobId); if (!stream) break; streams.push(stream); } return streams; } async function getImageStream(host, jobId) { const url = `${host}/api/device/scanners/jobs/${jobId}/next-page`; try { const response = await request({ url, method: 'GET', stream: true }); if (response.status === 200) { return response.stream; } } catch (error) { console.error('Stream fetch failed:', error.message); } return null; }
Step 2: Scan Documents from the Command Line
Let’s create a app.js file for scanning documents from the command line.
-
Import
docscan4nodejsandreadline. Thedocscan4nodejsmodule is what we just implemented, andreadlineis used to read user input from the command line.const docscan4nodejs = require("docscan4nodejs") const readline = require('readline'); -
Create a
readline.Interfaceinstance to read user input from the command line.const rl = readline.createInterface({ input: process.stdin, output: process.stdout }); rl.question(questions, function (answer) {}); -
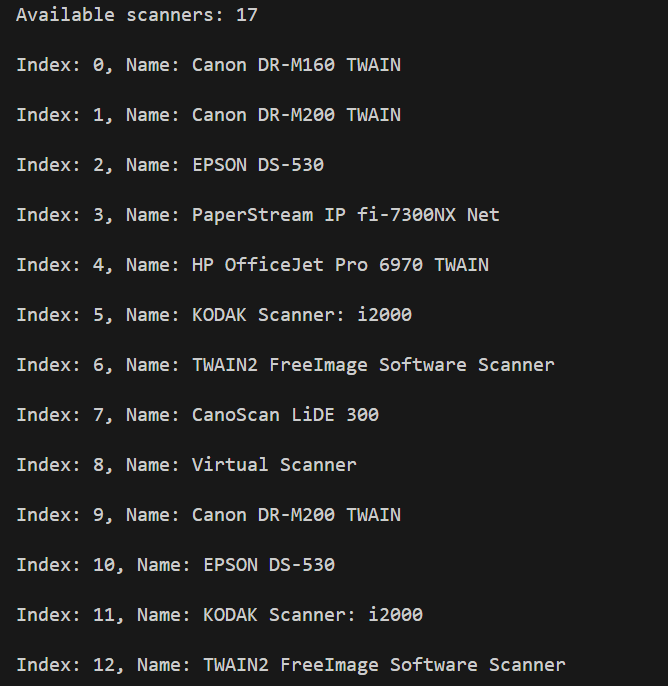
Get all available scanners that compatible with TWAIN, SANE, ICA, WIA, and eSCL.
let devices = await docscan4nodejs.getDevices(host); -
Select a scanner from the list for scanning documents. A valid license key is required.
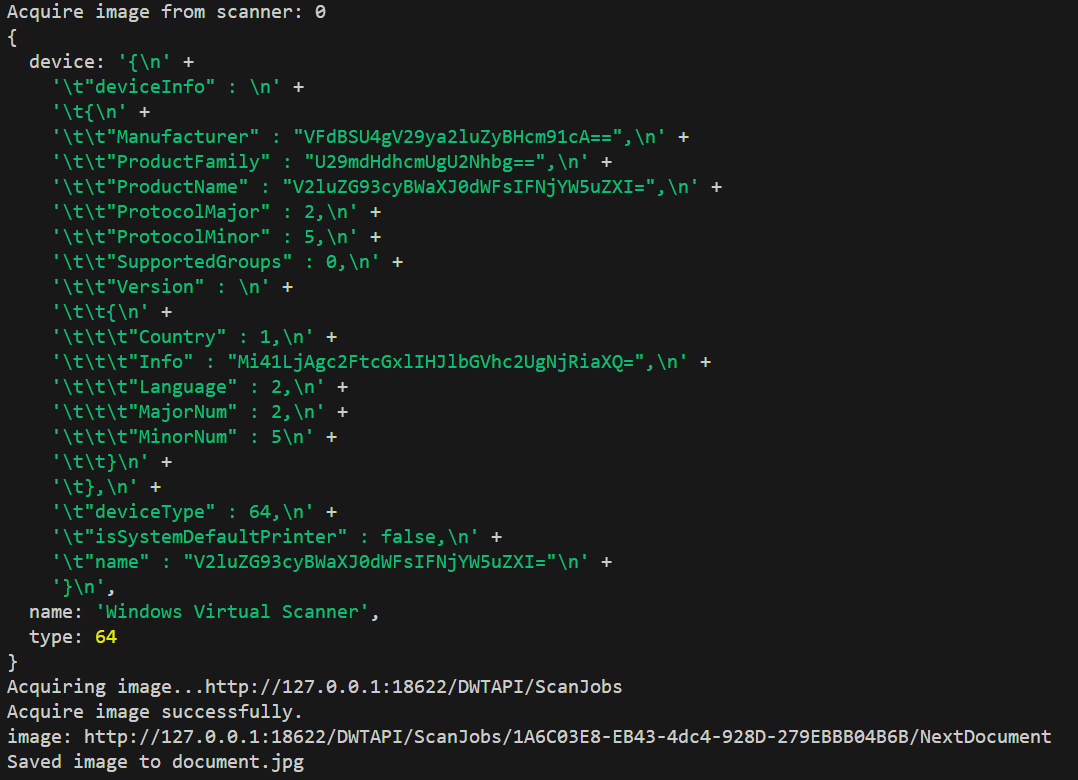
let parameters = { license: "LICENSE-KEY", device: devices[index].device, }; parameters.config = { IfShowUI: false, PixelType: 2, //XferCount: 1, //PageSize: 1, Resolution: 200, IfFeederEnabled: false, IfDuplexEnabled: false, }; docscan4nodejs.scanDocument(host, parameters).then((jobId) => { if (jobId !== '') { console.log('job id: ' + jobId); (async () => { let images = await docscan4nodejs.getImageFiles(host, jobId, './'); for (let i = 0; i < images.length; i++) { console.log('Image ' + i + ': ' + images[i]); } await docscan4nodejs.deleteJob(jobId); })(); } }); -
Run the script in the terminal.
node app.jsGet all available scanners
Acquire a Document
Step 3: Implement Server-Side Document Scanning for Web Applications
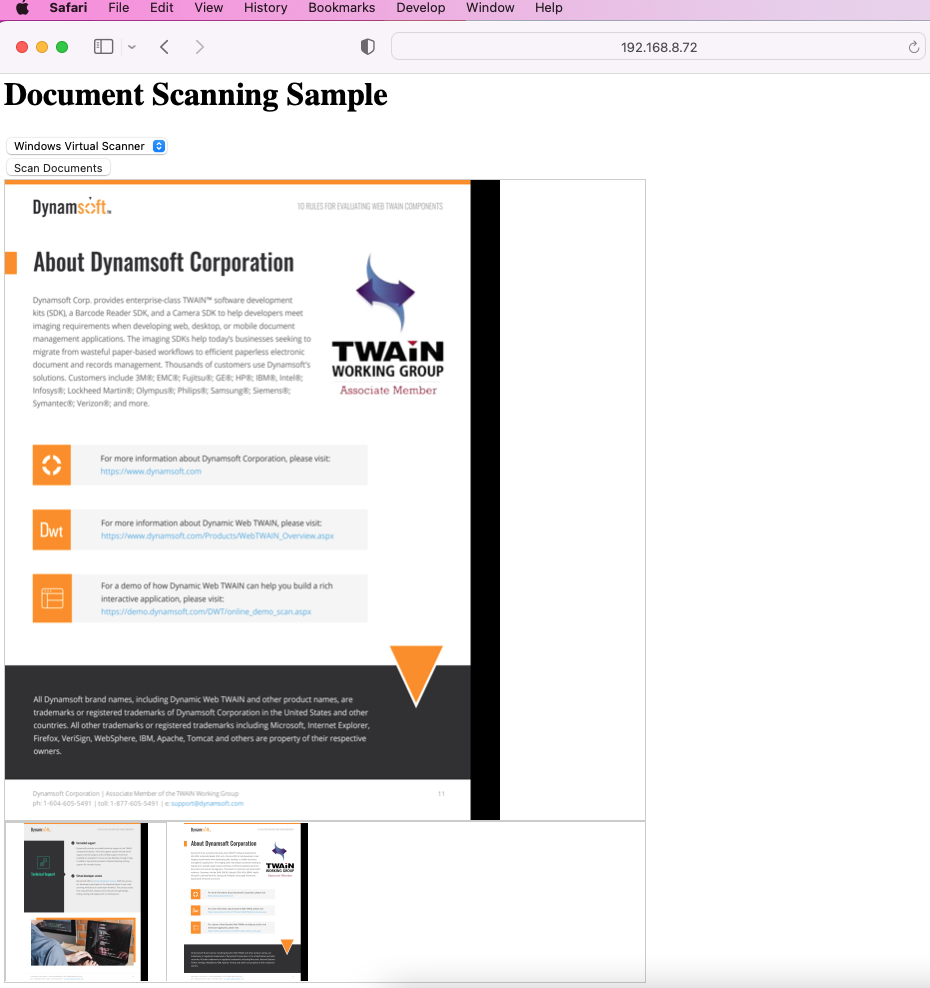
A more advanced use case involves implementing server-side document scanning for web-based applications. The key benefit of this strategy is that it enables document scanning directly from a web browser, eliminating the need for additional software installations. For instance, if your office has a single document scanner and you wish to share it among multiple colleagues, a web-based application would allow them to initiate scans from their individual computers.
We use express to create a web server and socket.io to transmit data between the server and the client.
npm install express socket.io
Node.js Web Server
-
Initialize
expressandsocket.io.const express = require('express'); const path = require('path'); const fs = require('fs'); const app = express(); const http = require('http'); const server = http.createServer(app); const io = require('socket.io')(server); const docscan4nodejs = require("docscan4nodejs") const { PassThrough } = require('stream'); app.use(express.static('public')); app.use('/node_modules', express.static(__dirname + '/node_modules')); const connections = new Map(); io.on('connection', (socket) => { connections.set(socket.id, socket); console.log(socket.id + ' connected'); socket.on('disconnect', () => { console.log(socket.id + ' disconnected'); connections.delete(socket.id); }); socket.on('message', async (message) => { }); }); // Start the server const port = process.env.PORT || 3000; server.listen(port, '0.0.0.0', () => { console.log(`Server running at http://0.0.0.0:${port}/`); }); -
As the
socket.ioconnection is established, get the available scanners and send them to the client.io.on('connection', (socket) => { ... docscan4nodejs.getDevices(host).then((scanners) => { socket.emit('message', JSON.stringify({ 'devices': scanners })); }); }); -
When receiving the scan event, initiate a document scan and transmit the resulting image stream to the web client:
 socket.on('message', async (message) => {
     let json = JSON.parse(message);
     if (json) {
         if (json['scan']) {
             console.log('device: ' + json['scan']);
             let parameters = {
                 license: "LICENSE-KEY",
                 device: json['scan'],
             };

             parameters.config = {
                 IfShowUI: false,
                 PixelType: 2,
                 //XferCount: 1,
                 //PageSize: 1,
                 Resolution: 200,
                 IfFeederEnabled: false,
                 IfDuplexEnabled: false,
             };

             let jobId = await docscan4nodejs.scanDocument(host, parameters);

             if (jobId !== '') {
                 console.log('job id: ' + jobId);
                 let streams = await docscan4nodejs.getImageStreams(host, jobId);
                 for (let i = 0; i < streams.length; i++) {
                     await new Promise((resolve, reject) => {
                         try {
                             const passThrough = new PassThrough();
                             const chunks = [];

                             streams[i].pipe(passThrough);

                             passThrough.on('data', (chunk) => {
                                 chunks.push(chunk);
                             });

                             passThrough.on('end', () => {
                                 const buffer = Buffer.concat(chunks);
                                 socket.emit('image', buffer);
                                 resolve();
                             });
                         }
                         catch (error) {
                             reject(error);
                         }
                     });
                 }
             }
         }
     }
 });
Web Client
-
Establish a
socket.ioconnection with the server.const socket = io(); var data = []; var devices = []; var selectSources = document.getElementById("sources"); socket.on('message', (message) => { }); socket.on('image', (buffer) => { }); -
Update the
<select>element with the available scanners.socket.on('message', (message) => { try { let json = JSON.parse(message); if (json) { if (json['devices']) { selectSources.options.length = 0; devices = json['devices']; for (let i = 0; i < devices.length; i++) { console.log('\nIndex: ' + i + ', Name: ' + devices[i]['name']); let option = document.createElement("option"); option.text = devices[i]['name']; option.value = i.toString(); selectSources.add(option); } } } } catch (error) { console.log(error) } }); -
Send a scan event to the server when the user clicks the
Scanbutton.<button onclick="acquireImage()">Scan Documents</button> function acquireImage() { if (devices.length > 0 && selectSources.selectedIndex >= 0) { socket.emit('message', JSON.stringify({ 'scan': devices[selectSources.selectedIndex]['device'] })); } } -
Display the image stream in the
<img>element.socket.on('image', (buffer) => { // Convert the Buffer into a base64 string const base64Image = btoa( new Uint8Array(buffer) .reduce((data, byte) => data + String.fromCharCode(byte), '') ); // Set the image src to display the image let img = document.getElementById('document-image'); let url = `data:image/jpeg;base64,${base64Image}`; img.src = url; data.push(url); let option = document.createElement("option"); option.selected = true; option.text = url; option.value = url; let thumbnails = document.getElementById("thumb-box"); let newImage = document.createElement('img'); newImage.setAttribute('src', url); if (thumbnails != null) { thumbnails.appendChild(newImage); newImage.addEventListener('click', e => { if (e != null && e.target != null) { let target = e.target; img.src = target.src; } }); } });
Start the web server on your Windows machine, and then navigate to http://LAN-IP:18625/ using Safari on macOS.
Common Issues and Edge Cases
- Service not running or unreachable. If requests to
http://127.0.0.1:18622fail, confirm that the Dynamic Web TWAIN Service is installed and running. On Linux, check withsystemctl status DynamsoftService. On Windows, look for the service in Task Manager. - Empty scanner list returned.
getDevices()returns an empty array when no compatible scanner is connected or when the scanner driver (TWAIN, WIA, SANE, or eSCL) is not installed. Verify the scanner appears in your OS device settings before calling the API. - Job returns no images. If
getImageFiles()orgetImageStreams()returns nothing after a job is created, the scan may have failed silently — for example, the document feeder was enabled (IfFeederEnabled: true) but no paper was loaded. Check the job status and scanner configuration parameters.