


How to Upload Scanned Documents to OneDrive and Dropbox with JavaScript
Continuous file synchronization programs synchronize files between two or more devices in real time. We can use them to sync scanned documents so that we can access the files on multiple devices.
There are many cloud storage services which do the job, like Box, Dropbox, Onedrive and Google Drive. There are also programs like Syncthing and Resilio Sync which use a decentralized P2P system.
These services or programs are easy to use. Add or rename a file and these changes are instantly synchronized.
This article is Part 1 in a 3-Part Series.
What you’ll build: A browser-based document scanning app using Dynamic Web TWAIN that saves scanned PDFs to OneDrive or Dropbox via their cloud APIs and OAuth authentication.
Key Takeaways
- Dynamic Web TWAIN lets you scan documents in the browser and export them as PDF blobs for upload to any cloud storage service.
- You can sync scanned documents by saving to a local synced folder (desktop only) or by uploading directly via the Dropbox SDK or Microsoft Graph API (works on desktop and mobile).
- Both Dropbox and OneDrive integrations require OAuth 2.0 authentication — the implicit grant flow returns an access token via URL hash redirect.
- For large files, OneDrive requires a resumable upload session via
createUploadSession, while Dropbox supports single-request uploads for files under 150 MB.
Common Developer Questions
How do I upload scanned documents to Dropbox or OneDrive from a web app using JavaScript?
Scan the document with Dynamic Web TWAIN, export the pages as a PDF blob, obtain an access token through the provider’s OAuth flow, and then call the Dropbox or Microsoft Graph upload API with that file data. This article shows both the Dropbox SDK route and the OneDrive REST approach.
How do I authenticate with the Dropbox API or Microsoft Graph API using OAuth in a browser-based scanning application?
Redirect the user to the provider’s authorization page, receive the access token back through the redirect URL hash, and store that token for later upload calls. The browser app then uses that token to talk directly to Dropbox or Microsoft Graph.
Can I automatically sync scanned PDFs across devices without installing desktop sync clients?
You can sync scanned documents by saving to a local synced folder (desktop only) or by uploading directly via the Dropbox SDK or Microsoft Graph API (works on desktop and mobile). The SaveAllAsPDF method with an absolute file path only works on desktop browsers where the local Dynamsoft Service is running, so on mobile devices use the API upload approach instead.
Prerequisites
- Dynamic Web TWAIN SDK installed in your project. Get a 30-day free trial license to get started.
- A Dropbox developer app or an Azure App registration depending on the cloud service you want to integrate.
- Basic familiarity with JavaScript and OAuth 2.0 flows.
Scan and Sync Documents with Dynamic Web TWAIN
Dynamic Web TWAIN (DWT) is an SDK to build web document scanning applications (online demo).
We can scan documents with DWT on browsers and then save them to synced folders.
There are two ways to sync scanned documents to file synchronization services like Onedrive and Dropbox. One is saving the files to the service’s local folder and let the background program discover the changes and sync automatically. The other is directly uploading the documents using their APIs.
Save Scanned Documents to a Local Sync Folder
In DWT, we can save the scanned documents into a specified folder with its Save methods:
DWObject.IfShowFileDialog = false;
//Save to a folder with its absolute path
DWObject.SaveAllAsPDF("D:\\ScannedDocuments\\Sample.pdf",
    function() {
        console.log('Successful!');
    },
    function(errCode, errString) {
        console.log(errString);
    }
);
We can name the file with a formatted date:
DWObject.IfShowFileDialog = false;
DWObject.SaveAllAsPDF("D:\\ScannedDocuments\\"+getFormattedDate()+".pdf",
    function() {
        console.log('Successful!');
    },
    function(errCode, errString) {
        console.log(errString);
    }
);

function getFormattedDate() {
    var date = new Date();

    var month = date.getMonth() + 1;
    var day = date.getDate();
    var hour = date.getHours();
    var min = date.getMinutes();
    var sec = date.getSeconds();

    month = (month < 10 ? "0" : "") + month;
    day = (day < 10 ? "0" : "") + day;
    hour = (hour < 10 ? "0" : "") + hour;
    min = (min < 10 ? "0" : "") + min;
    sec = (sec < 10 ? "0" : "") + sec;

    var str = date.getFullYear().toString() + month + day + hour + min + sec;

    return str;
}
After the file is saved, the synchronization program will sync the new file to any connected devices.
But this does not work on mobile devices, since we cannot specify where the downloaded files should be saved.
Upload Scanned Documents via Cloud Storage APIs
Most of the file synchronization services provide APIs so that we can directly upload documents. Although this needs extra work, it works on both desktop and mobile devices.
Here, we are going to integrate Dropbox and Onedrive to our web scanning application.
The flows of uploading to Dropbox and Onedrive are similar.
First, we redirect users to an authorization page (OAuth). Users are asked to log in and authorize our app to have access to their files. A token will be generated for further operations. Then, we can upload scanned documents.
Upload Scanned PDFs to Dropbox with the JavaScript SDK
We use the official Dropbox SDK for Javascript to upload files.
-
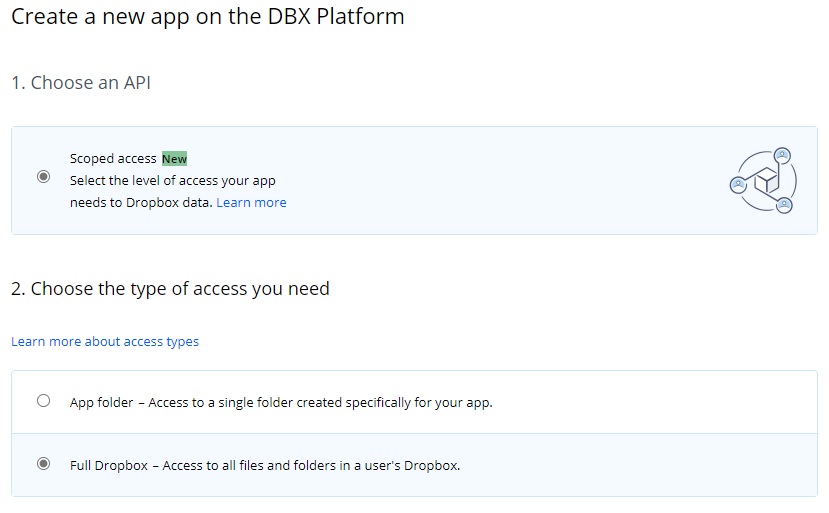
Create an application on the DBX platform.
-
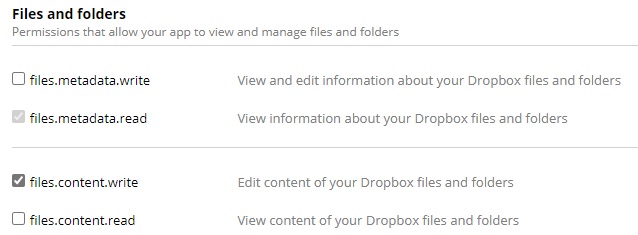
Enable the File Write permission.
-
In the HTML file, add authorization-related code.
HTML:
<a href="" id="dropbox-authlink" target="_blank" class="button" style="display:none;">Authenticate</a>Javascript:
 function LoadDropboxAuthHref(){
     // Set the login anchors href using dbx.getAuthenticationUrl()
     var CLIENT_ID = '0xmo16xy0ki1tbd';
     var dbx = new Dropbox.Dropbox({ clientId: CLIENT_ID });
     var redirectUri = window.location.href+'auth.html';
     var authUrl = dbx.auth.getAuthenticationUrl(redirectUri)
       .then((authUrl) => {
         document.getElementById('dropbox-authlink').href = authUrl;
       }
     )
 }
The code will generate the href to the authorization page. The client id is just another name of your app key which we can find on the DBX platform.
-
Create a new file for redirection: auth.html.
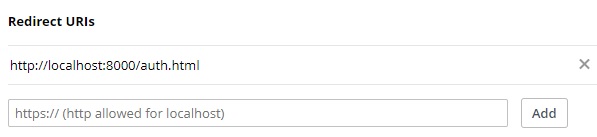
After the user has granted access on the authorization page, he will be redirected to a predefined redirect URI where we can retrieve the access token. The auth.html we create can parse the URL and save the token in the cookie. The following is its content:
 <html>
 <head>
     <title>Auth</title>
     <script src="utils.js"></script>
     <meta name="viewport" content="width=device-width,initial-scale=1.0,maximum-scale=1.0,user-scalable=0" />
 </head>
 <body>
     <p>Please close the page.</p>
     <script type="text/javascript">
         // Parses the url and gets the access token if it is in the urls hash
         var token = utils.parseQueryString(window.location.hash).access_token;
         var expires_in = utils.parseQueryString(window.location.hash).expires_in;
         var expires = new Date().getTime()+parseInt(expires_in);

         if (!!token){
             document.cookie="dropbox_expires="+expires+";";
             document.cookie="dropbox_token="+token+";";
             alert("You have been authorized.");
         }else{
             alert("You have not been authorized.");
         }
         window.close();
     </script>
 </body>
 </html>
We need to define the redirect uri in the DBX platform:
-
Upload the documents.
Convert the scanned documents to a PDF file and upload it to Dropbox.
If there is no valid access token, users will be asked to authorize.
function ConvertAndUpload(value){
     var indices = imageIndices();
     var filename = getFormattedDate()+".pdf";
     if (isAuthenticated()){
         DWObject.ConvertToBlob(
             indices,
             Dynamsoft.DWT.EnumDWT_ImageType.IT_PDF,
             function(result, indices, type) {
                 UploadPDFtoDropbox(result,filename);
             },
             function(errorCode, errorString) {
                 console.log(errorString);
             }
         );
     }else{
         alert("Please authorize first.");
         document.getElementById("dropbox-authlink").click();
     }
 }

 function UploadPDFtoDropbox(blob,filename){
     var file = new File([blob], filename,{type:"application/pdf", lastModified:new Date().getTime()});
     var ACCESS_TOKEN = getAccessTokenFromCookie();
     var dbx = new Dropbox.Dropbox({ accessToken: ACCESS_TOKEN });
     dbx.filesUpload({path: '/' + file.name, contents: file})
       .then(function(response) {
         alert('File uploaded!');
         console.log(response);
   })
   .catch(function(error) {
     console.error(error);
   });
 }
Upload Scanned PDFs to OneDrive with Microsoft Graph API
We use the Microsoft Graph API to upload files.
-
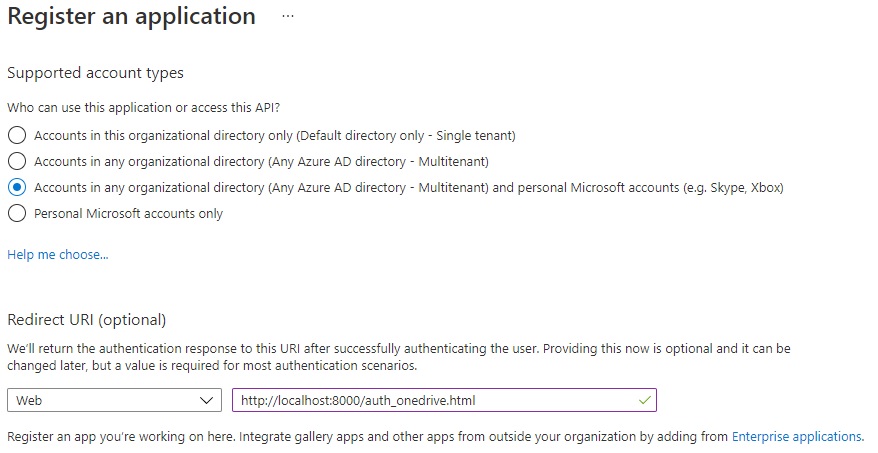
Create an app on the Azure App registrations page.
It also needs a redirect URI. Here, we set the URI as http://localhost:8000/auth_onedrive.html.
-
Go to Platform configurations. Enable access token.

-
In the HTML file, add authorization-related code.
HTML:
<a href="" id="onedrive-authlink" target="_blank" class="button" style="display:none;">Authenticate</a>Javascript:
function LoadOnedriveAuthHref(){ var CLIENT_ID = '2dfb77f2-ed6e-4a06-8219-1d3140b1a30e'; var redirectUri = window.location.href+"auth_onedrive.html"; var authurl = "https://login.microsoftonline.com/common/oauth2/v2.0/authorize?client_id="+CLIENT_ID+"&scope=Files.ReadWrite.All&response_type=token&redirect_uri="+redirectUri; document.getElementById('onedrive-authlink').href = authurl; } -
Create a new file for redirection: auth_onedrive.html. The content is much the same as Dropbox’s version.
-
Upload the documents.
To upload large files, we need to create an upload session first and then upload them.
 function UploadLargeFileToOnedrive(blob,filename){
     var ACCESS_TOKEN = getAccessTokenFromCookie("onedrive");
     var endpoint = "https://graph.microsoft.com/v1.0"
     var url = endpoint+"/me/drive/root:/ScannedDocuments/"+filename+":/createUploadSession";
     var xhr = new XMLHttpRequest();
     xhr.open("POST", url);
     xhr.setRequestHeader("Authorization", "Bearer " + ACCESS_TOKEN);
     xhr.onreadystatechange = function () {
        if (xhr.readyState === 4) {
           console.log(xhr.status);
           console.log(xhr.responseText);
           if (xhr.status==200){
               UploadToSession(JSON.parse(xhr.responseText).uploadUrl,blob,filename);
           }
        }};
     xhr.send();
 }

 function UploadToSession(session,blob,filename){
     var ACCESS_TOKEN = getAccessTokenFromCookie("onedrive");
     var file = new File([blob], filename,{type:"application/pdf", lastModified:new Date().getTime()});
     var xhr = new XMLHttpRequest();
     xhr.open("PUT", session);
     xhr.setRequestHeader("Authorization", "Bearer " + ACCESS_TOKEN);
     xhr.setRequestHeader("Content-Length", file.size);
     xhr.setRequestHeader("Content-Range", "bytes 0-"+(file.size-1)+"/"+file.size);

     xhr.onreadystatechange = function () {
        if (xhr.readyState === 4) {
           console.log(xhr.status);
           console.log(xhr.responseText);
           if (xhr.status==201){
               alert("uploaded");
           }else{
               alert("failed");
           }
        }};
     xhr.send(blob);
 }
Common Issues and Edge Cases
- OAuth token expiration: Both Dropbox and OneDrive access tokens expire. Always check
expires_infrom the auth response and prompt re-authentication before making upload calls with an expired token. - Local sync folder path not working on mobile: The
SaveAllAsPDFmethod with an absolute file path only works on desktop browsers where the local Dynamsoft Service is running. On mobile devices, use the API upload approach instead. - Large file upload failures with OneDrive: If uploading files larger than 4 MB, you must use the
createUploadSessionendpoint. A single PUT request to the standard upload endpoint will fail for large scanned documents.
Source Code
Get the complete sample project source code on GitHub
Try Dynamic Web TWAIN for Document Scanning
Download a trial version of Dynamic Web TWAIN to have a try on your own: Download Free Trial.
