


How to Scan Documents and Upload to a WebDAV Server with JavaScript
WebDAV stands for Web Distributed Authoring and Versioning. It is an HTTP extension that makes it easy to create, read, and edit files hosted on remote Web servers. Many HTTP servers or file sync and share applications support this protocol like Apache, Lighttpd, Seafile and Nextcloud.
In this article, we are going to create a web app to scan documents with Dynamic Web TWAIN and save them to a WebDAV server.
What you’ll build: A browser-based document scanning app that captures pages via a TWAIN scanner or mobile camera, converts them to PDF, and uploads the result to any WebDAV-compatible server (e.g., Nextcloud) through a Python Flask backend.
Key Takeaways
- Dynamic Web TWAIN lets you scan documents directly in the browser using TWAIN scanners on desktop or the device camera on mobile.
- A Python Flask backend with the
webdav4library bridges the browser and the WebDAV server, avoiding CORS restrictions. - The scanned pages are converted to a base64-encoded PDF on the client side before uploading, preserving multi-page document structure.
- This approach works with any WebDAV-compatible server, including Apache, Nextcloud, Seafile, and Lighttpd.
Common Developer Questions
How do I upload scanned documents to a WebDAV server from a web browser using JavaScript?
Scan the document pages with Dynamic Web TWAIN, convert the selected pages into a PDF on the client side, and then POST that PDF to your own backend service. In this article, the Flask backend performs the final WebDAV upload so the browser does not need direct DAV access.
How do I set up a Nextcloud WebDAV endpoint for programmatic file uploads?
Use a standard Nextcloud file endpoint such as remote.php/dav/files/<username>/, then provide valid credentials to a WebDAV client library on the server side. The sample backend uses Python plus webdav4 to connect to that endpoint and upload the generated PDF.
Why do I get CORS errors when accessing a WebDAV server from the browser, and how do I fix it?
Most WebDAV servers are not configured to accept arbitrary browser-originated uploads, so direct JavaScript calls often fail due to cross-origin restrictions. Routing the upload through your own backend avoids that browser CORS barrier and keeps credentials off the client.
This article is Part 3 in a 3-Part Series.
Prerequisites
To follow this tutorial, you need:
- A modern web browser (Chrome, Firefox, or Edge).
- Python 3 with Flask and the
webdav4package installed. - Docker (optional, for running a local Nextcloud server).
- A Dynamic Web TWAIN license. Get a 30-day free trial license to get started.
Step 1: Build a Web Page for Document Scanning
Let’s first create a web page to scan documents in the browser.
-
Create a new HTML file with the following template.
<!DOCTYPE html> <html> <head> <title>Scan to WebDAV</title> <meta name="viewport" content="width=device-width,initial-scale=1.0,maximum-scale=1.0,user-scalable=0" /> <style></style> </head> <body> <div> </div> <script type="text/javascript"> </script> </body> </html> -
Add the following in the head to include Dynamic Web TWAIN via CDN.
<script src="https://unpkg.com/dwt@18.0.0/dist/dynamsoft.webtwain.min.js"></script> -
Add a container for the document viewer of Web TWAIN.
<div style="width: 360px; height: 480px;" id="dwtcontrolContainer"></div> -
Initialize an instance of Web TWAIN and bind it with the viewer. Use the trial license from the Prerequisites section above.
let DWObject; Dynamsoft.DWT.AutoLoad = false; Dynamsoft.DWT.ResourcesPath = "https://unpkg.com/dwt@18.0.0/dist"; Dynamsoft.DWT.ProductKey = "<your license>"; init(); function init(){ Dynamsoft.DWT.Containers = [{ ContainerId: "dwtcontrolContainer" }]; Dynamsoft.DWT.RegisterEvent("OnWebTwainReady", function () { console.log("ready"); DWObject = Dynamsoft.DWT.GetWebTwain("dwtcontrolContainer"); DWObject.Viewer.width = "100%"; DWObject.Viewer.height = "100%"; DWObject.SetViewMode(2,2); }); Dynamsoft.DWT.Load(); } -
Add a button to scan documents.
HTML:
<input class="scanButton" type="button" value="Scan" onclick="AcquireImage();" />JavaScript:
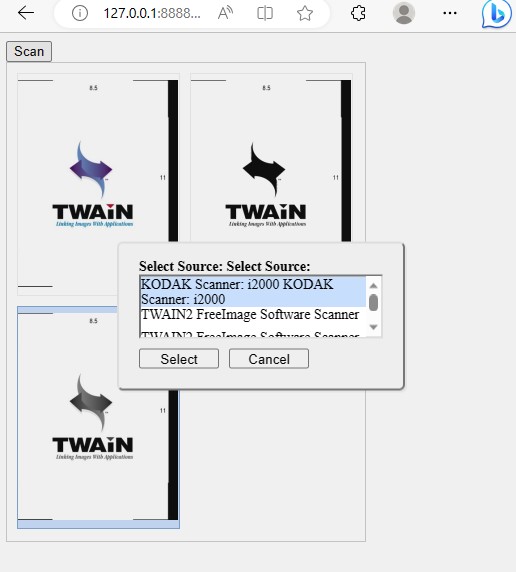
async function AcquireImage() {
  if (DWObject) {
    if (Dynamsoft.Lib.env.bMobile) {
      DWObject.Addon.Camera.scanDocument(); //use camera on mobile devices
    }else{
      const index = await DWObject.SelectSourceAsync(); //use document scanners on desktop devices
      DWObject.AcquireImageAsync({SelectSourceByIndex:index});
    }
  }
}
The web page is finished. We can now scan documents in the browser.
Step 2: Set Up a Nextcloud WebDAV Server with Docker
Here, we are going to start a local Nextcloud server to save documents. For convenience, we can use Docker to start one with the following command:
docker run -d -p 8080:80 nextcloud
By default, it can only be accessed in the local network. We can modify the /var/www/html/config/config.php to add extra domains.
'trusted_domains' =>
array (
  0 => '127.0.0.1:8080',
  1 => '192.168.8.65:8080',
),
Step 3: Create a Python Flask Backend for WebDAV Upload
Directly accessing a WebDAV server in the browser will encounter CORS errors. We need to create a backend server to receive the documents from the web page and upload them to a WebDAV server. Here, we use Python + Flask to do this.
from webdav4.client import Client
from io import BytesIO
import base64
import os
import json

app = Flask(__name__, static_url_path='/', static_folder='./')

@app.route('/uploadfile', methods=['POST'])
def upload_file():
    if request.method == 'POST':
        data = request.get_json()
        URL = data["URL"]
        username = data["username"]
        password = data["password"]
        client = Client(URL, auth=(username, password))

        path = data["filepath"]
        if client.exists(path) == False:
            base64str = data["base64"]
            bytes_decoded = base64.b64decode(base64str)

            client.upload_fileobj(BytesIO(bytes_decoded), path, overwrite = True)
            return json.dumps({"status":"success"})
        else:
            return json.dumps({"status":"file exists"})

if __name__ == '__main__':
   app.run(host = "0.0.0.0", port = 8888)
Step 4: Send Scanned Documents to the WebDAV Server from the Browser
On the web page, add several input controls to set the info about the WebDAV server: URL, username, password, along with the file path to save into.
<div>
  <div>
    <label>
      Server URL:
      <input type="text" id="URL" value="http://127.0.0.1:8080/remote.php/dav/files/admin/"/>
    </label>
  </div>
  <div>
    <label>
      Username:
      <input type="text" id="username"/>
    </label>
  </div>
  <div>
    <label>
      Password:
      <input type="password" id="password"/>
    </label>
  </div>
  <div>
    <label>
      Path:
      <input type="text" id="filepath" value="scanned.pdf"/>
    </label>
  </div>
</div>
Convert the scanned documents as a base64-encoded PDF file and send it to the Python server.
function convertAndUpload(){
  if (DWObject) {
    DWObject.ConvertToBase64(
      getIndices(),
      Dynamsoft.DWT.EnumDWT_ImageType.IT_PDF,
      function (result, indices, type) {
        var base64 = result.getData(0, result.getLength());
        upload(base64);
      },
      function (errorCode, errorString) {
        console.log(errorString);
      }
    );
  }
}

function getIndices(){
  var indices = [];
  for (let index = 0; index < DWObject.HowManyImagesInBuffer; index++) {
    indices.push(index);
  }
  return indices;
}

function upload(base64){
  document.getElementById("status").innerText = "Uploading...";
  let xhr = new XMLHttpRequest();
  let pay_load = {};
  pay_load["URL"] = document.getElementById("URL").value;
  pay_load["username"] = document.getElementById("username").value;
  pay_load["password"] = document.getElementById("password").value;
  pay_load["filepath"] = document.getElementById("filepath").value;
  pay_load["base64"] = base64;
  console.log(pay_load);
  xhr.open("POST", "/uploadfile");
  xhr.setRequestHeader("content-type", "application/json");

  xhr.onreadystatechange = function(){
    if(xhr.readyState === 4){
      if (xhr.status === 200) {
        document.getElementById("status").innerText = "";
        var status = JSON.parse(xhr.responseText)["status"];
        alert(status);
      }else{
        onerror();
      }
    }
  }

  xhr.onerror = onerror;

  xhr.send(JSON.stringify(pay_load));
}

function onerror(){
  document.getElementById("status").innerText = "";
  alert("Failed");
}
Common Issues and Edge Cases
- CORS errors when calling the WebDAV server directly from the browser. WebDAV servers typically do not set
Access-Control-Allow-Originheaders. The Python Flask backend in Step 3 acts as a proxy to avoid this. Do not attempt to call the WebDAV endpoint from client-side JavaScript. - Nextcloud blocks requests from untrusted domains. If you see a “not a trusted domain” error, add your host IP to the
trusted_domainsarray in Nextcloud’sconfig.phpas shown in Step 2. - Upload fails with large multi-page PDFs. The base64 encoding increases payload size by ~33%. For very large documents, consider chunked uploads or streaming the file through the backend instead of sending the entire base64 string in one request.
Source Code
Get the complete sample project source code on GitHub
