


How to Build a Cross-Platform GUI Python Barcode and QR Code Reader with PySide6 and Qt Designer
Qt Designer is a powerful tool for creating cross-platform graphical user interfaces (GUIs) using Qt widgets. In this guide, we’ll use Qt Designer to develop an advanced GUI for a Python-based barcode and QR code reader, leveraging the Dynamsoft Python Barcode SDK. This application will be compatible with Windows, Linux, macOS, and Raspberry Pi OS, and includes all the robust features of the Dynamsoft Barcode Reader.
What you’ll build: A cross-platform desktop GUI barcode and QR code reader in Python — running on Windows, Linux, macOS, and Raspberry Pi OS — built with PySide6, Qt Designer, and the Dynamsoft Capture Vision SDK.
Key Takeaways
- The Dynamsoft
dynamsoft-capture-vision-bundlepip package handles all barcode and QR code decoding; PySide6 and Qt Designer provide the cross-platform GUI shell. - Real-time camera scanning runs in a separate Python
Process(not a thread) to bypass GIL limitations on CPU-intensive barcode decoding without freezing the UI. - The same Python codebase runs unmodified on Windows x64, Linux x64, macOS, and Raspberry Pi OS — no platform-specific code branches required.
- Qt Designer
.uifiles are compiled to Python viaPySide6-uic, keeping the visual layout fully decoupled from application logic.
Common Developer Questions
- How do I build a cross-platform Python barcode scanner with a desktop GUI on Windows and Linux?
- How do I run barcode decoding in the background in Python without blocking the PySide6 Qt UI?
- How do I use Qt Designer and PySide6 to create a GUI barcode reader app on macOS or Raspberry Pi?
This article is Part 2 in a 7-Part Series.
- Part 1 - Build a Python GUI Barcode Scanner on Raspberry Pi with Qt PySide6
- Part 2 - How to Build a Cross-Platform GUI Python Barcode and QR Code Reader with PySide6 and Qt Designer
- Part 3 - How to Read QR Codes from Screen Capture in Python with Qt and Dynamsoft Barcode SDK
- Part 4 - How to Integrate a Barcode Scanner in a Django Web App with Python
- Part 5 - How to Build a Python Flet Chat App with Barcode Scanning and Gemini AI
- Part 6 - How to Dockerize a Python Barcode Reader for ARM64 and ARM32 Devices
- Part 7 - ZXing vs ZBar vs Dynamsoft: Python Barcode Reader Comparison with Accuracy and Speed Benchmarks
Prerequisites
-
OpenCV
python3 -m pip install opencv-python -
PySide6
python3 -m pip install PySide6 -
Dynamsoft Barcode Reader
python3 -m pip install dynamsoft-capture-vision-bundle
Design the GUI Layout with Qt Designer
To build the GUI, you’ll need the following Qt widgets:
- Menu Bar
- Open file
- Open folder
- Save template
- Enter license key
- About
- Status Bar
- Show status information
- List Widget
- List loaded file names
- Label
- Display image or webcam frame
- Group Box
- Groups for camera, template and barcode type settings
- Push Button
- Start camera
- Stop camera
- Load barcode template file
- Export barcode template file
- Combo Box
- Camera resolution
- Check Box
- Auto-stop camera view when barcode recognition is done
- Synchronously or asynchronously display barcode results
- Text Edit
- Enter parameter template
- Show barcode decoding results
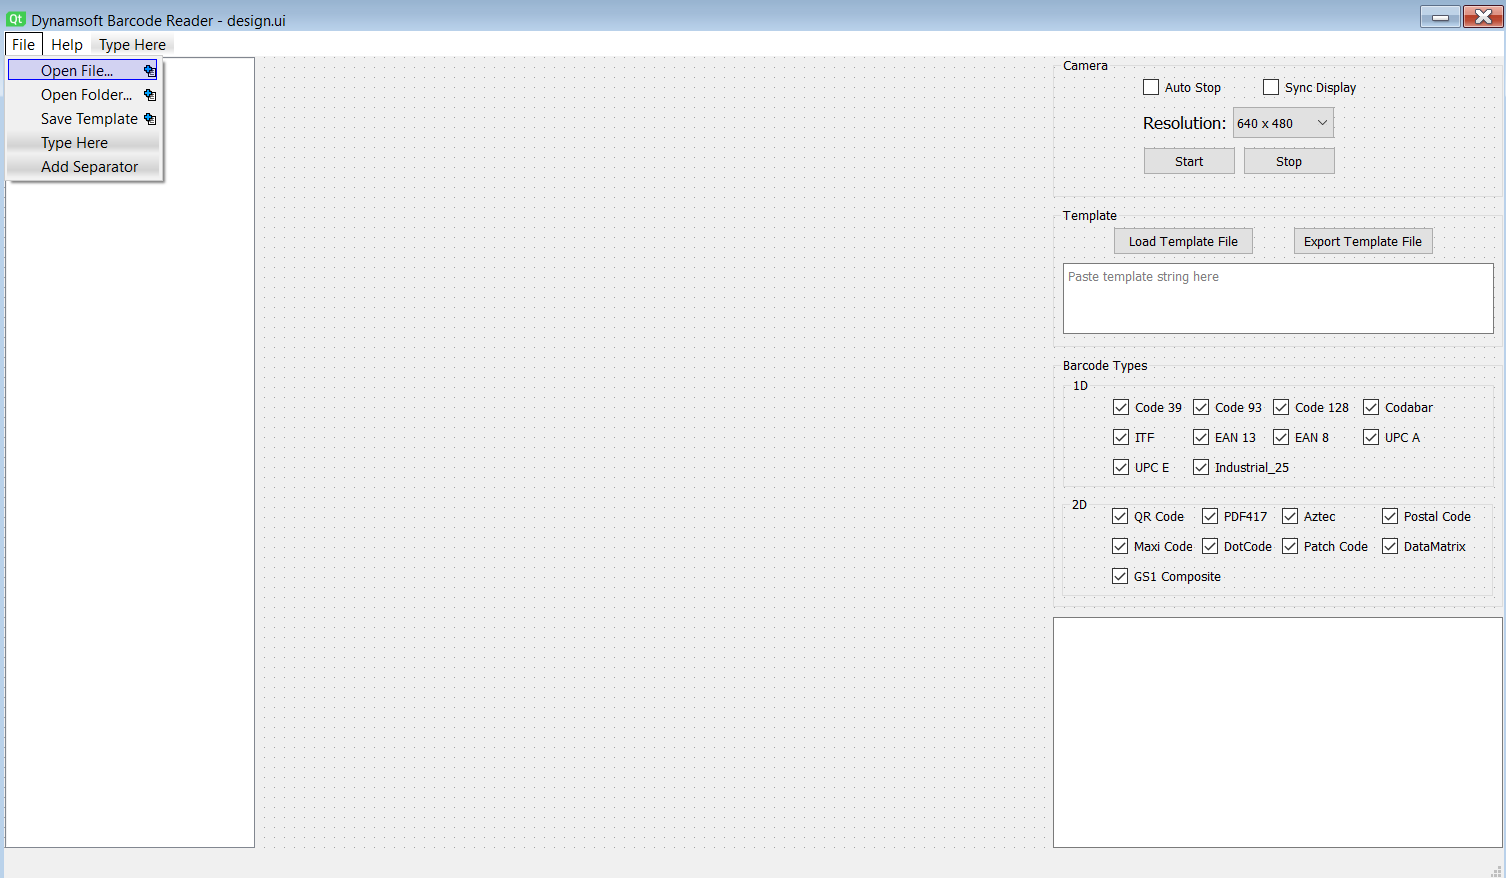
After designing your UI in Qt Designer, save the layout as a .ui file (e.g., design.ui). To use this layout in your Python application, convert the .ui file to a Python file using the following command:
PySide6-uic design.ui -o design.py
Build the Python Barcode Reader Application Step by Step
Let’s walk through building a Python barcode reader application step by step.
Load the Generated Qt UI File
With the UI code ready, you can load it into your application as follows:
'''
Usage:
   app.py <license.txt>
'''

import sys
from PySide6.QtGui import QPixmap, QImage
from PySide6.QtWidgets import QApplication, QMainWindow, QInputDialog
from PySide6.QtCore import QFile, QTimer
from PySide6.QtWidgets import *
from design import Ui_MainWindow

from barcode_manager import *
import os
import cv2
from dynamsoft_capture_vision_bundle import *

class MainWindow(QMainWindow):
    def __init__(self, license):
        super(MainWindow, self).__init__()
        self.ui = Ui_MainWindow()
        self.ui.setupUi(self)

def main():
    try:
        with open(sys.argv[1]) as f:
            license = f.read()
    except:
        license = ""

    app = QApplication(sys.argv)

    window = MainWindow(license)
    window.show()

    sys.exit(app.exec_())


if __name__ == '__main__':
    print(__doc__)
    main()
Initialize the Dynamsoft License Key
To use the SDK, set the license key via the BarcodeReader class:
from dbr import *

def set_license(self, key):
    return BarcodeReader.init_license(key)
Connect Widget Signals to Application Slots
Next, initialize global variables and bind widget signals to slots for various functionalities:
# Initialization
self._all_data = {}
self._results = None

# Dynamsoft Barcode Reader
self._barcodeManager = BarcodeManager()
    if license is not None and license != '':
        error = self._barcodeManager.set_license(license)
        if error[0] != EnumErrorCode.DBR_OK:
            self.showMessageBox(error[1])

# Create a timer.
self.timer = None

# Open camera
self._cap = None
# self.openCamera()

# Resolution list
self.ui.comboBox.currentTextChanged.connect(self.onComboBoxChanged)

# The current path.
self._path = os.path.dirname(os.path.realpath(__file__))

# Camera button
self.ui.pushButton_open.clicked.connect(self.openCamera)
self.ui.pushButton_stop.clicked.connect(self.stopCamera)

# Load file
self.ui.actionOpen_File.triggered.connect(self.openFile)

# Load directory
self.ui.actionOpen_Folder.triggered.connect(self.openFolder)

# Export template
self.ui.actionExport_template.triggered.connect(self.exportTemplate)

# About
self.ui.actionAbout.triggered.connect(self.about)

# Set license
self.ui.actionEnter_License_Key.triggered.connect(self.setLicense)

## List widget
self.ui.listWidget.currentItemChanged.connect(self.currentItemChanged)

## Template load button
self.ui.pushButton_template.clicked.connect(self.loadTemplate)

## Template export button
self.ui.pushButton_export_template.clicked.connect(self.exportTemplate)
Handle File Open and Save Dialogs
Handle essential file operations such as loading individual images, batch loading from folders, and saving template files:
-
Load a file:
def openFile(self): filename = QFileDialog.getOpenFileName(self, 'Open File', self._path, "Barcode images (*)") if filename is None or filename[0] == '': return filename = filename[0] -
Load files from a folder:
def openFolder(self): dir = QFileDialog.getExistingDirectory(self, 'Open Folder', self._path, QFileDialog.ShowDirsOnly) if dir is '': return files = [os.path.join(dir, f) for f in os.listdir(dir) if os.path.isfile(os.path.join(dir, f))] if len(files) == 0: return for filename in files: self.appendFile(filename) -
Save a template:
  def exportTemplate(self):
      filename = QFileDialog.getSaveFileName(self, 'Save File',
                                              self._path, "Barcode Template (*.json)")
      if filename is None or filename[0] == '':
          return

      filename = filename[0]
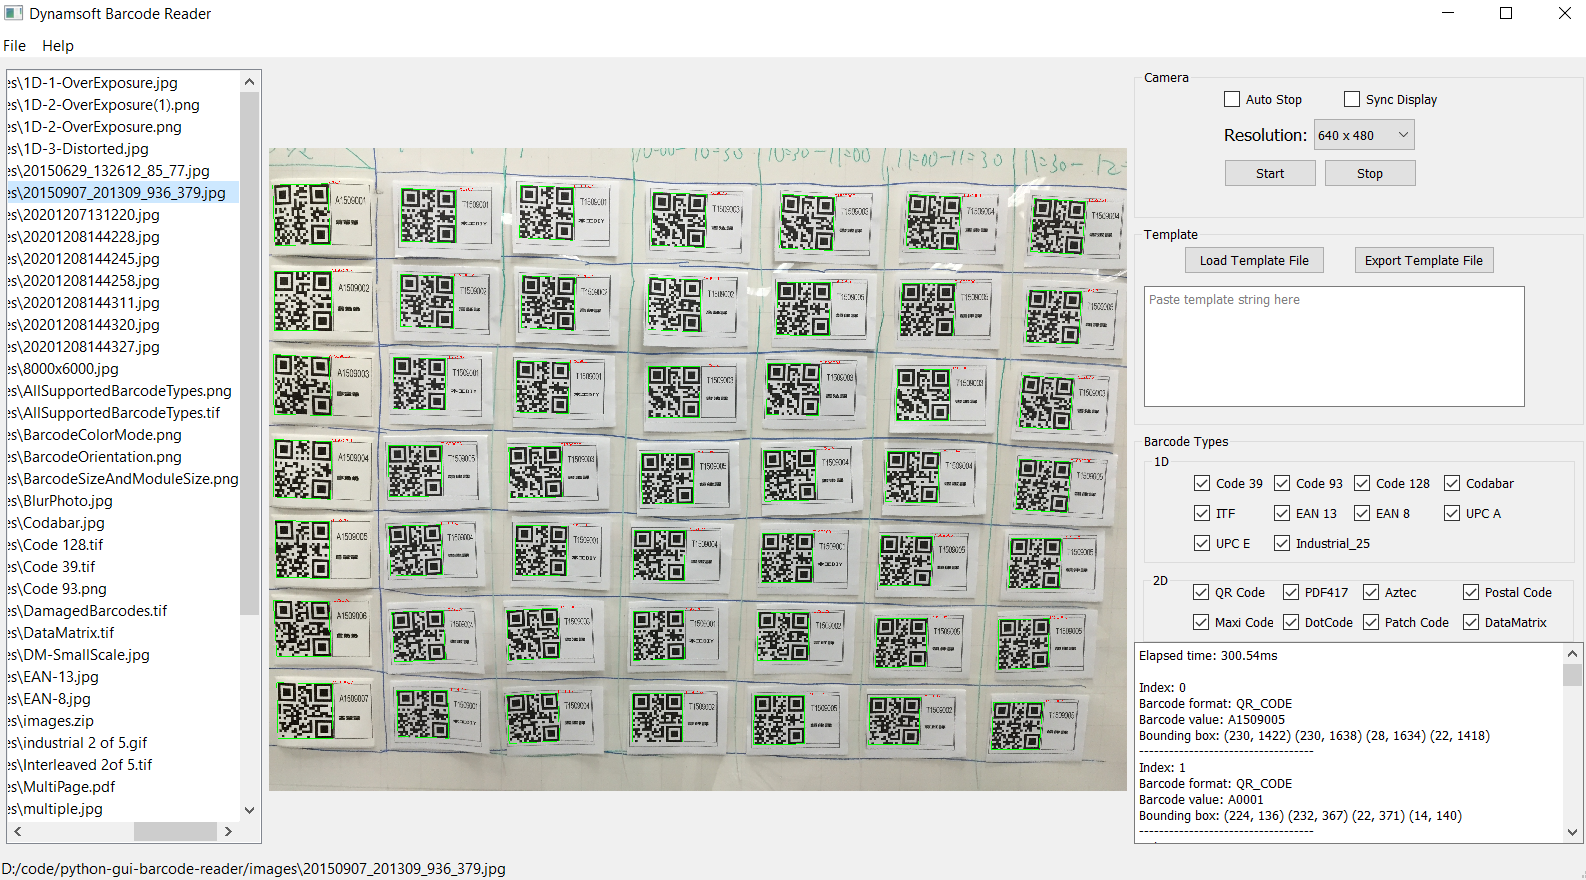
Decoding Barcodes from JPEG, PNG, TIFF, PDF and GIF Files
OpenCV supports JPEG, PNG, and TIFF formats. To decode barcodes and QR codes from these formats, use:
frame = cv2.imread(filename)
results = self._reader.decode_buffer(frame)
For additional formats like PDF and GIF, use Dynamsoft’s SDK:
results = self._reader.decode_file(filename)
To display images in the label widget, load the image with OpenCV and convert it to a QImage:
frame = cv2.imread(filename)
frame = cv2.cvtColor(frame, cv2.COLOR_BGR2RGB)
image = QImage(
    frame, frame.shape[1], frame.shape[0], frame.strides[0], QImage.Format.Format_RGB888)
Showing Webcam Stream
Trigger a timer to continuously update and display the webcam stream:
def openCamera(self):

    width = 640; height = 480
    self._cap = cv2.VideoCapture(0)
    self._cap.set(cv2.CAP_PROP_FRAME_WIDTH, width)
    self._cap.set(cv2.CAP_PROP_FRAME_HEIGHT, height)

    if not self._cap.isOpened():
        self.showMessageBox('Error', "Failed to open camera.")
        return

    self.timer = QTimer()
    self.timer.timeout.connect(self.nextFrameUpdate)
    self.timer.start(1000./24)

def nextFrameUpdate(self):
    ret, frame = self._cap.read()
    frame, self._results = self._barcodeManager.decode_frame(frame)

    self.showResults(frame, self._results)
Creating a Python Process for Real-Time Barcode Scanning
Since barcode decoding is CPU-intensive and Python’s GIL limits threading performance, use a separate process to avoid blocking the UI:
def create_barcode_process(self):
    size = 1
    self.frameQueue = Queue(size)
    self.resultQueue = Queue(size)
    self.barcodeScanning = Process(target=process_barcode_frame, args=(self.frameQueue, self.resultQueue, self._template, self._types, self._types2))
    self.barcodeScanning.start()
Run the Cross-Platform GUI Application
To run the application, execute the following command:
python3 app_advanced.py license.txt
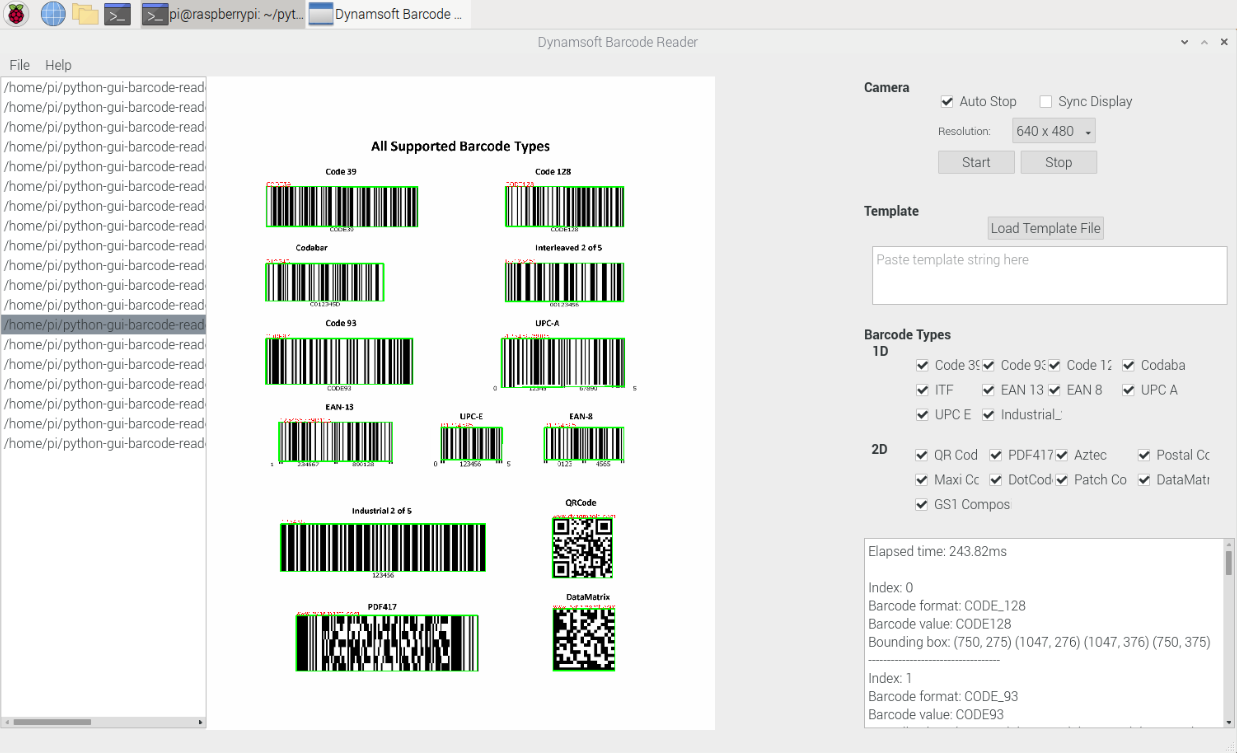
Here are screenshots of the GUI barcode reader on different platforms:
-
Windows
-
Raspberry Pi OS
Common Issues and Edge Cases
- GIL blocking the UI: Running barcode decoding in a
threading.Threadwill cause the Qt UI to freeze under heavy CPU load. Usemultiprocessing.Processwith aQueueinstead — as demonstrated in thecreate_barcode_process()method — to keep decoding truly parallel. - PySide6 not found on Raspberry Pi: Older Pi OS images may not have a pre-built PySide6 wheel for ARM. Use
pip install PySide6on Raspberry Pi OS 64-bit (Bullseye or later); 32-bit OS is not supported by PySide6. dynamsoft-capture-vision-bundleversion mismatch: TheBarcodeManagerclass uses the currentCaptureVisionRouterAPI. If you install an olderdbrordynamsoft-barcode-readerpackage, the import will fail. Always installdynamsoft-capture-vision-bundleand remove any olderdbrpackages.
Download the Dynamsoft Capture Vision SDK and start a 30-day free trial to integrate cross-platform barcode scanning into your own Python desktop app.
Source Code
https://github.com/yushulx/python-barcode-qrcode-sdk/tree/main/examples/official/qt_gui