


How to Integrate a Barcode Scanner in a Django Web App with Python
Barcodes and QR codes are essential tools across various industries, including healthcare, finance, and education. In this article, we’ll explore how to leverage Dynamsoft’s powerful barcode recognition technologies to create an online barcode and QR code scanning application using Python Django.
This article is Part 4 in a 7-Part Series.
- Part 1 - Build a Python GUI Barcode Scanner on Raspberry Pi with Qt PySide6
- Part 2 - How to Build a Cross-Platform GUI Python Barcode and QR Code Reader with PySide6 and Qt Designer
- Part 3 - How to Read QR Codes from Screen Capture in Python with Qt and Dynamsoft Barcode SDK
- Part 4 - How to Integrate a Barcode Scanner in a Django Web App with Python
- Part 5 - How to Build a Python Flet Chat App with Barcode Scanning and Gemini AI
- Part 6 - How to Dockerize a Python Barcode Reader for ARM64 and ARM32 Devices
- Part 7 - ZXing vs ZBar vs Dynamsoft: Python Barcode Reader Comparison with Accuracy and Speed Benchmarks
What you’ll build: A Django web application that accepts barcode and QR code image uploads and decodes them server-side using the Dynamsoft Capture Vision SDK.
Key Takeaways
- Python Django can serve as a backend for barcode and QR code scanning by processing uploaded images with Dynamsoft Capture Vision SDK.
- The
CaptureVisionRouter.capture()method decodes 1D barcodes, QR codes, PDF417, DataMatrix, and 40+ other symbologies from a single API call. - Server-side barcode decoding keeps SDK credentials off the client and works with any browser that can upload an image file.
- This approach suits inventory management portals, document intake systems, and any workflow where barcode data must be extracted on the server.
Common Developer Questions
- How do I integrate a barcode scanner in a Django web app?
- Can Dynamsoft Barcode Reader decode QR codes from uploaded images in Python?
- How do I handle file uploads and barcode decoding in Django views?
Prerequisites
-
Package Installation
pip install dynamsoft-capture-vision-bundle Django -
SDK License
Request a 30-day free trial license.
Supported Barcode Symbologies by Dynamsoft Barcode Reader
Dynamsoft Barcode Reader SDK supports a wide range of barcode symbologies, including:
- Linear Barcodes (1D)
- Code 39 (including Code 39 Extended)
- Code 93
- Code 128
- Codabar
- Interleaved 2 of 5
- EAN-8
- EAN-13
- UPC-A
- UPC-E
- Industrial 2 of 5
- MSI Code
- 2D Barcodes
- QR Code (including Micro QR Code)
- Data Matrix
- PDF417 (including Micro PDF417)
- Aztec Code
- MaxiCode (mode 2-5)
- DotCode
- Patch Code
- GS1 Composite Code
- GS1 DataBar :
- Omnidirectional
- Truncated
- Stacked
- Stacked Omnidirectional
- Limited
- Expanded
- Expanded Stacked
- Postal Codes :
- USPS Intelligent Mail
- Postnet
- Planet
- Australian Post
- UK Royal Mail
Build a Django Barcode and QR Code Reader Step by Step
Follow these steps to build your Django-based barcode and QR code reader:
Step 1: Initialize the Django Project
Start by creating a new Django project:
python -m django startproject djangodbr
Step 2: Create the scanbarcode App
Add a new app to your project:
python manage.py startapp scanbarcode
Step 3: Set Up the File Upload Frontend with jQuery
Copy jquery.min.js to the <project root>/static folder and create an index.html file in the <project root>/templates/scanbarcode directory. Use the following HTML and JavaScript code to handle file uploads:
    <!DOCTYPE html>

    <head>
      <title>Django Online Barcode Reader</title>
      <meta charset="utf-8">

      {% load static %}
      {% csrf_token %}
      <script type="text/javascript" src="{% static 'jquery-3.6.0.min.js' %}"></script>

    </head>

    <body>
      <input type="file" id="file" accept="image/*" />
      <input id="btnUpload" type="button" value="Read Barcode" onclick="scanBarcode()">
      <img id="image" />

      <script type="text/javascript">

        document.getElementById("file").addEventListener("change", function () {
          let file = this.files[0];
          var fileReader = new FileReader();
          fileReader.onload = function () {
            document.getElementById('image').src = fileReader.result;
          }
          fileReader.readAsDataURL(file);
        });

        function scanBarcode() {
          let formData = new FormData();
          formData.append('RemoteFile', document.getElementById('file').files[0], document.getElementById('file').files[0].name);

          let xhr = new XMLHttpRequest();
          xhr.open('POST', '/upload', true);
          xhr.setRequestHeader("X-CSRFToken", getCookie('csrftoken'));
          xhr.onreadystatechange = function () {
            if (xhr.readyState == XMLHttpRequest.DONE && xhr.status == 200) {
              alert(xhr.responseText);
            }
          }
          xhr.send(formData);
        }

        function getCookie(name) {
          var cookieValue = null;
          if (document.cookie && document.cookie != '') {
            var cookies = document.cookie.split(';');
            for (var i = 0; i < cookies.length; i++) {
              var cookie = jQuery.trim(cookies[i]);
              if (cookie.substring(0, name.length + 1) == (name + '=')) {
                cookieValue = decodeURIComponent(cookie.substring(name.length + 1));
                break;
              }
            }
          }
          return cookieValue;
        }

      </script>
    </body>
    </html>
Step 4: Define the View for the Web Page
In scanbarcode/views.py, set the default web page to render the index.html:
def index(request):
    return render(request, 'scanbarcode/index.html')
Step 5: Configure URL Patterns
Create a urls.py file in the scanbarcode directory with the following URL patterns:
from django.urls import path

from . import views

urlpatterns = [
  path('', views.index, name='index'),
  path('upload', views.upload, name="upload"),
]
Step 6: Integrate Custom URLs into the Django Project
Modify the <project root>/djangodbr/urls.py file to include your app’s URLs:
from django.contrib import admin
from django.urls import path, include

urlpatterns = [
    path('admin/', admin.site.urls),
    path('',  include('scanbarcode.urls'))
]
Step 7: Configure the Template Directory
Add the path of the template folder to the TEMPLATES setting in <project root>/djangodbr/settings.py:
TEMPLATES = [
    {
        'BACKEND': 'django.template.backends.django.DjangoTemplates',
        'DIRS': [os.path.join(BASE_DIR, 'templates')],
        'APP_DIRS': True,
        'OPTIONS': {
            'context_processors': [
                'django.template.context_processors.debug',
                'django.template.context_processors.request',
                'django.contrib.auth.context_processors.auth',
                'django.contrib.messages.context_processors.messages',
            ],
        },
    },
]
Step 8: Implement Barcode and QR Code Decoding in the Upload View
In scanbarcode/views.py, add the logic to scan barcodes and QR codes from uploaded images:
from django.http import HttpResponse, request
from django import template
from django.shortcuts import render
import os

from .models import Image

from dynamsoft_capture_vision_bundle import *
import json

error_code, error_message = LicenseManager.init_license(
"DLS2eyJoYW5kc2hha2VDb2RlIjoiMjAwMDAxLTE2NDk4Mjk3OTI2MzUiLCJvcmdhbml6YXRpb25JRCI6IjIwMDAwMSIsInNlc3Npb25QYXNzd29yZCI6IndTcGR6Vm05WDJrcEQ5YUoifQ==")
if error_code != EnumErrorCode.EC_OK and error_code != EnumErrorCode.EC_LICENSE_CACHE_USED:
    print("License initialization failed: ErrorCode:",
          error_code, ", ErrorString:", error_message)

def index(request):
  return render(request, 'scanbarcode/index.html')

def upload(request):
    out = "No barcode found"
    if request.method == 'POST':
        filePath = handle_uploaded_file(request.FILES['RemoteFile'], str(request.FILES['RemoteFile']))
        cvr_instance = CaptureVisionRouter()
        result = cvr_instance.capture(
            filePath, EnumPresetTemplate.PT_READ_BARCODES.value)

        items = result.get_items()

        if len(items) > 0:
            out = ''
            for item in items:
                out += "Barcode Format : " + item.get_format_string() + "\n"
                out += "Barcode Text : " + item.get_text() + "\n"
                out += "------------------------------------------------------------\n"


        return HttpResponse(out)

    return HttpResponse(out)

def handle_uploaded_file(file, filename):
    if not os.path.exists('upload/'):
        os.mkdir('upload/')

    filePath = 'upload/' + filename
    with open(filePath, 'wb+') as destination:
        for chunk in file.chunks():
            destination.write(chunk)

        return filePath
Step 9: Deploy and Run the Django Barcode Reader App
Deploy the app by running the following commands:
python manage.py makemigrations
python manage.py migrate --run-syncdb
python manage.py runserver
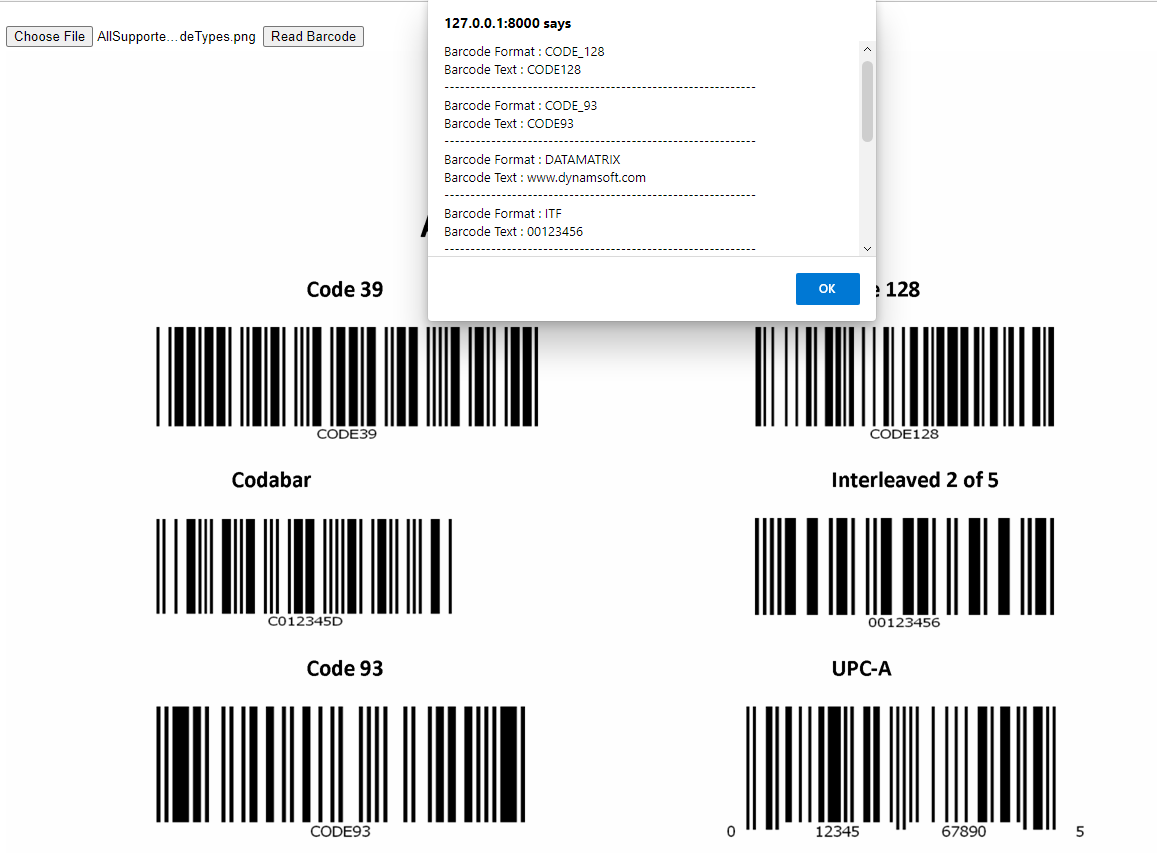
Open a browser and navigate to 127.0.0.1:8000 to test the application.
Common Issues and Edge Cases
- License initialization fails at startup: The
LicenseManager.init_license()call runs at module import time. If the license string is expired or the server cannot reach the Dynamsoft license server, the SDK still works with cached credentials temporarily. Check theerror_codeanderror_messageprinted to the console for diagnostics. - Large image uploads time out or fail: Django’s default
DATA_UPLOAD_MAX_MEMORY_SIZEis 2.5 MB. For high-resolution barcode images, increase this value insettings.pyor save the file to disk before decoding (the tutorial already writes to anupload/folder). - No barcode detected from a valid image: Ensure the image is not heavily compressed or blurred. The
PT_READ_BARCODESpreset works well for most symbologies, but low-contrast or skewed barcodes may need a customSimplifiedCaptureVisionSettingsconfiguration.
Source Code
https://github.com/yushulx/python-barcode-qrcode-sdk/tree/main/examples/official/django