How to Preprocess Images based on Different Scenarios
The default configuration of Dynamsoft Barcode Reader (DBR) can handle most common scenarios. However, there are still some specific scenarios where the default configuration of DBR cannot locate the code area for decoding. For these specific scenarios, DBR has built-in GrayscaleEnhancementModes to configure the grayscale enhancement algorithm. For different scenarios, a specific enhancement algorithm can effectively improve the success rate when detecting areas of interest. This article will detail how to choose the appropriate enhancement mode according to the scenario.
grayscale enhancement mode
DBR provides three grayscale enhancement modes, GEM_GRAY_EQUALIZE, GEM_GRAY_SMOOTH and GEM_SHARPEN_SMOOTH, to deal with different situations. Below we will introduce the scenarios where one of the these modes helps.
GEM_GRAY_EQUALIZE
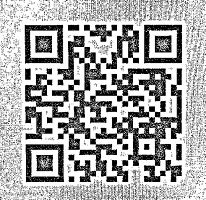
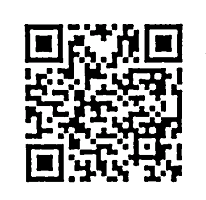
Gray-level equalization, which is used to enhance the contrast of an image. The sample image below demonstrates the effect, before and after grayscale equalization. The colours of the QR code on the original image (left) is too similar to the background color, which would makes decoding, as is, more difficult. The picture on the right is the result of preprocessing through GEM_GRAY_EQUALIZE. The QR code becomes much more pronounced, which will make the subsequent decoding process much easier.


This mode has an additional parameter Sensitivity, where the default value is 5, and the range is [1~9]. When you set GEM_GRAY_EQUALIZE, DBR does not necessarily perform equalization but will judge whether to perform it based on the gray distribution and Sensitivity of the image itself. The greater the value of Sensitivity, the more likely that DBR will perform the equalization process. Setting it to 9 means that gray-scale equalization must be performed while 1 means to skip the process.
GEM_GRAY_SMOOTH
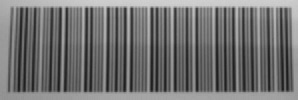
Grayscale smoothing, which is used to reduce image noise and texture. The following sample image shows a grayscale image with more noise and its corresponding binarized image. Obviously, there are many noises which will be bad for barcode reading.


After configuring GEM_GRAY_SMOOTH for smoothing. The noise of the binarized image are well handled well as shown below.


GEM_SHARPEN_SMOOTH
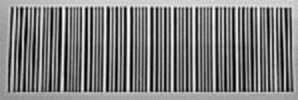
Sharpening and smoothing are used to reduce blur. The following sample image demonstrates the effect before and after processing in this mode. It is obvious that the processed picture is much clearer.


Combination of enhancement modes
If the image to be processed is more complicated, you can use the above grayscale enhancement modes in combination. After configuring multiple modes through GrayscaleEnhancementModes, DBR will try each mode in sequence until the number of successful decoded barcodes meets the expected value (ExpectedBarcodeCount), or the algorithm combination is exhausted.
Sample Code
Below is an example illustrating how to configure the parameter GrayscaleEnhancementModes.
-
update parameter
GrayscaleEnhancementModesin your JSON template{ "CaptureVisionTemplates": [ { "Name": "CV_0", "ImageROIProcessingNameArray": ["TA_0" ] } ], "TargetROIDefOptions" : [ { "Name": "TA_0", "TaskSettingNameArray": [ "BR_0" ] } ], "BarcodeReaderTaskSettingOptions": [ { "Name" : "BR_0", "SectionImageParameterArray": [ { "Section": "ST_REGION_PREDETECTION", "ImageParameterName": "IP_0" }, { "Section": "ST_BARCODE_LOCALIZATION", "ImageParameterName": "IP_0" }, { "Section": "ST_BARCODE_DECODING", "ImageParameterName": "IP_0" } ] } ], "ImageParameterOptions": [ { "Name": "IP_0", "GrayscaleEnhancementModes": [ { "Mode": "GEM_GRAY_EQUALIZE", "Sensitivity": 9 }, { "Mode": "GEM_GRAY_SMOOTH", "SmoothBlockSizeX": 10, "SmoothBlockSizeY": 10 }, { "Mode": "GEM_SHARPEN_SMOOTH", "SmoothBlockSizeX": 5, "SmoothBlockSizeY": 5, "SharpenBlockSizeX": 5, "SharpenBlockSizeY": 5 } ] } ] } -
apply settings by calling method
InitSettingsFromFile
- JavaScript
- C++
- Android
- Objective-C
- Swift
// `router` is an instance of `CaptureVisionRouter`.
// In the JS edition, the method name we use for initialization is different.
router.initSettings("PATH-TO-YOUR-SETTING")
char szErrorMsg[256] = {0}; CCaptureVisionRouter* cvr = new CCaptureVisionRouter; cvr->InitSettingsFromFile("PATH-TO-YOUR-SETTING-FILE", szErrorMsg, 256); // more process heretry { // `cvr` is an instance of `CaptureVisionRouter`. cvr.initSettingsFromFile("PATH-TO-YOUR-SETTING-FILE"); } catch (CaptureVisionRouterException e) { e.printStackTrace(); }NSError *error; // `cvr` is an instance of `DSCaptureVisionRouter`. [self.cvr initSettingsFromFile:@"PATH-TO-YOUR-SETTING-FILE" error:&error];do{ //`cvr` is an instance of `CaptureVisionRouter`. try cvr.initSettingsFromFile("PATH-TO-YOUR-SETTING-FILE") }catch{ // Add code to do when error occurs. }


