




Customizing the MRZ Scanner
MRZScannerActivity works out of the box with only a license key. This page covers what you can change through MRZScannerConfig when the defaults do not suit your app.
MRZScannerConfig Overview
MRZScannerConfig carries almost every option the MRZ Scanner exposes. You build one, set the properties you need, and pass it to launch() on the ActivityResultLauncher registered against MRZScannerActivity.ResultContract. The scanner reads it when it starts, so changing a property between launches takes effect on the next scan.
MRZScannerConfig contains the following properties:
-
setLicense/getLicense- the license key is the only property you must set; every other property has a working default. If the license is undefined, invalid, or expired, the scanner cannot proceed and instead displays an error message telling the user to contact the app administrator. -
setDocumentType/getDocumentType- specifies the type of document that the MRZ Scanner will recognize. This property accepts values defined in the EnumDocumentType such asEnumDocumentType.DT_ALL,EnumDocumentType.DT_ID, orEnumDocumentType.DT_PASSPORT. It helps the scanner to optimize its processing based on the expected document type. To learn more about the different document types that are supported, please refer to the Supported Document Types page. -
setTemplateFile/getTemplateFile- a template file is a JSON file or JSON string that contains a series of algorithm parameter settings (called Capture Vision templates) that is usually used for very specific and customized scanning and parsing scenarios. ThetemplateFilepoints to the location of the JSON file. The MRZ Scanner comes with a default template file, but you may choose to use a custom template to target specialized use cases. We recommend contacting the Dynamsoft Technical Support Team for assistance with template customization. -
setBeepEnabled/isBeepEnabled(default valuefalse) - a boolean that determines whether a beep sound is triggered upon a successful MRZ scan. When enabled, the scanner will play a sound to provide audible feedback. -
setVibrateEnabled/isVibrateEnabled(default valuefalse) - controls whether the device vibrates upon a successful MRZ scan. When enabled, the scanner will vibrate to provide haptic feedback if the device supports it. -
setCloseButtonVisible/isCloseButtonVisible(default valuetrue) - controls the visibility of the close button. When visible, users can tap this button to exit the scanning interface. -
setTorchButtonVisible/isTorchButtonVisible(default valuetrue) - determines whether the torch (flashlight) toggle button is visible. When visible, users can switch the device flashlight on or off during scanning. -
setCameraToggleButtonVisible/isCameraToggleButtonVisible(default valuetrue) - specifies whether the camera toggle button is displayed. When visible, users can switch between the front and rear cameras. -
setBeepButtonVisible/isBeepButtonVisible(default valuetrue) - controls whether the beep toggle button is visible in the scanning UI. When visible, users can tap this button to enable or disable the beep sound directly from the scanner interface. -
setVibrateButtonVisible/isVibrateButtonVisible(default valuetrue) - controls whether the vibrate toggle button is visible in the scanning UI. When visible, users can tap this button to enable or disable vibration feedback directly from the scanner interface. -
setFormatSelectorVisible/isFormatSelectorVisible(default valuetrue) - controls whether the document format selector is displayed at the bottom of the scanning UI. The format selector allows users to switch between scanning ID cards, passports, or both. -
setGuideFrameVisible/isGuideFrameVisible(default valuetrue) - serves as a toggle to show or hide the guide frame overlay during scanning. The guide frame assists users in properly aligning the document for optimal MRZ detection. Hiding it also widens the scanned area to the whole camera preview and hides the prompt text — see Hiding the guide frame. -
setReturnDocumentImage/isReturnDocumentImage(default valuetrue) - controls whether a cropped document image is included in the scan result. When enabled, the result’sgetDocumentImage()method will return the document image for each scanned side. -
setReturnOriginalImage/isReturnOriginalImage(default valuefalse) - controls whether the original full-frame camera image is included in the scan result. When enabled, the result’sgetOriginalImage()method will return the unprocessed camera frame for each scanned side. -
setReturnPortraitImage/isReturnPortraitImage(default valuetrue) - controls whether the detected portrait image is included in the scan result. When enabled, the result’sgetPortraitImage()method will return the portrait extracted from the document. -
setCameraPermissionPromptEnabled/isCameraPermissionPromptEnabled(default valuetrue) - controls whether the scanner presents its own dialog when camera access is unavailable. When enabled, the scanner explains the problem and offers a way forward before reporting. Disable it only if you intend to present your own permission UI. The camera is never started without access either way.
The sections below show these properties in use.
Setting the MRZ Document Type
Using the API
Setting the document type narrows what the scanner looks for, which improves both speed and accuracy. Use it whenever you know in advance that your users will only present one kind of document.
- Java
- Kotlin
MRZScannerConfig config = new MRZScannerConfig();
config.setDocumentType(EnumDocumentType.DT_PASSPORT);
val config = MRZScannerConfig().apply { documentType = EnumDocumentType.DT_PASSPORT }
Using a customized template file
A template file is a JSON file holding a set of algorithm parameters. It tunes recognition for a specific scanning scenario, and is only needed when the default behavior does not suit your documents or conditions. Contact us for a template tailored to your use case.
-
Add a Templates folder to the assets folder of your project at src/main/assets/Templates, and put your JSON file in it.
-
Point the config at it with
setTemplateFile:
- Java
- Kotlin
MRZScannerConfig config = new MRZScannerConfig();
config.setTemplateFile("CustomizedTemplate.json");
val config = MRZScannerConfig().apply { templateFile = "CustomizedTemplate.json" }
You can also pass a JSON string directly instead of a file path.
Related APIs
Configure the UI Elements
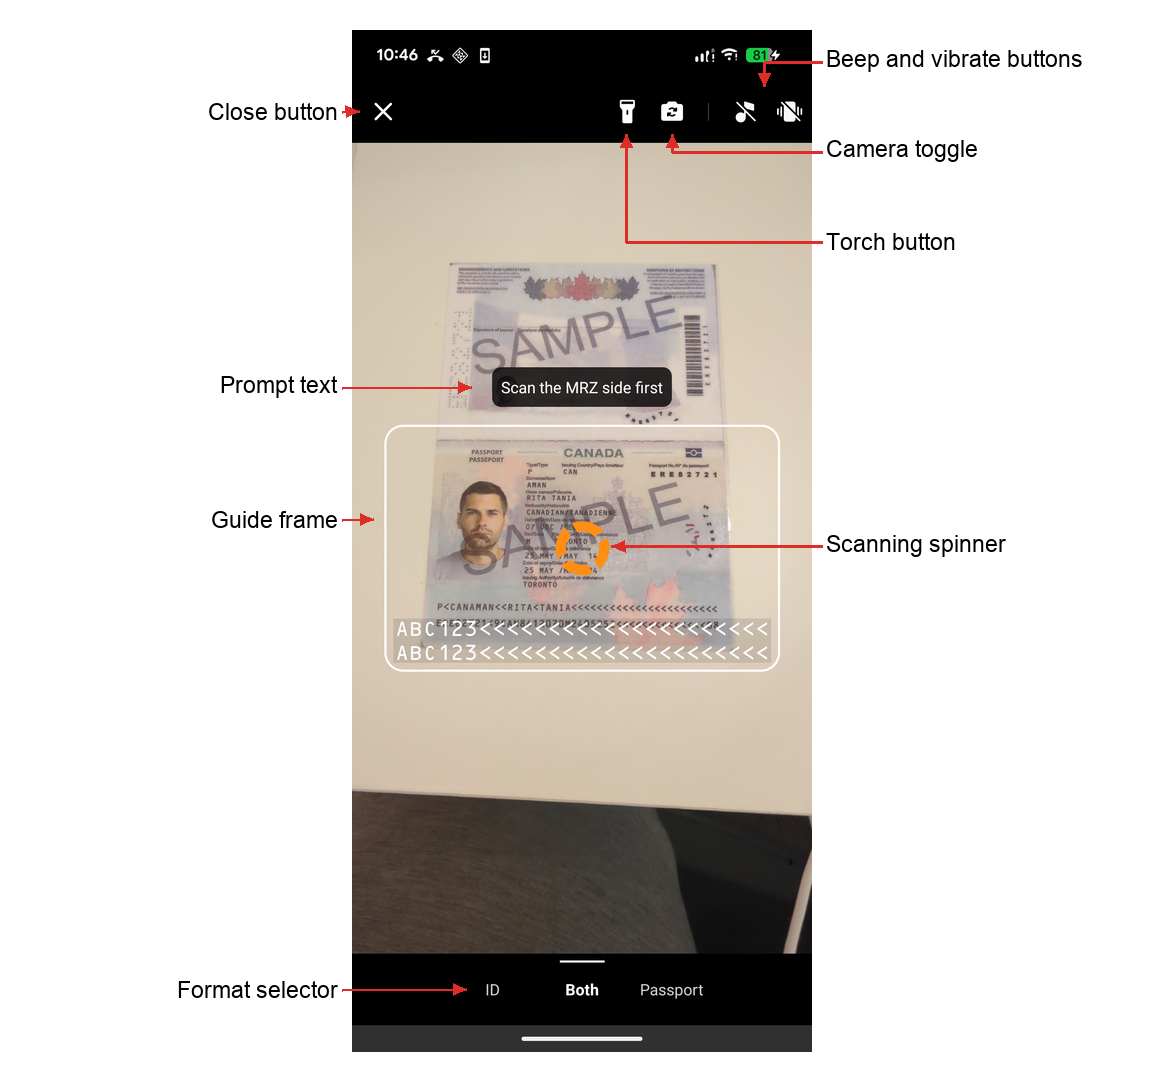
MRZ Scanner UI
The MRZ Scanner UI includes the following configurable elements:
- Close button: Dismisses the scanner and returns the user to the previous screen.
- Torch button: Turns the device flashlight on or off to improve scanning in low-light conditions.
- Camera toggle button: Switches between the front and rear cameras for flexible document placement.
- Beep button: Lets users enable or disable the audible beep that plays on a successful scan.
- Vibrate button: Lets users enable or disable haptic vibration feedback on a successful scan.
- Guide frame: A viewfinder overlay that guides users in positioning the document within the camera frame.
- Prompt text: A status label that updates dynamically to guide users through each step of the scanning process.
- Format selector: A bottom control bar for selecting the target document type — ID card, passport, or both.
The scanning spinner is labeled above for orientation but is not configurable — it appears while the scanner can see MRZ-like text in the frame. See The Scanner Screen for what it signals.
All UI elements are visible by default. Use the following configuration to hide any elements that are not needed for your use case:
- Java
- Kotlin
MRZScannerConfig config = new MRZScannerConfig();
config.setCloseButtonVisible(false);
config.setTorchButtonVisible(false);
config.setCameraToggleButtonVisible(false);
config.setBeepButtonVisible(false);
config.setVibrateButtonVisible(false);
config.setFormatSelectorVisible(false);
config.setGuideFrameVisible(false);
val config = MRZScannerConfig().apply { isCloseButtonVisible = false isTorchButtonVisible = false isCameraToggleButtonVisible = false isBeepButtonVisible = false isVibrateButtonVisible = false isFormatSelectorVisible = false isGuideFrameVisible = false }
Hiding the guide frame
The guide frame is more than an overlay: it defines the area the scanner reads. Hiding it therefore changes scanning behavior, not just appearance.
With setGuideFrameVisible(false):
- The whole camera preview is scanned. While the frame is visible, capture is limited to the area inside it. With no frame on screen the user has no way to know where to aim, so the restriction is lifted rather than left invisibly in place.
- The prompt text is hidden as well. The prompt is anchored to the frame and reads as a label on it, so the two are shown and hidden together.
- The scanning progress spinner and the flip prompt remain. They are siblings of the guide frame rather than children of it, and the frame is hidden without being removed from the layout, so their anchors survive and they stay visible. Both carry feedback the user still needs.
Account for that wider capture area if you hide the frame. With the entire preview in play, the scanner may pick up a document elsewhere in the shot.
Related APIs
setCloseButtonVisiblesetTorchButtonVisiblesetCameraToggleButtonVisiblesetBeepButtonVisiblesetVibrateButtonVisiblesetFormatSelectorVisiblesetGuideFrameVisible
Enabling Haptic and Audio Feedback
The MRZ Scanner can play a beep sound or vibrate the device upon a successful scan. Both are disabled by default.
setBeepEnabledandsetVibrateEnabledcontrol the behavior. The buttons that let users toggle it during a scan are controlled separately, bysetBeepButtonVisibleandsetVibrateButtonVisible.
- Java
- Kotlin
MRZScannerConfig config = new MRZScannerConfig();
config.setBeepEnabled(true);
config.setVibrateEnabled(true);
val config = MRZScannerConfig().apply { isBeepEnabled = true isVibrateEnabled = true }
Related APIs
Configure Scan Result Images
By default, the scan result includes a cropped document image and a portrait image. You can control which images are returned to reduce memory usage or processing overhead for your use case.
- Java
- Kotlin
MRZScannerConfig config = new MRZScannerConfig();
config.setReturnDocumentImage(true);   // Cropped document image (default: true).
config.setReturnPortraitImage(true);   // Portrait image (default: true).
config.setReturnOriginalImage(false);  // Original full-frame image (default: false).
val config = MRZScannerConfig().apply { isReturnDocumentImage = true // Cropped document image (default: true). isReturnPortraitImage = true // Portrait image (default: true). isReturnOriginalImage = false // Original full-frame image (default: false). }
Once configured, use the following methods on MRZScanResult to access the images:
getDocumentImage(EnumDocumentSide)- returns the cropped document image for the specified side.getOriginalImage(EnumDocumentSide)- returns the original full-frame image for the specified side.getPortraitImage()- returns the detected portrait image.
These images are backed by native buffers rather than ordinary
Bitmapobjects, but their lifetime is managed for you. Passing anMRZScanResultto another activity through anIntentrequires no extra work: the receiving instance takes its own reference as it is unparceled, and each instance releases its own when collected. See Results and Image Lifetime in the user guide.
Related APIs
setReturnDocumentImagesetReturnPortraitImagesetReturnOriginalImagegetDocumentImagegetOriginalImagegetPortraitImage
Handling Camera Permission
The MRZ Scanner manages the camera permission for you. The CAMERA permission is declared by the SDK and merged into your app at build time, MRZScannerActivity requests it on first launch, and the camera is never started without it. For most integrations there is nothing to add.
If access is unavailable, the scanner explains the situation and offers whatever action can actually resolve it:
| State | Dialog action |
|---|---|
| The permission can be requested again | Allow camera access — re-requests in place, no restart needed. |
| The permission is permanently denied | Open Settings — opens the app’s page in the system settings. |
| Camera access is blocked by device policy | Explanation only — there is no action the user can take. |
Cancel is available in every case, and taking it finishes the activity and reports the outcome through the normal result path as RS_EXCEPTION, with an error code of EC_CAMERA_PERMISSION_DENIED (1001) or EC_CAMERA_PERMISSION_RESTRICTED (1002).
The two actionable routes deliberately do not report or finish:
- Allow camera access re-requests the permission in place. If the user grants it, scanning begins; if they deny it again, the dialog returns.
- Open Settings leaves the scanner on the back stack. Granting the permission there does not restart the Android process, so the activity survives the trip and
onResumestarts the camera when the user comes back. Reporting at that point would finish the scanner and strand the user on a stale “access denied” screen immediately after they had granted access.
Presenting your own permission UI
To replace the scanner’s dialog with your own, disable the prompt:
- Java
- Kotlin
MRZScannerConfig config = new MRZScannerConfig();
config.setCameraPermissionPromptEnabled(false);
val config = MRZScannerConfig().apply { isCameraPermissionPromptEnabled = false }
The scanner then suppresses its dialog but still reports the denial through MRZScanResult, and still refuses to start the camera without access. Read the error code to decide what to show: EC_CAMERA_PERMISSION_DENIED is worth offering a route into Settings, while EC_CAMERA_PERMISSION_RESTRICTED is not — device policy withholds the camera, and the per-app camera toggle is absent from Settings in that state, so sending the user there is a dead end.
Granting the permission in Settings does not kill the Android process, so a screen showing a denial can re-check the permission in
onResumeand start a new scan in place. The ScanMRZ Demo App shows this.
Related APIs
Further Customization
If you have other customization requirements for the MRZScanner component, its source code is published on GitHub and you can modify it and build the library yourself. See Building the MRZ Scanner from Source for the toolchain, the build steps, and how to use your build in an app.
If you are unsure whether you need a source build, or get stuck along the way, contact the Dynamsoft Support Team.
 Yes
Yes No
No