


How to Build a Web Document Scanner with Google Drive Cloud Storage Upload
Capturing documents in the browser — from a physical scanner, a webcam, or an uploaded file — and then pushing them straight to cloud storage is a workflow many business apps need, but few SDKs support end-to-end. Dynamsoft Document Viewer (DDV) v4 handles the viewing, annotation, and export side, while Dynamic Web TWAIN handles physical scanner acquisition. Document edge detection is implemented with a pure-canvas algorithm (no external SDK required), and Google Identity Services provides the OAuth layer for cloud upload. This tutorial shows how to wire all of these together so scanned pages land in the cloud without ever touching a server.
What you’ll build: A browser-based document annotation studio that captures pages from a webcam and TWAIN scanner, auto-detects document boundaries with a pure-canvas pipeline (Otsu thresholding plus orientation-aware quadrilateral fitting that handles rotated ID cards), lets users annotate and redact, and uploads the result to Google Drive as a PDF or PNG images — built with Dynamsoft Document Viewer v4 and TypeScript.
Demo Video: Document Capture and Cloud Storage Upload
Key Takeaways
- Dynamsoft Document Viewer v4 provides a complete in-browser document editing canvas with annotation, redaction, page management, and multi-format export — no server-side processing required.
- Document edge detection is implemented with a pure-canvas pipeline — Otsu thresholding with dual-polarity segmentation, morphological closing, largest connected-component extraction, and orientation-aware quadrilateral fitting (minimum-area rectangle plus rotated-frame corner search) — so it locates rotated ID cards and passports, not just axis-aligned pages, with no additional SDK license beyond DDV.
- Google Drive direct upload is achievable entirely client-side using Google Identity Services for OAuth 2.0 and the Drive REST v3 multipart upload endpoint — no backend proxy needed.
- The browser’s native
MediaDevices.getUserMediaAPI powers a multi-shot camera capture dialog with thumbnail review, complementing Dynamic Web TWAIN’s physical scanner control. - All document operations — parsing, annotating, normalizing, and exporting — run via WebAssembly, so sensitive documents never leave the client machine until the user explicitly uploads them.
Common Developer Questions
What web scanner supports direct upload to cloud storage?
Dynamsoft Document Viewer combined with Dynamic Web TWAIN provides a browser-based scanner that captures from TWAIN/WIA/SANE/eSCL devices, and the app can upload the result directly to Google Drive using the Drive REST API. The sample in this tutorial demonstrates the full flow: scanner capture, camera capture, document edge detection, annotation, and Google Drive upload — all running client-side with TypeScript.
Why does Google Drive upload fail with “access_denied” / “has not completed the Google verification process”?
The OAuth consent screen is in “Testing” mode, which restricts sign-in to accounts explicitly listed under Test users. Go to Google Cloud Console → APIs & Services → OAuth consent screen → Test users → add the user’s email. To allow anyone without adding them individually, click PUBLISH APP to move it out of testing (this triggers Google’s verification flow).
Does document edge detection require an additional SDK license?
No — the edge detection is implemented entirely with browser Canvas APIs. It runs Otsu thresholding with both polarities (the document can be lighter or darker than its background), uses morphological operations to fill gaps, BFS flood fill to find the largest connected component, and an orientation-aware quadrilateral fit (minimum-area rectangle to recover the document’s rotation, then a corner search in that rotated frame). Candidates are scored by rectangularity and frame coverage so the whole-frame background blob is rejected. The only Dynamsoft license needed is for Document Viewer, which covers viewing, annotation, and export.
Prerequisites
- Dynamsoft Document Viewer v4 (
npm install dynamsoft-document-viewer) - Dynamic Web TWAIN v19 for physical scanner support (loaded via CDN)
- Node.js 18+ and an IDE (VS Code recommended)
- A Google Cloud project with the Drive API enabled and an OAuth 2.0 Web Client ID for the upload feature
- A valid Dynamsoft license key. Get a 30-day free trial license.
Step 1: Initialize the Document Viewer Engine
DDV’s WASM engine must be initialized before any viewer is created. Set the license and engine resource path, then call DDV.Core.init(). The engine runs entirely in the browser via WebAssembly.
const ENGINE_RESOURCE_PATH =
  "https://cdn.jsdelivr.net/npm/dynamsoft-document-viewer@4.0.0/dist/engine";

async function initDDV(license: string): Promise<void> {
  DDV.Core.license = license;
  DDV.Core.engineResourcePath = ENGINE_RESOURCE_PATH;
  await DDV.Core.init();
  DDV.setProcessingHandler("imageFilter", new DDV.ImageFilter());
}
Once initialized, create an EditViewer with a custom UI configuration that exposes DDV’s native annotation toolbar (shapes, ink, text, stamps, redaction) alongside page navigation, zoom, crop, and filter controls.
Step 2: Capture Photos from a Webcam
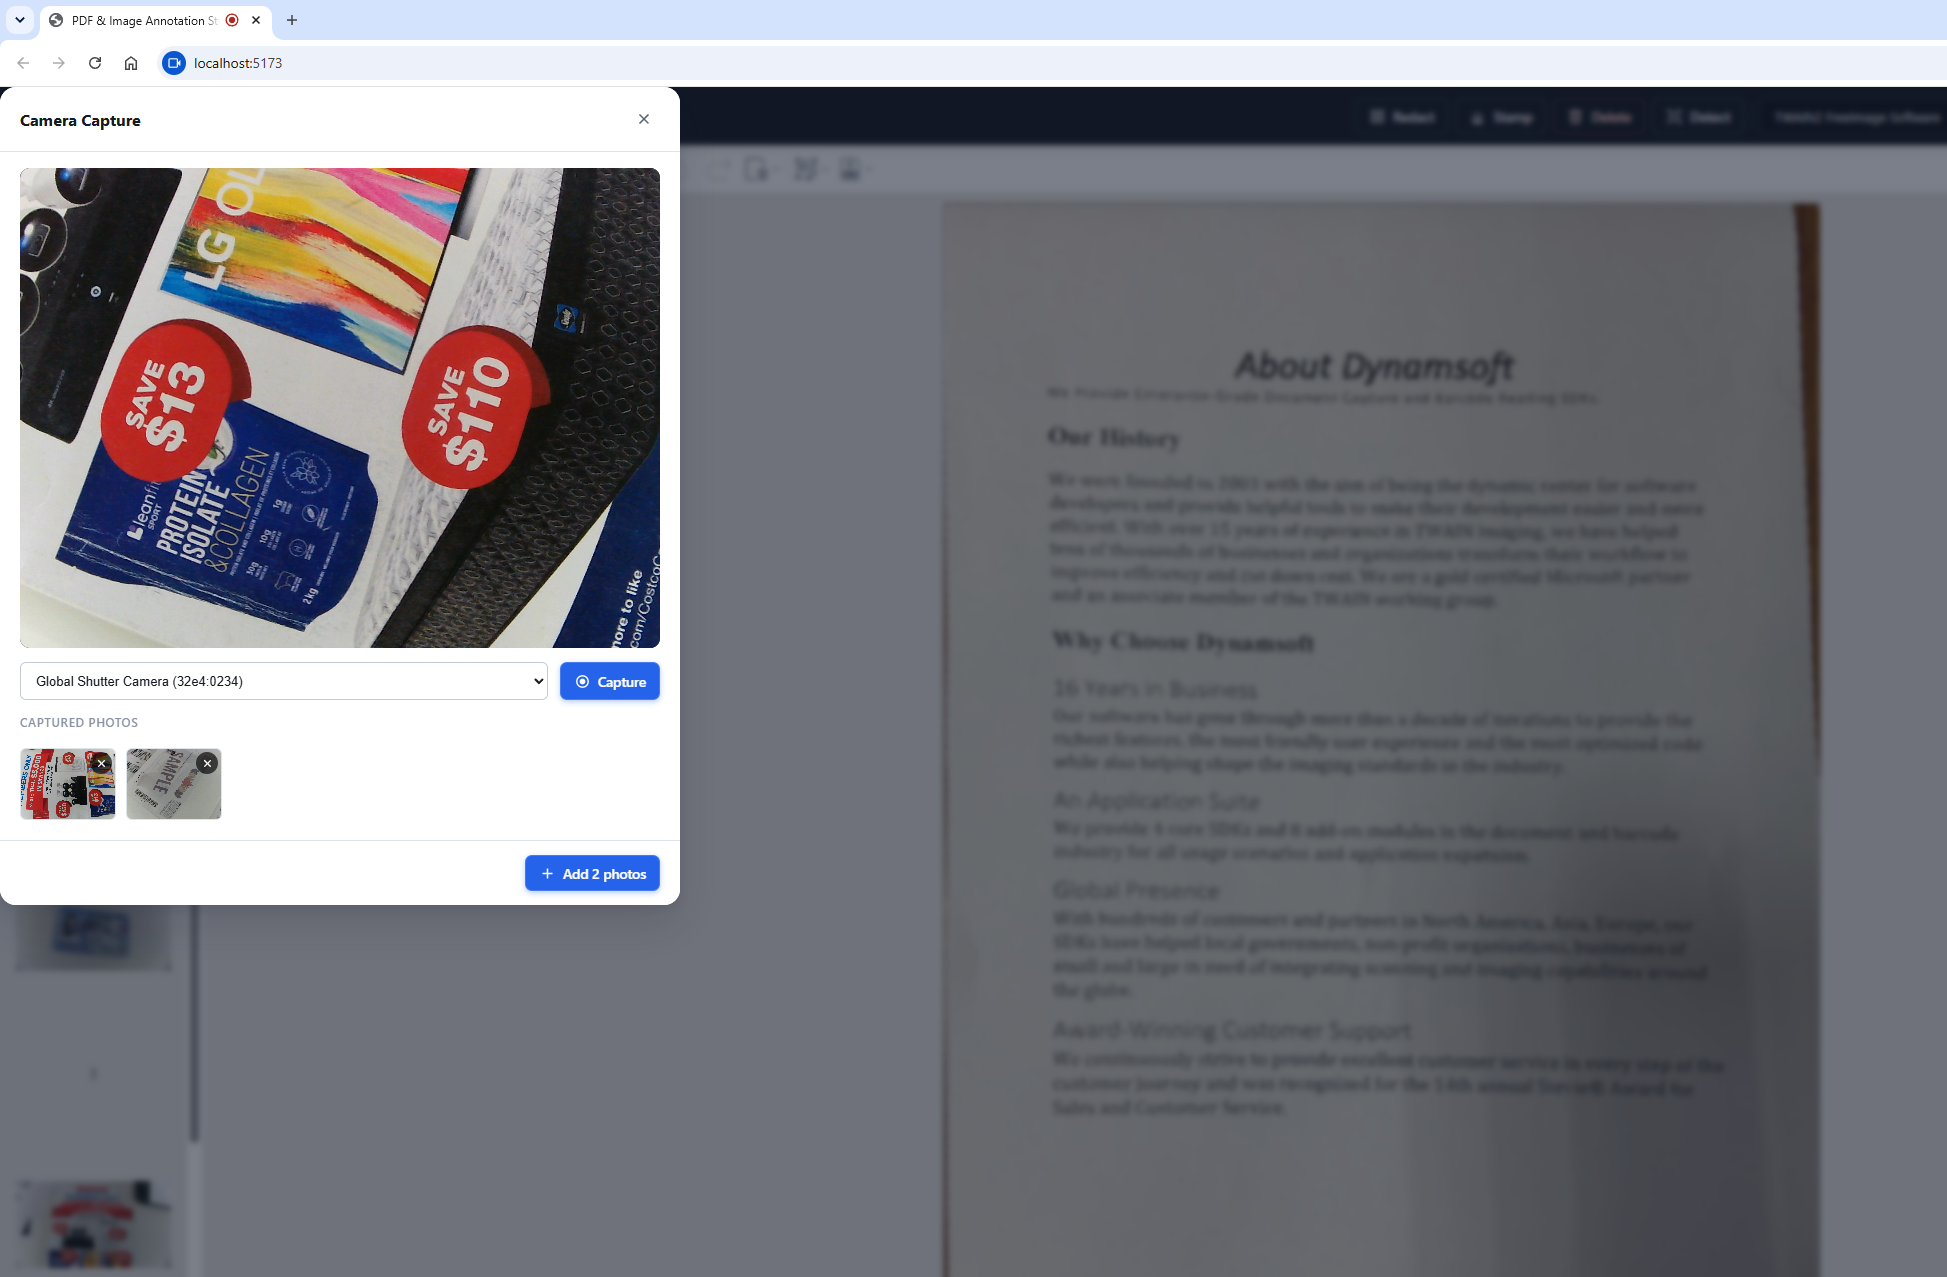
The camera capture system is split into two layers:
camera.ts— Opens a<dialog>element with a live camera stream, handles device switching, snapshots, thumbnail review, and returns an array of confirmedCapturedPhotoobjects.main.ts— Calls the camera dialog and inserts each confirmed photo into the DDV document viadoc.loadSource().
Camera Dialog Entry Point
openCameraCapture() requests a MediaStream with getUserMedia, populates a device-select dropdown, and returns a Promise that resolves with the user’s confirmed photos. Inside the promise, it wires up three button handlers — Capture, Add, and Close:
export async function openCameraCapture(): Promise<CapturedPhoto[]> {
  const photos: CapturedPhoto[] = [];

  // Request the camera (environment-facing, 1080p ideal)
  stream = await navigator.mediaDevices.getUserMedia({
    video: { facingMode: "environment", width: { ideal: 1920 }, height: { ideal: 1080 } },
    audio: false,
  });
  video.srcObject = stream;
  await video.play().catch(() => {});

  // Populate the camera device dropdown
  const devices = await navigator.mediaDevices.enumerateDevices();
  const videoDevices = devices.filter((d) => d.kind === "videoinput");
  videoDevices.forEach((d, i) => {
    deviceSelect.appendChild(new Option(d.label || `Camera ${i + 1}`, d.deviceId));
  });

  dialog.showModal();

  return new Promise<CapturedPhoto[]>((resolve) => {
    btnCapture.onclick = () => {
      captureFrame(video, (photo) => {
        photos.push(photo);
        renderThumbs(thumbStrip, photos, btnAdd);
      });
    };
    btnAdd.onclick = () => { stopStream(); dialog.close(); resolve(photos); };
    btnClose.onclick = () => { stopStream(); dialog.close(); resolve([]); };
    dialog.oncancel = () => { stopStream(); resolve([]); };
  });
}
Capturing a Single Frame
captureFrame() draws the current video frame to an off-screen canvas and converts it to a JPEG Blob via canvas.toBlob():
function captureFrame(
  video: HTMLVideoElement,
  cb: (photo: CapturedPhoto | null) => void
): void {
  const canvas = document.createElement("canvas");
  canvas.width = video.videoWidth;
  canvas.height = video.videoHeight;
  const ctx = canvas.getContext("2d")!;
  ctx.drawImage(video, 0, 0);
  canvas.toBlob(
    (blob) => {
      if (!blob) { cb(null); return; }
      cb({ blob, url: URL.createObjectURL(blob) });
    },
    "image/jpeg",
    0.92
  );
}
Switching the Active Camera
The device-select dropdown allows the user to switch between available cameras (e.g. front vs. rear on a phone). The handler stops the current stream and opens a new one with the selected device ID:
deviceSelect.onchange = async () => {
  stopStream();
  stream = await navigator.mediaDevices.getUserMedia({
    video: { deviceId: { exact: deviceSelect.value }, width: { ideal: 1920 }, height: { ideal: 1080 } },
    audio: false,
  });
  video.srcObject = stream;
  await video.play().catch(() => {});
};
Thumbnail Review with Per-Item Delete
Each captured frame is rendered as a 96 × 72 px thumbnail with a delete button. Clicking the delete button removes the photo from the array and re-renders the thumbnail strip:
function renderThumbs(
  container: HTMLElement,
  photos: CapturedPhoto[],
  btnAdd: HTMLButtonElement
): void {
  container.innerHTML = "";
  photos.forEach((photo, index) => {
    const wrapper = document.createElement("div");
    wrapper.className = "cam-thumb";

    const img = document.createElement("img");
    img.src = photo.url;
    img.alt = `Capture ${index + 1}`;

    const delBtn = document.createElement("button");
    delBtn.className = "cam-thumb-del";
    delBtn.innerHTML = '<svg viewBox="0 0 24 24" fill="none" stroke="currentColor" stroke-width="2.5"><path d="M18 6L6 18M6 6l12 12"/></svg>';
    delBtn.onclick = () => {
      URL.revokeObjectURL(photo.url);
      photos.splice(index, 1);
      renderThumbs(container, photos, btnAdd);
    };

    wrapper.appendChild(img);
    wrapper.appendChild(delBtn);
    container.appendChild(wrapper);
  });
}
Inserting Photos Into the DDV Document
Once the user clicks “Add”, main.ts iterates over the confirmed photos and loads each Blob as a new page:
async function captureFromCamera(): Promise<void> {
  if (!viewerHandle) return;
  const photos = await openCameraCapture();
  if (photos.length === 0) return;

  for (let i = 0; i < photos.length; i++) {
    await appendImageBlob(viewerHandle, photos[i].blob, `camera photo ${i + 1}`);
    URL.revokeObjectURL(photos[i].url);
  }
  showToast(`Added ${photos.length} photo${photos.length > 1 ? "s" : ""} from camera.`, "success");
}
Each Blob is loaded via doc.loadSource({ fileData: blob }), which appends the image as a new page. The DDV viewer automatically updates the thumbnail rail and page count.
Step 3: Detect Document Edges and Normalize Perspective
Document edge detection uses a pure-canvas algorithm — no external SDK or license required. The image is downscaled to 500px on the longest side, converted to grayscale, and smoothed with a Gaussian blur. Otsu’s thresholding algorithm automatically determines the optimal threshold to separate the document from its background.
Because a document can be either lighter or darker than its background (a white page on a dark desk, or a glossy ID card on light wood), a single brightness guess is unreliable. The pipeline instead segments with both polarities and keeps whichever yields the more document-like region. For each polarity it applies a morphological closing (dilate then erode) to fill gaps, extracts the largest connected component via BFS flood fill, and computes a convex hull from its boundary pixels.
The convex hull is then turned into a quadrilateral with an orientation-aware fit. The naive approach of picking corners by image-axis extremes (x + y, x − y) collapses to a degenerate triangle on rotated cards. Instead, the minimum-area enclosing rectangle (via rotating calipers) recovers the document’s own rotation angle, and the four corners are located in that rotated frame — so rotated passports and ID cards are detected as cleanly as upright pages. Each candidate quad is scored by rectangularity (how completely the hull fills its minimum-area rectangle) and frame coverage. Blobs that fill more than ~90% of the frame are rejected as background, which is what stops the detector from selecting the whole image.
function detectDocumentQuad(img: HTMLImageElement): Quad | null {
  // Downscale for performance (max 500px on the long side)
  const scale = Math.min(500 / origW, 500 / origH, 1);

  // Grayscale + Gaussian blur to reduce noise
  const blurred = gaussianBlur(toGrayscale(imageData), w, h);
  const threshold = otsuThreshold(blurred);

  // Segment with BOTH polarities; keep the most document-like result.
  let best: { quad: Quad; score: number } | null = null;
  for (const docIsDark of [false, true]) {
    const binary = thresholdBinary(blurred, threshold, docIsDark);
    const closed = morphologicalClose(binary, w, h, 3);
    const boundary = findLargestComponent(closed, w, h, mask);
    if (!boundary) continue;

    const hull = convexHull(boundary);
    const fit = fitBestQuad(hull, w, h); // orientation-aware + scored
    if (fit && (!best || fit.score > best.score)) {
      best = { quad: orderQuadCorners(fit.quad), score: fit.score };
    }
  }
  return best ? scaleQuad(best.quad, 1 / scale) : null;
}

function fitBestQuad(hull: Pt[], w: number, h: number) {
  const rect = minAreaRect(hull);                 // document's orientation
  const oriented = fitQuadOriented(hull, rect.angle);

  // A real document is surrounded by background: reject blobs that fill
  // almost the whole frame — that is the background, not the document.
  const coverage = polygonArea(hull) / (w * h);
  if (coverage < 0.04 || coverage > 0.9) return null;

  const rectangularity = polygonArea(hull) / rect.area;
  // ...pick the tightest convex quad and combine the signals into a score
}
The entry point exports the current DDV page as a PNG Blob, runs detectDocumentQuad(), and opens a preview dialog. If auto-detection fails (low-contrast background, heavy shadow), a default inset quad is provided. In the dialog, the user sees the original image with the detected quadrilateral overlaid. They can drag the four corner handles to manually adjust the boundary.
export async function detectDocumentBoundary(
  handle: EditViewerHandle
): Promise<void> {
  const pageIndex = handle.viewer.getCurrentPageIndex();
  const originalBlob = await doc.saveToPng(pageIndex);

  const imgEl = await blobToImage(originalBlob);
  const detectedQuad = detectDocumentQuad(imgEl);

  // Fallback quad if detection fails
  const quad = detectedQuad ?? {
    tl: { x: imgWidth * 0.1, y: imgHeight * 0.1 },
    tr: { x: imgWidth * 0.9, y: imgHeight * 0.1 },
    br: { x: imgWidth * 0.9, y: imgHeight * 0.9 },
    bl: { x: imgWidth * 0.1, y: imgHeight * 0.9 },
  };

  const confirmed = await showDetectPreview(originalBlob, imgWidth, imgHeight, quad);
  // ... replace page with normalized result
}
When the user clicks “Confirm”, the adjusted quad is used to compute a perspective-corrected image via a homography matrix — a pure pixel-level transform that runs on a temporary canvas without any library.
Step 4: Replace the Page with the Normalized Image
The normalized image replaces the original page using DDV’s doc.updatePage() API, which accepts an UpdatedSource containing the new image Blob.
const pageUid = handle.viewer.indexToUid(pageIndex);
const normalizedBlob = await dataUrlToBlob(confirmed);
await doc.updatePage(pageUid, { fileData: normalizedBlob });
This preserves the document’s page order and immediately reflects the change in the viewer canvas.
Step 5: Upload to Google Drive
Google Drive upload is handled entirely client-side. Google Identity Services provides the OAuth 2.0 token, and the Drive REST v3 multipart upload endpoint handles file creation.
First, load Google Identity Services and initialize the token client with the drive.file scope:
tokenClient = window.google.accounts.oauth2.initTokenClient({
  client_id: CLIENT_ID,
  scope: "https://www.googleapis.com/auth/drive.file",
  callback: (response: any) => {
    if (response.error) {
      reject(new Error(response.error_description || response.error));
      return;
    }
    accessToken = response.access_token;
    resolve();
  },
});
tokenClient.requestAccessToken({ prompt: "consent" });
For PDF upload, DDV’s doc.saveToPdf() produces a flattened PDF Blob that is sent to Drive via a multipart/related request:
async function uploadAsPdf(doc: any): Promise<void> {
  const blob = await doc.saveToPdf({ saveAnnotation: "flatten" });
  const fileName = `${timestampedName()}.pdf`;
  const result = await uploadFile(blob, fileName, "application/pdf");
  openInDrive(result.id);
}
The multipart upload builds a boundary-delimited body containing JSON metadata and the file bytes:
const boundary = "-------dynamsoft_upload_" + Math.random().toString(36).slice(2);

const metadataBlob = new Blob([
  `--${boundary}\r\nContent-Type: application/json; charset=UTF-8\r\n\r\n`,
  JSON.stringify(metadata),
  `\r\n--${boundary}\r\nContent-Type: ${mimeType}\r\n\r\n`,
]);
const body = new Blob([metadataBlob, blob, new Blob([`\r\n--${boundary}--`])], {
  type: `multipart/related; boundary="${boundary}"`,
});

const res = await fetch(DRIVE_UPLOAD_URL, {
  method: "POST",
  headers: {
    Authorization: `Bearer ${accessToken}`,
    "Content-Type": `multipart/related; boundary="${boundary}"`,
  },
  body,
});
For image upload, each page is exported as a PNG via doc.saveToPng(i) and uploaded individually. After a successful upload, the file is opened in a new tab via window.open().
Common Issues & Edge Cases
-
Camera access blocked: Browsers require HTTPS (or
localhost) forgetUserMedia. If the camera fails to open, check that the page is served over a secure context and that the user has granted camera permissions. -
Google Drive OAuth origin mismatch: The OAuth Client ID must list your exact origin (e.g.
http://localhost:5173for dev,https://yourapp.comfor production) under “Authorized JavaScript origins” in the Google Cloud Console. A mismatch produces aredirect_uri_mismatcherror. -
Google Drive test user restriction: While the OAuth consent screen is in “Testing” status, only accounts explicitly listed under Test users can sign in. Add each tester’s email in Google Cloud Console → APIs & Services → OAuth consent screen → Test users.
-
Edge detection accuracy on low-contrast backgrounds: The Otsu thresholding works best when the document has a clear brightness contrast against its background. If detection fails, the dialog falls back to a default inset quad that the user can manually adjust by dragging the corner handles.
Conclusion
This project demonstrates a complete client-side document scanning pipeline: webcam capture, TWAIN scanner acquisition, automatic document edge detection using pure-canvas image processing, in-browser annotation, and direct Google Drive upload — all powered by Dynamsoft Document Viewer v4 and Dynamic Web TWAIN. The edge detection algorithm runs entirely on Canvas APIs with no additional license required. The next step is to extend the upload targets to other cloud providers (OneDrive, Dropbox). See the Dynamsoft Document Viewer docs for more on the annotation and export API.