


JavaScript Driver's License Barcode Scanner: Read PDF417 and Parse AAMVA ID Data in the Browser
Driver’s license scanning is a routine step in onboarding, age checks, and automated data entry across many industries. With Dynamsoft’s JavaScript APIs, web developers can build a complete driver’s license scanner that runs entirely in the browser — no server, and no image or personal data leaving the device. This tutorial walks through a single self-contained sample that decodes the PDF417 barcode on a driver’s license from a live camera or an uploaded image, then parses the AAMVA payload into structured identity fields.
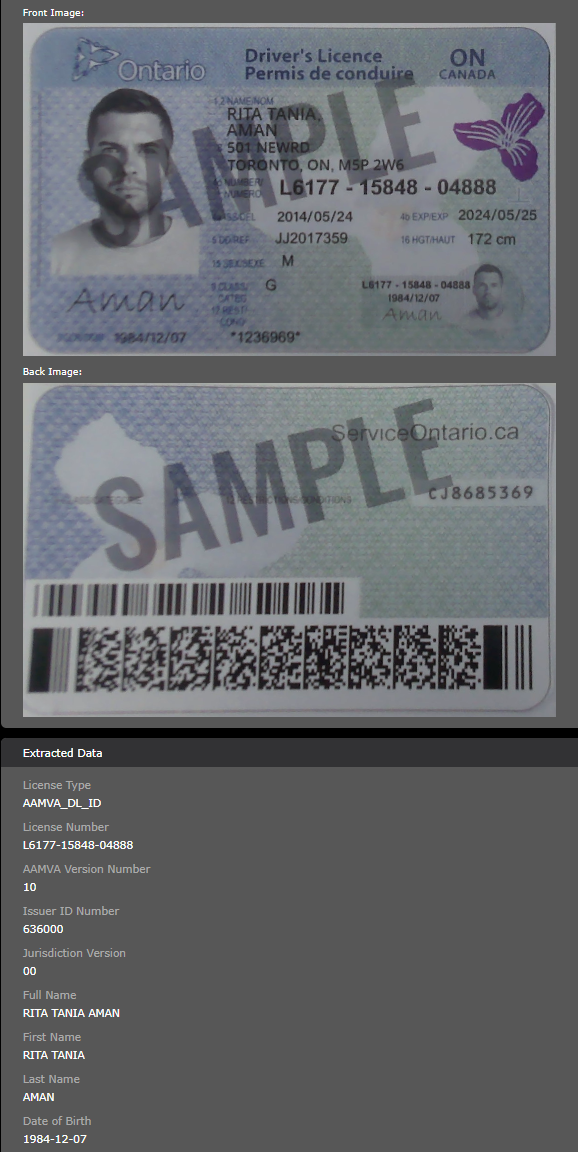
What you’ll build: A JavaScript web application that scans driver’s license PDF417 barcodes, parses AAMVA-encoded fields (name, DOB, address, license number), and displays them as structured data — using Dynamsoft’s Capture Vision SDK.
Key Takeaways
- Dynamsoft’s JavaScript SDK reads and parses AAMVA-encoded PDF417 barcodes from North American driver’s licenses directly in the browser, with no server required.
- The
CodeParsermodule decodes raw PDF417 bytes into named fields (first name, DOB, expiration date, license class) using theAAMVA_DL_IDspec — which also covers magnetic-stripe licenses — and theSOUTH_AFRICA_DLspec. - One HTML page plus a stylesheet is all it takes: the sample narrows the
ReadDenseBarcodestemplate to PDF417, adds aMultiFrameResultCrossFilterto drop duplicate reads from consecutive frames, and renders the parsed fields in a results panel. - Live video and still-image upload share a single
CameraEnhancerinstance —singleFrameModeswitches between"disabled"and"image", so switching modes never creates a second camera session that tears down the first one.
Common Developer Questions
How do I build a JavaScript driver’s license scanner that reads PDF417 barcodes in the browser?
Initialize the Dynamsoft browser SDK, restrict the decode settings to PDF417, and wire the capture flow to either a live camera or uploaded image. The sample then hands the decoded payload to the parsing layer so the UI can show structured driver’s license fields instead of raw barcode text.
How do I parse AAMVA barcode data into structured JSON fields (name, DOB, address) using JavaScript?
Load the AAMVA parsing specs into CodeParser, pass the raw PDF417 bytes or text into the parser, and map the returned properties into your own JSON shape. That step is what turns the driver’s license barcode into named fields like date of birth, address, expiry date, and license class.
What is the best JavaScript library for scanning and parsing North American driver’s license barcodes?
For this workflow, the useful combination is a reader that can reliably decode PDF417 from a camera feed and a parser that understands AAMVA field mappings. The article demonstrates both pieces together in Dynamsoft’s JavaScript stack, including live scanning and structured parsing.
Demo Video: JavaScript Driver’s License Scanner
Online Demo
You can also run the demo yourself from the sample project.
Prerequisites
- A 30-day trial license for the Dynamsoft JavaScript Barcode SDK.
- A modern browser — Chrome, Edge, Firefox, or Safari. Camera access requires a secure context, so serve the page over HTTPS or
http://localhost. - Any static file server (
python -m http.serverornpx http-server). No build step and no bundler are involved.
Understand PDF417 Encoding and the AAMVA Format Before Writing Code
Before diving into the code, let’s briefly understand the technology behind driver’s license scanning.
How PDF417 Encodes Driver’s License Data
Most North American driver’s licenses use PDF417 barcodes, which encode structured data such as:
@
ANSI 636026020002DL00410288ZA03290015DLDCANONE,JANE
DCS DOE
DAC JANE
DDF N
DAD NONE
DBD 04232024
DBB 04231990
DBA 04232030
DBC 1
DAU 505
DAY BLU
DAG 123 MAIN ST
DAI ANYTOWN
DAJ CA
DAK 902230000
DAQ 123456789
DCF 12345678901234567890
DCG USA
This includes:
- Personal information (name, address, birth date)
- License details (number, expiration, class)
- Physical characteristics (height, eye color)
- Security features and validation codes
Common Technical Challenges in Driver’s License Scanning
- Barcode Quality: Varying lighting and print conditions affect readability
- Data Parsing: Converting raw strings into structured key-value data
- Validation: Verifying the completeness and accuracy of extracted fields
- User Experience: Delivering smooth, real-time, intuitive scanning interactions
Why a Parsable AAMVA Barcode Is Not a Valid License
The AAMVA payload is plaintext. There is no signature, no encryption and no secret — the header, the subfile designators and every data element are readable by anyone who can decode PDF417, and writable by anyone too. The companion driver license generator demonstrates this directly: it assembles a byte-perfect AAMVA payload for any of the 71 jurisdictions AAMVA assigns an IIN to and renders it as a scannable card image, entirely in the browser.
The practical consequences for anything you build on top of this:
- A barcode that parses correctly proves the payload is well-formed. It says nothing about whether the document is genuine.
- A barcode that disagrees with the text printed on the front of the card is a strong tampering signal. That cross-check is the most valuable thing the barcode offers.
- A barcode that matches the front proves the card is internally consistent — not that it was legitimately issued, and not that the person presenting it is the person described.
- Age checks, onboarding and access decisions should combine barcode parsing with whatever physical and procedural checks your organisation requires. Avoid describing this pipeline as “verifying” or “authenticating” a driver’s license.
The fields you extract — name, date of birth, address, license number — are personal data. Keep them on-device where you can (this sample never uploads an image or a field to a server), and handle storage and retention under whichever regime applies to you.
Build the PDF417 Driver’s License Scanner
The sample is small enough to follow end to end: one HTML page, one stylesheet, and all the application logic in a single <script> block at the bottom of the page.
Step 1: Project Setup
The folder contains four files plus a README:
driver_license/
├── index.html    # UI + SDK bootstrap + PDF417 scanning + AAMVA parsing
├── style.css     # Responsive layout (desktop, tablet, phone)
├── 1.jpg         # Sample driver license image (front)
└── 2.jpg         # Sample driver license image (back)
index.html declares the page shell, the Camera / Upload toggle, the container the SDK mounts its camera UI into, and the results panel. The SDK itself comes from a single CDN script tag, so there is nothing to build:
<!DOCTYPE html>
<html lang="en">
<head>
    <meta charset="utf-8">
    <meta name="viewport" content="width=device-width,initial-scale=1.0,viewport-fit=cover">
    <title>Driver License PDF417 Scanner</title>
    <link href="style.css" rel="stylesheet">
</head>
<body>
    <div id="app">
        <!-- License setup screen, mode toggle, #camera-view, #results -->
    </div>

    <!-- Dynamsoft Barcode Reader SDK (DBR + DCP + DCE + CVR bundled) -->
    <script src="https://cdn.jsdelivr.net/npm/dynamsoft-barcode-reader-bundle@11.6.3200/dist/dbr.bundle.js"></script>

    <script>
        class DriverLicenseScanner {
            // Application code from the steps below
        }
        document.addEventListener('DOMContentLoaded', () => {
            new DriverLicenseScanner();
        });
    </script>
</body>
</html>
viewport-fit=cover is what makes env(safe-area-inset-*) resolve on notched phones, and style.css pairs it with height: 100dvh so the mobile browser’s address bar does not clip the camera view.
Step 2: Initialize Barcode Reader, Code Parser, and Camera Enhancer
The Dynamsoft JavaScript Barcode SDK is composed of several components that work together to provide a complete scanning solution:
CaptureVisionRouter: The core engine that manages data flow between components.CameraView: The user interface for camera input.CameraEnhancer: Manages the camera lifecycle and configuration.CodeParser: Parses structured data from scanned barcodes.
Note: The barcode reader module (DBR) is loaded and used behind the scenes via CaptureVisionRouter. You don’t create a BarcodeReader instance manually—cvRouter manages it internally based on the loaded module and the selected template (ReadDenseBarcodes).
async initSDK() {
  // Activate the license before any component is created, otherwise
  // CaptureVisionRouter.createInstance() throws. The second argument runs the
  // license check in a dedicated worker.
  await Dynamsoft.License.LicenseManager.initLicense(this.licenseKey, true);

  // Preload modules
  await Dynamsoft.Core.CoreModule.loadWasm(["DBR", "DCP"]);
  // AAMVA_DL_ID also covers magnetic-stripe licenses in bundle 11.6.
  await Dynamsoft.DCP.CodeParserModule.loadSpec("AAMVA_DL_ID");
  await Dynamsoft.DCP.CodeParserModule.loadSpec("SOUTH_AFRICA_DL");

  // Create components
  this.components.parser = await Dynamsoft.DCP.CodeParser.createInstance();
  this.components.cameraView = await Dynamsoft.DCE.CameraView.createInstance();
  this.components.cameraEnhancer = await Dynamsoft.DCE.CameraEnhancer.createInstance(this.components.cameraView);
  this.components.cvRouter = await Dynamsoft.CVR.CaptureVisionRouter.createInstance();

  // Setup camera view
  const cameraContainer = document.getElementById('camera-view');
  cameraContainer.replaceChildren(this.components.cameraView.getUIElement());

  // Configure router
  this.components.cvRouter.setInput(this.components.cameraEnhancer);

  // Setup result filter
  const filter = new Dynamsoft.Utility.MultiFrameResultCrossFilter();
  filter.enableResultDeduplication("barcode", true);
  await this.components.cvRouter.addResultFilter(filter);

  // Configure barcode settings
  const settings = await this.components.cvRouter.getSimplifiedSettings("ReadDenseBarcodes");
  settings.barcodeSettings.barcodeFormatIds = Dynamsoft.DBR.EnumBarcodeFormat.BF_PDF417;
  await this.components.cvRouter.updateSettings("ReadDenseBarcodes", settings);

  this.components.receiver = {
    onCapturedResultReceived: (result) => this.handleCapturedResult(result),
    onDecodedBarcodesReceived: (result) => this.handleBarcodeResult(result)
  };

  this.isInitialized = true;
}
initSDK() rejects on failure rather than swallowing the error, so the caller can surface the problem and keep the license screen up instead of leaving the user on a blank scanner page:
async initializeWithLicense(licenseKey) {
  const submitBtn = document.getElementById('license-submit');
  const trialBtn = document.getElementById('use-trial');

  try {
    submitBtn.disabled = true;
    trialBtn.disabled = true;
    submitBtn.textContent = 'Initializing...';

    this.licenseKey = licenseKey;
    await this.initSDK();

    // Hide license setup and show scanner
    document.getElementById('license-setup').style.display = 'none';
    document.getElementById('scanner-app').classList.remove('hidden');
    await this.startCapturingMode();
  } catch (error) {
    console.error('License initialization failed:', error);
    alert('Failed to initialize with the provided license key. Please check the key and try again.');
  } finally {
    submitBtn.disabled = false;
    trialBtn.disabled = false;
    submitBtn.textContent = 'Initialize Scanner';
  }
}
Step 3: Scan from Camera or Image
The SDK provides a built-in UI that supports both real-time video and single-frame image scanning:
- Set
singleFrameModeto"disabled"for a continuous video stream, or to"image"to let the user pick an image. - Get the processed results through the
onCapturedResultReceivedandonDecodedBarcodesReceivedcallbacks.
The CameraEnhancer is created once, at initialization, and reused for every mode switch. A CameraView can only host one enhancer, so creating a new enhancer over the same view on each switch leaves the previous instance tearing the camera down in parallel and open() intermittently fails with Error opening camera: Camera closed.. Close the camera first, flip singleFrameMode, then reopen:
// Called from the Camera / Upload toggle in the UI
switchMode(mode) {
  if (this.currentMode === mode || !mode) return;

  this.currentMode = mode;
  this.updateModeUI();

  if (this.isInitialized && this.components.cameraEnhancer) {
    this.startCapturingMode().catch((error) => {
      console.error('Failed to switch capture mode:', error);
      alert('Failed to switch mode: ' + error.message);
    });
  }
}

async startCapturingMode() {
  const elements = {
    mainContainer: document.getElementById('main-container'),
    tipMessage: document.getElementById('tip-message'),
    cameraView: document.getElementById('camera-view')
  };

  elements.mainContainer.style.display = 'flex';
  elements.tipMessage.hidden = false;
  elements.cameraView.style.display = 'block';

  this.components.cvRouter.removeResultReceiver(this.components.receiver);
  await this.components.cvRouter.stopCapturing();

  // singleFrameMode has to change while the camera is closed.
  if (this.components.cameraEnhancer.isOpen()) {
    await this.components.cameraEnhancer.close();
  }
  this.components.cameraEnhancer.singleFrameMode =
    this.currentMode === 'camera' ? 'disabled' : 'image';
  await this.openCamera();

  this.components.cvRouter.setInput(this.components.cameraEnhancer);
  await this.components.cvRouter.startCapturing("ReadDenseBarcodes");
  this.components.cvRouter.addResultReceiver(this.components.receiver);
}

// Retry once: right after a mode switch the device may still be releasing.
async openCamera() {
  try {
    await this.components.cameraEnhancer.open();
  } catch (error) {
    console.warn('Camera open failed, retrying once:', error);
    await new Promise((resolve) => setTimeout(resolve, 400));
    await this.components.cameraEnhancer.open();
  }
}
If the camera cannot be opened at all — no device, permission denied — catch the error and fall back to singleFrameMode = "image", which needs no camera, instead of leaving the page unusable.
Step 4: Parse Driver License Data and Display Structured Fields
Use CodeParser.parse() to extract structured fields:
// Report "nothing found" in image mode, where the user captures a single frame
handleCapturedResult(result) {
if (!this.components.cameraEnhancer) return;
if (this.components.cameraEnhancer.singleFrameMode === "disabled"
|| !this.components.cameraEnhancer.isOpen()) return;
const hasBarcodes = (result.items || []).some(item =>
item.type === Dynamsoft.Core.EnumCapturedResultItemType.CRIT_BARCODE
);
if (!hasBarcodes) {
this.showResults("No PDF417 Barcode Found!");
}
}
// Handle successful barcode detection
async handleBarcodeResult(result) {
if (!result.barcodeResultItems || !result.barcodeResultItems.length) return;
Dynamsoft.DCE.Feedback.beep();
const success = await this.parseDriverLicense(result.barcodeResultItems[0].bytes);
if (success) {
await this.components.cvRouter.stopCapturing();
}
}
// Parse driver license information
async parseDriverLicense(bytesToParse) {
try {
const parsedResult = await this.components.parser.parse(bytesToParse);
if (parsedResult.exception) return false;
const dlInfo = JSON.parse(parsedResult.jsonString);
console.log('Parsed Driver License Info:', dlInfo);
this.parsedInfo = {};
this.extractLicenseFields(dlInfo);
this.displayResults();
return true;
} catch (error) {
console.error('Parsing error:', error);
alert('Failed to parse driver license: ' + error.message);
return false;
}
}
// Extract fields based on driver license type
extractLicenseFields(dlInfo) {
const { CodeType, ResultInfo } = dlInfo;
switch (CodeType) {
case "AAMVA_DL_ID":
this.extractAAMVAFields(ResultInfo, "commonSubfile");
break;
case "AAMVA_DL_ID_WITH_MAG_STRIPE":
this.extractAAMVAMagStripeFields(ResultInfo);
break;
case "SOUTH_AFRICA_DL":
this.extractSouthAfricaFields(ResultInfo);
break;
default:
console.warn('Unknown driver license type:', CodeType);
}
}
// Extract AAMVA standard fields
extractAAMVAFields(resultInfo, targetField) {
for (const info of resultInfo || []) {
if (info.FieldName === targetField && info.ChildFields) {
this.processChildFields(info.ChildFields);
}
}
}
// Extract AAMVA magnetic stripe fields
extractAAMVAMagStripeFields(resultInfo) {
for (const info of resultInfo || []) {
if (info.FieldName.includes("track") && info.ChildFields) {
this.processChildFields(info.ChildFields);
}
}
}
// Extract South Africa driver license fields
extractSouthAfricaFields(resultInfo) {
for (const info of resultInfo || []) {
this.parsedInfo[info.FieldName] = info.Value;
if (info.ChildFields) {
this.processChildFields(info.ChildFields);
}
}
}
// Recursively process child fields
processChildFields(childFields) {
const excludedFields = ["dataElementSeparator", "segmentTerminator", "subfile", "subfileType"];
for (const childField of childFields) {
for (const field of childField) {
if (!excludedFields.includes(field.FieldName)) {
this.parsedInfo[field.FieldName] = field.Value;
}
if (field.ChildFields) {
this.processChildFields(field.ChildFields);
}
}
}
}
// Render the parsed fields in the results panel
displayResults() {
const resultsContainer = document.getElementById('results-content');
const resultHTML = Object.entries(this.parsedInfo)
.filter(([, value]) => value)
.map(([key, value]) => `
<div class="result-item">
<label>${this.formatFieldName(key)}:</label>
<span>${this.escapeHtml(value)}</span>
</div>
`)
.join('');
resultsContainer.innerHTML = resultHTML || '<p>No information extracted</p>';
this.showResults();
}
// "licenseNumber" -> "License Number"
formatFieldName(fieldName) {
return fieldName
.replace(/([A-Z])/g, ' $1')
.replace(/^./, str => str.toUpperCase())
.trim();
}
// The values come from a barcode payload, so escape them before inserting HTML.
escapeHtml(value) {
return String(value)
.replace(/&/g, '&')
.replace(/</g, '<')
.replace(/>/g, '>');
}
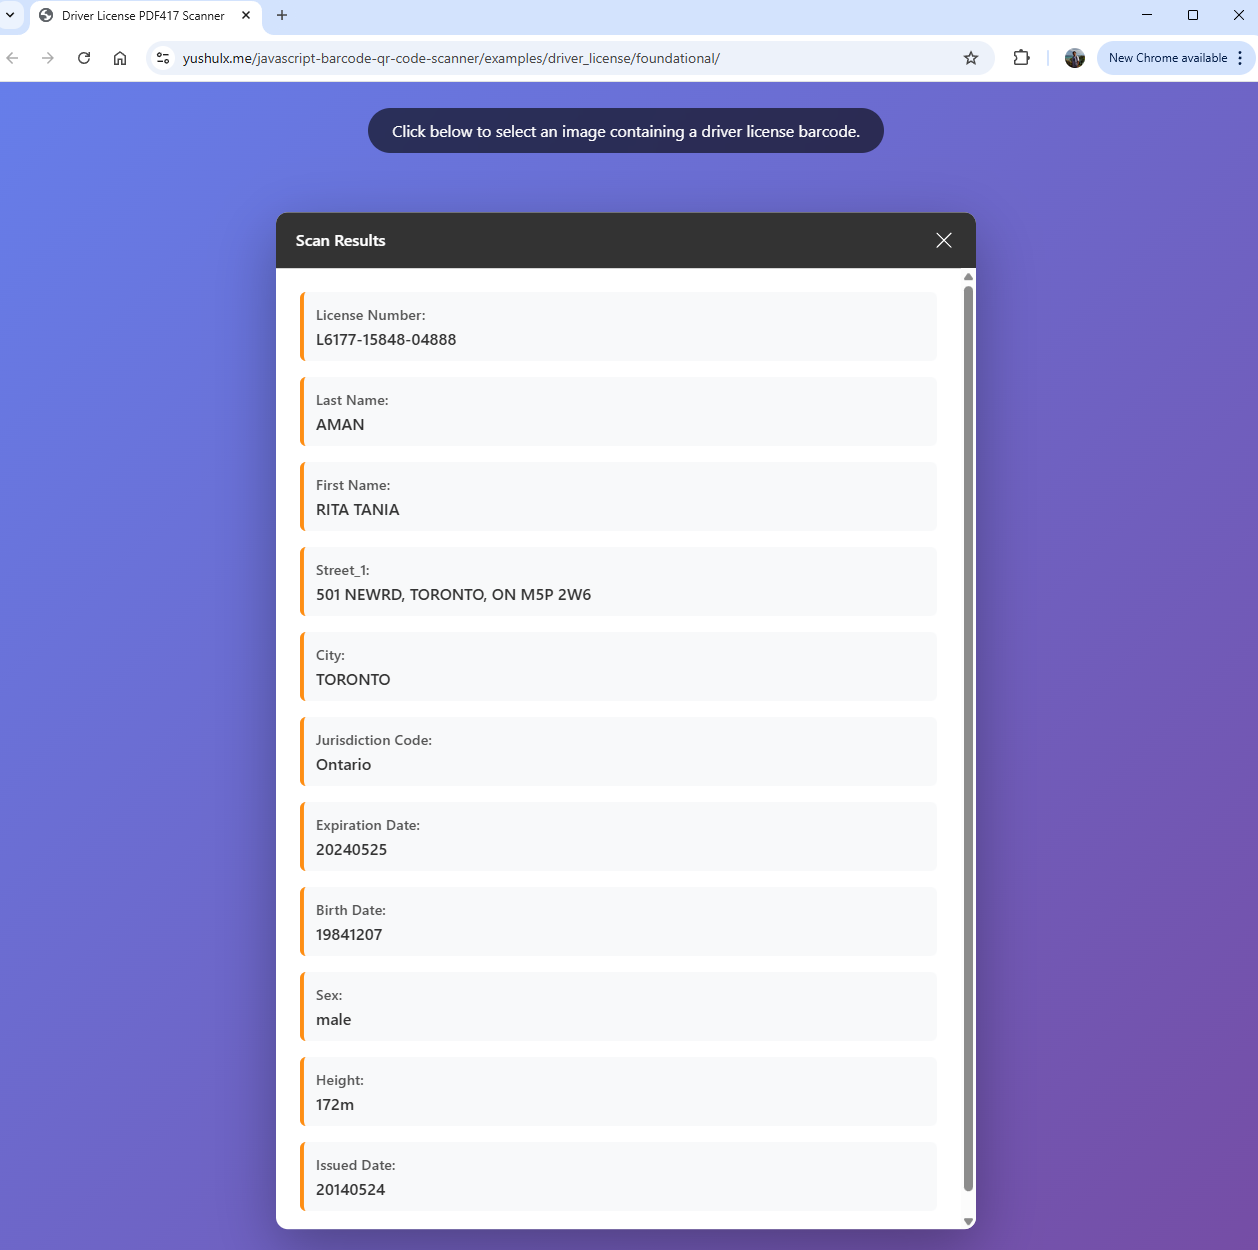
Closing the results panel resumes scanning in whichever mode is active, so the user can go straight to the next license without reloading the page:
closeResults() {
  document.getElementById('results').style.display = 'none';
  document.getElementById('results-content').innerHTML = '';
  if (this.boundClickToHide) {
    document.removeEventListener('mousedown', this.boundClickToHide);
  }
  // Resume scanning in whichever mode is currently active.
  this.components.cvRouter?.startCapturing("ReadDenseBarcodes");
}
The sample also watches resize and orientationchange and calls CameraEnhancer.resize(). On mobile, showing and hiding the address bar changes the usable viewport height, and without that call the camera preview keeps the old height.
What the Sample Already Handles
- PDF417-only decoding through the
ReadDenseBarcodestemplate - Live camera scanning and still-image upload behind one Camera / Upload toggle
- AAMVA DL/ID, magnetic-stripe, and South Africa driver license payloads parsed into named fields
- A results panel that becomes a bottom sheet on phones, with HTML-escaped values
- Responsive layout:
100dvhheight, safe-area padding, and a landscape layout for short viewports
Common Issues & Edge Cases
- Low-quality or damaged barcodes: PDF417 barcodes on worn or laminated driver’s licenses may have reduced readability. Use the
ReadDenseBarcodestemplate (already configured in this tutorial) and ensure adequate lighting. For image uploads, scanning in grayscale before processing can improve decode rates. - Unsupported license formats: Not all international driver’s licenses use the AAMVA PDF417 standard. When
CodeParser.parse()returns a non-nullexceptionfield the sample simply returnsfalseand keeps scanning, so add your own fallback that displays the raw barcode text — the user still gets useful output instead of silence. - Camera permission denied: If
CameraEnhancer.open()fails with aNotAllowedError, detect it and prompt the user to enable camera access in their browser settings. The single-frame image upload mode (singleFrameMode = "image") remains available as a fallback. [-10005]: The specified file could not be found: this comes fromCodeParserModule.loadSpec()when a spec name is not shipped by the bundle. Since bundle 11.6 the parser resources are consolidated into one.datafile per spec andAAMVA_DL_ID_WITH_MAG_STRIPEno longer exists as a separate file — callingloadSpec("AAMVA_DL_ID_WITH_MAG_STRIPE")fails with this error and aborts initialization. LoadAAMVA_DL_IDandSOUTH_AFRICA_DLonly; magnetic-stripe licenses are still parsed (asAAMVA_DL_ID_WITH_MAG_STRIPE), because the AAMVA spec bundles that definition.
Run the Sample Locally
The sample is a single HTML page plus a stylesheet, so any static server works:
python -m http.server 8000
Then open http://localhost:8000/. localhost counts as a secure context, so the camera works without a certificate.
The folder ships two test images, 1.jpg (front) and 2.jpg (back), so you can exercise the Upload mode before you have a physical license at hand — switch the toggle to Upload, tap the gallery button, and pick one.
The sample ships its own license setup screen — paste a key, or click Use Trial License to start with the SDK’s public 24-hour key. The online demo skips that screen and activates on page load, picking the key by hostname: the Codepool key (bound to dynamsoft.com) on the production domain, and the SDK trial key on any other host such as localhost, so a local run still activates instead of failing:
const BOUND_HOSTS = ['dynamsoft.com'];

function isBoundHost() {
  const host = window.location.hostname.toLowerCase();
  return BOUND_HOSTS.some((bound) => host === bound || host.endsWith('.' + bound));
}

function resolveLicenseKey() {
  // The Codepool key is domain-bound, so anywhere else use the SDK trial key.
  return isBoundHost() ? CODEPOOL_LICENSE_KEY : TRIAL_LICENSE_KEY;
}