


Install Dynamsoft License Server on Windows Server
Example Environment
- CPU: Intel Core 2 Duo or AMD Athlon 64 X2 5600+
- Memory: 2G
- OS: Windows Server 2016
- Disk Space
- System: 30 GB
- Data: 20 GB
Installation
Run DLS as a service
-
Download the installer from Dynamsoft-Licensing-Server v2.4.11 and unzip it to a proper location. In our case, it’s unzipped to “E:\dynamsoft_dls-win_x64-v2.4.11”.
-
Download NSSM and unzip, in our case, it’s unzipped to “E:\nssm-2.24”.
-
Open cmd, navigate to the directory “E:\nssm-2.24\win64” and run the following command
.\nssm install dynamsoft-dls
-
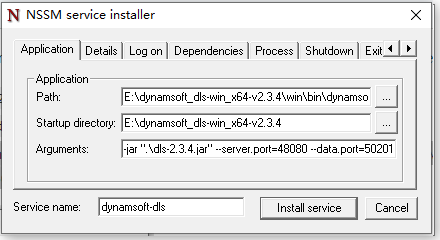
A GUI will open, fill the parameters for the application like this (change the values according to where you put the files, and change ports if ports are occupied)
- Path:
E:\dynamsoft_dls-win_x64-v2.4.11\win\bin\dynamsoftdlsx.exe - Startup directory:
E:\dynamsoft_dls-win_x64-v2.4.11 - Arguments:
".\win\jre\bin\dynamsoftdls.exe" -Duser.language=en -Duser.region=CA -Djavax.net.ssl.trustStoreType=WINDOWS-ROOT --add-opens java.base/jdk.internal.loader=ALL-UNNAMED -jar ".\dls-2.4.11.jar" --server.port=48080 --data.port=30201
- Path:
-
Switch to the last tab “Hooks” and choose “Application exit” as the Event and specify the parameter as
- Command:
E:\dynamsoft_dls-win_x64-v2.4.11\shutdown.bat
- Command:

- Press the button “Install Service” and you should be able to find dynamsoft-dls as one of the services in the services GUI or in Task Manager -> Service. If it is not started, start it.
NOTE
It usually takes a few seconds for the service to start. Sometimes it might take longer.
Test the service
Once the server is running, you can test it via the URL http://127.0.0.1:48080/page/index.html.
If you changed the port during installation, you should use that port instead.
Upon the first visit, you will be asked to set an admin password. A few things to note:
- The default password is empty;
- The user name is admin and it can not be changed;
- Currently, there isn’t a way to retrieve the password should it get lost. Therefore, please keep the password secure.
After that, you will land on the home page where you can find the UUID of this DLS .
This UUID is required when activating your licenses.
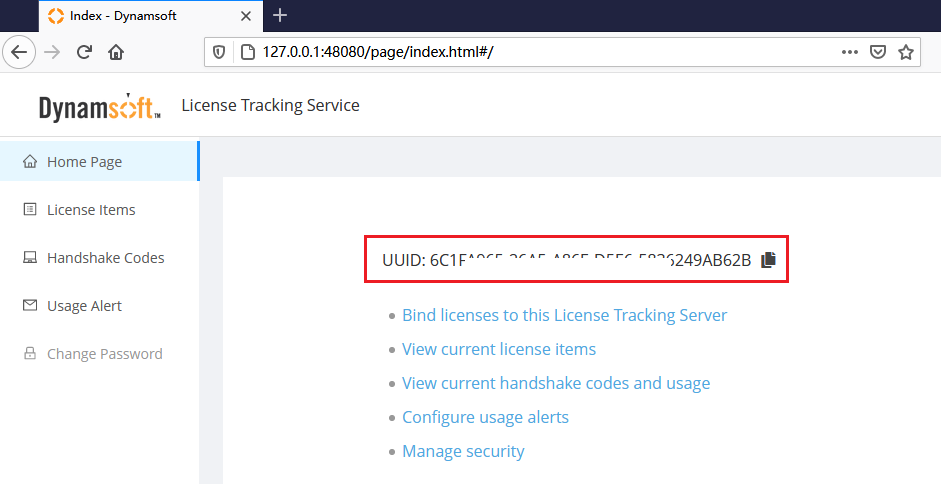
If the above page shows up, then the server is installed correctly and is ready to process requests. In order to better integrate with your original service, and make the service more secure on the Internet, the next step is to configure the network environment - (set up a reverse proxy) - for it with the help of IIS . See Configure Reverse Proxy Using IIS on how to redirect requests sent to https://www.yoursite.com/dls/* to https://127.0.0.1:48080/*.
Notes
- About
PsExec64.exe
PsExec64.exeis a powerful tool on windows, but it is also considered risky by antivirus software.Normally, DLS does not allow “start as administrator”. However, in order to meet some specific needs, we allow “administrator” to create another user to start DLS, which requires the use of
PsExec64.exe.When using
NSSMas described in this article, the startup user isLocal System Account, which means you can safely removewin/bin/PsExec64.exe.
- “proxy” and “https” are only required if you use one of the following products:
- SDKs for Javascript without a local service (like Dynamsoft BarcodeReader Javascript Edition).
- SDKs for iOS (unless the user makes an exception for the application).
(Reference: https://stackoverflow.com/questions/31254725/transport-security-has-blocked-a-cleartext-http#answer-33712228)
If “proxy” and “https” are not configured, please use
http://ip:port/in the following steps.
Configuration
With the above steps, DLS will be listening on requests sent to this URL “https://www.yoursite.com/dls/”. You can set up another DLS on another machine as the standby server just in case the main server is temporarily unavailable due to network and other reasons.
Configure a Standby DLS
For maximum up time, a standby DLS is necessary. Assume you have installed two copies of DLS, the following are the steps to configure them
-
Find the file
dls.json.samplein the DLS directory, copy and rename it todls.json -
In the configuration, there are two settings: “serverMode” and “servers”. We only need to change “servers”. It accepts two values, the first specifies the main DLS URL and the second, the standby URL.
-
For the main DLS:
"servers": ["self", "https://standby.yoursite.com/dls/"] -
For the standby DLS:
"servers": ["https://www.yoursite.com/dls/", "self"]
-
NOTE that you need to configure both the main DLS and the standby DLS separately.
Configure Server URLs
In order for the license client to know where to find DLS, the server URLs need to be embedded in the license string.
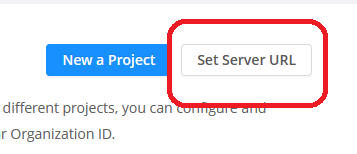
By default, when you first import a license and create a project, the license string for the project will already contain a server URL which is simply the host of the website. For example, if DLS is being visited like shown in the following image, then the license string will contain server URL as http://127.0.0.1:48080/.

Since the client devices may visit the DLS through a proxy, the automatically detected URL can be incorrect. We can click the button “Set Server URL” and correct it:
Input the actual server URLs and save:
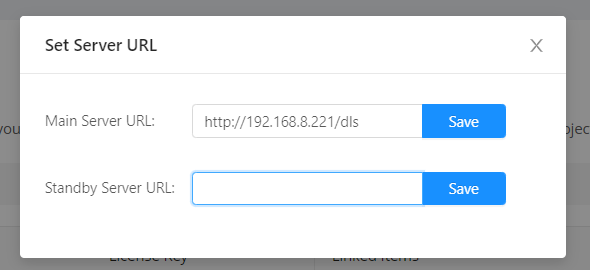
Once saved, all license strings will be updated to contain the server URLs.