


Appearance
Scan Multi-Page Documents with Mobile Web Capture
Mobile Web Capture (MWC) is an advanced sample designed to extend the features of Mobile Document Scanner (MDS) for managing and scanning multi-page documents. It integrates Mobile Document Scanner (MDS) functionality while offering additional features such as multi-document management, annotation, and uploading by integrating Dynamsoft Document Viewer (DDV), making it a comprehensive solution for managing complex document workflows.
Tip
See it in action with the Mobile Web Capture Demo.
This guide walks you through building a web application that scans multi-page documents using MWC, with pre-defined configurations.
Tip
If you are looking for a solution that scans single-page documents, read the Mobile Document Scanner User Guide instead.
Views
MWC features are organized into configurable UI Views, each of which comes ready-to-use and can be customized with a configuration object.
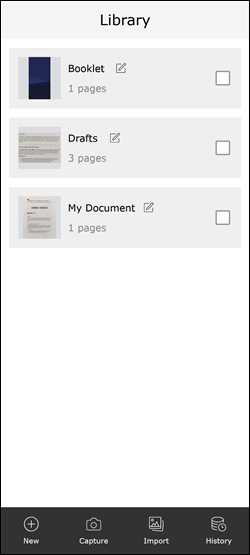
Library View
- Organize and manage multiple scanned documents
- Export, delete, share, or print documents
- View upload history for server-stored documents
Document View
- View page thumbnails
- Reorder or delete pages
- Export or share documents
Page View
- Close-up view of single pages
- Upload or save individual pages
- Full-featured annotations, including inking, shapes, highlighting, text boxes, signatures, and more
Transfer View
- Copy or move pages between documents
History View
- View upload history
Note
The following three Views are powered by Mobile Document Scanner (MDS). Learn more in the MDS user guide.
Document Scanner View
- Camera viewfinder with resolution toggle and more
- Automatic document detection and capture from the optimal frame in the video feed
- Manual capture for greater control
Document Correction View
- Fine-tune automatically detected document boundaries
Document Result View
- Preview the corrected scan
- Quickly re-scan and inspect documents until the desired result is achieved
- Share the scanned document or save it locally
System Requirements
MWC runs wherever MDS runs, and inherits its requirements — a secure context (HTTPS) and a browser with WebAssembly, Blob, URL/createObjectURL, and Web Workers support. See System Requirements in the MDS introduction for the minimum supported browser versions.
License
Get a Trial License
If you do not have a trial license for MWC, you can request one through our customer portal. The trial can be renewed twice for up to two months of free access.
Note
MDS and MWC share the same license keys. If you already have an MDS license, you can use it for MWC, and vice versa.
Get a Full License
To purchase a full license, contact us.
Quick Start
To use MWC, the first step is to obtain its library files. You can acquire them from one of the following sources:
- GitHub – contains the source files for the MWC sample, which can be compiled into library files.
- npm – provides precompiled library files via npm for easier installation.
- CDN – delivers precompiled library files through a CDN for quick and seamless integration.
You can choose one of the following methods to set up a Hello World page:
- Build from source – download the source files from GitHub and compile the resource scripts yourself.
- Use precompiled scripts – use the precompiled resource scripts from npm or the CDN for a quicker setup.
Option 1: Build from Source
This method retrieves all MWC source files from its GitHub Repository, compiles them into a distributable package, and then runs a ready-made Hello World sample page included in the repository.
Follow these steps:
Download MWC from GitHub as a compressed folder.
Extract the contents of the archive.
Set the license key you received from Get a Trial License:
Tip
In your code editor, open the Hello World sample located at
/samples/hello-world.html. Search for"YOUR_LICENSE_KEY_HERE"and replace it with your actual license key.In the terminal, navigate to the project root directory and run the following to a. install project dependencies, b. build the library, and c. serve the sample:
shellnpm install npm run build npm run dev
Once the server is running, open the application in a browser using the address printed in the terminal.
Tip
See the server configuration details in /dev-server/index.js.
Option 2: Use Precompiled Script
Since the MWC library files are published on npm, it's easy to reference them from a CDN.
To use the precompiled script, include the following URL in a <script> tag:
html
<script src="https://cdn.jsdelivr.net/npm/dynamsoft-mobile-web-capture@4.1.0/dist/mwc.bundle.js"></script>Below is the complete Hello World sample page that uses this precompiled script from a CDN.
Note
The repository's /samples/hello-world.html, used in the Build from Source section, is the same workflow with two differences: it loads the script from a local build rather than the CDN, and it sets showLibraryView: true so the app opens on the document library. See Enable the LibraryView.
Warning
Don't forget to replace "YOUR_LICENSE_KEY_HERE" with your actual license key.
html
<!DOCTYPE html>
<html lang="en">
	<head>
		<meta charset="utf-8" />
		<meta name="viewport" content="width=device-width, initial-scale=1.0" />
		<title>Mobile Web Capture - Hello World</title>
		<script src="https://cdn.jsdelivr.net/npm/dynamsoft-mobile-web-capture@4.1.0/dist/mwc.bundle.js"></script>
	</head>
	<body>
		<script>
			// Instantiate a Mobile Web Capture Object
			const mobileWebCapture = new Dynamsoft.MobileWebCapture({
				license: "YOUR_LICENSE_KEY_HERE", // Replace this with your actual license key
			});
			(async () => {
				// Launch the Mobile Web Capture Instance
				const fileName = `New_Document_${Date.now().toString().slice(-5)}`;
				await mobileWebCapture.launch(fileName);
			})();
		</script>
	</body>
</html>
To run the sample, create a new file called hello-world.html, then copy and paste the code above into the file. Next, serve the page from a local web server.
If you are using VS Code, a quick and easy way to serve the project is to use the Live Server (Five Server) VSCode extension. Install the extension, open the hello-world.html file in the editor, and click "Go Live" in the bottom-right corner of the editor. This serves the application at http://127.0.0.1:5500/hello-world.html.
Alternatively, you can use other servers like IIS or Apache, but they are outside the scope of this guide for brevity.
Hello World Sample Explained
Next we walk through the code above to understand how it works.
Reference MWC
html
<head>
	<meta charset="utf-8" />
	<meta name="viewport" content="width=device-width, initial-scale=1.0" />
	<title>Mobile Web Capture - Hello World</title>
	<script src="../dist/mwc.bundle.js"></script>
	<!--Alternatively, reference the script from CDN
	<script src="https://cdn.jsdelivr.net/npm/dynamsoft-mobile-web-capture@4.1.0/dist/mwc.bundle.js"></script>
	-->
</head>
When building from source, MWC is referenced using a relative local path in the <head> section of the HTML:
html
<script src="../dist/mwc.bundle.js"></script>Alternatively, the script can be referenced from a CDN:
html
<script src="https://cdn.jsdelivr.net/npm/dynamsoft-mobile-web-capture@4.1.0/dist/mwc.bundle.js"></script>MWC wraps all its dependency scripts, so an MWC project only needs to include MWC itself as a single script. No additional dependency scripts are required.
Important
Even if you reference the script locally, supporting resources like .wasm engine files are still loaded from the CDN at runtime. If you require a fully offline setup, follow the instructions in Self-Hosting Resource Files.
Instantiate MWC
javascript
// Instantiate a Mobile Web Capture Object
const mobileWebCapture = new Dynamsoft.MobileWebCapture({
	license: "YOUR_LICENSE_KEY_HERE", // Replace this with your actual license key
});
API Reference:
This step creates the MWC UI, which, when launched, occupies the entire visible area of the browser window by default. If needed, you can specify a container to restrict the UI's size. For more details, refer to Specify the UI Container.
Warning
A license key is required for the instantiation.
Launch MWC
javascript
const fileName = `New_Document_${Date.now().toString().slice(-5)}`; // Generates a unique filename to use as the initial document name
await mobileWebCapture.launch(fileName);
API Reference: launch()
This step launches the UI, starting in DocumentView, where the user can begin building a document in two ways:
Note
The document name passed to launch() becomes the name of the document the DocumentView opens on, and the default filename when it is shared or uploaded. If omitted, MWC names the document Doc-<timestamp>.
- Capture: capture image(s) of the document pages.
- Import: import one or multiple images or PDF files.
Once a document has been created, the user can navigate between two Views.
The DocumentView
The user can:
- Share: share the document as a multi-page PDF file.
- Download is enabled where Share is not supported (e.g., in Firefox).
- Manage: select one or multiple pages for further actions.
- Manage → Select All: select all pages.
- Manage → Delete: delete selected pages from the document.
- Manage → Share: share individual pages as images (.png).
- Download is enabled where Share is not supported (e.g., in Firefox).
The user can also enable the Upload feature. See Enable File Upload.
The PageView
When the user selects a page thumbnail, the PageView opens for that page, where the user can:
- Delete: remove the current page.
- Add Page: add more pages to the document.
- Share: share the current page as an image (.png).
- Download is enabled where Share is not supported (e.g., in Firefox).
- Edit: display additional editing features to further process the page.
- Edit → Crop: select a portion of the page and crop.
- Edit → Rotate: rotate the page 90 degrees counterclockwise.
- Edit → Filter: adjust the page's pixels.
- Edit → Annotate: add annotations to the page.
The user can also enable the Upload feature. See Enable File Upload.
Next Step
Mobile Web Capture provides extensive customization options. Read on to explore the available customizations in the MWC Customization Guide, or see the Framework Samples for complete Angular, React, and Vue projects.