




MRZ Scanner User Guide (Android Edition)
The Dynamsoft MRZ Scanner (Android Edition) provides a ready-to-use scanning component that lets you add MRZ reading to your app with minimal setup. This guide walks through building an MRZ scanning app from scratch using MRZScannerActivity — the built-in activity that handles the camera UI, scanning logic, and result delivery.
The app built here is ScanMRZBasic, available on GitHub in Java and Kotlin. For a fuller app with a dedicated result screen, document images, and camera-permission recovery, see the ScanMRZ Demo App.
Upgrading an existing integration rather than starting fresh? See the Upgrade Guide first.
Supported Document Types
The SDK supports three ICAO Machine Readable Travel Document (MRTD) formats: TD1 (ID cards, 3-line MRZ), TD2 (ID cards, 2-line MRZ), and TD3 (passports, 2-line MRZ). For a visual reference of each format, see Supported Document Types.
To request support for other MRTD types, contact the Dynamsoft Support Team.
System Requirements
- Supported OS: Android 5.0 (API Level 21) or higher.
- Supported ABI: armeabi-v7a, arm64-v8a, x86 and x86_64.
- Development Environment:
- IDE: Android Studio 2024.3.2 suggested.
- JDK: Java 17 or higher.
- Gradle: 8.0 or higher.
- Hardware: a physical Android device. The Android Emulator does not expose a camera, so the scanner cannot run on it.
Licensing
A valid license key is required to use the SDK. If you are just getting started, request a free 30-day trial license below:
- The license string above grants a time-limited free trial which requires a network connection.
- You can request a 30-day trial license via the Request a Trial License link.
- For production license setup, see the License Activation guide.
Add the SDK
-
Open settings.gradle (Groovy DSL) or settings.gradle.kts (Kotlin DSL) at the project root and add the Dynamsoft Maven repository to the
dependencyResolutionManagementblock:- Groovy
- Kotlin
-
dependencyResolutionManagement { repositoriesMode.set(RepositoriesMode.FAIL_ON_PROJECT_REPOS) repositories { google() mavenCentral() maven { url "https://download2.dynamsoft.com/maven/aar" } } } -
dependencyResolutionManagement {
    repositoriesMode.set(RepositoriesMode.FAIL_ON_PROJECT_REPOS)
    repositories {
        google()
        mavenCentral()
        maven {
            url = uri("https://download2.dynamsoft.com/maven/aar")
        }
    }
}
-
Open build.gradle (Module: app) for Groovy DSL — or build.gradle.kts (Module: app) for Kotlin DSL — and add the dependency:
- Groovy
- Kotlin
-
dependencies { implementation 'com.dynamsoft:mrzscannerbundle:3.6.2000' } -
dependencies {
    implementation("com.dynamsoft:mrzscannerbundle:3.6.2000")
}
-
Click Sync Now. After the synchronization completes, the SDK is added to the project.
Building the MRZ Scanner Application
The following steps build ScanMRZBasic — the smallest app that scans an MRZ and shows the parsed result. You can download the finished project from GitHub in Java or Kotlin.
The whole app is a single activity: a button launches the scanner, and the result renders on the same screen. For a fuller app with a dedicated result screen, a document image pager, per-field validation explanations, and camera-permission recovery, see the ScanMRZ Demo App.
Before you start, have these ready:
- A license key — a trial key is embedded in the snippets below. See Licensing to request your own.
- A physical Android device, connected over USB. Step 6 covers enabling USB debugging if you have not done so before.
- A document to scan — any passport or ID card carrying a TD1, TD2, or TD3 machine-readable zone. See Supported Document Types for what each format looks like.
The Kotlin snippets below use the package
com.dynamsoft.scanmrzbasic, matching the project name from Step 1. The downloadable Kotlin sample usescom.dynamsoft.scanmrzbasicktso that both samples can be installed on one device. The code is otherwise identical.
Step 1: Create a New Project
- Open Android Studio and select File > New > New Project.
- Choose Empty Views Activity as the project template.
- Set the app name to ScanMRZBasic, choose a save location, and set the Minimum SDK to 21.
- Choose your preferred Language (either Java or Kotlin) and Build configuration language (either Kotlin DSL or Groovy DSL). The SDK supports all combinations — the snippets below cover both languages, and the Add the SDK section covers both DSLs.
Step 2: Add the SDK
Follow the instructions in the Add the SDK section above to add mrzscannerbundle to your project.
Step 3: Add the App Resources
Three resource files support the screen you build in Step 4. Start with colors.xml in src/main/res/values/, which defines the text color and the amber used to flag a field that fails validation:
<?xml version="1.0" encoding="utf-8"?>
<resources>
    <color name="white">#FFFFFFFF</color>
    <!-- Applied to a field whose value does not match its check digit. -->
    <color name="warning_amber">#FFC107</color>
</resources>
Add the three strings the screen needs to strings.xml in the same folder. Your project already has an app_name entry, generated when you created it:
<string name="scan_an_mrz">Scan an MRZ</string>
<string name="scan_canceled">Scan canceled</string>
<string name="scan_no_data">Scan returned no data</string>
Finally, replace themes.xml in the same folder:
<resources>

    <style name="Theme.MRZScannerBasic" parent="Theme.AppCompat.NoActionBar">
        <item name="textAllCaps">false</item>
        <item name="colorAccent">@android:color/white</item>
        <item name="buttonTint">@color/white</item>
    </style>

    <!-- The two styles below just keep the field rows in activity_main.xml to one
         line each; they carry no SDK behavior. -->
    <style name="FieldLabel">
        <item name="android:layout_width">match_parent</item>
        <item name="android:layout_height">wrap_content</item>
        <item name="android:paddingTop">12dp</item>
        <item name="android:textSize">12sp</item>
    </style>

    <style name="FieldValue">
        <item name="android:layout_width">match_parent</item>
        <item name="android:layout_height">wrap_content</item>
        <item name="android:textStyle">bold</item>
    </style>

</resources>
The theme inherits from Theme.AppCompat because this project does not use Material Components. FieldLabel and FieldValue are ordinary layout styles that keep each field row in the next step to a single line; neither carries any SDK behavior.
Step 4: Set Up the Layout
Open activity_main.xml in src/main/res/layout/ and replace its contents. The screen has two halves: a Scan an MRZ button, and a result area that stays hidden until a scan succeeds.
<?xml version="1.0" encoding="utf-8"?>
<!--
    Deliberately plain — the smallest layout that can show a scan result. See the
    ScanMRZ sample for a styled result screen.

    The scan button sits outside the ScrollView so it stays reachable at the bottom of
    the screen while a long result scrolls above it.
-->
<LinearLayout xmlns:android="http://schemas.android.com/apk/res/android"
    xmlns:tools="http://schemas.android.com/tools"
    android:id="@+id/main"
    android:layout_width="match_parent"
    android:layout_height="match_parent"
    android:orientation="vertical"
    tools:context=".MainActivity">

    <ScrollView
        android:layout_width="match_parent"
        android:layout_height="0dp"
        android:layout_weight="1">

        <LinearLayout
            android:layout_width="match_parent"
            android:layout_height="wrap_content"
            android:orientation="vertical"
            android:padding="16dp">

            <!-- Carries the canceled message and any error string. -->
            <TextView
                android:id="@+id/tv_status"
                style="@style/FieldValue"
                android:textSize="16sp"
                android:visibility="gone"
                tools:text="Scan canceled"
                tools:visibility="visible" />

            <LinearLayout
                android:id="@+id/result_panel"
                android:layout_width="match_parent"
                android:layout_height="wrap_content"
                android:orientation="vertical"
                android:visibility="gone"
                tools:visibility="visible">

                <ImageView
                    android:id="@+id/iv_portrait"
                    android:layout_width="96dp"
                    android:layout_height="128dp"
                    android:scaleType="fitCenter"
                    android:visibility="gone"
                    tools:visibility="visible" />

                <TextView style="@style/FieldLabel" android:text="Full Name" />
                <TextView android:id="@+id/tv_full_name" style="@style/FieldValue" />

                <TextView style="@style/FieldLabel" android:text="Document Number" />
                <TextView android:id="@+id/tv_doc_number" style="@style/FieldValue" />

                <TextView style="@style/FieldLabel" android:text="Nationality" />
                <TextView android:id="@+id/tv_nationality" style="@style/FieldValue" />

                <TextView style="@style/FieldLabel" android:text="Date of Birth" />
                <TextView android:id="@+id/tv_date_of_birth" style="@style/FieldValue" />

                <TextView style="@style/FieldLabel" android:text="Date of Expiry" />
                <TextView android:id="@+id/tv_date_of_expiry" style="@style/FieldValue" />

                <TextView style="@style/FieldLabel" android:text="Document Type" />
                <TextView android:id="@+id/tv_doc_type" style="@style/FieldValue" />

                <TextView style="@style/FieldLabel" android:text="Raw MRZ Text" />
                <TextView
                    android:id="@+id/tv_raw_mrz"
                    style="@style/FieldValue"
                    android:fontFamily="monospace" />
            </LinearLayout>
        </LinearLayout>
    </ScrollView>

    <androidx.appcompat.widget.AppCompatButton
        android:id="@+id/btn_scan"
        android:layout_width="match_parent"
        android:layout_height="wrap_content"
        android:layout_margin="16dp"
        android:padding="16dp"
        android:text="@string/scan_an_mrz"
        android:textSize="18sp" />

</LinearLayout>
MainActivity finds every view it needs by ID, so these have to match:
| ID | Purpose |
|---|---|
main |
The root view. Window insets are applied to it so content clears the status and navigation bars. |
btn_scan |
Launches the scanner. |
tv_status |
Carries the “Scan canceled” message and any error string. Hidden until one of them applies. |
result_panel |
Wraps the whole result area. Starts gone, becomes visible only after a successful scan. |
iv_portrait |
The portrait cropped from the document, when one was found. |
tv_full_name … tv_raw_mrz |
One TextView per parsed field. |
Keeping result_panel hidden until a scan succeeds means the user never sees a screen of empty labels.
Step 5: Launch the Scanner and Show the Result
Open MainActivity and replace its contents. This is the whole application: it supplies the license, launches MRZScannerActivity, and handles whichever of the three result statuses comes back.
For optional config settings like document type filtering, UI visibility, and image capture, see the Customize MRZ Scanner guide.
You do not need to write any camera-permission code. The CAMERA permission is declared by the SDK and merged into your app at build time, and MRZScannerActivity requests it on first launch. If access is unavailable the scanner shows a dialog offering Allow camera access or Open Settings, never starts the camera, and reports the outcome as RS_EXCEPTION.
To present your own permission UI instead, call
config.setCameraPermissionPromptEnabled(false). The scanner then suppresses its dialog but still reports the denial, and still never starts the camera without access. See Customize MRZ Scanner for the full flow.
- Java
- Kotlin
package com.dynamsoft.scanmrzbasic;
import android.os.Bundle;
import android.view.View;
import android.widget.ImageView;
import android.widget.TextView;
import androidx.activity.EdgeToEdge;
import androidx.activity.result.ActivityResultLauncher;
import androidx.appcompat.app.AppCompatActivity;
import androidx.core.content.ContextCompat;
import androidx.core.graphics.Insets;
import androidx.core.view.ViewCompat;
import androidx.core.view.WindowInsetsCompat;
import com.dynamsoft.core.basic_structures.CoreException;
import com.dynamsoft.core.basic_structures.ImageData;
import com.dynamsoft.dcp.EnumValidationStatus;
import com.dynamsoft.mrzscannerbundle.ui.MRZData;
import com.dynamsoft.mrzscannerbundle.ui.MRZScanResult;
import com.dynamsoft.mrzscannerbundle.ui.MRZScannerActivity;
import com.dynamsoft.mrzscannerbundle.ui.MRZScannerConfig;
// Launches the built-in MRZ scanner and renders the result on this same screen. The whole
// sample is this one activity — see ScanMRZ for images, explanations and permission recovery.
public class MainActivity extends AppCompatActivity {
private final MRZScannerConfig config = new MRZScannerConfig();
private ActivityResultLauncher<MRZScannerConfig> launcher;
@Override
protected void onCreate(Bundle savedInstanceState) {
    super.onCreate(savedInstanceState);
    EdgeToEdge.enable(this);
    setContentView(R.layout.activity_main);
    ViewCompat.setOnApplyWindowInsetsListener(findViewById(R.id.main), (v, insets) -> {
        Insets bars = insets.getInsets(WindowInsetsCompat.Type.systemBars());
        v.setPadding(bars.left, bars.top, bars.right, bars.bottom);
        return insets;
    });
    // A trial license, so it needs a network connection. Request your own at
    // https://www.dynamsoft.com/customer/license/trialLicense?product=mrz&utm_source=samples&package=android
    config.setLicense("DLS2eyJvcmdhbml6YXRpb25JRCI6IjIwMDAwMSJ9");
    // The scanner is its own activity, so results arrive via the Activity Result API.
    launcher = registerForActivityResult(
            new MRZScannerActivity.ResultContract(), this::showResult);
    findViewById(R.id.btn_scan).setOnClickListener(v -> launcher.launch(config));
}
// Renders one of the three result statuses the scanner can come back with.
private void showResult(MRZScanResult result) {
    TextView tvStatus = findViewById(R.id.tv_status);
    View resultPanel = findViewById(R.id.result_panel);
    if (result.getResultStatus() == MRZScanResult.EnumResultStatus.RS_CANCELED) {
        // The user closed the scanner. There is no data and nothing went wrong.
        tvStatus.setText(R.string.scan_canceled);
        tvStatus.setVisibility(View.VISIBLE);
        resultPanel.setVisibility(View.GONE);
        return;
    }
    if (result.getResultStatus() == MRZScanResult.EnumResultStatus.RS_EXCEPTION) {
        // The scanner handles permission itself, so a denial arrives as an error string.
        tvStatus.setText(result.getErrorString());
        tvStatus.setVisibility(View.VISIBLE);
        resultPanel.setVisibility(View.GONE);
        return;
    }
    // A finished scan normally carries data, but guard it rather than assume.
    MRZData data = result.getData();
    if (data == null) {
        tvStatus.setText(R.string.scan_no_data);
        tvStatus.setVisibility(View.VISIBLE);
        resultPanel.setVisibility(View.GONE);
        return;
    }
    tvStatus.setVisibility(View.GONE);
    resultPanel.setVisibility(View.VISIBLE);
    // Validation is per field, so a joined full name is flagged when either half fails.
    int firstNameStatus = data.getFieldValidationStatus("firstName");
    int nameStatus = firstNameStatus == EnumValidationStatus.VS_FAILED
            ? firstNameStatus
            : data.getFieldValidationStatus("lastName");
    String fullName = (data.getFirstName() + " " + data.getLastName()).trim();
    applyField(findViewById(R.id.tv_full_name), fullName, nameStatus);
    applyField(findViewById(R.id.tv_doc_number), data.getDocumentNumber(),
            data.getFieldValidationStatus("documentNumber"));
    applyField(findViewById(R.id.tv_nationality), data.getNationality(),
            data.getFieldValidationStatus("nationality"));
    applyField(findViewById(R.id.tv_date_of_birth), data.getDateOfBirth(),
            data.getFieldValidationStatus("dateOfBirth"));
    applyField(findViewById(R.id.tv_date_of_expiry), data.getDateOfExpire(),
            data.getFieldValidationStatus("dateOfExpire"));
    // The document type comes from the MRZ layout itself, so it has no check digit.
    applyField(findViewById(R.id.tv_doc_type), data.getDocumentType(),
            EnumValidationStatus.VS_NONE);
    applyField(findViewById(R.id.tv_raw_mrz), data.getMrzText(),
            data.getFieldValidationStatus("mrzText"));
    showPortrait(result.getPortraitImage());
}
// The portrait is returned by default, but is null when none could be cropped.
private void showPortrait(ImageData portrait) {
    ImageView ivPortrait = findViewById(R.id.iv_portrait);
    ivPortrait.setVisibility(View.GONE);
    if (portrait == null) {
        return;
    }
    try {
        ivPortrait.setImageBitmap(portrait.toBitmap());
        ivPortrait.setVisibility(View.VISIBLE);
    } catch (CoreException ignored) {
    }
}
// Shows value, or "N/A" when empty; amber when it fails its check digit.
private void applyField(TextView tv, String value, int status) {
    boolean failed = status == EnumValidationStatus.VS_FAILED;
    tv.setText(value == null || value.isEmpty() ? "N/A" : value);
    tv.setTextColor(ContextCompat.getColor(this,
            failed ? R.color.warning_amber : R.color.white));
}
}
package com.dynamsoft.scanmrzbasic import android.os.Bundle import android.view.View import android.widget.ImageView import android.widget.TextView import androidx.activity.enableEdgeToEdge import androidx.activity.result.ActivityResultLauncher import androidx.appcompat.app.AppCompatActivity import androidx.core.content.ContextCompat import androidx.core.view.ViewCompat import androidx.core.view.WindowInsetsCompat import com.dynamsoft.core.basic_structures.CoreException import com.dynamsoft.core.basic_structures.ImageData import com.dynamsoft.dcp.EnumValidationStatus import com.dynamsoft.mrzscannerbundle.ui.MRZScanResult import com.dynamsoft.mrzscannerbundle.ui.MRZScannerActivity import com.dynamsoft.mrzscannerbundle.ui.MRZScannerConfig // Launches the built-in MRZ scanner and renders the result on this same screen. The whole // sample is this one activity — see ScanMRZ for images, explanations and permission recovery. class MainActivity : AppCompatActivity() { private val config = MRZScannerConfig() private lateinit var launcher: ActivityResultLauncher<MRZScannerConfig> override fun onCreate(savedInstanceState: Bundle?) { super.onCreate(savedInstanceState) enableEdgeToEdge() setContentView(R.layout.activity_main) ViewCompat.setOnApplyWindowInsetsListener(findViewById(R.id.main)) { v, insets -> val bars = insets.getInsets(WindowInsetsCompat.Type.systemBars()) v.setPadding(bars.left, bars.top, bars.right, bars.bottom) insets } // A trial license, so it needs a network connection. Request your own at // https://www.dynamsoft.com/customer/license/trialLicense?product=mrz&utm_source=samples&package=android config.license = "DLS2eyJvcmdhbml6YXRpb25JRCI6IjIwMDAwMSJ9" // The scanner is its own activity, so results arrive via the Activity Result API. launcher = registerForActivityResult(MRZScannerActivity.ResultContract()) { result -> showResult(result) } findViewById<View>(R.id.btn_scan).setOnClickListener { launcher.launch(config) } } // Renders one of the three result statuses the scanner can come back with. private fun showResult(result: MRZScanResult) { val tvStatus = findViewById<TextView>(R.id.tv_status) val resultPanel = findViewById<View>(R.id.result_panel) if (result.resultStatus == MRZScanResult.EnumResultStatus.RS_CANCELED) { // The user closed the scanner. There is no data and nothing went wrong. tvStatus.setText(R.string.scan_canceled) tvStatus.visibility = View.VISIBLE resultPanel.visibility = View.GONE return } if (result.resultStatus == MRZScanResult.EnumResultStatus.RS_EXCEPTION) { // The scanner handles permission itself, so a denial arrives as an error string. tvStatus.text = result.errorString tvStatus.visibility = View.VISIBLE resultPanel.visibility = View.GONE return } // A finished scan normally carries data, but guard it rather than assume. val data = result.data if (data == null) { tvStatus.setText(R.string.scan_no_data) tvStatus.visibility = View.VISIBLE resultPanel.visibility = View.GONE return } tvStatus.visibility = View.GONE resultPanel.visibility = View.VISIBLE // Validation is per field, so a joined full name is flagged when either half fails. val firstNameStatus = data.getFieldValidationStatus("firstName") val nameStatus = if (firstNameStatus == EnumValidationStatus.VS_FAILED) { firstNameStatus } else { data.getFieldValidationStatus("lastName") } val fullName = (data.firstName + " " + data.lastName).trim() applyField(findViewById(R.id.tv_full_name), fullName, nameStatus) applyField(findViewById(R.id.tv_doc_number), data.documentNumber, data.getFieldValidationStatus("documentNumber")) applyField(findViewById(R.id.tv_nationality), data.nationality, data.getFieldValidationStatus("nationality")) applyField(findViewById(R.id.tv_date_of_birth), data.dateOfBirth, data.getFieldValidationStatus("dateOfBirth")) applyField(findViewById(R.id.tv_date_of_expiry), data.dateOfExpire, data.getFieldValidationStatus("dateOfExpire")) // The document type comes from the MRZ layout itself, so it has no check digit. applyField(findViewById(R.id.tv_doc_type), data.documentType, EnumValidationStatus.VS_NONE) applyField(findViewById(R.id.tv_raw_mrz), data.mrzText, data.getFieldValidationStatus("mrzText")) showPortrait(result.portraitImage) } // The portrait is returned by default, but is null when none could be cropped. private fun showPortrait(portrait: ImageData?) { val ivPortrait = findViewById<ImageView>(R.id.iv_portrait) ivPortrait.visibility = View.GONE if (portrait == null) { return } try { ivPortrait.setImageBitmap(portrait.toBitmap()) ivPortrait.visibility = View.VISIBLE } catch (ignored: CoreException) { } } // Shows value, or "N/A" when empty; amber when it fails its check digit. private fun applyField(tv: TextView, value: String?, status: Int) { val failed = status == EnumValidationStatus.VS_FAILED tv.text = if (value.isNullOrEmpty()) "N/A" else value tv.setTextColor( ContextCompat.getColor(this, if (failed) R.color.warning_amber else R.color.white) ) } }
Key APIs in use
MRZScannerConfig— carries your license and any optional settings. The same instance is handed to every launch, so configure it once.MRZScannerActivity.ResultContract— the Activity Result contract for the scanner.registerForActivityResultreturns a launcher that accepts anMRZScannerConfigand delivers anMRZScanResultback. The scanner runs as its own activity, which is why the result arrives here rather than through a listener you register on the config.getResultStatus()— one ofRS_FINISHED,RS_CANCELED, orRS_EXCEPTION. Handle all three: cancellation and failure are reported through the same path as success rather than thrown, so a scanner that never produces a result is usually an unhandled status rather than a crash.getErrorString()— a readable message that accompaniesRS_EXCEPTION.getErrorCodegives the machine-readable code behind it.getData()— the parsedMRZData, holding every field read from the document.getPortraitImage()— the portrait cropped from the document, ornullwhen none was found.toBitmap()throwsCoreException, so it is wrapped in atry.
Reading a field’s validation status
Most MRZ fields are protected by a check digit, and getFieldValidationStatus reports whether the value read from the document matched it. It takes the same field names as the getters on MRZData:
applyField(findViewById(R.id.tv_doc_number), data.getDocumentNumber(),
        data.getFieldValidationStatus("documentNumber"));
The result is VS_SUCCEEDED, VS_NONE when the field carries no check digit, or VS_FAILED when the value and its check digit disagree — meaning the document may be misread, invalid, or altered. applyField colors the row amber in that case. Note that the value is still returned either way, so you can decide whether to accept it, prompt for a re-scan, or ask for manual correction.
The full name is the one field that needs two lookups, because the single line on screen joins two separately validated fields:
int firstNameStatus = data.getFieldValidationStatus("firstName");
int nameStatus = firstNameStatus == EnumValidationStatus.VS_FAILED
        ? firstNameStatus
        : data.getFieldValidationStatus("lastName");
The displayed line should be flagged if either half failed, so a failed firstName is used when present, and the status of lastName otherwise. Document type is passed VS_NONE explicitly, since it is derived from the MRZ layout itself rather than read from a field with a check digit.
The ScanMRZ Demo App shows a richer treatment of the same API: an error icon, an underline marking the row as tappable, and a dialog explaining what a failed check digit means.
Step 6: Run the Project
Before running, complete these steps on your Android device:
-
Enable USB Debugging — Go to Settings > About Phone and tap Build Number seven times to unlock Developer Options. Then go to Settings > Developer Options and enable USB Debugging.
-
Connect your device — Connect your Android device to your development machine via USB. If prompted on the device, tap Allow to authorize the debugging connection.
-
Select your device — In Android Studio, select your connected device from the run configuration dropdown at the top of the IDE.
-
Click Run.
Tap Scan an MRZ and point the camera at the machine-readable zone of a passport or ID card. The scanner closes as soon as it has what it needs, and the parsed fields appear on the screen underneath.
A physical Android device is required. The camera is not available on the Android Emulator.
Results and Image Lifetime
The scanner is a separate activity, which shapes how results reach you and how long the images in them stay valid.
How the result arrives
MRZScannerActivity.ResultContract is an ActivityResultContract, so the scanner is launched and its result collected through the standard Activity Result API rather than a listener you register on the config. Two things follow from that:
- Register the launcher unconditionally, at the point where the activity is constructed — in
onCreate, not inside a click handler. Android restores pending results during activity recreation, and a launcher registered later may miss one. - One launcher handles any number of scans. Call
launch(config)again for a re-scan; there is no teardown between runs, and the sameMRZScannerConfigcan be reused.
The config is read when the scanner starts, so changes made to it between launches take effect on the next scan.
How long the images stay valid
getDocumentImage, getOriginalImage, and getPortraitImage return ImageData backed by a native buffer rather than an ordinary Bitmap. Each MRZScanResult holds a reference to those buffers and releases it when the object is collected.
You do not have to manage this. Passing a result to another activity through an Intent works without any extra call: the instance that comes out the other side takes its own reference as it is unparceled, so the buffers stay alive as long as any result object still points at them.
Do not call
retainAllImageInstances()orreleaseAllImageInstances(). Both are annotated@RestrictTo(LIBRARY_GROUP)and exist for the SDK’s internal use. Taking a manual reference leaks the buffer, because nothing will ever release it.
If you need an image to outlive the result — to cache it, upload it, or hold it in a view model — convert it to something with ordinary Java lifetime as soon as you receive it:
- Java
- Kotlin
ImageData portrait = result.getPortraitImage();
if (portrait != null) {
   try {
      Bitmap bitmap = portrait.toBitmap(); // an ordinary Bitmap, safe to keep
   } catch (CoreException e) {
      e.printStackTrace();
   }
}
val portrait = result.portraitImage if (portrait != null) { try { val bitmap = portrait.toBitmap() // an ordinary Bitmap, safe to keep } catch (e: CoreException) { e.printStackTrace() } }
toBitmap() produces an ordinary Bitmap, subject to normal garbage collection and no longer tied to the result.
The Scanner Screen
MRZScannerActivity supplies its own full-screen UI, so nothing you wrote above controls what the user sees while scanning. It is worth knowing what that UI already tells them, because it decides how much your own screens still need to explain.
The screen is a live camera preview with a guide frame marking where to place the document, a toolbar across the top carrying the close, torch, camera-toggle, beep, and vibrate buttons, a format selector along the bottom for choosing between ID, passport, or both, and a prompt that updates as the scan progresses. Every one of these can be hidden — see Configure the UI Elements.
What the user is told
The scanner narrates its own progress, so the prompt text is the main thing a user follows:
| Stage | On screen |
|---|---|
| Waiting for a document | Scan the MRZ side first |
| Text lines detected in frame | A spinner at the center of the guide frame |
| MRZ read, nothing further needed | MRZ scanned ✓ |
| MRZ read, portrait found on the same side | MRZ scanned ✓ / Portrait scanned ✓ |
| MRZ read, still looking for a portrait | MRZ scanned ✓ / Finding portrait… |
| No portrait found after five seconds | MRZ scanned ✓ / No portrait detected |
| MRZ read, opposite side needed | MRZ scanned ✓ / Flip and scan the other side, with an animated flip prompt |
| Both sides captured | MRZ scanned ✓ / Both sides scanned ✓ |
The spinner is not a generic busy indicator. It is driven by per-frame text-line detection, so it appears when the scanner can see MRZ-like text and is working on it, and disappears when the document moves out of frame. Once the MRZ is confirmed it stops for the rest of the session. For the user it is the cue that holding the device steady is paying off.
The prompt is hidden along with the guide frame, since it reads as a label on it. Hiding the frame also widens the scanned area to the whole preview — see Hiding the guide frame.
The last four rows are covered in detail in the next section.
Scanning Two-Sided Documents
On a passport the machine-readable zone and the portrait share one page, so a single capture collects everything. On most TD1 and TD2 ID cards they are on opposite sides, and the scanner has to see both. It handles this itself — the app you built above needs no extra code — but it changes what the scan looks like to the user and what comes back in the result.
The scanner always reads the MRZ side first, whichever physical side that is. The API names the sides DS_MRZ and DS_OPPOSITE for that reason: document layouts vary by country, so there is no guarantee the MRZ is on the back or that the portrait is on the front.
What happens during a scan
- The user scans the MRZ side. This fills the images returned for
DS_MRZ. - The scanner looks for a portrait on that same side. If it finds one — the usual case for a passport — the scan ends there and
DS_OPPOSITEstaysnull. - If no portrait is found and the document is not a passport, the scanner shows “Flip and scan the other side” with an animated prompt. Once the opposite side is captured, its images fill
DS_OPPOSITEand the portrait is taken from it.
A passport that yields no portrait is treated differently: the scanner keeps looking on the same page rather than asking for a flip, since flipping a passport would not help.
Five seconds after the MRZ is read, a tappable “Continue scanning or tap to finish →” prompt appears. It lets the user finish with whatever has been captured so far, which is the way out when a document has no portrait to find. Ending the scan this way leaves
DS_OPPOSITEand the portraitnull, so treat both as optional in your result handling.
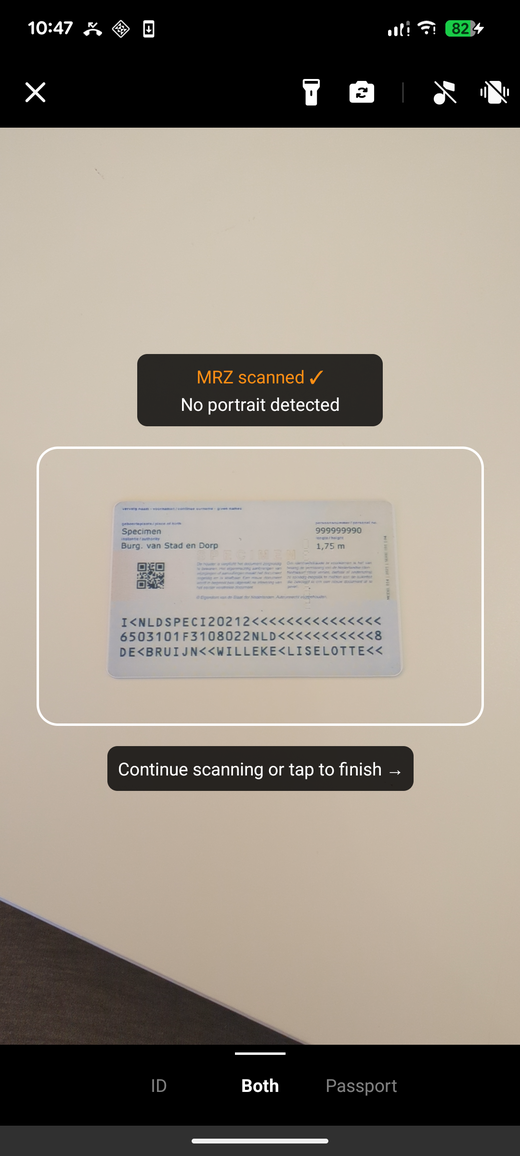
The scanner offering a way out when no portrait is found
What you get back
Assuming default settings:
| Document | getDocumentImage(DS_MRZ) |
getDocumentImage(DS_OPPOSITE) |
getPortraitImage() |
|---|---|---|---|
| Passport (TD3) | populated | null |
populated, from the MRZ side |
| ID card (TD1 / TD2) | populated | populated | populated, from the opposite side |
Any document, with setReturnPortraitImage(false) |
populated | null |
null |
The same pattern applies to getOriginalImage(side) once setReturnOriginalImage(true) is set.
Turning it off
Two-sided scanning is driven entirely by the portrait. It is on by default because setReturnPortraitImage defaults to true; setting it to false ends every scan as soon as the MRZ is read:
- Java
- Kotlin
config.setReturnPortraitImage(false);config.isReturnPortraitImage = false
That is the right choice when you only need the parsed text, and it makes every scan a single capture. getPortraitImage() and both DS_OPPOSITE getters then always return null.
For an example that displays the document images from both sides, see the ScanMRZ Demo App.
Preparing for Release
Two things are worth checking before you ship a build that includes the scanner: that shrinking has not broken the native bindings, and that you are not shipping more of the SDK than your users need.
Shrinking and obfuscation
You do not need to add any ProGuard rules for the SDK. A project that keeps Android’s default configuration will build and run correctly with minifyEnabled true.
That default is doing real work, though. Several SDK classes declare native methods that the native layer resolves by name, so if R8 renames or removes them, the binding fails at runtime rather than at build time. The rule that prevents this ships in proguard-android-optimize.txt, the file new projects reference by default:
-keepclasseswithmembernames class * {
    native <methods>;
}
If your project uses a hand-written ProGuard configuration instead of the default file, make sure it includes that rule.
App size
Most of the footprint is the Dynamsoft Capture Vision engine and its models, not the MRZ layer. Measured from a build of ScanMRZBasic, the native libraries alone come to:
| ABI | Native libraries |
|---|---|
armeabi-v7a |
~11 MB |
arm64-v8a |
~16 MB |
x86 |
~19 MB |
x86_64 |
~19 MB |
A single APK carrying all four is the worst case. Two ways to avoid it:
- Publish an Android App Bundle. Google Play generates per-device APKs from it and delivers only the matching ABI, so a user installs roughly one column of that table rather than all of it. This is the recommended option and needs no configuration.
- Filter ABIs when you distribute APKs directly.
x86andx86_64mostly serve emulators, and the scanner needs a camera the emulator does not provide — but ChromeOS devices arex86_64and do have cameras, so drop them only if you know your distribution does not include them:
- Groovy
- Kotlin
android {
   defaultConfig {
      ndk {
         abiFilters 'armeabi-v7a', 'arm64-v8a'
      }
   }
}
android { defaultConfig { ndk { abiFilters += listOf("armeabi-v7a", "arm64-v8a") } } }
16 KB page sizes
The SDK’s native libraries are built for devices whose kernels use a 16 KB memory page size, so no action is needed on your side.
Next Steps
- Demo app — Work through the ScanMRZ Demo App to add a dedicated result screen, a document image pager, per-field validation explanations, and camera-permission recovery.
- Samples — Browse all four Android samples on the Demo and Samples page.
- Customize — Learn how to configure document type, UI elements, and feedback in the Customize MRZ Scanner guide.
- Build from source — When
MRZScannerConfigcannot express what you need, the component’s source is published and you can build the library yourself. See Building from Source. - API Reference — Browse the full Android API Reference for all classes and methods.
- License — See the License Activation guide for production license setup.
- Support — Contact the Dynamsoft Support Team for help or custom requirements.
 Yes
Yes No
No