


Document Scanner Chrome Extension: Scan Paper Documents Directly into Web Apps
With Dynamsoft’s Document Scanner extension for Chrome, you can easily scan documents directly into popular web applications such as Gmail, Outlook, or Salesforce. Dynamsoft Document Scanner Chrome Extension enables secure browser-based document scanning directly from a TWAIN document scanner into modern web systems. With this extension, users can scan documents into web applications without installing heavy desktop software or leaving Google Chrome.
The extension is a part of the Dynamic Web TWAIN ecosystem, a browser-based document scanning SDK for developing web applications to scan documents in all common web browsers and platforms.
Key Takeaways
- Dynamsoft Document Scanner Chrome Extension enables direct document scanning from Chrome into web applications.
- Supports TWAIN-compatible scanners via the required Dynamsoft local service.
- Simple 4-step setup: install extension, open web app, install service, select scanner.
- Designed for browser-based document capture workflows without leaving Chrome.
- Includes troubleshooting guidance to quickly resolve setup or connection issues.
This guide will walk you through the process of installing and using this Document Scanner extension.
How to Install the Dynamsoft Document Scanner Chrome Extension (Complete Setup Guide)
Follow the steps below to install the Document Scanner Chrome Extension and enable browser-based document scanning in your web application.
Step 1: Add Dynamsoft Document Scanner Extension to Google Chrome
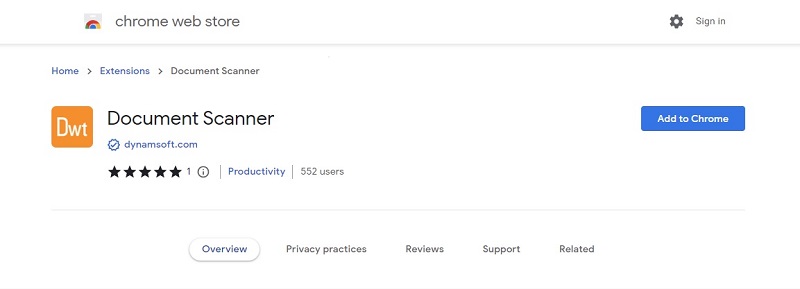
- Launch Google Chrome. Go to the Chrome Web Store.
- Search for “Document Scanner”. Or, visit its web store link.
-
Click the “Add to Chrome” button.
Step 2: Open Your Web Application in Chrome
-
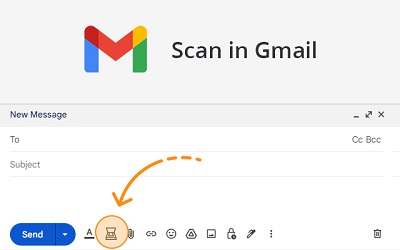
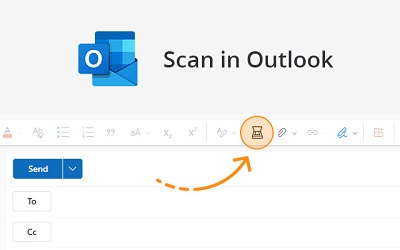
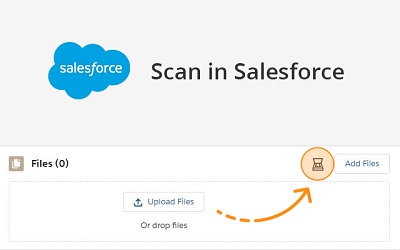
Open your preferred web application where you want to scan documents directly. The extension works with several popular web applications including Gmail, Outlook, or Salesforce.
-
Log into your account, if required.
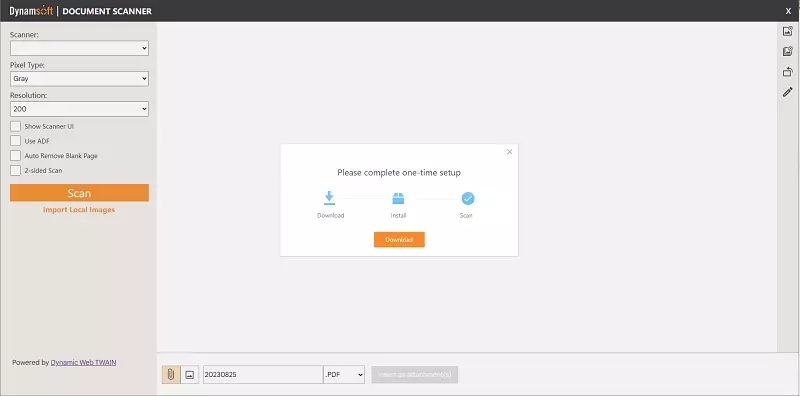
Step 3: Install the Dynamsoft Service
- After you’ve opened your web application, a dialog box will appear, prompting you to install the Dynamsoft Service.
-
Click on the link provided in the dialog box to download the DynamsoftServiceSetup.msi installer.
- Locate the downloaded file on your computer (usually in the “Downloads” folder) and double-click it to start the installation process.
- Follow the on-screen instructions to install the Dynamsoft Service.
- Once the installation is complete, the dialog box that prompted you to download the Dynamsoft Service will automatically disappear.
Step 4: Select Your Document Scanner
- After the Dynamsoft Service is installed, the Scanner dropdown list will be populated, showing all the available scanners connected to your computer.
- Click on the dropdown list and select the scanner you want to use.
Scan Documents into Your Web Application Using the Chrome Extension
After setup, you can use the Document Scanner Chrome Extension to scan documents into web applications directly from your connected TWAIN document scanner.
- Place the document you want to scan into your scanner.
- Select the appropriate scan settings (such as resolution, color mode, and scan area) in the scanner settings dialog box. Click the “Scan” button.
- Once the scanning is complete, the scanned image(s) will be displayed in the right pane of the extension interface. You can then easily insert them as attachments into your chosen web application.
Troubleshooting Common Issues with the Document Scanner Chrome Extensio
If your Document Scanner Chrome Extension is not detecting your TWAIN document scanner or cannot connect to your web application, review the common issues below:
- Make sure that your scanner is properly connected to your computer and powered on.
- Ensure that you have the latest drivers installed for your scanner.
- Restart the Dynamsoft Service.
- If the issue persists, please contact the extension’s support team for further assistance.
Thank you for choosing the Document Scanner extension for Chrome. We hope that this guide has helped you successfully install and use the extension. If you have any further questions or need assistance, please don’t hesitate to reach out to us. https://www.dynamsoft.com/contact/
Explore Our Developer Hub for Guides, API References, and More.