


How to Upload Scanned Images to Amazon S3 Using Dynamic Web TWAIN SDK
In this tutorial, I’d like to share how to upload images, captured with Dynamic Web TWAIN (DWT), to Amazon S3. The adopted techniques include Dynamic Web TWAIN SDK, Amazon S3 REST API, JavaScript and PHP. You need to get familiar with DWT SDK and the Amazon S3 stuff (e.g., Bucket, Access Key, Secret Key, Policy and so on).
As stated on Amazon S3 official documents, S3 supports HTTP Post request from the client directly as long as the request is associated with the correct authenticated information: policy and signature. To upload the image data captured by DWT SDK, you will need to:
1) Create Web pages contain DWT SDK, policy and signature information (encrypted).
2) Once scanning process is finished, read the acquired image to a buffer, convert the buffer into BLOB, and send the BLOB data to S3.
How to Send Data to Amazon S3
On the server side, you can write PHP code as follows. You need access key and secret key generated by Amazon S3 account:
<?php
$bucket = "XXX"; //Specify the bucket which is the place or the folder name used for storing data on Amazon S3
$accesskey = "YourOwnAccessKey";
$secret = "YourOwnSecretKey"; //Specify the Access Key and Secret Key you obtained from your Amazon S3 account. You should keep this confidential

$policy = json_encode(array(
'expiration' => '2018-08-06T12:00:00.000Z',
'conditions' => array(
array(
'bucket' => $bucket
),
array(
'starts-with',
'$key',
'Events/'
),
array(
'acl' => 'public-read'
)
)
)); //Create a policy that specifies what you permit and what you don't permit for the data uploaded from a client web page
$base64Policy = base64_encode($policy);
$signature = base64_encode(hash_hmac("sha1", $base64Policy, $secret, $raw_output = true)); //Encode and encrypt these policies and signatures to keep them confidential, and store the encoded and encrypted values in the hidden input elements.
?>
The code for the client side is trickier and might be error-prone if you are not familiar with S3 rules. Check the code below:
HTML
<input type="hidden" name="AWSAccessKeyId" value="<?php echo htmlspecialchars($accesskey, ENT_QUOTES, 'UTF-8'); ?>">
<input type="hidden" name="policy" value="<?php echo htmlspecialchars($base64Policy, ENT_QUOTES, 'UTF-8'); ?>">
<input type="hidden" name="signature" value="<?php echo htmlspecialchars($signature, ENT_QUOTES, 'UTF-8'); ?>">
<li style="text-align: center;">
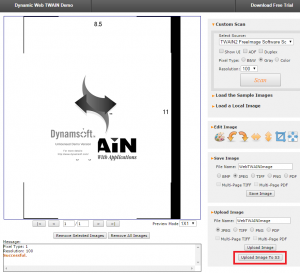
<input id="btnUploadS3" type="button" value="Upload Image To S3" onclick="btnUploadS3_onclick()" />
</li>
JavaScript
function btnUploadS3_onclick() {
if (!checkIfImagesInBuffer()) {
return;
}
var i, strHTTPServer, strActionPage, strImageType;
_txtFileName.className = "";
if (!strre.test(_txtFileName.value)) {
_txtFileName.className += " invalid";
_txtFileName.focus();
appendMessage("Please input <b>file name</b>.<br />Currently only English names are allowed.<br />");
return;
}
for (i = 0; i < 4; i++) {
if (document.getElementsByName("ImageType").item(i).checked == true) {
strImageType = i + 1;
break;
}
}
var uploadfilename = _txtFileName.value + '.' + document.getElementsByName("ImageType").item(i).value;
DWObject.SelectedImagesCount = 1;
var size = DWObject.GetSelectedImagesSize(strImageType);
var ary = new Array(size);
for (var i =0; i<size; i++) ary[i] = 0;
DWObject.SaveSelectedImagesToBytes(size, ary); //<span style="color: #656565;"> save the image data into buffer</span>
// make xmlHttpRequest and send the binary data to S3
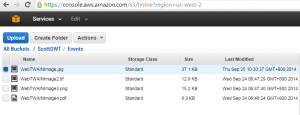
strActionPage = "http://s3.amazonaws.com/XXX/"; //<span style="color: #666666;">The XXX would be your bucket name that you would like the uploaded data to be stored</span>
var UTF8_STR = new Uint8Array(ary); // Convert to UTF-8…
var BINARY_ARR=UTF8_STR.buffer; // Convert to buffer…
var dataBlob = new Blob([BINARY_ARR]);
var fd = new FormData();
uploadfilename = 'Events/' + uploadfilename;
// <span style="color: #666666;">The common fields you need to specify include: </span><b style="color: #666666;">Key</b><span style="color: #666666;">, </span><b style="color: #666666;">AWSAccessKeyId</b><span style="color: #666666;">, </span><b style="color: #666666;">Acl</b><span style="color: #666666;">, </span><b style="color: #666666;">Policy</b><span style="color: #666666;">,</span><b style="color: #666666;">Signature</b><span style="color: #666666;"> and </span><b style="color: #666666;">File</b><span style="color: #666666;">. Note: the order of the fields (key, acl, policy, signature, and file should be the last one) matters. If you disorder them, you will fail to upload the image data.</span>
fd.append('key', uploadfilename);
fd.append('AWSAccessKeyId', document.getElementsByName("AWSAccessKeyId").item(0).value);
fd.append('acl', 'public-read');
fd.append('policy', document.getElementsByName("policy").item(0).value);
fd.append('signature', document.getElementsByName("signature").item(0).value);
fd.append("file", dataBlob, uploadfilename);
var xhr = new XMLHttpRequest();
xhr.open('POST', strActionPage);
xhr.addEventListener('load', function(e) {
console.log('uploaded!', e) // Successful upload!
});
xhr.send(fd);
}