How to Build an Android Document Scanner
Dynamsoft Document Normalizer is an SDK to detect the boundary of documents and runs perspective transformation to get a normalized document image. A normalized image can be used for further processing such as OCR.
In this article, we are going to create an Android document scanner using Dynamsoft Document Normalizer and CameraX.
A demo video of the final result:
The scanning process:
- Start the camera using CameraX and analyse the frames to detect the boundary of documents. When the IoUs of three consecutive detected polygons are over 90%, take a photo.
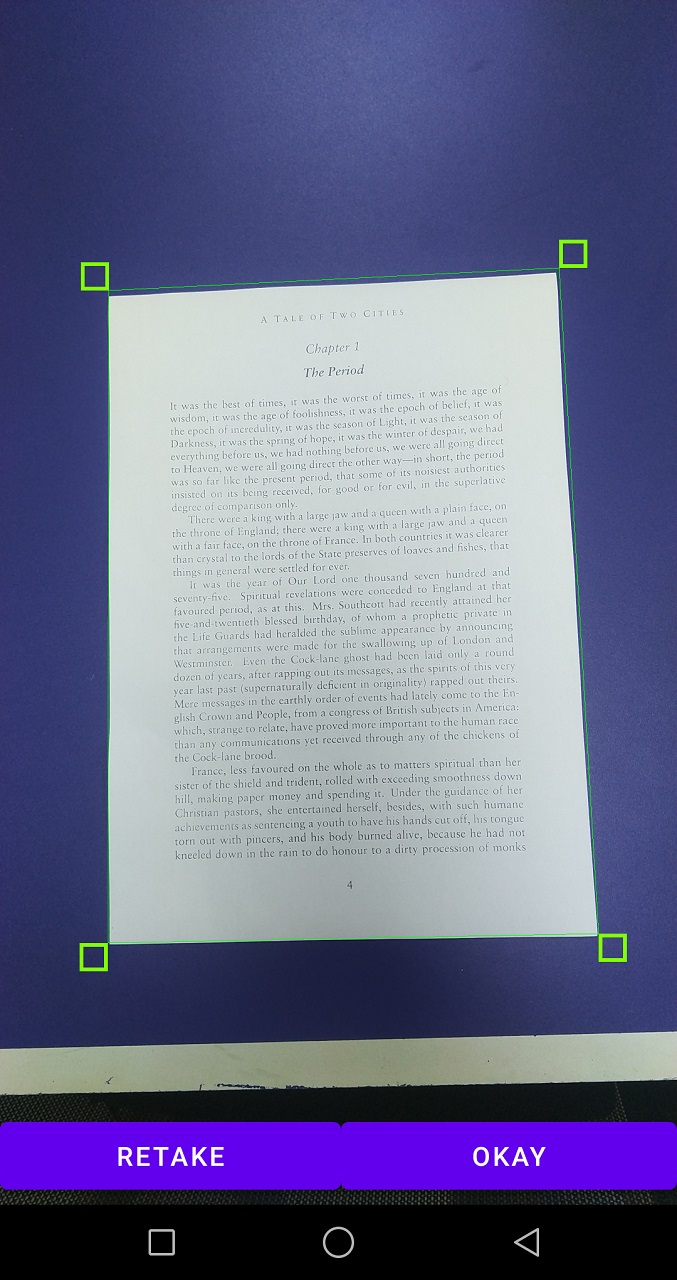
- After the photo is taken, the users are directed to a cropping activity. They can drag the corner points to adjust the detected polygons.
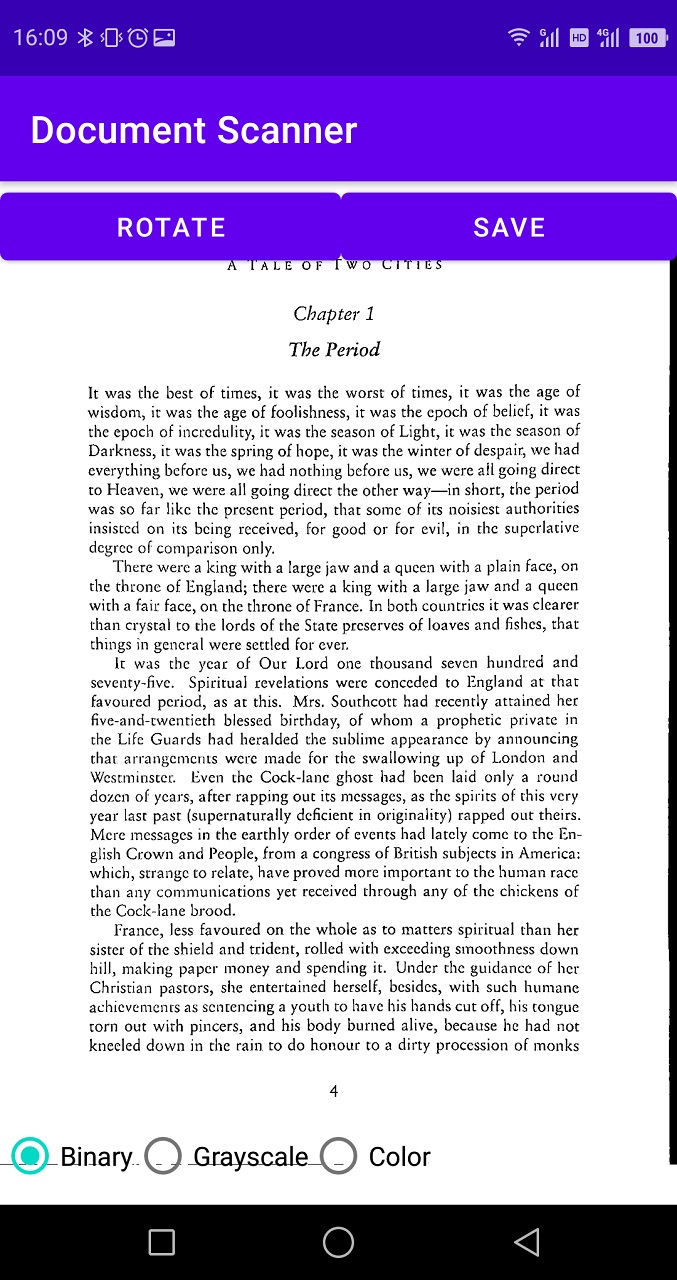
- If the user confirms that the polygon is correct, the app then runs perspective correction and cropping to get a normalized document image. Users can rotate the image and set the color mode (binary, grayscale and color) of the image.
If you are using Jetpack Compose or need to acquire images from physical document scanners, you can check out this article.
Build an Android Document Scanner
Let’s do this in steps. We are going to talk about what to configure and what to do for each activity.
Add Dependencies
In settings.gradle, add the following repository.
repositories {
    maven {
        url "https://download2.dynamsoft.com/maven/aar"
    }
}
In the app’s build.gradle, add the following packages.
//zoomable imageview
implementation 'com.jsibbold:zoomage:1.3.1'

//Dynamsoft products
implementation 'com.dynamsoft:dynamsoftcapturevisionrouter:2.0.21'
implementation 'com.dynamsoft:dynamsoftdocumentnormalizer:2.0.20'
implementation 'com.dynamsoft:dynamsoftcore:3.0.20'
implementation 'com.dynamsoft:dynamsoftlicense:3.0.30'
implementation 'com.dynamsoft:dynamsoftimageprocessing:2.0.21'

//CameraX
def camerax_version = '1.1.0-rc01'
implementation "androidx.camera:camera-core:$camerax_version"
implementation "androidx.camera:camera-camera2:$camerax_version"
implementation "androidx.camera:camera-lifecycle:$camerax_version"
implementation "androidx.camera:camera-view:$camerax_version"
Add Permissions
We have to add the following to AndroidManifest.xml for the permissions to access the camera and write files to the storage.
<uses-permission android:name="android.permission.CAMERA" />
<uses-permission android:name="android.permission.WRITE_EXTERNAL_STORAGE"></uses-permission>
Main Activity
Add a start scanning button to navigate to the camera activity.
It will check and request the camera permission before doing so. Meanwhile, the license of Dynamsoft Document Normalizer is also initialized when the app starts.
@Override
protected void onCreate(Bundle savedInstanceState) {
    super.onCreate(savedInstanceState);
    setContentView(R.layout.activity_main);
    startScanButton = findViewById(R.id.startScanButton);
    startScanButton.setOnClickListener(v -> {
        if (hasCameraPermission()) {
            startScan();
        } else {
            requestPermission();
        }
    });
    initDynamsoftLicense();
}

private void initDynamsoftLicense(){
    LicenseManager.initLicense("LICENSE-KEY", this, (isSuccess, error) -> {
        if (!isSuccess) {
            Log.e("DDN", "InitLicense Error: " + error);
        }else{
            Log.d("DDN","license valid");
        }
    });
}
You can apply for a trial license of Dynamsoft Document Normalizer here.
Camera Activity
In the camera activity, we start the camera, detect the document and then automatically take a photo of a document.
Start the Camera using CameraX
When the activity starts, start the camera, initialize an instance of Capture Vision Router which can call Dynamsoft Document Normalizer and bind use cases for CameraX.
private PreviewView previewView;
private ListenableFuture<ProcessCameraProvider> cameraProviderFuture;
private ExecutorService exec;
private CaptureVisionRouter cvr;
@Override
protected void onCreate(Bundle savedInstanceState) {
    super.onCreate(savedInstanceState);
    setContentView(R.layout.activity_camera);
    previewView = findViewById(R.id.previewView);
    exec = Executors.newSingleThreadExecutor();
    cameraProviderFuture = ProcessCameraProvider.getInstance(this);
    cameraProviderFuture.addListener(new Runnable() {
        @Override
        public void run() {
            try {
                ProcessCameraProvider cameraProvider = cameraProviderFuture.get();
                bindUseCases(cameraProvider);
            } catch (ExecutionException | InterruptedException e) {
                e.printStackTrace();
            }
        }
    }, ContextCompat.getMainExecutor(this));
    cvr = new CaptureVisionRouter(CameraActivity.this);
    try {
        // update settings for document detection
        cvr.initSettings("{\"CaptureVisionTemplates\": [{\"Name\": \"Default\"},{\"Name\": \"DetectDocumentBoundaries_Default\",\"ImageROIProcessingNameArray\": [\"roi-detect-document-boundaries\"]},{\"Name\": \"DetectAndNormalizeDocument_Default\",\"ImageROIProcessingNameArray\": [\"roi-detect-and-normalize-document\"]},{\"Name\": \"NormalizeDocument_Binary\",\"ImageROIProcessingNameArray\": [\"roi-normalize-document-binary\"]},  {\"Name\": \"NormalizeDocument_Gray\",\"ImageROIProcessingNameArray\": [\"roi-normalize-document-gray\"]},  {\"Name\": \"NormalizeDocument_Color\",\"ImageROIProcessingNameArray\": [\"roi-normalize-document-color\"]}],\"TargetROIDefOptions\": [{\"Name\": \"roi-detect-document-boundaries\",\"TaskSettingNameArray\": [\"task-detect-document-boundaries\"]},{\"Name\": \"roi-detect-and-normalize-document\",\"TaskSettingNameArray\": [\"task-detect-and-normalize-document\"]},{\"Name\": \"roi-normalize-document-binary\",\"TaskSettingNameArray\": [\"task-normalize-document-binary\"]},  {\"Name\": \"roi-normalize-document-gray\",\"TaskSettingNameArray\": [\"task-normalize-document-gray\"]},  {\"Name\": \"roi-normalize-document-color\",\"TaskSettingNameArray\": [\"task-normalize-document-color\"]}],\"DocumentNormalizerTaskSettingOptions\": [{\"Name\": \"task-detect-and-normalize-document\",\"SectionImageParameterArray\": [{\"Section\": \"ST_REGION_PREDETECTION\",\"ImageParameterName\": \"ip-detect-and-normalize\"},{\"Section\": \"ST_DOCUMENT_DETECTION\",\"ImageParameterName\": \"ip-detect-and-normalize\"},{\"Section\": \"ST_DOCUMENT_NORMALIZATION\",\"ImageParameterName\": \"ip-detect-and-normalize\"}]},{\"Name\": \"task-detect-document-boundaries\",\"TerminateSetting\": {\"Section\": \"ST_DOCUMENT_DETECTION\"},\"SectionImageParameterArray\": [{\"Section\": \"ST_REGION_PREDETECTION\",\"ImageParameterName\": \"ip-detect\"},{\"Section\": \"ST_DOCUMENT_DETECTION\",\"ImageParameterName\": \"ip-detect\"},{\"Section\": \"ST_DOCUMENT_NORMALIZATION\",\"ImageParameterName\": \"ip-detect\"}]},{\"Name\": \"task-normalize-document-binary\",\"StartSection\": \"ST_DOCUMENT_NORMALIZATION\",   \"ColourMode\": \"ICM_BINARY\",\"SectionImageParameterArray\": [{\"Section\": \"ST_REGION_PREDETECTION\",\"ImageParameterName\": \"ip-normalize\"},{\"Section\": \"ST_DOCUMENT_DETECTION\",\"ImageParameterName\": \"ip-normalize\"},{\"Section\": \"ST_DOCUMENT_NORMALIZATION\",\"ImageParameterName\": \"ip-normalize\"}]},  {\"Name\": \"task-normalize-document-gray\",   \"ColourMode\": \"ICM_GRAYSCALE\",\"StartSection\": \"ST_DOCUMENT_NORMALIZATION\",\"SectionImageParameterArray\": [{\"Section\": \"ST_REGION_PREDETECTION\",\"ImageParameterName\": \"ip-normalize\"},{\"Section\": \"ST_DOCUMENT_DETECTION\",\"ImageParameterName\": \"ip-normalize\"},{\"Section\": \"ST_DOCUMENT_NORMALIZATION\",\"ImageParameterName\": \"ip-normalize\"}]},  {\"Name\": \"task-normalize-document-color\",   \"ColourMode\": \"ICM_COLOUR\",\"StartSection\": \"ST_DOCUMENT_NORMALIZATION\",\"SectionImageParameterArray\": [{\"Section\": \"ST_REGION_PREDETECTION\",\"ImageParameterName\": \"ip-normalize\"},{\"Section\": \"ST_DOCUMENT_DETECTION\",\"ImageParameterName\": \"ip-normalize\"},{\"Section\": \"ST_DOCUMENT_NORMALIZATION\",\"ImageParameterName\": \"ip-normalize\"}]}],\"ImageParameterOptions\": [{\"Name\": \"ip-detect-and-normalize\",\"BinarizationModes\": [{\"Mode\": \"BM_LOCAL_BLOCK\",\"BlockSizeX\": 0,\"BlockSizeY\": 0,\"EnableFillBinaryVacancy\": 0}],\"TextDetectionMode\": {\"Mode\": \"TTDM_WORD\",\"Direction\": \"HORIZONTAL\",\"Sensitivity\": 7}},{\"Name\": \"ip-detect\",\"BinarizationModes\": [{\"Mode\": \"BM_LOCAL_BLOCK\",\"BlockSizeX\": 0,\"BlockSizeY\": 0,\"EnableFillBinaryVacancy\": 0,\"ThresholdCompensation\" : 7}],\"TextDetectionMode\": {\"Mode\": \"TTDM_WORD\",\"Direction\": \"HORIZONTAL\",\"Sensitivity\": 7},\"ScaleDownThreshold\" : 512},{\"Name\": \"ip-normalize\",\"BinarizationModes\": [{\"Mode\": \"BM_LOCAL_BLOCK\",\"BlockSizeX\": 0,\"BlockSizeY\": 0,\"EnableFillBinaryVacancy\": 0}],\"TextDetectionMode\": {\"Mode\": \"TTDM_WORD\",\"Direction\": \"HORIZONTAL\",\"Sensitivity\": 7}}]}");
    } catch (CaptureVisionRouterException e) {
        e.printStackTrace();
    }
}
The bindUseCases method will add the preview, image analysis and image capture use cases to the camera.
@SuppressLint("UnsafeExperimentalUsageError")
private void bindUseCases(@NonNull ProcessCameraProvider cameraProvider) {

    //set up the resolution for the preview and image analysis.
    int orientation = getApplicationContext().getResources().getConfiguration().orientation;
    Size resolution;
    if (orientation == Configuration.ORIENTATION_PORTRAIT) {
        resolution = new Size(720, 1280);
    }else{
        resolution = new Size(1280, 720);
    }

    //back camera
    CameraSelector cameraSelector = new CameraSelector.Builder()
        .requireLensFacing(CameraSelector.LENS_FACING_BACK).build();


    Preview.Builder previewBuilder = new Preview.Builder();
    previewBuilder.setTargetAspectRatio(AspectRatio.RATIO_16_9);
    Preview preview = previewBuilder.build();
    preview.setSurfaceProvider(previewView.getSurfaceProvider());

    ImageAnalysis.Builder imageAnalysisBuilder = new ImageAnalysis.Builder();

    imageAnalysisBuilder.setTargetResolution(resolution)
            .setBackpressureStrategy(ImageAnalysis.STRATEGY_KEEP_ONLY_LATEST);

    ImageAnalysis imageAnalysis = imageAnalysisBuilder.build();

    imageAnalysis.setAnalyzer(exec, new ImageAnalysis.Analyzer() {
        @Override
        public void analyze(@NonNull ImageProxy image) {
            //image processing
            image.close();
        }
    });

    imageCapture =
            new ImageCapture.Builder()
                    .setTargetAspectRatio(AspectRatio.RATIO_16_9)
                    .build();
    UseCaseGroup useCaseGroup = new UseCaseGroup.Builder()
            .addUseCase(preview)
            .addUseCase(imageAnalysis)
            .addUseCase(imageCapture)
            .build();
    camera = cameraProvider.bindToLifecycle((LifecycleOwner) this, cameraSelector, useCaseGroup);
}
We are going to dive into the image processing part in the following.
Analyse Frames and Take a Photo
-
Convert the image frame to bitmap.
Convert the image frame in YUV format to RGB format and rotate it if needed.
We can do this using the getBitmap method provided by Google.
-
Use Dynamsoft Document Normalizer to detect the document boundary.
try { CapturedResult capturedResult = cvr.capture(bitmap,"DetectDocumentBoundaries_Default"); CapturedResultItem[] results = capturedResult.getItems(); if (results != null) { if (results.length>0) { DetectedQuadResultItem result = (DetectedQuadResultItem) results[0]; } } } catch (Exception e) { e.printStackTrace(); } -
Draw document overlay using a SurfaceView.
We can draw overlay for the detected document using a SurfaceView.
Let’s create a view called
OverlayViewextending SurfaceView. We can pass the points of a polygon for it to draw.public class OverlayView extends SurfaceView implements SurfaceHolder.Callback { private int srcImageWidth; private int srcImageHeight; private SurfaceHolder surfaceHolder = null; private Point[] points = null; private Paint stroke = new Paint(); public OverlayView(Context context, AttributeSet attrs) { super(context, attrs); setFocusable(true); srcImageWidth = 0; srcImageHeight = 0; if(surfaceHolder == null) { // Get surfaceHolder object. surfaceHolder = getHolder(); // Add this as surfaceHolder callback object. surfaceHolder.addCallback(this); } stroke.setColor(Color.GREEN); // Set the parent view background color. This can not set surfaceview background color. this.setBackgroundColor(Color.TRANSPARENT); // Set current surfaceview at top of the view tree. this.setZOrderOnTop(true); this.getHolder().setFormat(PixelFormat.TRANSLUCENT); } @Override public void surfaceCreated(SurfaceHolder surfaceHolder) { if (points != null) { drawPolygon(); } } @Override public void surfaceChanged(SurfaceHolder surfaceHolder, int i, int i1, int i2) { } @Override public void surfaceDestroyed(SurfaceHolder surfaceHolder) { } public SurfaceHolder getSurfaceHolder(){ return surfaceHolder; } public void setStroke(Paint paint){ stroke = paint; } public Paint getStroke(){ return stroke; } public void setPointsAndImageGeometry(Point[] points, int width,int height){ this.srcImageWidth = width; this.srcImageHeight = height; this.points = points; drawPolygon(); } public void drawPolygon() { // Get and lock canvas object from surfaceHolder. Canvas canvas = surfaceHolder.lockCanvas(); if (canvas == null) { return; } Point[] pts; if (srcImageWidth != 0 && srcImageHeight != 0) { pts = convertPoints(canvas.getWidth(),canvas.getHeight()); }else{ pts = points; } // Clear canvas canvas.drawColor(Color.TRANSPARENT, PorterDuff.Mode.CLEAR); for (int index = 0; index <= pts.length - 1; index++) { if (index == pts.length - 1) { canvas.drawLine(pts[index].x,pts[index].y,pts[0].x,pts[0].y,stroke); }else{ canvas.drawLine(pts[index].x,pts[index].y,pts[index+1].x,pts[index+1].y,stroke); } } // Unlock the canvas object and post the new draw. surfaceHolder.unlockCanvasAndPost(canvas); } public Point[] convertPoints(int canvasWidth, int canvasHeight){ Point[] newPoints = new Point[points.length]; double ratioX = ((double) canvasWidth)/srcImageWidth; double ratioY = ((double) canvasHeight)/srcImageHeight; for (int index = 0; index <= points.length - 1; index++) { Point p = new Point(); p.x = (int) (ratioX * points[index].x); p.y = (int) (ratioY * points[index].y); newPoints[index] = p; } return newPoints; } }Here is how to update it in the image analysis.
Point[] points = results[0].getLocation().points;
overlayView.setPointsAndImageGeometry(points,bitmapWidth,bitmapHeight);
In order to let the camera preview match the overlay view, we also need to make the activity fullscreen.
getSupportActionBar().hide(); getWindow().setFlags(WindowManager.LayoutParams.FLAG_FULLSCREEN, WindowManager.LayoutParams.FLAG_FULLSCREEN); -
Check the IoUs of three consecutive detected polygons. If they are all above 0.9, take a photo and navigate to the cropping activity.
When the detected polygon is stable, we can take a photo of the document. How to check whether it is stable? We can check the IoUs of three consecutive polygons.
IoU stands for intersection over union. It can be used to check how much two objects overlap with each other. For simplicity, we convert points to rectangles and calculate the IoUs.
Here is the code:
public static float intersectionOverUnion(Point[] pts1,Point[] pts2){
    Rect rect1 = getRectFromPoints(pts1);
    Rect rect2 = getRectFromPoints(pts2);
    return intersectionOverUnion(rect1,rect2);
}

public static float intersectionOverUnion(Rect rect1, Rect rect2){
    int leftColumnMax = Math.max(rect1.left, rect2.left);
    int rightColumnMin = Math.min(rect1.right,rect2.right);
    int upRowMax = Math.max(rect1.top, rect2.top);
    int downRowMin = Math.min(rect1.bottom,rect2.bottom);

    if (leftColumnMax>=rightColumnMin || downRowMin<=upRowMax){
        return 0;
    }

    int s1 = rect1.width()*rect1.height();
    int s2 = rect2.width()*rect2.height();
    float sCross = (downRowMin-upRowMax)*(rightColumnMin-leftColumnMax);
    return sCross/(s1+s2-sCross);
}

public static Rect getRectFromPoints(Point[] points){
    int left,top,right,bottom;
    left = points[0].x;
    top = points[0].y;
    right = 0;
    bottom = 0;
    for (Point point:points) {
        left = Math.min(point.x,left);
        top = Math.min(point.y,top);
        right = Math.max(point.x,right);
        bottom = Math.max(point.y,bottom);
    }
    return new Rect(left,top,right,bottom);
}
In the image analysis process, if the confidence of the detected polygon is over 50%, then add it to the array list of detected polygons which has a maximum size of three. If there are three detected polygons, check whether the IoUs are all over 90%. If so, then take a photo and go to the cropping activity.
if (result.getConfidenceAsDocumentBoundary() > 50) {
    if (previousResults.size() == 3) {
        if (steady() == true) {
            takePhoto(result, bitmap.getWidth(), bitmap.getHeight());
            taken = true;
        }else{
            previousResults.remove(0);
            previousResults.add(result);
        }
    }else{
        previousResults.add(result);
    }
}
The
steadymethod:private Boolean steady(){ float iou1 = Utils.intersectionOverUnion(previousResults.get(0).getLocation().points,previousResults.get(1).getLocation().points); float iou2 = Utils.intersectionOverUnion(previousResults.get(1).getLocation().points,previousResults.get(2).getLocation().points); float iou3 = Utils.intersectionOverUnion(previousResults.get(0).getLocation().points,previousResults.get(2).getLocation().points); if (iou1>0.9 && iou2>0.9 && iou3>0.9) { return true; }else{ return false; } }The
takePhotomethod:private void takePhoto(DetectedQuadResult result,int bitmapWidth,int bitmapHeight){ File dir = getExternalCacheDir(); File file = new File(dir, "photo.jpg"); ImageCapture.OutputFileOptions outputFileOptions = new ImageCapture.OutputFileOptions.Builder(file).build(); imageCapture.takePicture(outputFileOptions, exec, new ImageCapture.OnImageSavedCallback() { @Override public void onImageSaved(ImageCapture.OutputFileResults outputFileResults) { Intent intent = new Intent(CameraActivity.this, CroppingActivity.class); intent.putExtra("imageUri",outputFileResults.getSavedUri().toString()); intent.putExtra("points",result.getLocation().points); intent.putExtra("bitmapWidth",bitmapWidth); intent.putExtra("bitmapHeight",bitmapHeight); startActivity(intent); } @Override public void onError(@NonNull ImageCaptureException exception) { } } ); }It will save the photo in a cache folder and pass its uri, the detected result and the camera frame’s size to the cropping activity.
Cropping Activity
In the cropping activity, we display the photo taken and the detected polygon. Users can drag four corner points to adjust the polygon.
Similar to what we have done in the camera activity, we display the image in an image view, draw the overlay using the OverlayView and make the activity fullscreen so that the two can match each other.
In addition, four image views are used as corner points to adjust the polygon.
@Override
protected void onCreate(Bundle savedInstanceState) {
    corner1 = findViewById(R.id.corner1);
    corner2 = findViewById(R.id.corner2);
    corner3 = findViewById(R.id.corner3);
    corner4 = findViewById(R.id.corner4);
    corners[0] = corner1;
    corners[1] = corner2;
    corners[2] = corner3;
    corners[3] = corner4;
    setEvents();
}

private void setEvents(){
    for (int i = 0; i < 4; i++) {
        corners[i].setOnTouchListener(new View.OnTouchListener() {
            @Override
            public boolean onTouch(View view, MotionEvent event) {
                int x = (int) event.getX();
                int y = (int) event.getY();
                switch (event.getAction()){
                    case MotionEvent.ACTION_MOVE:
                        view.setX(view.getX()+x);
                        view.setY(view.getY()+y);
                        updatePointsAndRedraw();
                        break;
                    default:
                        break;
                }
                return true;
            }
        });
    }
}

private void updatePointsAndRedraw(){
    for (int i = 0; i < 4; i++) {
        int offsetX = getOffsetX(i);
        int offsetY = getOffsetY(i);
        points[i].x = (int) ((corners[i].getX()-offsetX)/screenWidth*bitmapWidth);
        points[i].y = (int) ((corners[i].getY()-offsetY)/screenHeight*bitmapHeight);
    }
    drawOverlay();
}
The corner point image view is bit away from the polygon so that we can still see the polygon when adjusting it.
Here is the code about the offset of X and Y for the four image views.
private int getOffsetX(int index) {
    if (index == 0) {
        return -cornerWidth;
    }else if (index == 1){
        return 0;
    }else if (index == 2){
        return 0;
    }else{
        return -cornerWidth;
    }
}

private int getOffsetY(int index) {
    if (index == 0) {
        return -cornerWidth;
    }else if (index == 1){
        return -cornerWidth;
    }else if (index == 2){
        return 0;
    }else{
        return 0;
    }
}
A screenshot of the cropping activity.

Result Viewing Activity
After the polygon is confirmed, we can use Dynamsoft Document Normalizer to run perspective transformation to get a normalized image. We use a zoomable image to display the result.
We can also adjust the color mode of the normalized image and rotate it.
-
Normalize an image in different color modes.
We can define several templates in the settings and call different templates to get the images in different color modes.
try { // update settings for document detection cvr.initSettings("{\"CaptureVisionTemplates\": [{\"Name\": \"Default\"},{\"Name\": \"DetectDocumentBoundaries_Default\",\"ImageROIProcessingNameArray\": [\"roi-detect-document-boundaries\"]},{\"Name\": \"DetectAndNormalizeDocument_Default\",\"ImageROIProcessingNameArray\": [\"roi-detect-and-normalize-document\"]},{\"Name\": \"NormalizeDocument_Binary\",\"ImageROIProcessingNameArray\": [\"roi-normalize-document-binary\"]}, {\"Name\": \"NormalizeDocument_Gray\",\"ImageROIProcessingNameArray\": [\"roi-normalize-document-gray\"]}, {\"Name\": \"NormalizeDocument_Color\",\"ImageROIProcessingNameArray\": [\"roi-normalize-document-color\"]}],\"TargetROIDefOptions\": [{\"Name\": \"roi-detect-document-boundaries\",\"TaskSettingNameArray\": [\"task-detect-document-boundaries\"]},{\"Name\": \"roi-detect-and-normalize-document\",\"TaskSettingNameArray\": [\"task-detect-and-normalize-document\"]},{\"Name\": \"roi-normalize-document-binary\",\"TaskSettingNameArray\": [\"task-normalize-document-binary\"]}, {\"Name\": \"roi-normalize-document-gray\",\"TaskSettingNameArray\": [\"task-normalize-document-gray\"]}, {\"Name\": \"roi-normalize-document-color\",\"TaskSettingNameArray\": [\"task-normalize-document-color\"]}],\"DocumentNormalizerTaskSettingOptions\": [{\"Name\": \"task-detect-and-normalize-document\",\"SectionImageParameterArray\": [{\"Section\": \"ST_REGION_PREDETECTION\",\"ImageParameterName\": \"ip-detect-and-normalize\"},{\"Section\": \"ST_DOCUMENT_DETECTION\",\"ImageParameterName\": \"ip-detect-and-normalize\"},{\"Section\": \"ST_DOCUMENT_NORMALIZATION\",\"ImageParameterName\": \"ip-detect-and-normalize\"}]},{\"Name\": \"task-detect-document-boundaries\",\"TerminateSetting\": {\"Section\": \"ST_DOCUMENT_DETECTION\"},\"SectionImageParameterArray\": [{\"Section\": \"ST_REGION_PREDETECTION\",\"ImageParameterName\": \"ip-detect\"},{\"Section\": \"ST_DOCUMENT_DETECTION\",\"ImageParameterName\": \"ip-detect\"},{\"Section\": \"ST_DOCUMENT_NORMALIZATION\",\"ImageParameterName\": \"ip-detect\"}]},{\"Name\": \"task-normalize-document-binary\",\"StartSection\": \"ST_DOCUMENT_NORMALIZATION\", \"ColourMode\": \"ICM_BINARY\",\"SectionImageParameterArray\": [{\"Section\": \"ST_REGION_PREDETECTION\",\"ImageParameterName\": \"ip-normalize\"},{\"Section\": \"ST_DOCUMENT_DETECTION\",\"ImageParameterName\": \"ip-normalize\"},{\"Section\": \"ST_DOCUMENT_NORMALIZATION\",\"ImageParameterName\": \"ip-normalize\"}]}, {\"Name\": \"task-normalize-document-gray\", \"ColourMode\": \"ICM_GRAYSCALE\",\"StartSection\": \"ST_DOCUMENT_NORMALIZATION\",\"SectionImageParameterArray\": [{\"Section\": \"ST_REGION_PREDETECTION\",\"ImageParameterName\": \"ip-normalize\"},{\"Section\": \"ST_DOCUMENT_DETECTION\",\"ImageParameterName\": \"ip-normalize\"},{\"Section\": \"ST_DOCUMENT_NORMALIZATION\",\"ImageParameterName\": \"ip-normalize\"}]}, {\"Name\": \"task-normalize-document-color\", \"ColourMode\": \"ICM_COLOUR\",\"StartSection\": \"ST_DOCUMENT_NORMALIZATION\",\"SectionImageParameterArray\": [{\"Section\": \"ST_REGION_PREDETECTION\",\"ImageParameterName\": \"ip-normalize\"},{\"Section\": \"ST_DOCUMENT_DETECTION\",\"ImageParameterName\": \"ip-normalize\"},{\"Section\": \"ST_DOCUMENT_NORMALIZATION\",\"ImageParameterName\": \"ip-normalize\"}]}],\"ImageParameterOptions\": [{\"Name\": \"ip-detect-and-normalize\",\"BinarizationModes\": [{\"Mode\": \"BM_LOCAL_BLOCK\",\"BlockSizeX\": 0,\"BlockSizeY\": 0,\"EnableFillBinaryVacancy\": 0}],\"TextDetectionMode\": {\"Mode\": \"TTDM_WORD\",\"Direction\": \"HORIZONTAL\",\"Sensitivity\": 7}},{\"Name\": \"ip-detect\",\"BinarizationModes\": [{\"Mode\": \"BM_LOCAL_BLOCK\",\"BlockSizeX\": 0,\"BlockSizeY\": 0,\"EnableFillBinaryVacancy\": 0,\"ThresholdCompensation\" : 7}],\"TextDetectionMode\": {\"Mode\": \"TTDM_WORD\",\"Direction\": \"HORIZONTAL\",\"Sensitivity\": 7},\"ScaleDownThreshold\" : 512},{\"Name\": \"ip-normalize\",\"BinarizationModes\": [{\"Mode\": \"BM_LOCAL_BLOCK\",\"BlockSizeX\": 0,\"BlockSizeY\": 0,\"EnableFillBinaryVacancy\": 0}],\"TextDetectionMode\": {\"Mode\": \"TTDM_WORD\",\"Direction\": \"HORIZONTAL\",\"Sensitivity\": 7}}]}"); } catch (CaptureVisionRouterException e) { e.printStackTrace(); } String templateName = "NormalizeDocument_Binary"; // alternatives: NormalizeDocument_Gray, NormalizeDocument_Color Quadrilateral quad = new Quadrilateral(); quad.points = points; SimplifiedCaptureVisionSettings settings = cvr.getSimplifiedSettings(templateName); settings.roi = quad; settings.roiMeasuredInPercentage = false; cvr.updateSettings(templateName,settings); //pass the polygon to the capture router CapturedResult capturedResult = cvr.capture(rawImage,templateName); //run normalization NormalizedImageResultItem result = (NormalizedImageResultItem) capturedResult.getItems()[0]; -
Rotate the image.
To rotate the image, we can first set the rotation of the image view and then rotate the bitmap in the saving process.
Rotate the image view:
normalizedImageView.setRotation(rotation);Rotate the bitmap:
if (rotation != 0) {
    Matrix matrix  = new Matrix();
    matrix.setRotate(rotation);
    Bitmap rotated = Bitmap.createBitmap(bmp,0,0,bmp.getWidth(),bmp.getHeight(),matrix,false);
    rotated.compress(Bitmap.CompressFormat.JPEG, 100, fos);
}
A screenshot of the result viewing activity.

Post Processing
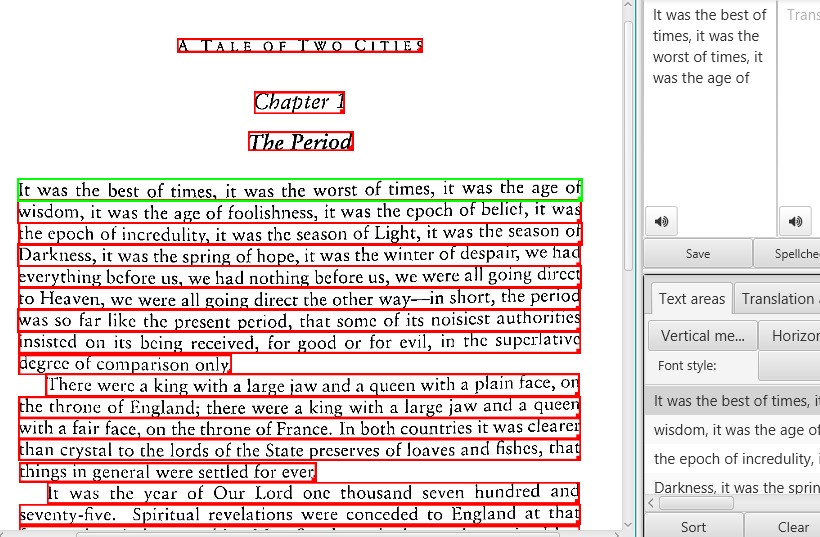
After getting the normalized image, we can use OCR tools like ImageTrans to extract the text. We can see that the OCR result is quite good.

Source Code
Get the source code and have a try: https://github.com/xulihang/Android-Document-Scanner


