Building an Auto-Scan Document Processing Solution: Automatic Image Cropping and Barcode Extraction
Modern enterprises process thousands of documents daily—from shipping labels and invoices to medical records and ID cards. Manual document processing is slow, error-prone, and doesn’t scale. The question is: how does bulk document scanning simplify large-scale data management for enterprises? The answer lies in automation — replacing human cropping, rotating, and data entry with an AI-driven pipeline that detects documents, normalizes them, extracts key data from barcodes, and stores everything in a searchable archive. This comprehensive guide shows you how to build exactly that: a production-ready auto-scan document processing solution using JavaScript and the Dynamsoft Capture Vision SDK.
Key Takeaways
- Bulk document scanning automates every step between a physical document and structured digital data — detection, cropping, normalization, and barcode extraction — eliminating manual bottlenecks in large-scale enterprise workflows.
- The Dynamsoft Capture Vision SDK combines AI-powered document detection with barcode reading in a single JavaScript pipeline, capable of handling millions of documents per month.
- Stability-based auto-capture ensures consistent image quality across operators and environments, which is critical when digitizing documents for compliance, auditing, or downstream data processing.
- IndexedDB-based local storage enables offline-capable scan history with fast retrieval, keeping your scanned records accessible even without a server connection.
Common Developer Questions
How does bulk document scanning simplify large-scale data management for enterprises?
Bulk document scanning automates every step between a physical document and structured digital data — detection, cropping, normalization, and barcode extraction — eliminating manual bottlenecks in large-scale enterprise workflows.
How do I build a production-ready auto-scan document processing pipeline with document cropping and barcode extraction in JavaScript?
Build the pipeline in the browser by initializing the Dynamsoft Capture Vision SDK, detecting document boundaries with stability tracking, normalizing the detected document, and then reading barcodes from the normalized image. The SDK combines AI-powered document detection and barcode reading in a single JavaScript pipeline.
What’s the best approach for auto-capture — stability tracking vs. manual trigger — when processing thousands of documents daily?
Stability-based auto-capture is the better choice for high-volume document processing because it waits until the document boundary is steady before capturing, ensuring consistent image quality across operators and environments.
How can I store scanned documents and barcode data locally in the browser using IndexedDB?
Store each scan result — the cropped document image data URL, detected barcodes, and timestamp — as a record in an IndexedDB object store, as the sample does with saveScanToDB(). This keeps the scan history available locally and offline.
Demo Video: Document Detection and Barcode Extraction
Online Demo
https://yushulx.me/javascript-barcode-qr-code-scanner/examples/document_barcode/
Business Case
The Problem
Manual document processing creates bottlenecks:
- Slow processing: Employees spend hours cropping, rotating, and extracting data
- Human error: Incorrect data entry, missed barcodes, poor image quality
- No scalability: Can’t handle volume spikes (50,000+ documents/month)
- High costs: Labor-intensive workflows require continuous staffing
The Solution
An auto-scan system that:
- Detects documents automatically using AI edge detection
- Crops & straightens documents with perspective correction
- Extracts barcode data from 1D/2D barcodes instantly
- Processes at scale - handle millions of documents/month
Technical Architecture
System Components
┌─────────────────────────────────────────────────────┐
│           Web Application Interface                  │
├─────────────────────────────────────────────────────┤
│                                                      │
│  ┌─────────────────┐      ┌────────────────────┐   │
│  │  Camera Input   │─────▶│  Document Detector │   │
│  │  (Live Stream)  │      │  (DDN Module)      │   │
│  └─────────────────┘      └──────┬─────────────┘   │
│                                   │                  │
│                           Quad Detected              │
│                                   │                  │
│                          ┌────────▼─────────────┐   │
│                          │  Stability Tracker   │   │
│                          │  (Auto-Capture)      │   │
│                          └────────┬─────────────┘   │
│                                   │                  │
│                          Stable Document             │
│                                   │                  │
│  ┌────────────────────────────────▼──────────────┐  │
│  │     Document Normalizer (DDN)                 │  │
│  │  • Perspective correction                     │  │
│  │  • Image cropping                             │  │
│  │  • Quality enhancement                        │  │
│  └────────────────────────┬──────────────────────┘  │
│                            │                         │
│                     Cropped Image                    │
│                            │                         │
│  ┌────────────────────────▼──────────────────────┐  │
│  │     Barcode Reader (DBR)                      │  │
│  │  • 1D/2D barcode detection                    │  │
│  │  • Multi-format support                       │  │
│  │  • Data extraction                            │  │
│  └────────────────────────┬──────────────────────┘  │
│                            │                         │
│                     ┌──────▼────────┐                │
│                     │  Result Data  │                │
│                     │  • Image      │                │
│                     │  • Barcodes   │                │
│                     └───────────────┘                │
└─────────────────────────────────────────────────────┘
Key Technologies
- Document Detection & Normalization (DDN): AI-powered edge detection and perspective correction
- Barcode Reader (DBR): Reads 40+ barcode formats (QR, Code 39, Code 128, PDF417, etc.)
- Camera Enhancer (DCE): Real-time video streaming with auto-focus optimization
- Capture Vision Router (CVR): Orchestrates multi-module workflows
Get Your Trial License
-
Register for a free trial license
-
Receive license key via email
-
Use in your web application:
 // Initialize the SDK with your license key
 await Dynamsoft.License.LicenseManager.initLicense("YOUR-LICENSE-KEY", true);
Step-by-Step Implementation
Let’s build the auto-scan document processing system from scratch using JavaScript for a web-based solution that runs in any modern browser.
Step 1: Project Setup
Create your project structure:
auto-document-scanner/
├── index.html          # Main HTML page
├── app.js             # Application logic
├── styles.css         # Styling
└── README.md          # Documentation
index.html - Basic HTML structure:
<!DOCTYPE html>
<html lang="en">
<head>
    <meta charset="UTF-8">
    <meta name="viewport" content="width=device-width, initial-scale=1.0">
    <title>Auto Document Scanner</title>
    <link rel="stylesheet" href="styles.css">

    <!-- Load Dynamsoft Capture Vision Bundle -->
    <script src="https://cdn.jsdelivr.net/npm/dynamsoft-capture-vision-bundle@3.2.5000/dist/dcv.bundle.min.js"></script>
</head>
<body>
    <div id="app">
        <!-- License activation screen -->
        <div id="license-screen" class="screen">
            <h1>📱 Auto Document Scanner</h1>
            <input type="text" id="license-input" placeholder="Enter license key">
            <button id="activate-btn">Activate & Start</button>
        </div>

        <!-- Camera view (initially hidden) -->
        <div id="camera-screen" class="screen hidden">
            <div id="camera-view"></div>
            <div id="status">Looking for document...</div>
            <button id="capture-btn">Capture</button>
        </div>

        <!-- Results screen -->
        <div id="result-screen" class="screen hidden">
            <h2>Scan Result</h2>
            <img id="cropped-image" alt="Cropped document">
            <div id="barcode-results"></div>
            <button id="scan-next-btn">Scan Next</button>
        </div>
    </div>

    <script src="app.js"></script>
</body>
</html>
Step 2: SDK Initialization & License Activation
app.js - Initialize the SDK:
let cvr = null;
let cameraEnhancer = null;
let cameraView = null;
let isSDKReady = false;

const licenseInput = document.getElementById('license-input');
const activateBtn = document.getElementById('activate-btn');
const cameraScreen = document.getElementById('camera-screen');
const resultScreen = document.getElementById('result-screen');

activateBtn.addEventListener('click', async () => {
    const licenseKey = licenseInput.value.trim();
    if (!licenseKey) {
        alert('Please enter a license key');
        return;
    }

    try {
        console.log('Activating license...');
        await Dynamsoft.License.LicenseManager.initLicense(licenseKey, true);

        console.log('Loading modules...');
        await Dynamsoft.Core.CoreModule.loadWasm(["DBR", "DDN"]);

        console.log('Initializing camera...');
        await initCamera();

        console.log('Setting up scanner...');
        cvr = await Dynamsoft.CVR.CaptureVisionRouter.createInstance();

        cvr.addResultReceiver({
            onCapturedResultReceived: handleCapturedResult
        });

        isSDKReady = true;

        document.getElementById('license-screen').classList.add('hidden');
        cameraScreen.classList.remove('hidden');

        await startScanning();

    } catch (error) {
        console.error('Initialization failed:', error);
        alert(`Error: ${error.message}`);
    }
});
Step 3: Camera Setup
async function initCamera() {
    cameraView = await Dynamsoft.DCE.CameraView.createInstance();
    cameraEnhancer = await Dynamsoft.DCE.CameraEnhancer.createInstance(cameraView);

    const container = document.getElementById('camera-view');
    container.appendChild(cameraView.getUIElement());

    const cameras = await cameraEnhancer.getAllCameras();
    console.log('Available cameras:', cameras);

    if (cameras.length > 0) {
        await cameraEnhancer.selectCamera(cameras[0]);
        cameraEnhancer.setPixelFormat(10);
        await cameraEnhancer.open();
    } else {
        throw new Error('No cameras found');
    }
}
Step 4: Document Detection with Auto-Capture
This is where the magic happens—automatic document detection with stability tracking:
async function startScanning() {
    if (!isSDKReady) return;

    try {
        let settings = await cvr.getSimplifiedSettings("DetectDocumentBoundaries_Default");
        await cvr.updateSettings("DetectDocumentBoundaries_Default", settings);

        cvr.setInput(cameraEnhancer);
        await cvr.startCapturing("DetectDocumentBoundaries_Default");

        updateStatus('Looking for document...');
    } catch (error) {
        console.error('Failed to start scanning:', error);
    }
}

let stabilityThreshold = 12;
let movementTolerance = 15;
let stabilityCounter = 0;
let lastQuadPoints = null;
let latestDetectedQuad = null;
let isCaptureInProgress = false;

async function handleCapturedResult(result) {
    if (isCaptureInProgress) return;

    const items = result.items;
    if (!items || items.length === 0) {
        resetStabilityTracking();
        updateStatus('Looking for document...');
        return;
    }

    for (const item of items) {
        if (item.type === Dynamsoft.Core.EnumCapturedResultItemType.CRIT_DETECTED_QUAD) {
            latestDetectedQuad = item;
            checkStability(item.location.points);
        }
    }

    if (stabilityCounter >= stabilityThreshold && !isCaptureInProgress) {
        await performCapture();
    }
}

function checkStability(currentPoints) {
    if (!lastQuadPoints) {
        lastQuadPoints = currentPoints;
        stabilityCounter = 1;
        updateStatus('Document detected, hold steady...');
        return;
    }

    const isStable = isQuadStable(currentPoints, lastQuadPoints);

    if (isStable) {
        stabilityCounter++;
        const progress = Math.min(stabilityCounter / stabilityThreshold * 100, 100);

        if (stabilityCounter >= stabilityThreshold) {
            updateStatus('Ready to capture!');
        } else {
            updateStatus(`Hold steady... ${Math.round(progress)}%`);
        }
    } else {
        resetStabilityTracking();
        stabilityCounter = 1;
        updateStatus('Movement detected, hold steady...');
    }

    lastQuadPoints = currentPoints;
}

function isQuadStable(current, last) {
    if (current.length !== 4 || last.length !== 4) return false;

    for (let i = 0; i < 4; i++) {
        const dx = Math.abs(current[i].x - last[i].x);
        const dy = Math.abs(current[i].y - last[i].y);

        if (dx > movementTolerance || dy > movementTolerance) {
            return false;
        }
    }
    return true;
}

function resetStabilityTracking() {
    stabilityCounter = 0;
    lastQuadPoints = null;
}

function updateStatus(message) {
    document.getElementById('status').textContent = message;
}
Step 5: Document Cropping & Normalization
When the document is stable, capture and normalize it:
async function performCapture() {
    isCaptureInProgress = true;
    updateStatus('Capturing...');

    try {
        await cvr.stopCapturing();

        let normalizeSettings = await cvr.getSimplifiedSettings("NormalizeDocument_Default");
        normalizeSettings.roiMeasuredInPercentage = false;
        normalizeSettings.roi = latestDetectedQuad.location;
        await cvr.updateSettings("NormalizeDocument_Default", normalizeSettings);

        const image = cameraEnhancer.fetchImage();
        const normalizeResult = await cvr.capture(image, "NormalizeDocument_Default");

        let normalizedImage = null;
        for (const item of normalizeResult.items) {
            if (item.type === Dynamsoft.Core.EnumCapturedResultItemType.CRIT_NORMALIZED_IMAGE) {
                normalizedImage = item;
                break;
            }
        }

        if (!normalizedImage) {
            throw new Error('Failed to normalize document');
        }

        await readBarcodesFromDocument(normalizedImage);

    } catch (error) {
        console.error('Capture failed:', error);
        alert('Failed to capture document');

        isCaptureInProgress = false;
        resetStabilityTracking();
        await startScanning();
    }
}
Step 6: Barcode Extraction
After cropping and normalizing the document, extract barcodes from it:
async function readBarcodesFromDocument(normalizedImageItem) {
try {
updateStatus('Reading barcodes...');
const imageData = normalizedImageItem.toCanvas().toDataURL();
let barcodeSettings = await cvr.getSimplifiedSettings("ReadBarcodes_Balance");
await cvr.updateSettings("ReadBarcodes_Balance", barcodeSettings);
const barcodeResult = await cvr.capture(normalizedImageItem.imageData, "ReadBarcodes_Balance");
const barcodes = [];
for (const item of barcodeResult.items) {
if (item.type === Dynamsoft.Core.EnumCapturedResultItemType.CRIT_BARCODE) {
barcodes.push({
text: item.text,
format: item.formatString,
type: item.formatString
});
}
}
displayResults(imageData, barcodes);
} catch (error) {
console.error('Barcode reading failed:', error);
displayResults(normalizedImageItem.toCanvas().toDataURL(), []);
}
}
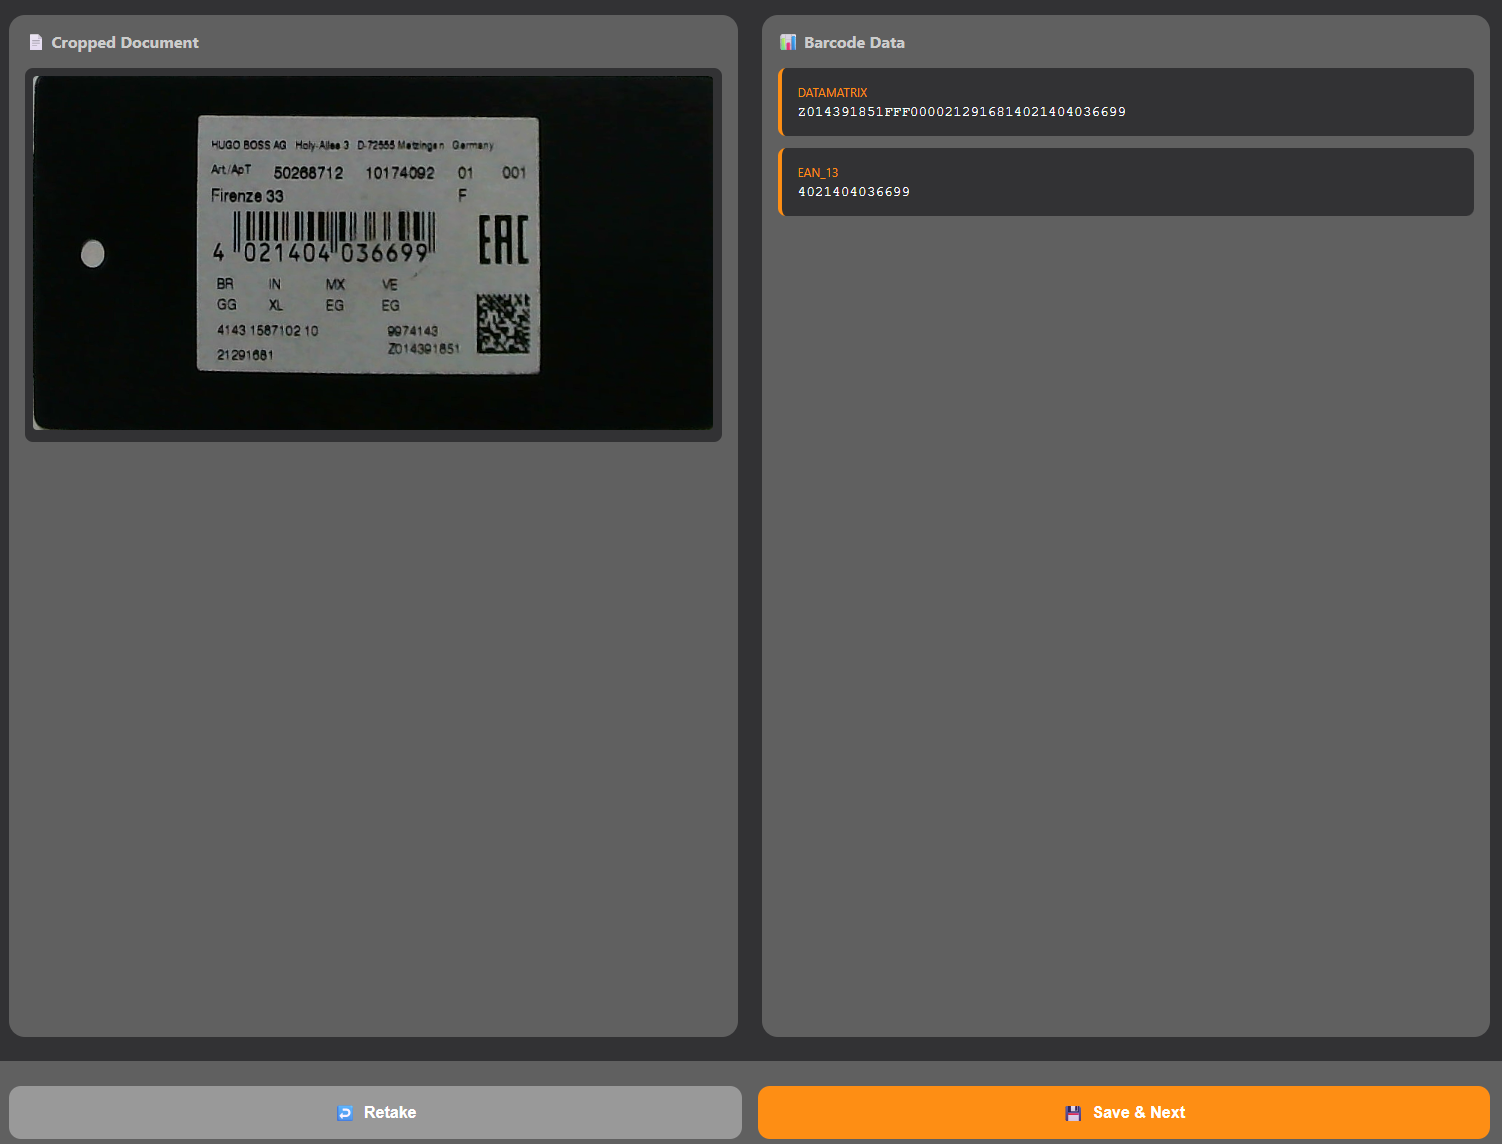
function displayResults(croppedImageData, barcodes) {
cameraScreen.classList.add('hidden');
resultScreen.classList.remove('hidden');
const croppedImage = document.getElementById('cropped-image');
croppedImage.src = croppedImageData;
const barcodeResults = document.getElementById('barcode-results');
barcodeResults.innerHTML = '';
if (barcodes.length === 0) {
barcodeResults.innerHTML = '<p>No barcodes detected</p>';
} else {
barcodeResults.innerHTML = '<h3>Detected Barcodes:</h3>';
barcodes.forEach((barcode, index) => {
barcodeResults.innerHTML += `
<div class="barcode-item">
<strong>Barcode ${index + 1}:</strong> ${barcode.text}<br>
<em>Format:</em> ${barcode.format}
</div>
`;
});
}
currentScanResult = {
imageDataUrl: croppedImageData,
barcodes: barcodes,
timestamp: new Date().toISOString()
};
}
Step 7: IndexedDB History Storage
The captured documents and barcode results will be saved to a history using IndexedDB for later review.
const DB_NAME = 'DocumentScannerDB';
const DB_VERSION = 1;
const STORE_NAME = 'scanHistory';

function openDB() {
    return new Promise((resolve, reject) => {
        const request = indexedDB.open(DB_NAME, DB_VERSION);
        request.onerror = (event) => reject('Database error: ' + event.target.error);
        request.onsuccess = (event) => resolve(event.target.result);
        request.onupgradeneeded = (event) => {
            const db = event.target.result;
            if (!db.objectStoreNames.contains(STORE_NAME)) {
                db.createObjectStore(STORE_NAME, { keyPath: 'timestamp' });
            }
        };
    });
}

async function saveScanToDB(scanResult) {
    const db = await openDB();
    return new Promise((resolve, reject) => {
        const transaction = db.transaction([STORE_NAME], 'readwrite');
        const store = transaction.objectStore(STORE_NAME);
        const request = store.add(scanResult);
        request.onsuccess = () => resolve();
        request.onerror = (event) => reject('Save error: ' + event.target.error);
    });
}

async function saveToHistory() {
    if (!currentScanResult) return;

    try {
        await saveScanToDB(currentScanResult);
        scanHistory.unshift(currentScanResult);

        if (scanHistory.length > 50) {
            scanHistory = scanHistory.slice(0, 50);
        }

        updateHistoryCount();
        currentScanResult = null;
    } catch (e) {
        console.warn('Failed to save history to DB:', e);
        showToast('Failed to save history');
    }
}
Step 8: Adjustable Stability Settings
To give users control over the auto-capture sensitivity, add a settings UI that allows real-time adjustment of stability parameters:
HTML (Settings Modal):
<!-- Add to your index.html -->
<div id="settings-overlay" class="overlay hidden">
<div class="settings-modal">
<div class="settings-header">
<h2>Settings</h2>
<button id="close-settings-btn" class="close-btn">×</button>
</div>
<div class="settings-body">
<div class="setting-group">
<label for="stability-threshold">
Stability Threshold: <span id="stability-threshold-value">12</span>
<span class="tooltip">Number of stable frames required before capture</span>
</label>
<input type="range" id="stability-threshold"
min="5" max="30" value="12" step="1">
</div>
<div class="setting-group">
<label for="movement-tolerance">
Movement Tolerance: <span id="movement-tolerance-value">15</span>
<span class="tooltip">Allowed pixel movement to be considered stable</span>
</label>
<input type="range" id="movement-tolerance"
min="5" max="50" value="15" step="1">
</div>
</div>
</div>
</div>
<!-- Add Settings button to your status bar -->
<button id="settings-btn" class="icon-button" title="Settings">⚙️</button>
JavaScript (Settings Logic):
// Settings UI Management
const settingsBtn = document.getElementById('settings-btn');
const settingsOverlay = document.getElementById('settings-overlay');
const closeSettingsBtn = document.getElementById('close-settings-btn');
const stabilityInput = document.getElementById('stability-threshold');
const stabilityValue = document.getElementById('stability-threshold-value');
const movementInput = document.getElementById('movement-tolerance');
const movementValue = document.getElementById('movement-tolerance-value');

function initSettings() {
    // Open settings modal
    settingsBtn.addEventListener('click', () => {
        // Sync inputs with current values
        stabilityInput.value = stabilityThreshold;
        stabilityValue.textContent = stabilityThreshold;
        movementInput.value = movementTolerance;
        movementValue.textContent = movementTolerance;

        settingsOverlay.classList.remove('hidden');
    });

    // Close settings
    const closeSettings = () => {
        settingsOverlay.classList.add('hidden');
    };

    closeSettingsBtn.addEventListener('click', closeSettings);

    // Close on click outside modal
    settingsOverlay.addEventListener('click', (e) => {
        if (e.target === settingsOverlay) {
            closeSettings();
        }
    });

    // Real-time parameter updates
    stabilityInput.addEventListener('input', (e) => {
        stabilityThreshold = parseInt(e.target.value);
        stabilityValue.textContent = stabilityThreshold;
    });

    movementInput.addEventListener('input', (e) => {
        movementTolerance = parseInt(e.target.value);
        movementValue.textContent = movementTolerance;
    });
}

initSettings();
CSS (Settings Modal Styling):
.settings-modal {
    position: fixed;
    top: 50%;
    left: 50%;
    transform: translate(-50%, -50%);
    background: white;
    border-radius: 12px;
    padding: 24px;
    min-width: 400px;
    max-width: 90%;
    box-shadow: 0 8px 32px rgba(0, 0, 0, 0.3);
    z-index: 10001;
}

.setting-group {
    margin-bottom: 20px;
}

.setting-group label {
    display: block;
    margin-bottom: 8px;
    font-weight: 600;
}

.setting-group input[type="range"] {
    width: 100%;
    height: 6px;
    border-radius: 3px;
    background: #e0e0e0;
    outline: none;
}

.tooltip {
    display: block;
    font-size: 12px;
    color: #666;
    font-weight: normal;
    margin-top: 4px;
}
This feature is particularly valuable for:
- Production environments - optimize for speed vs. quality
- Different document types - small cards vs. large posters
- Various lighting conditions - adjust sensitivity for low-light scenarios
- User preferences - let end-users customize their experience
Testing Your Implementation
# Option 1: Using Python
python -m http.server 8000 --bind localhost

# Option 2: Using Node.js (http-server)
npx http-server -p 8000