


How to Build a Salesforce Lightning Web Component Barcode Scanner with JavaScript
Salesforce Lightning Web Components cannot run Dynamsoft Barcode Reader’s WebAssembly module directly, so this tutorial embeds a barcode scanning page in an iframe and uses postMessage to return scan results to the LWC.
Dynamsoft Barcode Reader handles the actual barcode decoding inside the iframe, while the Lightning component manages the CRM workflow and receives the scanned data.
Jump to: Full Source Code
Demo video:
What you’ll build: A Salesforce Lightning Web Component (LWC) that embeds a Dynamsoft Barcode Reader page in an iframe hosted as a Static Resource, enabling real-time QR code and barcode scanning with results returned to the CRM via postMessage.
Key Takeaways
- Dynamsoft Barcode Reader’s WASM engine cannot run directly inside Salesforce LWC due to Content Security Policy (CSP) restrictions — hosting the scanner as a Static Resource in an iframe is the correct workaround.
- Communication between the LWC and the iframe is handled entirely via
window.postMessage, keeping the integration decoupled from Salesforce internals. - Dynamsoft Barcode Reader supports high-accuracy decoding of QR Code, Code 128, PDF417, DataMatrix, and 20+ other barcode formats from a live camera stream.
- This iframe + postMessage pattern applies to any WASM-based JavaScript SDK that needs to run inside Salesforce LWC.
Common Developer Questions
How do I integrate a barcode scanner into a Salesforce Lightning Web Component?
Build the scanner page as a separate HTML asset, upload it to Salesforce as a Static Resource, and then append an iframe to the LWC in renderedCallback() so that page can run inside the component. The LWC only needs to host the iframe, toggle scanning, and display the returned barcode text.
Why can’t I run WebAssembly (WASM) directly inside Salesforce LWC, and what is the iframe Static Resource workaround?
Salesforce LWC applies CSP restrictions that make it impractical to load the Dynamsoft WASM scanner directly inside the component itself. The workaround used here is to host the scanner HTML as a Static Resource and load it in an iframe, where the barcode page can initialize the SDK and camera flow separately from the LWC runtime.
How do I use postMessage to pass barcode scan results from an iframe to a Salesforce LWC?
The iframe listens for a control message such as toggle, starts or stops scanning, and then posts the decode result back to window.parent when a barcode is found. On the LWC side, a message event listener reads barcodeResultItems, stores the first result, and exposes its text through the barcodeValue getter; in production, that listener should also validate event.origin.
Prerequisites
- A Salesforce Developer account and a connected org.
- Salesforce CLI installed on your machine.
- Visual Studio Code with the Salesforce Extension Pack.
- Get a 30-day free trial license for Dynamsoft Barcode Reader — replace
"LICENSE-KEY"in the scanner page code below.
Step 1: Set Up Your Development Environment
- Install Salesforce CLI.
- Install Visual Studio Code and extensions for Salesforce DX.
You can find the detailed guide here.
Step 2: Create a New Salesforce DX Project
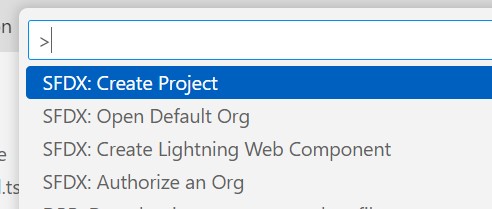
Open Visual Studio Code, open the Command Palette by pressing Ctrl+Shift+P (Windows) or Cmd+Shift+P (macOS) and input SFDX to select the Create Project operation.
Here, we use the standard option.
Then, run SFDX: Create Lightning Web Component to create a component named barcodeScanner.
Step 3: Build the Barcode Scanning Web Page
Create a new HTML file named barcode-scanner.html with the following content. You can apply for a license here.
<!DOCTYPE html>
<head>
  <meta charset="UTF-8">
  <meta name="viewport" content="width=device-width, initial-scale=1.0">
  <title>Barcode Scanner</title>
  <style>
  #cameraView {
    width: 100%;
    height: 100%;
    position: absolute;
    left: 0;
    top: 0;
  }
  </style>
  <script src="https://cdn.jsdelivr.net/npm/dynamsoft-barcode-reader-bundle@10.4.2000/dist/dbr.bundle.js"></script>
</head>
<html>
<body>
  <div id="cameraView"></div>
  <script>
    let cvRouter;
    let cameraEnhancer;
    let scanning = false;
    window.addEventListener(
      "message",
      async (event) => {
        console.log("received message in iframe");
        console.log(event);
        if (event.data === "toggle") {
          toggleScanning();
        }
      },
      false,
    );

    initBarcodeScanner();
    async function initBarcodeScanner(){
      Dynamsoft.License.LicenseManager.initLicense("LICENSE-KEY");
      Dynamsoft.Core.CoreModule.loadWasm(["dbr"]);
      cvRouter = await Dynamsoft.CVR.CaptureVisionRouter.createInstance();
      let cameraView = await Dynamsoft.DCE.CameraView.createInstance();
      cameraEnhancer = await Dynamsoft.DCE.CameraEnhancer.createInstance(cameraView);
      document.querySelector("#cameraView").append(cameraView.getUIElement());
      cvRouter.setInput(cameraEnhancer);

      const resultsContainer = document.querySelector("#results");
      cvRouter.addResultReceiver({ onDecodedBarcodesReceived: (result) => {
        console.log(result);
        window.parent.postMessage(result);
      }});
      window.parent.postMessage({initialized:true});
    }

    async function toggleScanning() {
      if (!cvRouter) {
        alert("Please wait for the initialization...");
        return;
      }
      if (!scanning) {
        await cameraEnhancer.open();
        await cvRouter.startCapturing("ReadBarcodes_Balance");
      }else{
        await cvRouter.stopCapturing();
        await cameraEnhancer.close();
      }
      scanning = !scanning;
    }
  </script>
</body>
</html>
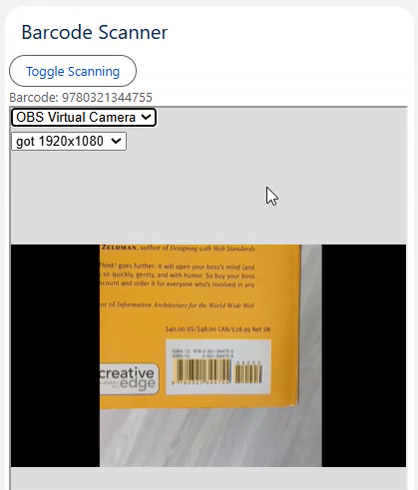
It can open the camera to scan barcodes. It can receive messages to control the scanning status and send the barcode result back to the parent.
Step 4: Add Static Resources to Salesforce
- Create a folder under the
staticresourcesfolder. - Put the
barcode-scanner.htmlinto the folder. -
Create a metadata file named
foldername.resource-meta.xmlin thestaticresourcesfolder with the following content to describe the resource.<?xml version="1.0" encoding="UTF-8"?> <StaticResource xmlns="http://soap.sforce.com/2006/04/metadata"> <cacheControl>Private</cacheControl> <contentType>application/zip</contentType> </StaticResource>
Step 5: Implement the Lightning Web Component
Now, go to the lightning web component we created.
-
Add elements in the HTML file.
<template> <lightning-card title="Barcode Scanner"> <lightning-button label="Toggle Scanning" onclick={toggleScanning} ></lightning-button> <div> <label> Barcode: <span>{barcodeValue}</span> </label> </div> <div class="viewer" id="viewer" style="height:500px;width:400px;"></div> </lightning-card> </template> -
When the component is mounted, append the iframe.
import dwt from '@salesforce/resourceUrl/dwt'; //import path of the resources folder export default class BarcodeScanner extends LightningElement { initialized = false; dbrFrame; renderedCallback() { if (this.initialized) { return; } this.initialized = true; this.dbrFrame = document.createElement('iframe'); this.dbrFrame.src = dwt + "/barcode-scanner.html"; // div tag in which iframe will be added should have id attribute with value myDIV this.template.querySelector("div.viewer").appendChild(this.dbrFrame); // provide height and width to it this.dbrFrame.setAttribute("style","height:100%;width:100%;"); } } -
Toggle scanning when the button is clicked by posting the message to the iframe.
toggleScanning(){ this.dbrFrame.contentWindow.postMessage("toggle"); } -
Receive the barcode result.
barcodeResult; window.addEventListener( "message", (event) => { console.log(event); if (event.data.barcodeResultItems) { this.barcodeResult = event.data.barcodeResultItems[0]; } }, false, ); -
Display the barcode text.
get barcodeValue() {
  if (this.barcodeResult) {
    return this.barcodeResult.text;
  }else{
    return "";
  }
}
Common Issues & Edge Cases
- WASM blocked by Salesforce CSP: Dynamsoft Barcode Reader uses WebAssembly, which Salesforce’s Content Security Policy blocks when loaded inline in an LWC. Solve this by hosting the scanner HTML as a Static Resource and loading it in an iframe — WASM runs inside the iframe’s own origin context, bypassing the LWC CSP restriction.
- Camera permission not granted on mobile: On Salesforce mobile apps, the camera permission prompt may not appear automatically. Ensure your org’s Trusted URLs list includes
blob:anddata:origins, and have users grant camera permissions in device settings before opening the scanner. postMessagesecurity — validate event origin: The example uses an openwindow.addEventListener("message", ...)without origin validation. In production, always checkevent.originagainst your expected Salesforce domain (e.g.,https://yourorg.lightning.force.com) before processing incoming messages to prevent message injection attacks.